41
7.
The display will return to the home screen and your chosen drawer will now be displayed as unassigned.
Fig 35
Page 1: ...MEDLINK PRO USER MANUAL Humanscale ...
Page 2: ...g Drawers Without Scanning Bar Codes 46 5 9 Swapping Drawers 49 5 10 Ejecting a Cassette 52 5 11 Pharmacy Mode 53 Reporting 6 1 Generating a Report 54 6 2 Viewing and Saving a Report 55 Help and Troubleshooting 7 1 Help and Troubleshooting 56 Legal 8 1 Legal Notice 57 Introduction 1 1 About Humanscale Healthcare 3 1 2 Contact Information 3 1 3 Introduction to Medlink 4 1 4 About the T7TM Point Of ...
Page 3: ...life and follow the belief that if a design solves a functional problem as simply and elegantly as possible the resulting form will be timeless Humanscale Healthcare applies that same design approach to ergonomic solutions that are created to improve the caregiving experience for caregivers and patients alike Humanscale Healthcare s products include the ViewPoint series of technology wall stations...
Page 4: ...ery while enhancing patient safety MedLink is expertly designed to reduce human error and supports a closed loop medication system 1 4 ABOUT THE T7TM POINT OF CARE TECHNOLOGY CART At the core of MedLink is T7 part of the revolutionary TouchPoint line of mobile technology cards Built with the caregiver s workflow in mind T7 addresses the challenges faced by existing medical cards by offering optima...
Page 5: ...placed and fit into the cassettes There are 3 sizes of drawers small medium and large Shelves are used to compartmentalize cassettes depending on the required drawer layout Dividers can be placed into the drawers to create multiple compartments within a single drawer Override Keys are used to unlock and gain access to the drawers in the event of a system or power failure The keys are not used duri...
Page 6: ...a cassette you must first insert shelves to configure your required drawer layout Cassettes maybe reconfigured at any time if the layout requirements change 1 To insert a shelf hold the cassette in place on a flat surface with one hand With the other hand insert the shelf so that the slots on sides of the shelf slide over the locating pins on the inside side walls of the cassette 2 Ensure the rear...
Page 7: ...up but when the cutouts are positioned facing upwards it allows packaged syringes to be laid flat on top of the dividers 2 5 INSERTING AND REMOVING CASSETTES Once a cassette is configured with the required shelf layout it can be inserted into the housing Slide the cassette into an available location on the housing and push it fully into place Push the cassette handle into the housing until it lock...
Page 8: ... storage drawer for non patient specific supplies 1 When inserting drawers they must be tilted backwards slightly to ensure the tabs at the rear of the drawer clear the underside of the shelf 2 Once the back of the drawer is inserted the drawer can be tilted back to a horizontal angle and pushed all the way in When the drawer is fully inserted you should hear a click This is the locking mechanism ...
Page 9: ... new T7 carts the default PIN code is set to 1234 You should change the PIN to a unique code that is only known to supervisors managers and technical support staff within your facility Instructions for this can be found within the T7 User Guide Initial Software Configuration The MedLink Lite control software is built into the T7 cart touch screen user interface Before you can use MedLink you must ...
Page 10: ... the settings screens by touching the gear icon in the header again 6 If the toggle control is green on touch the control to switch it to gray and disable MedLink Pro This will enable MedLink Lite 7 When switching this control on or off you will be prompted to confirm the change Touching OK will confirm the change and the cart will reboot with the new setting configured 8 Once fully booted with Me...
Page 11: ...igure MedLink to point to the correct server 1 Load the MedLink application You will be presented with the login screen Click on the menu icon in the title bar to access the Setup screen MedLink Pro Configuration MedLink Pro is an advanced software application with many configurable user permissions workflow options and customizable preferences Before deploying MedLink Pro in your facility you sho...
Page 12: ...populate if the MedLink drawer system is connected properly You must enter the credentials of a user with administrator privileges to save the changes 3 MedLink is now set up to connect to the right server You should only need to go through this process once during the initial installation or if a different PC or drawer system is used on the cart Fig 2 ...
Page 13: ... the system in the way that best meets the requirements of your workflows and organizational needs 1 To access the MedLink Configuration menu you must login to the software using an account with administrator privileges 2 Once logged in click on the menu icon in the title bar 3 This will display the MedLink Configuration menu Below is a brief description of the purpose of each section Further chap...
Page 14: ... in the assigned group A user can only be assigned to one User Group Rooms Rooms are created from the HL7 feed Rooms are associated with Departments Carts Associates Cabinets with Departments and PC Global Settings Settings that apply to all Users and all Cabinets Patient Labels Configures displayed information on drawer fronts and current drawer selection header Reports Reports usage information ...
Page 15: ...4 3 Departments 4 3 1 DEPARTMENT LIST Displays list of Department Select Remove to remove that department Select Edit to edit that department s information Select Add Department to create departments Fig 5 ...
Page 16: ...awer Defines if and when storage drawers will automatically open Options are to open o On Click Only o On Login and On Click o With Patient Drawer and On Click Relock drawer after Defines how long the drawer will sit in the Unlocked state before auto closing Allow users to exit withou replacing a drawer If a drawer is unlocked and removed and this option is not checked the user will not be able to...
Page 17: ... LIST Displays list of users Can filter or search list using the given fields Select Remove to remove a user Select Edit to edit that user User Groups button is a shortcut to User Groups Select Add User to add a new user Fig 7 ...
Page 18: ...they are considered to be a Temporary user Deactivate will deactivate this users account and they will not be able to login User Group and Department Settings User Group Assigns this user to the selected User Group Departments Assigns this user to the selected departments o Select Add in the left list to assign the user to that department o The list under Departments for on the right displays a li...
Page 19: ...s Select Remove to remove the User Group o Users should be removed from the Group before removing the group itself as they will not be able to login if they are only in this group Select Edit to edit the User Group rights Select Add Group to create a new User Group Fig 9 ...
Page 20: ...ink Group to an Active Directory Group o Can only be part of one MedLink Group Inactivity timeout o Amount of time before the program will auto logout the user when there is no activity within the program or drawer interaction o Setting the value to 0 zero will disable the auto logout Fig 10 ...
Page 21: ...ocess off Require users to enter override reason o Check this setting to require the user to enter a reason for the Administrative Override Allow User to open manually labeled drawers without override o Check this setting to allow manually labeled patient drawers to be opened and not require an Override o Manually labeled patient drawers cannot be opened by scanning a patient s wrist band Administ...
Page 22: ...f there is an HL7 feed Rooms may be assigned to a department Search will search for Computer Names and Cart Names Select Remove to remove a cart Select Edit to edit the carts information and Assigned Department Select Add Cart to add a new cart Fig 11 Fig 12 ...
Page 23: ... the cart Descriptive Location The location where the cart will be used Assigned Department The department where the cart is assigned Pharmacy Cabinet Is this a Pharmacy cabinet Pharmacy has special rights for assigning filling and emptying patient drawers Fig 13 ...
Page 24: ...n Scanning Location Bar Code Scan Timeout o The amount of time the scan will remain after the scanning action o For example if it is set to 15 minutes the drawers could be opened for 15 minutes after the initial Location Scan without scanning the barcode again Clear Removed Drawer Labels After XX Days o If a drawer is not used for the set number of days it will be cleared from the database Fig 14 ...
Page 25: ...ssword rule to require an upper case letter Integration Settings Enable Active Directory Integration o Check this setting to enable Active Directory o With active directory enabled and configured the login will use their windows login Active Directory Server o Path for the Active Directory Server Enable Single Sign On o With this setting enabled and Active Directory Setup the user will be automati...
Page 26: ...Labels Patient Name Format Specifies the name format for display Options are o Last First Default o Last First Middle o First Last o First Middle Last Custom Label 1 o Specifies what information will be shown In this image Label 1 is PAN Custom Label 2 o Specifies what information will be shown In this image Label 2 is Gender Custom Label 2 o Specifies what information will be shown In this image ...
Page 27: ...icrosoft Active Directory to allow the login screen to be bypassed entirely 5 2 HOME SCREEN Once your login credentials are accepted you will be presented with the home page The home page displays a graphical representation of the drawer system itself The cassettes are represented on the left and right of the screen just as they are positioned on the left and right of the cart If you have a single...
Page 28: ... leads to the change password page Logoff leads back to the Login page 5 2 3 Understanding On Screen Prompts and Bar Code Scanning The center of the screen contains the on screen prompts that you should follow to complete various tasks such as opening drawers to retrieve and administer medication In a typical configuration the home screen will prompt you to either Scan a patient wristband Scan a l...
Page 29: ...opriate area for accessing MedLink drawers Scanning the location bar code does not automatically open any drawers since the code does not relate to a particular patient but doing so allows you to go ahead and assign drawers to patients refill existing assigned drawers or unassign drawers Selecting a drawer on screen displays more actions for that particular drawer but in order to open or reassign ...
Page 30: ... be opened until the locking mechanism is release through a software input or the cassette is removed and the mechanical override is used Selected means the drawer has been selected on screen The drawer remains physically locked by is highlighted on screen for further action Unlocked means the drawer locking mechanism has been triggered and the drawer has been pushed out far enough that it can be ...
Page 31: ... see the option to assign drawers when following this process it is likely this function is not allowed for your user or user group profile You should consult your system administrator for assistance 5 6 ASSIGNING AND FILLING DRAWERS In normal usage a typical workflow will involve a nurse receiving medication from the hospital pharmacy or retrieving it from an Automated Dispensing Cabinet The nurs...
Page 32: ...logging in to the software you will be presented with the home screen 2 Scan the location bar code as prompted to tell the system you are in a designated location for assigning and filling drawers 3 When the location bar code is successfully scanning the center icon will change to blue Click on screen on a currently unassigned drawer that you wish to assign to a patient Ë654183 Î Fig 3 ...
Page 33: ...patient or as a storage drawer Click the Patient button 5 The selected drawer will open slightly on the physical drawer system and the screen will change to show the drawer is unlocked with the auto close relock timer counting down If no further action is taken at this stage the drawer will relock when the timer reaches zero Fig 3 Fig 16 ...
Page 34: ...t The list may be searched using the text box If the patient is not found in the list or an HL7 feed is not enabled a drawer may be manually labelled using the button in the top right Note that when using this option drawers do not display any information other than the label you enter and it will not be possible to open the drawer using patient wristband scanning since there will not be a wristba...
Page 35: ...turn the drawer to the cassette as prompted ensuring it locks into place 9 You will be returned to the home screen and the selected drawer will now show the details of the patient you chose The assigning and filling process is now complete Fig 19 Fig 20 Fig 21 ...
Page 36: ... patient details in the center area Clicking the Open button will then prompt you to scan the location bar code 5 6 3 ASSIGNING A DRAWER AS STORAGE A drawer should be assigned a storage drawer when it will be used for storing non medication items A storage drawer is less secure than a patient drawer and once assigned does not require a bar code scan to open Assigning a drawer as a storage drawer f...
Page 37: ...n buttons 3 Click on the Storage button The drawer will unlock and the screen will change to show the auto close timer If there is no further input at this stage the drawer will relock and the process will be cancelled 4 The screen will change to allow you to enter a label for the storage drawer Enter a label and click the Save button Fig 23 Fig 24 Fig 26 ...
Page 38: ...fill the drawer and return it to the cassette 6 On returning the drawer to the cassette the screen will revert to the home screen and the chosen drawer will now display as a storage drawer with the label you entered h Fig 27 Fig 28 ...
Page 39: ...ode 2 Click on the drawer you want to reassign 3 You are prompted to choose whether you want to reassign the drawer to another patient as a storage drawer or simply unassign it completely The 3 processes are similar but this example follows the unassign option Click the Unassign button to continue Ë654183 Î Fig 29 Fig 31 ...
Page 40: ...he drawer will unlock and the auto close timer will appear Pull the drawer to open it and remove it from the cassette 5 Empty the drawer of its contents and return it to the cassette as prompted Fig 32 Fig 34 ...
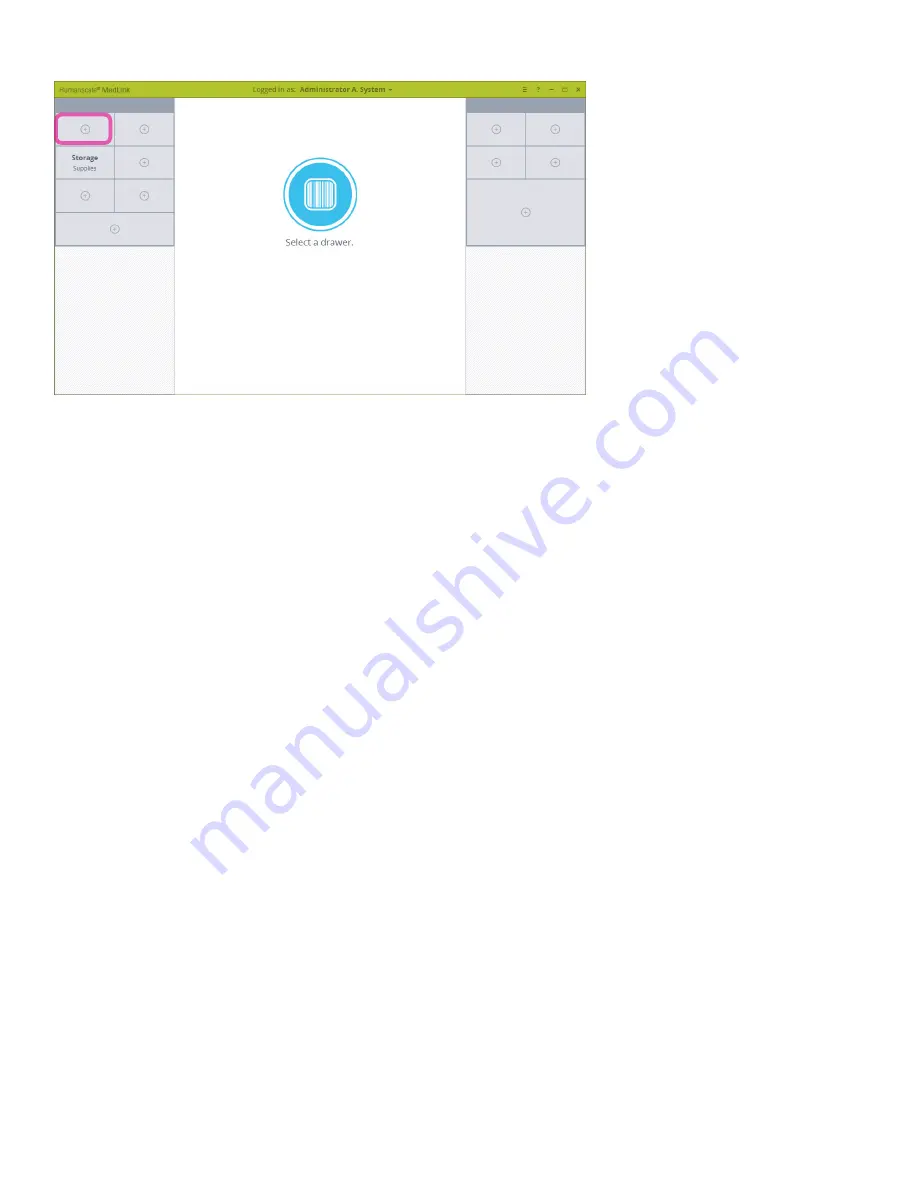
Page 41: ...41 7 The display will return to the home screen and your chosen drawer will now be displayed as unassigned Fig 35 ...
Page 42: ...ned below NOTE Some aspects of this process are configurable user departmental and user group permissions so the system behavior may not be exactly as described here Consult a Humanscale MedLink specialist to ensure the system is configured for your specific needs 5 7 1 OPENING PATIENT DRAWERS 1 Login to MedLink and begin the process on the home screen with all drawers closed 2 When you are with t...
Page 43: ...ing the medication 4 Pull the drawer out and remove it completely if you wish The screen will update indicating the drawer has been removed At this point you can go ahead with your normal medication administration process 5 With a patient drawer open you may also open storage drawers to access supplies and consumables needed to administer the medication Simply click on a storage drawer to unlock i...
Page 44: ...tient drawer to continue This ensures that only one patient drawer may be opened at a time thereby preventing the possibility of medication getting mixed between patient drawers 7 When the patient drawer is returned to the cassette the process has ended and you will be returned to the home screen Fig 39 Fig 3 ...
Page 45: ... and Override are disabled the drawer will unlock or enter the Reassign process with no other interaction Left Double Click opens the drawer o If User Rights for Location Scanning and Override are enabled the user will need to Scan a location barcode or use the Override process to unlock the drawer o If User Rights for Location Scanning and Override are disabled the drawer will unlock with no othe...
Page 46: ... reassign process o If User Rights for Location Scanning and Override are enabled the user will need to Scan a location barcode or use the Override process to reassign the drawer o If User Rights for Location Scanning and Override are disabled the drawer will enter the Reassign process with no other interaction Left Double Click has no effect on unassigned drawers 5 8 OPENING DRAWERS WITHOUT SCANN...
Page 47: ... configured to use the PAN MRN override process you will be prompted to enter the ID number associated with the patient s drawer you are trying to open NOTE if the override process is set to PAN MRN it applies only to patient drawers where patient data is sourced from an HL7 feed Manually labeled patient drawers and storage drawers will default to use the Witness override process as they do not ha...
Page 48: ... cannot scan the appropriate bar code This information is also recorded in the reporting database so that override events can be reviewed with a view to reducing their occurrence 6 On clicking Continue the drawer will unlock and you can continue to fill or administer medication as needed Fig 42 Fig 43 Fig 44 ...
Page 49: ...be carried out as part of the normal process of ejecting the cassette and reconfiguring it manually 1 Begin at the home screen You must be logged in as a user with the swap drawer permission enabled 2 Select the first drawer you wish to swap The drawer will highlight Click on the Swap drawer button NOTE If you are logged in as a user without the swap drawer permission enabled you will not see the ...
Page 50: ...oted to choose a second drawer to swap with Click on another drawer of matching size 5 The second drawer will also highlight and both drawers will be unlocked 6 Remove one drawer at a time The graphics will update on screen to show the drawer being removed Fig 47 Fig 48 Fig 49 ...
Page 51: ...ers removed swap the position of the drawers and return them to the cassettes The graphics will update on screen and the system and will continue to display the prompt until both drawers are returned Fig 50 Fig 51 Fig 52 ...
Page 52: ... cart NOTE The ability to eject a cassette is a configurable user permission If you cannot eject a cassette following this process consult your system administrator or Humanscale MedLink specialist 1 Click the icon on top of the cassette to eject that cassette Note that all drawers on the chosen cassette much be locked first 2 The cassette handle will pop out of the housing allowing you to pull th...
Page 53: ...for rapidly emptying unused medication from drawer without changing drawer assignments Assign Fill o Allows the user to assign and fill drawers without requiring bar code scanning Open Unassign All o Allows the user to select a cassette all drawers for that cassette will be unlocked o As the user removes each unlocked drawer in order to remove items from that drawer the drawer is automatically set...
Page 54: ...w Once the required options are selected click the Create button to generate the report Filter By o Filters the report by the selection or entry Date Range o The date range is limited on some reports due to the possible size of the report o If you want a single day set the start and end dates the same Show only Override actions o If this option shows it will limit that report to only show Override...
Page 55: ...enerate the report The top header of the report viewer has options to print export and various viewing options The Export CSV button generates a text file with the data formatted for use within excel This gives the user more flexibility in organizing the data to meet their needs Fig 55 ...
Page 56: ... will access the help screen The help screen displays Support and Contact information with links to documentation Help also displays the Software and Firmware versions This information may be used when troubleshooting an issue 7 1 HELP AND TROUBLESHOOTING Fig 3 Fig 56 ...
Page 57: ...es to ensure the correct medication is being administered to the correct patient in the prescribed dosage and delivery method When placing medication into MedLink drawers the medication must be in its original packaging or contained within separate closed packaging All rights reserved 2016 Humanscale Corporation The Humanscale word mark and logo are registered trademarks in the United States and c...