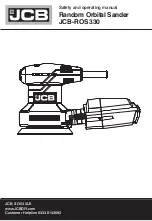
ELECTRIC RANDOM-ORBITAL
SANDER
EN
10
conditions and the work to be performed. Use of the power tool for operations different from those intended could result
in a hazardous situation.
5)
SERVICE
a)
Have your power tool serviced by a qualified repair person using only identical replacement parts. This will ensure that the
safety of the power tool is maintained.
8.12.1.102
Additional safety instructions for all operations Kickback and Related Warnings
Kickback is a sudden reaction to a pinched or snagged rotating wheel, backing pad, brush or any other accessory.
Pinching or snagging causes rapid stalling of the rotating accessory which in turn causes the uncontrolled tool to be
forced in the direction opposite of the accessory’s rotation at the point of the binding. For example, if an abrasive wheel is
snagged or pinched by the workpiece, the edge of the wheel that is entering into the pinch point can dig into the surface of
the material causing the wheel to climb out or kick out. The wheel may either jump toward or away from the operator,
depending on direction of the wheel’s movement at the point of pinching. Abrasive wheels may also break under these
conditions.
Kickback is the result of tool misuse and/or incorrect operating procedures or conditions and can be avoided by taking
proper precautions as given below.
a)
Maintain a firm grip on the tool and position your body and arm to allow you to resist kickback forces. Always use
auxiliary handle, if provided, for maximum control over kickback or torque reaction during start-up. The operator can
control torque reactions or kickback forces, if proper precautions are taken.
b)
Never place your hand near the rotating accessory. Accessory may kickback over your hand.
c)
Do not position your body in the area where tool will move if kickback occurs. Kickback will propel the tool in direction
opposite to the wheel’s movement at the point of snagging.
d)
Use special care when working corners, sharp edges etc. Avoid bouncing and snagging the accessory. Corners, sharp
edges or bouncing have a tendency to snag the rotating accessory and cause loss of control or kickback.
Do not attach a saw chain woodcarving blade or toothed saw blade.
Such blades create frequent kickback and loss of
control.
GENERAL WARNINGS
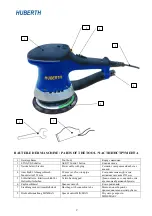
The tool must be connected to a suitable dust extraction system (mobile suction unit or dust bag (7)).
SAFETY AND ACCIDENT PREVENTION INSTRUCTIONS
The safety and accident prevention instructions are reported in the “SAFETY INSTRUCTION” booklet which forms an
integral part of these documents; the operating instructions indicate the additional information required specifically for use of
the tool.
Never use the tools without the safety guards.
Any operations carried out on the tool must be effected with the tool disconnected.
Before starting the tool, ensure that it is held tightly and not in contact with the work surface.
The tool must be connected to a suitable dust extraction unit and applicable safety regulations must be observed if dusts
dangerous to health are likely to occur during sanding.
Due to risks that may arise during sanding, we recommend the constant use of P.S.D. (personal safety devices such as gloves,
headphones, goggles, face masks, etc.) according to laws in force to prevent or reduce accident probability.
CORRECT USAGE
The sanders are designed for sanding wood, plastic, composite materials, paint/varnish, filling material and similar materials.
Metal and materials with an asbestos content must not be processed with these tools.
The tools may only be used for dry sanding.
Make sure the work piece is sufficiently fastened.
In the event of improper use, the user is fully liable for any damages or accidents.
STARTING UP
Before starting-up the tool, ensure that:
- the packaging is complete and does not show signs of having been damaged during storage or transport;
- the tool is complete; check that the number and type of components comply with that reported in this instruction
booklet;


