background image


Logging In to the Router

1. Logging In to the AP Through the Console Port

    This section describes how to log in to the AP through the console port. After logging in to the AP, you can configure the 
    AP using commands.

Procedure

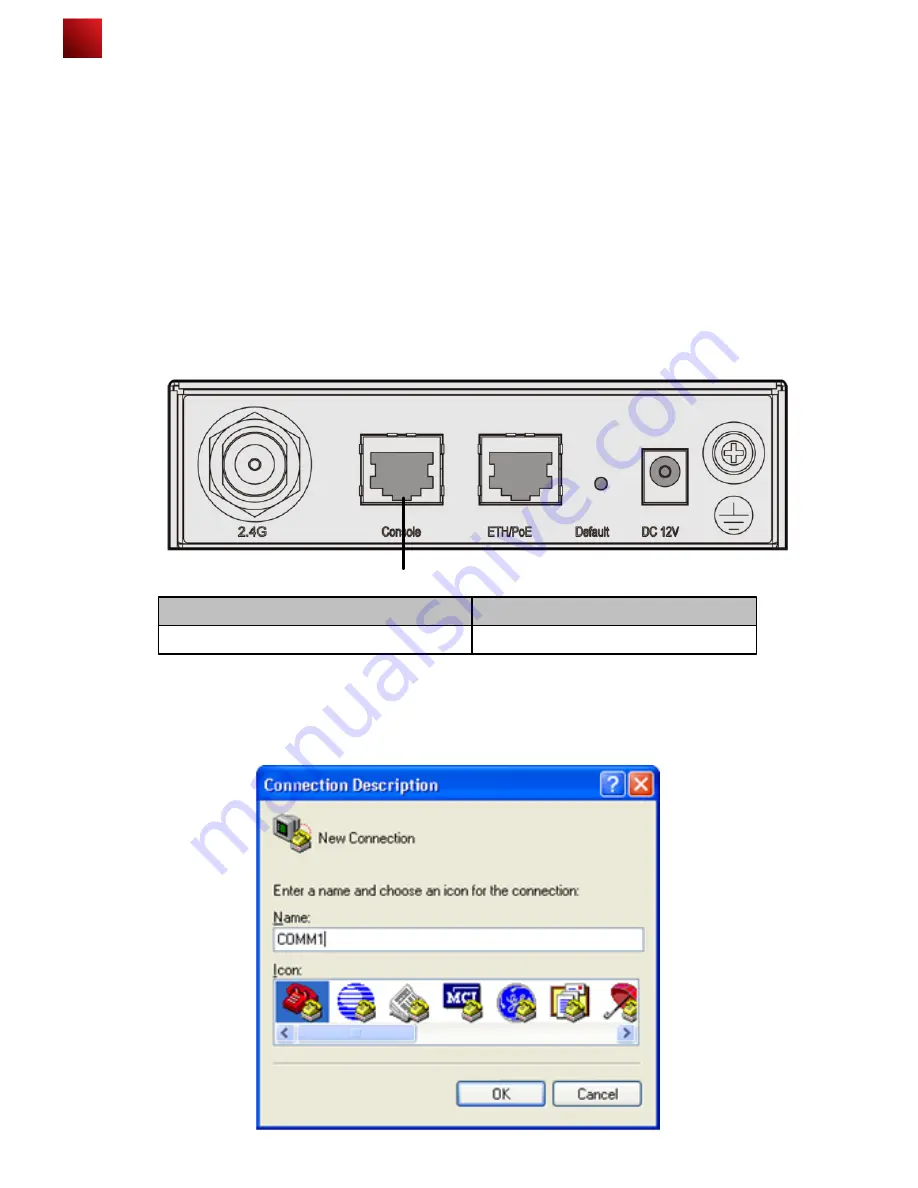
       Step 1  Connect a PC to the AP with a console cable. Connect the RJ45 connector to the console port of the AP and 
                   connect the DB9 connector to the serial port of the PC. Figure 1-1 shows the location of the AP's console port. 

                   Figure 1-1       Location of the AP's console port


9

       Step 2  Run the terminal emulation program on the PC. For example, to open the HyperTerminal of Windows XP on 
                   the PC, choose Start > Programs > Accessories > Communications > HyperTerminal. Enter the name of 
                   the new connection in the Name text box and click OK, as shown in Figure 1-2. 
        
                   Figure 1-2      Setting up a connection
        

No

Port

1

Console port

After an AP is powered on, you can log in to the AP using the following methods.
1. Logging In to the AP Through the Console Port
This section describes how to log in to the AP through the console port. After logging in to the AP, you can configure 
the AP using commands.
2. Logging In to the AP Using Telnet
This section describes how to log in to the AP using Telnet. After logging in to the AP, you can configure the AP using 
commands.

1

Summary of Contents for WA635SN-GN

Page 1: ...WA635SN GN Wireless LAN Access Point Quick Start Guide HUAWEI TECHNOLOGIES CO LTD ...

Page 2: ...roperty of their respective holders Notice The purchased products services and features are stipulated by the contract made between Huawei and the customer All or part of the products services and features described in this document may not be within the purchase scope or the usage scope Unless otherwise specified in the contract all statements information and recommendations in this document are ...

Page 3: ...ed could result in equipment damage data loss performance degradation or unexpected results Provides additional information to emphasize or supplement important points of the main text 2 Change History Changes between document issues are cumulative Therefore the latest document issue contains all the changes in previous issues Change in Issue 01 2012 07 30 Initial commercial release ...

Page 4: ...lity knife Cable cutter RJ45 Crimping tool Combination pliers Diagonal pliers ESD gloves COAX crimping tool Adjustable wrench Measuring tape Hammer drill Multimeter Hammer Level Vacuum cleaner Network Cable tester Indicators Wall mounting template 1 2 3 4 5 6 7 8 Connected to the maintenance terminal 7 Default 3 1 2 3 Description No Name SYS Wireless Link SYS status indicator For details about ind...

Page 5: ...g screws into the expansion tubes Leave a 3 mm space between the screw head and the wall 4 Align the cucurbit holes at the rear side of the AP with the screws on the wall and hang the AP on the screws Hold the AP with one hand and press the AP downwards with another hand to secure the AP on the wall The AP can be installed with antennas upwards or downwards which depends on cable routing 1 Use a m...

Page 6: ...les in the drilling positions Hammer the expansion tubes into the holes until the expansion tubes are embedded into the wall 4 Align the holes at the rear side of the AP with the hooks on the bracket and hang the AP on the bracket Hold the AP with one hand and press the AP downwards with another hand to secure the AP on the bracket The AP can be installed with antennas upwards or downwards which d...

Page 7: ...e correct direction otherwise the clip holder cannot fix the AP Ensure that the AP is correctly installed on the wall mounting bracket and there must be 20 cm space above and around the AP for maintenance Lock hole To prevent unauthorized personnel from moving the AP lock the AP The preceding figure shows the security lock The carrier should purchase the security lock and determine the position fo...

Page 8: ...b c 1 2 4 Ground cable 3 The M4 connector is connected to the WA635SN GN and the M6 connector is connected to the ground bar Description SN Name Power adapter 12 V DC Network cable RF cable The WA635SN GN supports PoE power supply and DC power supply Use the power adapter attached with the WA635SN GN otherwise the WA635SN GN may be damaged Connect AP interfaces with antennas to transmit signals or...

Page 9: ...he device is being started Blinking once every 2s Blinking once every 2s Blinking once every 2s The system is working properly but the Ethernet is not connected and radios or all VAPs are disabled The system is working properly but the Ethernet is not connected The AP has wireless users connected and is transmitting data traffic The indicator blinks more quickly when more data is being transmitted...

Page 10: ... program on the PC For example to open the HyperTerminal of Windows XP on the PC choose Start Programs Accessories Communications HyperTerminal Enter the name of the new connection in the Name text box and click OK as shown in Figure 1 2 Figure 1 2 Setting up a connection No Port 1 Console port After an AP is powered on you can log in to the AP using the following methods 1 Logging In to the AP Th...

Page 11: ...g communication parameters Step 5 Press Enter on the subsequent dialog boxes until the command line prompt of the user view such as Enterprise AP is displayed You can run commands to configure the AP Enter a question mark whenever you need help End 10 Step 3 Select the serial port used on the PC and click OK as shown in Figure 1 3 Figure 1 3 Selecting the connected port ...

Page 12: ...is set up successfully If the ping operation fails The connection fails to be set up Check whether the network cable works properly Step 3 Access the command line window on the PC For example if the PC runs Windows XP choose Start Run And enter cmd in the displayed dialog box Step 4 Run the telnet 192 168 0 1 command to log in to the AP Step 5 Enter the default user name and password admin If the ...

Page 13: ... address to discover the AC and establishes a control tunnel with the AC NOTE By default AP s go online in DHCP mode Configuring the Mode for an AP to Go Online Configuring the AP to go online in DHCP mode 1 Use Telnet to log in to the AP from a PC login admin Password The default password is admin 2 Configure the AP to go online in DHCP mode cli Enterprise AP configure interface ethernet Enter th...

Page 14: ...ethernet show sysinfo ap_ipmode pppoe ap_ipaddr ap_ipversion 4 ap_netmask ap_gateway ac_ip1 ac_ip2 ac_ip3 ac_ip4 pppoe_username wlan huawei pppoe_pwd_type simple pppoe_password wlan huawei NOTE By default the PVID of a wired side interface is 0 and no VLAN is configured on the interface 1 Use Telnet to log in to the AP from a PC login admin Password The default password is admin 2 Configure VLANs ...

Page 15: ...he hazardous substance contained in all the homogeneous materials of this part is above the limit requirement Hazardous Substances Pb Hg Cd Cr6 PBB PBDE Part Mechanical part Board circuit module Signal cable Cable connector Power adapter Auxiliary equipment O O O O O O O O O O O O O O O O O O O O O O O O O O O O O O Declaration on Hazardous Substances in Electronic Information Products QUALIFICATI...

Page 16: ... caused by improper handling in transportation and assembly 2 The defects are caused by the fact that the product is dismantled or altered by anyone that is not from a Huawei authorized service partner 3 The defects are caused by the fact that the product is used in a harsh environment that is not suitable for the operation of the product 4 The defects are caused by any force majeure including but...

Page 17: ...16 WA635SN GN Installation Template Mounting hole 4 φ2 ...

Page 18: ...HUAWEI TECHNOLOGIES CO LTD Huawei Industrial Base Bantian Longgang Shenzhen 518129 People s Republic of China www huawei com Part Number 31505364 Issue 01 ...

Reviews: