background image

HUAWEI VP9660 
Quick Start Guide 

2 Installing the VP9660 


Issue 04 (2013-12-30) 

Huawei Proprietary and Confidential                                     

Copyright © Huawei Technologies Co., Ltd. 

26 


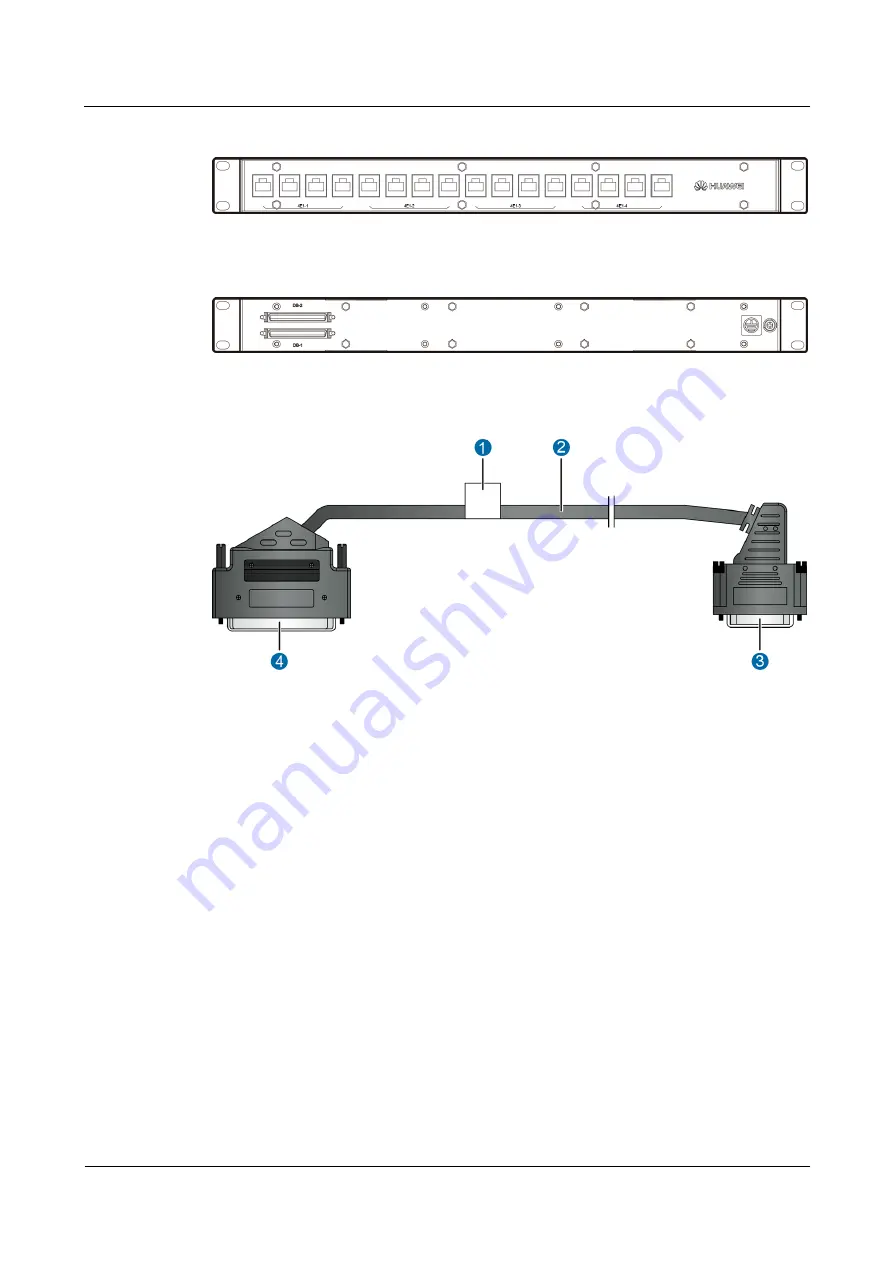
Figure 2-17


Front panel of the PRI cable box (120-ohm balanced) 


Figure 2-18


Rear panel of the PRI cable box 


Figure 2-19


DB-36—DB-68 cable 


1. Main tag 

2. Communication cable 

3. DB-36 connector 

4. DB-68 connector 


Procedure 

The connection between the GWBB subboard and the PRI cable box needs two 
DB-36—DB-68 cables that connect to DB-1 and DB-2 respectively on the rear panel of the 
PRI cable box. Each PRI cable box supports a maximum of 16-port PRI access. The ports can 
be classified into two sets, namely, DB-1 and DB-2, corresponding to that of the DB-68 ports 
in the rear panel of the PRI cable box.   

The following uses the PRI cable box (75-ohm unbalanced) as an example to illustrate the 
16-port PRI access. 

Step 1


Connect the DB-36 connector and the DB-68 connector of the DB-36—DB-68 cable to the 
DB-36 port in the front panel of the ISDN board and the DB-68 port in the rear panel of the 
PRI cable box respectively, as shown i

Figure 2-20

. 

Summary of Contents for VP9660

Page 1: ...HUAWEI VP9660 V200R001 Quick Start Guide Issue 04 Date 2013 12 30 HUAWEI TECHNOLOGIES CO LTD ...

Page 2: ...ei and the customer All or part of the products services and features described in this document may not be within the purchase scope or the usage scope Unless otherwise specified in the contract all statements information and recommendations in this document are provided AS IS without warranties guarantees or representations of any kind either express or implied The information in this document i...

Page 3: ... On 30 3 1 1 Verification Before Power On 30 3 1 2 Powering On the Device 31 3 1 3 Verification After Power On 33 3 2 Logging In to the Web Interface 34 3 3 Changing the Administrator Password 37 3 4 Configuration for the First Time 38 3 4 1 Setting the IP Address 38 3 4 2 Setting the System Time 40 3 4 3 Setting GK Parameters 40 4 Using the SMC2 0 43 4 1 Preparing for a Conference 43 4 1 1 Planni...

Page 4: ...roprietary and Confidential Copyright Huawei Technologies Co Ltd iii 5 Controlling a Conference 61 6 Troubleshooting 62 6 1 Failure to Register with a GK 62 6 2 Conference Fails to Start as Scheduled 63 6 3 Failure to Access the VP9660 by Dialing the IVR Conference ID 63 ...

Page 5: ...f the device While using the device observe all applicable laws directives and regulations and ensure such usage does not infringe on the legal rights of any other party Environmental Precautions Keep the device away from heat sources and open flames such as an electric heater or candle Keep the device away from any household appliances with strong magnetic or electric fields such as a microwave o...

Page 6: ...wer supply and unplug all the cables connected to the device If the device will not be used for long periods of time power off the device disconnect the power supply and unplug all the cables connected to the device Do not look into the infrared transmitting interface on the remote control without eye protection If smoke noise or odor is emitted from the device stop using and power off the device ...

Page 7: ...ents or units must be disposed of in accordance with local regulations in order to support recycling activities If the device has been operating for long periods of time the shell may get heated which is normal Class A Product Warning This is a class A product In a household or other environment this product may cause radio interference If such interference is detected the user may be required to ...

Page 8: ...e devices against the packing list 3 2 4 Plugging In the Ground Cable Connect the provided ground cable from the VP9660 ground screw to a ground bar 4 2 5 Plugging In Power Cables Connect the provided power cables to the VP9660 5 2 6 Installing Boards Mount boards in the corresponding chassis slots 6 2 7 Plugging In Network Cables Connect network cables to the VP9660 7 2 8 Connect the ISDN board O...

Page 9: ... Measures distance Multimeter Measures the resistance voltage and conductivity Electrostatic discharge ESD wrist strap Prevents ESD damage when you touch or operate devices or components ESD gloves Prevents ESD damage when you insert remove and hold a mainboard or precision device Cable tie Bundles cables Illustrations listed in Table 2 2 are for your reference only 2 3 Unpacking To ensure that yo...

Page 10: ...ts never touch uncoated surfaces with sweat soaked or dirty gloves Table 2 3 lists the items to be checked before unpacking Table 2 3 Items to be checked No Item 1 The wooden crate and cartons are intact undamaged and not wet or water damaged 2 The wooden crate and cartons are not placed upside down 3 The delivery destination on the packing slip matches the installation site If all the items meet ...

Page 11: ...When moving the device grip the firm parts such as the support or backbone frames Too much force on weaker parts of the structure such as support beams may cause damage or lead to accidents To unpack a wooden crate perform the following steps Step 1 Insert one end of the provided wrench into the hole with the tongue on the cover of the wooden crate Lift the wrench to pull the tongue straight as sh...

Page 12: ... the side boards and remove these boards as shown in Figure 2 3 Figure 2 3 Removing the side boards Step 5 Remove foam boards Step 6 Carry the device to the installation site End Unpacking a Carton Cartons are used to pack cables boards and terminal devices It is recommended that one person be in charge of each individual carton Check the cartons one by one Confirm that cartons are empty before th...

Page 13: ...y has a desiccant inside which absorbs moisture to keep the bag dry inside If you move a board from an environment with a low temperature and dry air to one with high temperature and humid air wait for at least 30 minutes before unpacking the board Otherwise moisture will condense on the board surface and damage it Step 6 Unpack the board bags 1 Check the bags for damage If any bag is damaged cont...

Page 14: ...en Ground cable with VP9660 AC power modules 25030017 Electrical cable black Ground cable with VP9660 DC power modules AC power cable Country specific types Chinese standard AC power cables and standard power cables for European and British Commonwealth countries 25030074 Electrical cable blue DC power cable Its terminals are described as follows When the VP9660 is installed in the cabinet one end...

Page 15: ...wer cable 31505556 Quick Start Guide Product document License certificate Authorization clarification for the VP9660 license 31111220 Warranty Card 29041060 Blank label Used to identify the devices to which a cable connects 21100015 Cable tie Used to strap cables The VP9660 supports AC and DC power supplies The cables delivered vary according to the power modules specified in the purchase contract...

Page 16: ...0 Issue 04 2013 12 30 Huawei Proprietary and Confidential Copyright Huawei Technologies Co Ltd 12 Figure 2 4 VP9660 hardware structure 1 Front panel of the air outlet trough 2 Upper fan assembly 3 Boards 4 ESD holes 5 Cable trough panel 6 Air intake trough ...

Page 17: ...assemblies and dust filter are preinstalled on the chassis before the delivery of the VP9660 You only need to install boards and connect the ground power and network cables to the VP9660 Do not install both AC and DC power modules in the VP9660 Boards The VP9660 are configured with three types of boards Install boards based on the site requirements ECCB board main control board of the VP9660 This ...

Page 18: ...icator 8 RST button 9 GE0 port 10 RS 232 serial port Unlike an ECCB board a media board does not provide the ACT indicator Figure 2 6 shows the ISDN board front panel Figure 2 6 ISDN board front panel 1 DB port 2 FE maintenance network port 3 GE1 port 4 Optical ports SFP1 upper and SFP0 lower 5 ALM indicator 6 ISDN board name 7 RUN indicator 8 RST button 9 GE0 port 10 RS 232 serial port Each GWBB ...

Page 19: ...stance between the VP9660 chassis and earth is less than 5 ohms Before plugging in the power cable ensure that the ground cable is properly connected to the VP9660 At the lower right corner of the VP9660 chassis rear panel you will find two M6 ground screws Choose either of the screws to connect the ground cable Procedure Step 1 Use a Phillips screwdriver to turn the selected ground screw anticloc...

Page 20: ...ble with the ground screw hole as shown in Figure 2 8 Figure 2 8 Aligning the ground cable wiring terminal Step 3 Tighten the ground screw in the screw hole clockwise Step 4 Connect the other end of the ground cable to the ground bar End 2 5 Plugging In Power Cables The VP9660 supports AC and DC power supplies It comes with four AC or DC power modules An AC power module requires one power cable an...

Page 21: ... the following operating ranges for a power module before you power on the VP9660 DC power module 36 72V AC power module 90 280 V 50 or 60 Hz To protect other equipment in the equipment room from being affected when the VP9660 experiences a power supply fault the following specifications are recommended DC power module 50A AC power module 10A Connecting a Power Cable to a DC Power Module A DC powe...

Page 22: ...p 3 Connect the other end of the power cables to the power supply device in the equipment room Step 4 Check the output voltage of the power supply device and turn on the power switch of the device Step 5 Check whether the following conditions are met The difference between the power supply device s output voltage and the voltage between the RTN and NEG wiring terminal sockets is less than 2 V The ...

Page 23: ...nto the power socket of the power supply device End 2 6 Installing Boards Before installing boards into the VP9660 chassis set the switches on the power modules to OFF Mount a filler panel on each empty slot in the chassis Doing so improves the electromagnetic compatibility and cooling of the VP9660 and protects the system air channels Preparations Check the boards Wear an ESD wrist strap and take...

Page 24: ...re 2 11 Slots and boards Take ESD measures Boards are susceptible to ESD damage To protect the boards observe the following rules Ground the VP9660 correctly in accordance with the grounding requirements Always wear an ESD wrist strap to protect the boards against ESD during operation Tighten the wrist strap so it is tight against your skin and 0 Figure 2 12 Figure 2 12 Wearing an ESD wrist strap ...

Page 25: ...bags or paper bags to pack or touch boards Wear an ESD wrist strap when working on a board port Before you connect a cable or protective sleeve to a board port discharge any buildup of static electricity Reserve some installation materials for example vacuum formed box and static shielding bag for boards in the equipment room Procedure Slots 0 and 1 are used to accommodate ECCB boards If there is ...

Page 26: ...the VP9660 Issue 04 2013 12 30 Huawei Proprietary and Confidential Copyright Huawei Technologies Co Ltd 22 Figure 2 13 Inserting the board Step 2 Press the ejector levers inward until the ejector levers are locked in place as shown in Figure 2 14 ...

Page 27: ...alling the VP9660 Issue 04 2013 12 30 Huawei Proprietary and Confidential Copyright Huawei Technologies Co Ltd 23 Figure 2 14 Pressing the ejector lever inward Step 3 Tighten the screws clockwise to secure the board as shown in Figure 2 15 ...

Page 28: ... Huawei Proprietary and Confidential Copyright Huawei Technologies Co Ltd 24 Figure 2 15 Tightening the board screws End If a slot has no board inserted mount a filler panel on the slot Otherwise the heat dissipation and electromagnetic shielding of the VP9660 will be affected ...

Page 29: ...t the ISDN board of VP9660 and Primary Rate Interface PRI cable box Base on the connector the PRI cable box can be classified into two types including the 75 ohm unbalanced and 120 ohm balanced There are 32 SMB 75 ohm RF coaxial connectors male on the front panel of the PRI cable box 75 ohm unbalanced which can be classified into two sets of ports namely DB 1 and DB 2 There are 16 RJ45 connectors ...

Page 30: ...B 36 DB 68 cables that connect to DB 1 and DB 2 respectively on the rear panel of the PRI cable box Each PRI cable box supports a maximum of 16 port PRI access The ports can be classified into two sets namely DB 1 and DB 2 corresponding to that of the DB 68 ports in the rear panel of the PRI cable box The following uses the PRI cable box 75 ohm unbalanced as an example to illustrate the 16 port PR...

Page 31: ... When the GWBB subboard communicates with other devices you can use the female connectors for connection To comply with the principle that the sending end should be corresponding to the receiving end and the receiving end should be corresponding to the sending end make sure that the sending cable connector of the device is connected to the Rx interface and the receiving cable connector is connecte...

Page 32: ...rs female at one end of the PRI cables to the Tx0 port and Rx0 port in the front panel of the PRI cable box and then connect the SMB connectors female at other end of the PRI cables to the XR0 port and XT0 port of the switch as shown in Figure 2 21 Figure 2 21 Cable connection of the PRI cable box and the switch Illustrations listed in Figure 2 19 Figure 2 20 and Figure 2 21 are for your reference...

Page 33: ...Confidential Copyright Huawei Technologies Co Ltd 29 Follow up Procedure For details of Configuring the ISDN Service see the HUAWEI VP9660 VP9650 VP9630 V200R001 Configuration Guide You can contact Huawei technical support engineers or visit http enterprise huawei com support to obtain this document ...

Page 34: ...evice installation items All bolts are mounted securely and the device has enough space around for cooling if the VP9660 is installed in a cabinet Boards can be inserted and removed smoothly with the fastening screws well tightened The device surface is clean and all parts are in good condition The ESD wrist strap is inserted into the chassis ESD jack All empty slots have filler panels installed V...

Page 35: ...ion is incorrect do not power on the VP9660 to prevent injuries and device damage The VP9660 is shipped with four DC or AC power modules If DC power modules are provided the VP9660 requires two power modules to be fully powered The other two power modules serve as backups If you install three or four power modules replacing any of them will not affect the ongoing service If AC power modules are pr...

Page 36: ...0 Huawei Proprietary and Confidential Copyright Huawei Technologies Co Ltd 32 Figure 3 1 Power switch in an AC power module Figure 3 2 shows the power switch in a DC power module Figure 3 2 Power switch in a DC power module Step 2 Set the four power switches to ON End ...

Page 37: ...input is normal Off The power module input is abnormal OUT Steady green The power module output is normal Off The power module output is abnormal FAIL Steady green The power module is malfunctioning Off The power module is operating correctly The fans are operating correctly which can be ascertained by checking the indicators listed in Table 3 2 Table 3 2 Fan assembly indicators Indicator Status D...

Page 38: ...ng programs GE FE Steady green The network port connection is normal Green off No connection is established on the network port or the connection fails Blinking orange Data is being received or sent through the network port Orange off No data is being received or sent through the network port The media and ISDN boards do not provide the ACT indicator The other indicators listed in Table 3 3 are th...

Page 39: ...ng lists the minimum requirements for the computer to be used for web login CPU Intel Pentium E2180 2 0 GHz or higher Memory 1 GB or more Operating system Windows XP or later Browser Microsoft Internet Explorer 6 0 Mozilla Firefox 3 0 or later For smoother operation during the use of the web interface a computer with the following specifications is recommended CPU Intel Pentium E2200 2 2 GHz or hi...

Page 40: ...tocol Version 4 TCP IPv4 Properties The Internet Protocol Version 4 TCP IPv4 Properties dialog box is displayed as shown in Figure 3 3 Figure 3 3 Internet Protocol Version 4 TCP IPv4 Properties 4 Click Advanced The Advanced TCP IP settings dialog box is displayed 5 Select IP settings and click Add The window shown in Figure 3 4 is displayed Figure 3 4 Advanced TCP IP settings ...

Page 41: ...sword differs due to different software version HUAWEI VP9660 V200R001C01B019SP02 or an earlier version admin HUAWEI VP9660 V200R001C01B019SP03 or a later version Change_Me The account is locked out for five minutes by default if you enter incorrect passwords empty passwords excluded three consecutive times when attempting to log in to the MCU The admin account can be used to perform all operation...

Page 42: ...ecial symbols This requirement is not imposed on other versions Step 4 Click OK Keep record of the new administrator user name and password End 3 4 Configuration for the First Time When you log in to the VP9660 web interface for the first time set the IP address system time and gatekeeper GK parameters 3 4 1 Setting the IP Address Based on the actual network change the IP addresses of the board GE...

Page 43: ... 168 2 254 Example 200 54 0 1 Procedure Step 1 Log in to the VP9660 web interface Step 2 Choose Settings Network The Network page is displayed Step 3 Click the Network Interface tab Step 4 Set Slot The Network page is displayed as shown in Figure 3 7 Figure 3 7 Network page Step 5 Set Network Interface parameters based on the actual settings recorded in Table 3 5 Retain the default settings for ot...

Page 44: ...1 Log in to the VP9660 web interface Step 2 Choose Settings System The System page is displayed Step 3 Choose Time The Time page is displayed as shown in Figure 3 8 Figure 3 8 Time page Step 4 Click Synchronize Local Time to initialize the system time You can also manually set the time in Date and MCU local time or select a date by clicking after Date Click to set the Time zone of MCU location Ste...

Page 45: ...ween endpoints and the VP9660 translates the addresses of the endpoints and VP9660 and controls calls and bandwidth If you have defined participants on the VP9660 and the participants and VP9660 have registered with the same GK the VP9660 can call the participants using their IP addresses or numbers To enable communication between IP and integrated services digital network ISDN participants you mu...

Page 46: ...ue 04 2013 12 30 Huawei Proprietary and Confidential Copyright Huawei Technologies Co Ltd 42 Parameter Description Setting GK GK address IP address of an online standalone GK Example 200 54 11 111 IP address of the SMC2 0 embedded GK Step 4 Click OK End ...

Page 47: ...d plan conference data Understanding the Network This section describes the network and its key components using an enterprise network as an example An enterprise network is an IP network where the SMC2 0 VP9660 and endpoints telepresence systems are deployed You can select the required endpoints and use the SMC2 0 to manage all connected devices and registrations initiate conferences and perform ...

Page 48: ...ces such as web based control office automation OA integration and management on resources registration information users and conferences GK Bridge to transfer call information between endpoints and the VP9660 translates the addresses of the endpoints and VP9660 and controls calls and bandwidth In an enterprise network you can use the embedded GK of the SMC2 0 Endpoint New generation videoconferen...

Page 49: ...two participants on the SMC2 0 V100R002 Table 4 2 lists the conference data plan Table 4 2 Conference data plan Parameter Example Value Conference name Conference 1 Default duration 120 minutes Conference type Common or Ad hoc Encryption type Support encryption Table 4 3 lists the component data plan Table 4 3 Component data plan Component IP Address Other Configuration VP9660 200 54 99 225 None S...

Page 50: ...nagement page is displayed as shown in Figure 4 2 Figure 4 2 Connection Management page Step 3 Set the parameters listed in Table 4 4 Table 4 4 Connection parameters Parameter Description Settings Connection type Type of the conference management system to which the VP9660 is connected Third party The conference management system is a third party system SMC2 0 The conference management system is t...

Page 51: ...Confirm Step 5 Click Yes to restart the VP9660 End 4 1 3 Setting GK Parameters The VP9660 cooperates with the SMC2 0 to initiate conferences Before using the VP9660 to initiate a conference you must set GK parameters This section describes how to set GK parameters using the SMC2 0 embedded GK as an example The SMC2 0 has one embedded GK which comes online when being installed successfully On the G...

Page 52: ...page is displayed as shown in Figure 4 5 Figure 4 5 ServiceArea 3 Click Add Service Area The Add Service Area dialog box is displayed as shown in Figure 4 6 Figure 4 6 Add ServiceArea 4 Set Service area name and click Add 5 Select the newly added service area At the lower left corner of the page set Add Prefix to Add Prefix The Add Prefix dialog box is displayed as shown in Figure 4 7 ...

Page 53: ...ial Copyright Huawei Technologies Co Ltd 49 Figure 4 7 Add Prefix 6 Set Prefix name and Service area prefix and click Add Step 3 Add a prefix for the embedded GK 1 Choose Devices GK The GK page is displayed 2 Select Embedded GK and click Edit GK The Edit GK dialog box is displayed as shown in Figure 4 8 ...

Page 54: ...tion describes how to add an MCU to the SMC2 0 On the SMC2 0 the administrator can search for an MCU by its IP address to obtain the configuration information of the MCU After checking and modifying the configuration information the administrator can add the MCU to the SMC2 0 The modifications are synchronized to the MCU This enables the administrator to manage the MCU on the SMC2 0 Step 1 Log in ...

Page 55: ...he MCU a search for the MCU will fail If the search fails modify the displayed SNMP settings based on your modifications on the MCU For details see the HUAWEI VP9660 VP9650 VP9630 V200R001 Configuration Guide You can contact Huawei technical support engineers or visit http enterprise huawei com support to obtain this document Step 5 Under general settings Set Name and Prefix Under H 323 settings s...

Page 56: ...ddress to obtain the configuration information of the participant After checking and modifying the configuration information the administrator can add the participant to the SMC2 0 The modifications are synchronized to the participant This enables the administrator to manage the participant on the SMC2 0 Step 1 Log in to the SMC2 0 web interface Step 2 Choose Devices Participant The Participant pa...

Page 57: ...ed SNMP settings based on your modifications on the participant For details see the HUAWEI VP9660 VP9650 VP9630 V200R001 Configuration Guide You can contact Huawei technical support engineers or visit http enterprise huawei com support to obtain this document To search for a participant in non SNMP mode enter User name and Password on the participant search page Step 5 Under general settings enter...

Page 58: ...2 0 At least two participants have been added to the SMC2 0 The participants and the MCU have registered with the embedded GK and are online Step 1 Log in to the SMC2 0 web interface Step 2 Choose Conferences New Conference The New Conference page is displayed as shown in Figure 4 14 Figure 4 14 New Conference page Step 3 Retain the default settings for basic conference parameters Step 4 Click Add...

Page 59: ... You have configured a GK on the SMC2 0 and added the VP9660 and participants to the SMC2 0 Use the embedded GK of the SMC2 0 For details about how to configure the GK see 4 1 3 Setting GK Parameters For details about how to add the VP9660 see 4 1 4 Adding an MCU For details about how to add a participant see 4 1 5 Adding a Participant Procedure Step 1 Log in to the SMC2 0 web interface Step 2 Cho...

Page 60: ...tive MCU Step 11 Click Save as Template End 4 3 2 Joining a Conference On the video interactive voice response IVR screen you can activate and join a predefined Ad hoc conference Context To join a predefined Ad hoc conference you can call the IVR conference ID to display the video IVR screen of the VP9660 For details about how to create an Ad hoc conference see 4 3 1 Creating an Ad hoc Conference ...

Page 61: ...p 4 Click OK End Prerequisites You have registered the desired participant endpoint with the embedded GK of the SMC2 0 For how to register a participant endpoint with the embedded GK see 4 1 5 Adding a Participant Procedure When you use the endpoint remote control The 2 and 8 keys function as the up and down arrow keys The 4 and 6 keys function as the left and right arrow keys Step 1 Use the endpo...

Page 62: ...Quick Start Guide 4 Using the SMC2 0 Issue 04 2013 12 30 Huawei Proprietary and Confidential Copyright Huawei Technologies Co Ltd 58 Figure 4 16 IVR screen Step 2 Press 1 The screen shown in Figure 4 17 is displayed ...

Page 63: ...pyright Huawei Technologies Co Ltd 59 Figure 4 17 Joining a conference Step 3 Press the up and down arrow keys 2 and 8 keys to scroll to the desired conference Then press the right arrow key 6 key You can also press enter the conference ID in the text box and press The screen shown in Figure 4 18 is displayed ...

Page 64: ...ies Co Ltd 60 Figure 4 18 Password request screen Step 4 Enter the conference password defined in 4 3 1 Creating an Ad hoc Conference followed by the pound key The participant joins the conference after password verification If no password is set for the conference the endpoint can join the conference without entering a password End ...

Page 65: ...tions on the SMC2 0 web interface Choose Conference Report Scheduled Conference Select an ongoing conference and click the required conference control buttons to control the conference For details about the conference control buttons see the HUAWEI SMC2 0 V100R002 Online Help Conference Control Functions on the Endpoint You can use the endpoint remote control to control a conference such as specif...

Page 66: ...nsistent GK registration settings Procedure Network error 1 Log in to the VP9660 web interface 2 Choose Settings Maintenance Ping The Ping page is displayed 3 Select Slot Enter the GK IP address 4 Click Test If no answer from IP address is displayed the network connection to the GK fails Contact the network administrator to address this issue Inconsistent GK registration settings 1 Log in to the V...

Page 67: ... conference is added to the scheduled conferences list and will start when the system time on the VP9660 reaches 14 00 January 18 2013 Procedure Step 1 Log in to the VP9660 web interface Step 2 Change the system time of the VP9660 to the current time End 6 3 Failure to Access the VP9660 by Dialing the IVR Conference ID Symptom The network used by a participant is working properly and the participa...

Page 68: ...ight Huawei Technologies Co Ltd 64 3 On the Policy for Scheduling and Controlling a Conference tab change Auto attendant ID 4 Click OK Step 2 Register the participant endpoint with a GK 1 Log in to the web interface of the participant endpoint 2 Register the endpoint with the GK to which the VP9660 connects End ...

Reviews: