7
If assembling an SXRC-1V (single-level stand or amp stand) go to Step 10. If not,
continue with next step.
Step 5.
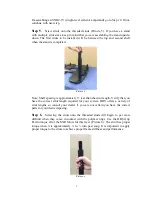
Screw struts onto the threaded studs (Picture 5). If you have a stand
with multiple strut sizes, keep in mind that you are assembling the stand upside-
down. The first struts to be installed will be between the top and second shelf
when the stand is completed.
Picture 5
Note: Shelf spacing is approximately 3” less than the strut length. Verify that you
have the correct strut length required for your system. HRS offers a variety of
strut lengths so consult your dealer if you are not certain you have the correct
parts for your desired spacing.
Step 6.
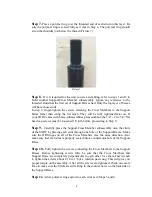
Screwing the struts onto the threaded studs will begin to get more
difficult when they come in contact with the polymer rings. Use the HRS Grip
Pad to torque all of the SXR Struts for this layer (Picture 6). The strut has proper
torque when it is approximately
¼
to
½
turn past snug. It is important to apply
proper torque to the struts to achieve proper frame stiffness and performance.
Picture 6


