background image

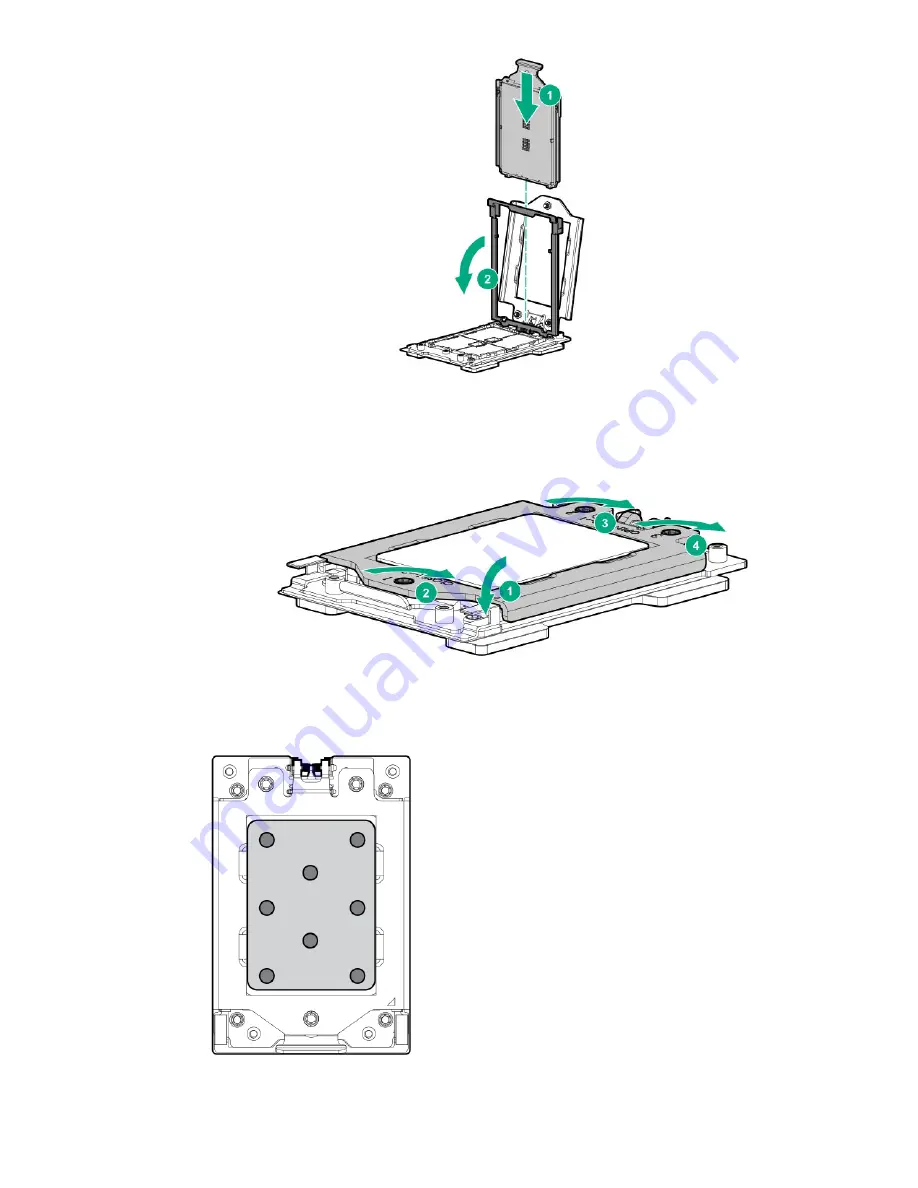
When fully inserted, you will feel the carrier frame engage into the rail frame.

e.

Remove the pin field cover cap.

f.

Close the processor rail frame and tighten the captive screws until they stop.

5.

Apply new thermal grease to the processor in the pattern shown below. Use the full contents of the
thermal grease syringe.

84

Removal and replacement procedures

Summary of Contents for ProLiant DL325

Page 1: ...n and maintenance procedures diagnostic tools specifications and requirements for hardware components and software This guide is for an experienced service technician Hewlett Packard Enterprise assumes that you are qualified in the servicing of computer equipment trained in recognizing hazards in products and are familiar with weight and stability precautions ...

Page 2: ...Documentation and Technical Data for Commercial Items are licensed to the U S Government under vendor s standard commercial license Links to third party websites take you outside the Hewlett Packard Enterprise website Hewlett Packard Enterprise has no control over and is not responsible for information outside the Hewlett Packard Enterprise website Acknowledgments Microsoft and Windows are either ...

Page 3: ...atsink spare parts 22 Processor spare parts 22 Secondary riser board assembly spare part 22 Primary riser board spare part 23 System battery spare part 23 System board spare part 23 Server options 23 Energy pack spare parts 24 Backplane board spare parts 24 Chassis Intrusion Detection Switch spare part 24 Serial port cable spare part 24 iLO service port spare part 25 USB 3 0 and SFF front I O cabl...

Page 4: ...g the quick release latch ears 58 Removing and replacing the LFF front I O assembly 59 Removing and replacing the SFF front I O assembly 60 Removing and replacing the iLO Service Port assembly in LFF 63 Removing and replacing the iLO Service Port assembly in SFF 64 Removing and replacing the USB 3 0 cable assembly in LFF 65 Removing and replacing the FlexibleLOM 66 Removing and replacing the seria...

Page 5: ...tion 106 Processor and socket components 107 Drive LEDs and buttons 108 Low profile LFF drive LED definitions 108 Hot plug drive LED definitions 109 NVMe SSD LED definitions 109 NVMe SSD button actions 111 Drive bay numbering 111 PCIe expansion slot definitions 112 PCIe slot description 112 Fan bay numbering 113 Cabling 114 Cabling guidelines 114 Cable routing 4LFF drive model 115 Cable routing 8S...

Page 6: ...0W Flex Slot Titanium Hot plug Low Halogen Power Supply 137 HPE 800W Flex Slot Universal Hot plug Low Halogen Power Supply 138 HPE 800W Flex Slot 48VDC Hot plug Low Halogen Power Supply 139 HPE 1600W Flex Slot Platinum Hot plug Low Halogen Power Supply 140 Websites 141 Support and other resources 142 Accessing Hewlett Packard Enterprise Support 142 ClearCARE technical support 142 Accessing updates...

Page 7: ...ifies in the materials shipped with a replacement CSR part whether a defective part must be returned to Hewlett Packard Enterprise In cases where it is required to return the defective part to Hewlett Packard Enterprise you must ship the defective part back to Hewlett Packard Enterprise within a defined period of time normally five 5 business days The defective part must be returned with the assoc...

Page 8: ...a société de courses ou le transporteur à utiliser Pour plus d informations sur le programme CSR de Hewlett Packard Enterprise contactez votre Mainteneur Agrée local Pour plus d informations sur ce programme en Amérique du Nord consultez le site Web Hewlett Packard Enterprise Service de garantie pièces seules Votre garantie limitée Hewlett Packard Enterprise peut inclure un service de garantie piè...

Page 9: ...aturzeiten zu minimieren und höhere Flexibilität beim Austausch defekter Bauteile zu ermöglichen Wenn Hewlett Packard Enterprise oder ein Hewlett Packard Enterprise Servicepartner bei der Diagnose feststellt dass das Produkt mithilfe eines CSR Teils repariert werden kann sendet Ihnen Hewlett Packard Enterprise dieses Bauteil zum Austausch direkt zu CSR Teile werden in zwei Kategorien unterteilt Zw...

Page 10: ...stos componentes también están diseñados para que puedan ser reparados por el usuario Sin embargo si precisa que Hewlett Packard Enterprise realice su sustitución puede o no conllevar costes adicionales dependiendo del tipo de servicio de garantía correspondiente al producto NOTA Algunos componentes de Hewlett Packard Enterprise no están diseñados para que puedan ser reparados por el usuario Para ...

Page 11: ...tt Packard Enterprise onderdelen zijn niet ontwikkeld voor reparatie door de klant In verband met de garantievoorwaarden moet het onderdeel door een geautoriseerde Service Partner worden vervangen Deze onderdelen worden in de geïllustreerde onderdelencatalogus aangemerkt met Nee Afhankelijk van de leverbaarheid en de locatie worden CSR onderdelen verzonden voor levering op de eerstvolgende werkdag...

Page 12: ...viadas no primeiro dia útil após o pedido Onde as condições geográficas permitirem a entrega no mesmo dia ou em quatro horas pode ser feita mediante uma taxa adicional Se precisar de auxílio entre em contato com o Centro de suporte técnico da Hewlett Packard Enterprise para que um técnico o ajude por telefone A Hewlett Packard Enterprise especifica nos materiais fornecidos com a peça CSR de reposi...

Page 13: ...Customer self repair 13 ...

Page 14: ...14 Customer self repair ...

Page 15: ...Customer self repair 15 ...

Page 16: ...16 Customer self repair ...

Page 17: ...lett Packard Enterprise PartSurfer website http www hpe com info partssurfer Item Description 1 Access panel spare part on page 18 2 Energy pack holder and fan blank spare parts on page 18 3 DIMM guard spare part on page 18 4 Air baffle spare part on page 18 5 Power supply blank spare part on page 18 6 Media bay blank in SFF spare part on page 19 Table Continued Illustrated parts catalog 17 ...

Page 18: ...elf repair mandatory Description Part number Access panel P06971 001 Energy pack holder and fan blank spare parts Customer self repair mandatory Description Part number Energy pack holder and fan blank 878530 001 DIMM guard spare part Customer self repair mandatory Description Part number Left and right DIMM guards P06972 001 Air baffle spare part Customer self repair mandatory Description Part nu...

Page 19: ...number 1U server bezel 875561 001 Latch ears spare part Customer self repair mandatory Description Part number Left and right latch ear kit P07014 001 SFF drive blank spare part Customer self repair mandatory Description Part number SFF drive blank 670033 001 LFF drive blank spare part Customer self repair mandatory Description Part number LFF reduced length drive blank 827363 001 Rear miscellaneo...

Page 20: ...ntinually improves and changes product parts For complete and current supported spare parts information see the Hewlett Packard Enterprise PartSurfer website http www hpe com info partssurfer Item Description 1 Fan spare parts 2 DIMM spare parts 3 Power distribution board spare part 4 Power supply spare parts 5 Heatsink spare parts Table Continued 20 Illustrated parts catalog ...

Page 21: ... self repair mandatory Description Part number DIMM 8GB PC4 2666V R 1Gx8 868841 001 DIMM 16GB PC4 2666V R 2Gx4 868842 001 DIMM 32GB PC4 2666V R 2Gx4 868843 001 DIMM 64GB PC4 2666V L 2Gx4 868844 001 DIMM 128GB PC4 2666V L 2Gx4 868845 001 DIMM 16GB PC4 2666V R 1Gx8 870840 001 DIMM 64GB PC4 2666V R 4Gx4 P06182 001 Power distribution board spare part Customer self repair optional Description Part numb...

Page 22: ...tomer self repair optional Description Part number 2 0GHz AMD EPYC 7251 processor 120W P00656 001 2 0GHz AMD EPYC 7401P processor 170W 882445 001 2 0GHz AMD EPYC 7501 processor 155W P00651 001 2 0GHz AMD EPYC 7551 processor 180W 882446 001 2 1GHz AMD EPYC 7281 processor 170W P00657 001 2 2GHz AMD EPYC 7301 processor 155W P00655 001 2 2GHz AMD EPYC 7601 processor 180W P00649 001 2 3GHz AMD EPYC 745...

Page 23: ...le P07018 001 Server options Hewlett Packard Enterprise continually improves and changes product parts For complete and current supported spare parts information see the Hewlett Packard Enterprise PartSurfer website http www hpe com info partssurfer Item Description 1 Energy pack spare parts on page 24 2 Backplane board spare parts on page 24 3 Chassis Intrusion Detection Switch spare part on page...

Page 24: ...able P07473 001 HPE Smart Storage Battery spare part Customer self repair on page 7 Mandatory Description Spare part number HPE Smart Storage Battery 96 W 145 mm cable 878643 001 Backplane board spare parts Customer self repair optional Description Part number 4LFF SAS SATA drive backplane 872885 001 8SFF SAS SATA drive backplane 780428 001 2SFF SAS SATA drive backplane 775401 001 2SFF NVMe drive ...

Page 25: ...541 001 ODD SATA cable 878324 001 4LFF SATA cable 878327 001 4LFF Mini SAS cable 878758 001 4LFF S100i Mini SAS to SATA cable P09654 001 Power cable from system board to drive backplane and ODD 878332 001 8SFF SATA cable kit P07471 001 8SFF Mini SAS cable kit 878328 001 Power cable from 8SFF drive backplane to 2SFF drive backplane 875566 001 2SFF SATA cable kit P07472 001 2SFF slimline Mini SAS an...

Page 26: ...rt Customer self repair no Description Part number HPE Trusted Platform Module Gen 10 TAA 872159 001 Thermal grease spare part Customer self repair mandatory Description Part number 1 0g thermal grease 777298 001 26 Illustrated parts catalog ...

Page 27: ...Keep electrostatic sensitive parts in their containers until they arrive at static free workstations Place parts on a grounded surface before removing them from their containers Avoid touching pins leads or circuitry Always be properly grounded when touching a static sensitive component or assembly Symbols on equipment The following symbols might be found on the equipment to indicate the presence ...

Page 28: ...he risk of injury from electric shock remove all power cords to disconnect power from the system completely Server warnings and cautions Before installing a server be sure that you understand the following warnings and cautions WARNING To reduce the risk of electric shock personal injury and damage to the equipment Do not attempt to service any parts of the equipment other than those specified in ...

Page 29: ...able when being moved on its casters Never stand in front of the rack when it is rolling down the ramp from the pallet Always handle the rack from both sides WARNING To reduce the risk of personal injury or damage to the equipment adequately stabilize the rack before extending a component outside the rack Extend only one component at a time A rack may become unstable if more than one component is ...

Page 30: ...wn the server IMPORTANT When the server is in standby mode auxiliary power is still being provided to the system Prerequisites Before powering down the server for any upgrade or maintenance procedures perform a backup of critical server data and programs Procedure 1 Remove the bezel 2 To power down the server use one of the following methods Press and release the Power On Standby button 30 Removal...

Page 31: ... T 25 screwdriver NOTE If the optional cable management arm option is installed you can extend the server without powering down the server or disconnecting peripheral cables and power cords These steps are only necessary with the standard cable management solution WARNING To reduce the risk of personal injury or equipment damage be sure that the rack is adequately stabilized before extending a com...

Page 32: ... fastened to the rails Hewlett Packard Enterprise recommends that a minimum of two people are required for all rack server installations If the server is installed higher than chest level a third person may be required to help align the server Use caution when installing the server in or removing the server from the rack The server is unstable when not fastened to the rails Procedure 1 If installe...

Page 33: ...urdy level surface Accessing the product rear panel Procedure 1 Release the cable management arm 2 Open the cable management arm The cable management arm can be right mounted or left mounted Removal and replacement procedures 33 ...

Page 34: ...Procedure 1 If installed remove the bezel 2 Power down the server 3 Remove all power a Disconnect each power cord from the power source b Disconnect each power cord from the server 4 Do one of the following Extend the server from the rack Remove the server from the rack 5 Remove the access panel a If necessary unlock the access panel latch b Press the release button and pull up the latch to diseng...

Page 35: ...e the amount of time the access panel is open Procedure 1 If installed remove the bezel 2 Power down the server 3 Remove all power a Disconnect each power cord from the power source b Disconnect each power cord from the server 4 Do one of the following Extend the server from the rack Remove the server from the rack 5 Remove the access panel 6 Remove the air baffle Removal and replacement procedure...

Page 36: ...re 1 If installed remove the bezel 2 Power down the server 3 Remove all power a Disconnect each power cord from the power source b Disconnect each power cord from the server 4 Do one of the following Extend the server from the rack Remove the server from the rack 5 Remove the access panel 6 Remove the fan blank LFF 36 Removal and replacement procedures ...

Page 37: ...Removing and replacing a fan CAUTION To prevent improper cooling and thermal damage do not operate the server unless all bays are populated Procedure 1 If installed remove the bezel 2 Power down the server 3 Remove all power Removal and replacement procedures 37 ...

Page 38: ...from the server 4 Do one of the following Extend the server from the rack Remove the server from the rack 5 Remove the access panel 6 If installed remove the air baffle 7 Disconnect the fan cable from the system board and remove the fan LFF SFF 38 Removal and replacement procedures ...

Page 39: ...n cable into the recess Removing and replacing a drive blank CAUTION To prevent improper cooling and thermal damage do not operate the server unless all bays are populated Procedure 1 If installed remove the bezel 2 Remove the drive blank LFF drive blank Removal and replacement procedures 39 ...

Page 40: ...ng and thermal damage do not operate the server unless all bays are populated with either a component or a blank Procedure 1 Back up all server data on the drive 2 If installed remove the bezel 3 Determine the status of the drive from the drive LED definitions 4 Remove the hot plug drive LFF drive SFF drive 40 Removal and replacement procedures ...

Page 41: ...1 If installed remove the bezel 2 Power down the server 3 Remove all power a Disconnect each power cord from the power source b Disconnect each power cord from the server 4 Do one of the following Extend the server from the rack Remove the server from the rack 5 Remove the access panel 6 Disconnect the SATA cables from the M 2 SSD enablement board 7 Remove the riser board assembly Removal and repl...

Page 42: ...emove all power a Disconnect each power cord from the power source b Disconnect each power cord from the server 4 Do one of the following Extend the server from the rack Remove the server from the rack 5 Remove the access panel 6 Remove all installed LFF drives 7 Disconnect all cables from the 4LFF drive backplane 8 Remove the 4LFF drive backplane a Press the latch b Slide the backplane and remove...

Page 43: ...e b Disconnect each power cord from the server 4 Do one of the following Extend the server from the rack Remove the server from the rack 5 Remove the access panel 6 If installed remove the air baffle 7 Remove all the fans 8 Remove all installed 8SFF drives 9 Disconnect all cables from the 8SFF drive backplane 10 Remove the 8SFF drive backplane a Pull up the latch b Slide the backplane and remove i...

Page 44: ...l power a Disconnect each power cord from the power source b Disconnect each power cord from the server 4 Do one of the following Extend the server from the rack Remove the server from the rack 5 Remove the access panel 6 If installed remove the air baffle 7 Remove the fans fan blanks from fan bay numbers 4 7 8 Remove the 2SFF SAS SATA or NVMe drives 9 Disconnect all cables from the 2SFF SAS SATA ...

Page 45: ...11 Remove the 2SFF SAS SATA or NVMe drive backplane a Pull up the latch b Detach the backplane 2SFF SAS SATA drive backplane 2SFF NVMe drive backplane Removal and replacement procedures 45 ...

Page 46: ...r board Procedure 1 If installed remove the bezel 2 Power down the server 3 Remove all power a Disconnect each power cord from the power source b Disconnect each power cord from the server 4 Do one of the following Extend the server from the rack Remove the server from the rack 5 Remove the access panel 6 Remove any expansion boards installed in the PCIe riser board 7 Remove the PCIe riser cage Pr...

Page 47: ...ser board Prerequisites Before you perform this procedure make sure that you have T 15 screwdriver available Procedure 1 If installed remove the bezel 2 Power down the server 3 Remove all power a Disconnect each power cord from the power source b Disconnect each power cord from the server Removal and replacement procedures 47 ...

Page 48: ...er board from the riser cage To replace the component reverse the removal procedure Removing and replacing a PCIe blank Prerequisites Before you perform this procedure make sure that you have T 15 screwdriver available Procedure 1 If installed remove the bezel 2 Power down the server 3 Remove all power a Disconnect each power cord from the power source b Disconnect each power cord from the server ...

Page 49: ...6 For slot 1 or slot 2 remove the primary riser cage 7 Remove the PCIe blank Slot 1 Slot 2 Slot 3 Removal and replacement procedures 49 ...

Page 50: ... bezel 2 Power down the server 3 Remove all power a Disconnect each power cord from the power source b Disconnect each power cord from the server 4 Do one of the following Extend the server from the rack Remove the server from the rack 5 Remove the access panel 6 Disconnect all cables from the expansion board 7 For slot 1 or 2 remove the primary riser cage 8 Remove the expansion board Slot 1 50 Re...

Page 51: ... Slot 2 Slot 3 To replace the component reverse the removal procedure Removal and replacement procedures 51 ...

Page 52: ...r 3 Remove all power a Disconnect each power cord from the power source b Disconnect each power cord from the server 4 Do one of the following Extend the server from the rack Remove the server from the rack 5 Remove the access panel 6 Disconnect all cables from the type a controller 7 Remove the Smart Array type a modular controller To replace the component reverse the removal procedure 52 Removal...

Page 53: ...4 Do one of the following Extend the server from the rack Remove the server from the rack 5 Remove the access panel 6 Disconnect the energy pack cable from the system board 7 Remove the energy pack To replace the component reverse the removal procedure Removing and replacing the energy pack holder Procedure 1 If installed remove the bezel 2 Power down the server 3 Remove all power Removal and repl...

Page 54: ...r from the chassis To replace the component reverse the removal procedure Removing and replacing the optical drive blank Prerequisites Before you perform this procedure make sure that you have T 10 Torx screwdriver available Procedure 1 If installed remove the bezel 2 Power down the server 3 Remove all power a Disconnect each power cord from the power source b Disconnect each power cord from the s...

Page 55: ...he server from the rack Remove the server from the rack 5 Remove the access panel 6 Remove the optical drive blank LFF SFF a Remove the optical drive cage b Remove the blank Removal and replacement procedures 55 ...

Page 56: ...dure 1 If installed remove the bezel 2 Power down the server 3 Remove all power a Disconnect each power cord from the power source b Disconnect each power cord from the server 4 Do one of the following Extend the server from the rack Remove the server from the rack 5 Remove the access panel 6 Disconnect all cables from the optical drive 7 Remove the optical drive LFF 56 Removal and replacement pro...

Page 57: ... SFF a Remove the optical drive cage b Remove the optical drive Removal and replacement procedures 57 ...

Page 58: ... screwdriver available Procedure 1 If installed remove the bezel 2 Power down the server 3 Remove all power a Disconnect each power cord from the power source b Disconnect each power cord from the server 4 Do one of the following Extend the server from the rack Remove the server from the rack 5 Remove the quick release latch ear Right latch ear 58 Removal and replacement procedures ...

Page 59: ...emoving and replacing the LFF front I O assembly Prerequisites Before you perform this procedure make sure that you have the T 10 screwdriver available Procedure 1 If installed remove the bezel 2 Power down the server 3 Remove all power Removal and replacement procedures 59 ...

Page 60: ...d 7 Release the front I O cable from the clips 8 Remove the front I O assembly a Detach the ambient thermal sensor cable from its clip b Remove one T 10 screw c Remove the front I O module To replace the component reverse the removal procedure Removing and replacing the SFF front I O assembly Prerequisites Before you perform this procedure make sure that you have the following tools available T 10...

Page 61: ...rack Remove the server from the rack 5 Remove the access panel 6 Disconnect the following cables from system board Front I O cable iLO service port cable USB 3 0 cable 7 Release all front I O assembly cables from clips 8 Remove the front I O assembly a Detach the ambient thermal sensor cable from its clip b Remove one T 10 screw c Remove the front I O assembly 9 Remove the USB 3 0 cable assembly R...

Page 62: ...10 Remove the iLO service port assembly 11 Remove the front I O module 62 Removal and replacement procedures ...

Page 63: ...e server 3 Remove all power a Disconnect each power cord from the power source b Disconnect each power cord from the server 4 Do one of the following Extend the server from the rack Remove the server from the rack 5 Remove the access panel 6 Disconnect the iLO Service Port cable from the system board 7 Release the cable from clips 8 Remove the iLO Service Port assembly in LFF a Remove one T 15 scr...

Page 64: ...ove the bezel 2 Power down the server 3 Remove all power a Disconnect each power cord from the power source b Disconnect each power cord from the server 4 Do one of the following Extend the server from the rack Remove the server from the rack 5 Remove the access panel 6 Remove the SFF front I O assembly 7 Remove the iLO Service Port assembly in SFF a Remove one T 15 screw b Remove the iLO Service ...

Page 65: ...lled remove the bezel 2 Power down the server 3 Remove all power a Disconnect each power cord from the power source b Disconnect each power cord from the server 4 Do one of the following Extend the server from the rack Remove the server from the rack 5 Remove the access panel 6 Disconnect the USB 3 0 cable from the system board 7 Release the cable from clips 8 Remove the USB 3 0 cable assembly Rem...

Page 66: ...ove the bezel 2 Power down the server 3 Remove all power a Disconnect each power cord from the power source b Disconnect each power cord from the server 4 Do one of the following Extend the server from the rack Remove the server from the rack 5 Remove the access panel 6 Remove the primary riser cage 7 Disconnect all cables connected to the existing FlexibleLOM 8 Remove the FlexibleLOM 66 Removal a...

Page 67: ... installed remove the bezel 2 Power down the server 3 Remove all power a Disconnect each power cord from the power source b Disconnect each power cord from the server 4 Do one of the following Extend the server from the rack Remove the server from the rack 5 Remove the access panel 6 Disconnect the serial port cable from the system board 7 Remove the serial port assembly Removal and replacement pr...

Page 68: ...oval procedure Removing and replacing a power supply blank CAUTION To prevent improper cooling and thermal damage do not operate the server unless all bays are populated Procedure Remove the power supply blank from the power supply bay 68 Removal and replacement procedures ...

Page 69: ...erequisites Before you perform this procedure make sure that you have a T 10 Torx screwdriver available Procedure 1 If installed remove the bezel 2 Power down the server 3 Access the product rear panel 4 Release the power cord from the strain relief clip 5 Remove all power Removal and replacement procedures 69 ...

Page 70: ... level work surface 8 Remove the access panel 9 Remove the left rail a Pull the latch on the inner rail b Detach the inner rail from the server 10 Remove the non hot plug power supply a Disconnect the power supply cable b Remove four screws c Remove the power supply To replace the component reverse the removal procedure 70 Removal and replacement procedures ...

Page 71: ...bezel 2 Power down the server 3 Access the product rear panel 4 Release the power cord from the strain relief strap 5 Remove all power a Disconnect each power cord from the power source b Disconnect each power cord from the server 6 Remove the power supply WARNING To reduce the risk of personal injury from hot surfaces allow the power supply or power supply blank to cool before touching it Removal...

Page 72: ...r a Disconnect each power cord from the power source b Disconnect each power cord from the server 4 Do one of the following Extend the server from the rack Remove the server from the rack 5 Remove the access panel 6 Remove all hot plug power supplies 7 Disconnect the power and signal cables from the power distribution board PDB 8 Remove the PDB a Remove three T 15 screws b Remove the PDB cover c R...

Page 73: ...wer down the server 3 Remove all power a Disconnect each power cord from the power source b Disconnect each power cord from the server 4 Do one of the following Extend the server from the rack Remove the server from the rack 5 Remove the access panel 6 From the left DIMM guard remove the Chassis Intrusion Detection switch 7 Remove the DIMM guard Right DIMM guard Removal and replacement procedures ...

Page 74: ... a DIMM To identify the DIMMs installed in the server see DIMM slot locations Procedure 1 If installed remove the bezel 2 Power down the server 3 Remove all power a Disconnect each power cord from the power source b Disconnect each power cord from the server 74 Removal and replacement procedures ...

Page 75: ...l need the following T 20 screwdriver Alcohol wipe Procedure 1 Observe the following alert CAUTION When handling the heatsink always hold it along the top and bottom of the fins Holding it from the sides can damage the fins 2 If installed remove the bezel 3 Power down the server 4 Remove all power a Disconnect each power cord from the power source b Disconnect each power cord from the server 5 Do ...

Page 76: ...rd d Place the heatsink on a flat work surface 9 Using an alcohol wipe remove the existing thermal grease from the processor Allow the alcohol to evaporate before continuing 10 Remove the thermal interface protective cover from the spare heatsink 11 Install the spare heatsink a Align the heatsink screws with the processor nuts correctly b Using a T 20 screwdriver fully tighten the four captive hea...

Page 77: ...ure 1 Observe the following alerts CAUTION When handling the heatsink always hold it along the top and bottom of the fins Holding it from the sides can damage the fins CAUTION To avoid damage to the processor or system board only authorized personnel should attempt to replace or install the processor in this server CAUTION To prevent possible server malfunction and damage to the equipment multipro...

Page 78: ... power a Disconnect each power cord from the power source b Disconnect each power cord from the server 5 Do one of the following Extend the server from the rack Remove the server from the rack 6 Remove the access panel 7 If installed remove the air baffle 8 Remove the heatsink 9 Using an alcohol wipe remove the existing thermal grease from the heatsink Allow the alcohol to evaporate before continu...

Page 79: ...11 Install the spare processor a Slide the processor into the rail frame b Close the processor rail frame and tighten the captive screws until they stop Removal and replacement procedures 79 ...

Page 80: ...sor nuts correctly b Using a T 20 screwdriver fully tighten the four captive heatsink screws in the order indicated on the heatsink label Otherwise boot failure or intermittent shutdowns might occur 14 If removed install the air baffle 15 Install the access panel 16 Install the server into the rack 17 Power up the server 18 If removed install the bezel 80 Removal and replacement procedures ...

Page 81: ... Extend the server from the rack Remove the server from the rack 5 Remove the access panel 6 If installed remove the air baffle 7 Remove all fans 8 Disconnect the Chassis Intrusion Detection switch cable and remove the DIMM guards 9 Remove all DIMMs 10 Remove all PCIe riser cages 11 Remove all optional components from the system board 12 Disconnect all cables from the system board 13 Remove one of...

Page 82: ... you perform this procedure make sure that you have the following components available T 15 screwdriver for system board screws T 20 screwdriver for heatsink screws Thermal grease part number 777298 001 Procedure 1 Install the spare system board a Install the system board handle on the spare system board b Place the spare system board in the chassis holding the handle 82 Removal and replacement pr...

Page 83: ...m board screws 4 Install the processor a Unscrew the three captive screws and pivot the force frame upward b Pivot the rail frame to the upright position c Remove the processor external cap from the rail frame d Slide the processor into the rail frame Removal and replacement procedures 83 ...

Page 84: ...ame e Remove the pin field cover cap f Close the processor rail frame and tighten the captive screws until they stop 5 Apply new thermal grease to the processor in the pattern shown below Use the full contents of the thermal grease syringe 84 Removal and replacement procedures ...

Page 85: ...l the server into the rack 10 Connect each power cord to the server 11 Connect each power cord to the power source 12 Power up the server 13 If removed install the bezel 14 Ensure all firmware including option cards and embedded devices is updated to the same versions to ensure that the latest drivers are being used 15 Re enter any Secure Boot Keys that were previously added in the Secure Boot con...

Page 86: ...rm exiting System Utilities press the F10 key The server automatically reboots Removing and replacing the system battery The system battery provides power to the real time clock If the server no longer automatically displays the correct date and time you might need to replace the system battery WARNING The computer contains an internal lithium manganese dioxide a vanadium pentoxide or an alkaline ...

Page 87: ...orized reseller or an authorized service provider To replace the component reverse the removal procedure Removing and replacing the Chassis Intrusion Detection switch Procedure 1 If installed remove the bezel 2 Power down the server 3 Remove all power a Disconnect each power cord from the power source b Disconnect each power cord from the server 4 Do one of the following Extend the server from the...

Page 88: ...ion The HPE Trusted Platform Module 2 0 Gen10 Option is not a customer removable part CAUTION If the TPM is removed from the original server and powered up on a different server data stored in the TPM including keys will be erased If you suspect a TPM board failure leave the TPM installed and remove the system board Removing and replacing the system board on page 81 Contact a Hewlett Packard Enter...

Page 89: ...the iLO Virtual NMI feature Troubleshooting resources Troubleshooting resources are available for HPE Gen10 server products in the following documents Troubleshooting Guide for HPE ProLiant Gen10 servers provides procedures for resolving common problems and comprehensive courses of action for fault isolation and identification issue resolution and software maintenance Error Message Guide for HPE P...

Page 90: ...cure Boot that enables the system firmware option card firmware operating systems and software collaborate to enhance platform security UEFI Graphical User Interface GUI An Embedded UEFI Shell that provides a preboot environment for running scripts and tools Boot support for option cards that only support a UEFI option ROM Selecting the boot mode This server provides two Boot Mode configurations U...

Page 91: ...nd operating systems with boot loaders must have an appropriate digital signature to execute during the boot process Operating systems must support Secure Boot and have an EFI boot loader signed with one of the authorized keys to boot For more information about supported operating systems see http www hpe com servers ossupport You can customize the certificates embedded in the UEFI BIOS by adding ...

Page 92: ...NOTE After you have selected a mode you must reprovision the server to change the mode that launches when you boot to F10 Intelligent Provisioning prepares the system for installing original licensed vendor media and Hewlett Packard Enterprise branded versions of OS software Intelligent Provisioning also prepares the system to integrate optimized server support software from the Service Pack for P...

Page 93: ...information about specific versions of a supported operating system see the OS Support Matrix on the Hewlett Packard Enterprise website http www hpe com info ossupport HPE Insight Remote Support Hewlett Packard Enterprise strongly recommends that you register your device for remote support to enable enhanced delivery of your Hewlett Packard Enterprise warranty HPE support services or Hewlett Packa...

Page 94: ...ge Administrator HPE SSA is the main tool for configuring arrays on HPE Smart Array SR controllers It exists in three interface formats the HPE SSA GUI the HPE SSA CLI and HPE SSA Scripting All formats provide support for configuration tasks Some of the advanced tasks are available in only one format The diagnostic features in HPE SSA are also available in the standalone software HPE Smart Storage...

Page 95: ...load the HPE SSA executables and install them You can run HPE SSA online after launching the host operating system For more information see HPE Smart Array SR Gen10 Configuration Guide at the Hewlett Packard Enterprise website Diagnostic tools 95 ...

Page 96: ...drive optional 2 Serial label pull tab 3 iLO service port 4 USB 3 0 port 5 LFF drive bays up to 4 LFF drives SFF SAS SATA drive model Item Description 1 Serial label pull tab 2 2SFF SAS SATA drive assembly optional 3 Optical drive assembly optional Table Continued 96 Component identification ...

Page 97: ...8 SFF drive bays up to 8 NVMe drives Serial number iLO information pull tab The serial number iLO information pull tab is double sided One side shows the server serial number and the customer asset tag label The other side shows the default iLO account information and QR code label Use a mobile device to scan the QR code label to display the server mobile product page http www hpe com qref dl325ge...

Page 98: ...lash per second Network active Off No network activity 3 Health LED Solid green Normal Flashing green 1 flash per second iLO is rebooting Flashing amber System degraded1 Flashing red 1 flash per second System critical1 4 Power On Standby button and system power LED Solid green System on Flashing green 1 flash per second Performing power on sequence Solid amber System in standby Off No power presen...

Page 99: ... power fault has occurred For more information see Power fault LEDs SFF drive model Item Description Status 1 Power On Standby button and system power LED Solid green System on Flashing green 1 flash per second Performing power on sequence Solid amber System in standby Off No power present 1 2 Health LED Solid green Normal Flashing green 1 flash per second iLO is rebooting Flashing amber System de...

Page 100: ...indicates a degraded or critical state review the system Integrated Management Log IML or use HPE iLO to review the system health status If all LEDs described in this table flash simultaneously a power fault has occurred For more information see Power fault LEDs UID button functionality The UID button can be used to display the Server Health Summary when the server will not power on For more infor...

Page 101: ...nts Item Description 1 Slot 1 PCIe3 x16 16 8 4 1 1 2 Slot 2 PCIe3 x8 8 4 1 1 3 Slot 3 PCIe3 x16 16 8 4 1 1 4 Standard power supply non hot plug 5 Flex Slot power supply 1 hot plug 6 Flex Slot power supply 2 hot plug 7 USB 3 0 ports 2 8 iLO Management port 9 NIC ports 1 4 1Gb 10 Video port 11 FlexibleLOM optional 1 For more information see PCIe riser board slot definitions Component identification ...

Page 102: ...es per second iLO manual reboot sequence initiated 8 flashes per second iLO manual reboot sequence in progress Off Deactivated 2 NIC link LED Green Network link Off No network link 3 NIC activity LED Solid green Link to network Flashing green Network active Off No network activity 4 Power supply LED Solid green Normal Off No power 1 102 Component identification ...

Page 103: ...supply is in standby mode Power supply error System board components Item Description 1 FlexibleLOM connector 2 Primary PCIe riser connector 3 System maintenance switch 4 iLO Service Port connector 5 System battery 6 NVMe connector port 4A 7 Internal USB 3 0 connector 8 microSD card slot1 Table Continued Component identification 103 ...

Page 104: ...connector 29 NVMe connector port 3A 30 NVMe connector port 2A 31 NVMe connector port 1A 32 Power connector for Standard or Flex Slot power supply 33 Power connector for Flex Slot power supply 34 Energy pack connector 35 Sideband connector for Flex Slot power supply 36 Chassis Intrusion Detection connector 37 Chassis Intrusion Detection switch optional 38 Smart Array modular controller connector 39...

Page 105: ...he redundant ROM set S1 S5 and S6 to On 2 When the system maintenance switch position 6 is set to the On position the system is prepared to restore all configuration settings to their manufacturing defaults 3 When the system maintenance switch position 6 is set to the On position and Secure Boot is enabled some configurations cannot be restored For more information see Secure Boot on page 91 DIMM ...

Page 106: ... locate specific information about the DIMM Item Description Example 1 Capacity 8 GB 16 GB 32 GB 64 GB 128 GB 2 Rank 1R Single rank 2R Dual rank 4R Quad rank 8R Octal rank 3 Data width on DRAM x4 4 bit x8 8 bit x16 16 bit 4 Memory generation PC4 DDR4 5 Maximum memory speed 2133 MT s 2400 MT s 2666 MT s 2933 MT s Table Continued 106 Component identification ...

Page 107: ...red L LRDIMM load reduced E Unbuffered ECC UDIMM For more information about product features specifications options configurations and compatibility see the HPE DDR4 SmartMemory QuickSpecs on the Hewlett Packard Enterprise website http www hpe com support DDR4SmartMemoryQS Processor and socket components Item Description 1 Pin field 2 Rail frame 3 Carrier frame 4 Processor 5 Force frame 6 Captive ...

Page 108: ...ber 1 flash per second A predictive failure alert has been received for this drive Replace the drive as soon as possible 2 Online Activity Solid green The drive is online and has no activity Flashing green 4 flashes per second The drive is operating normally and has activity Flashing green 1 flash per second The drive is doing one of the following Rebuilding Performing a RAID migration Performing ...

Page 109: ...ives Flashing green The drive is doing one of the following Rebuilding Performing a RAID migration Performing a strip size migration Performing a capacity expansion Performing a logical drive extension Erasing Spare part activation Flashing amber green The drive is a member of one or more logical drives and predicts the drive will fail Flashing amber The drive is not configured and predicts the dr...

Page 110: ...green The drive is doing one of the following Rebuilding Performing a RAID migration Performing a stripe size migration Performing a capacity expansion Performing a logical drive extension Erasing Flashing amber green The drive is a member of one or more logical drives and predicts the drive will fail Flashing amber The drive is not configured and predicts the drive will fail Solid amber The drive...

Page 111: ...tton actions Item Button Action 1 Do Not Remove Press to open the release lever 2 Power Press to request PCIe ejection Removal request can be denied by the RAID controller one or more of the logical drives could fail Operating system Drive bay numbering LFF drive model SFF SAS SATA drive model Component identification 111 ...

Page 112: ...ional Orange 2SFF SAS SATA drives optional PCIe expansion slot definitions Slot Type Form factor Connector link width Negotiable link width 1 PCIe 3 0 FL FH1 x16 16 8 4 1 2 PCIe 3 0 HH HL2 x8 8 4 1 33 PCIe 3 0 HH HL2 x16 16 8 4 1 1 FL FH Full length full height 2 HL HH Half length half height 3 Slot 3 is unavailable when a Smart Array type a modular controller is installed in system PCIe slot desc...

Page 113: ...latest information see the PCI SIG website 2 Physical connector link width PCIe devices communicate through a logical connection called an interconnect or link At the physical level a link is composed of one or more lanes The number of lanes is written with an prefix with 16 being the largest size in common use 1 2 4 8 16 3 Negotiable link width These numbers correspond to the maximum link bandwid...

Page 114: ...ce to verify the length of the cable Use the internal cable management features to properly route and secure the cables When routing cables be sure that the cables are not in a position where they can be pinched or crimped Avoid tight bend radii to prevent damaging the internal wires of a power cord or a server cable Never bend power cords and server cables tight enough to cause a crease in the sh...

Page 115: ...the server can restrict airflow If you intend to use the removed cables later label and store them for future use Cable routing 4LFF drive model 4LFF drive connected to system board 4LFF drive connected to Embedded HPE Smart Array S100i SR Gen10 Controller Cabling 115 ...

Page 116: ... 4LFF drive connected to type a controller 4LFF drive connected to type p controller Slot 1 116 Cabling ...

Page 117: ... Slot 2 Slot 3 Cabling 117 ...

Page 118: ...le Cable color Description Orange Power cable from system board to drive backplane Blue Power cable from system board to ODD reserved Cable routing 8SFF SAS SATA drive model 8SFF drive connected to system board 118 Cabling ...

Page 119: ... port 2 backplane to port 2 system board 8SFF drive connected to type a controller Cable color Description Orange Mini SAS cable from port 1 backplane to port 1 type a controller Blue Mini SAS cable from port 2 backplane to port 2 type a controller 8SFF drive connected to type p controller Slot 1 Cabling 119 ...

Page 120: ... Slot 2 Slot 3 120 Cabling ...

Page 121: ...SAS cable from port 2 backplane to port 2 type p controller 8SFF SAS SATA drive power cable Cable color Description Orange Power cable from system board to drive backplane Blue Power cable from system board to ODD reserved Cable routing 8SFF NVMe drive model 8NVMe drive connected to system board Cabling 121 ...

Page 122: ...m board Blue Slimline cable to NVMe port 2A on system board Gold Slimline cable to NVMe port 3A on system board Pink Slimline cable to NVMe port 4A on system board 8NVMe drive power cable Cable routing 2SFF SAS SATA drive cage SATA cable to system board 122 Cabling ...

Page 123: ...cription Orange Power cable from 8SFF drive backplane to 2SFF drive backplane Blue SATA cable to SATA ports 1 2 on system board Mini SAS cable to type a controller Cable routing 2SFF NVMe drive cage Cabling 123 ...

Page 124: ...drive backplane Blue Slimline cable to NVMe port 5A on system board Cable routing Optical Drive LFF Item Description Orange ODD SATA cable Blue ODD power cable Pink Power cable from system board to ODD Gold Power cable from system board to drive backplane SFF 124 Cabling ...

Page 125: ...em Description Orange ODD SATA cable Blue ODD power cable Pink Power cable from system board to ODD Gold Power cable from system board to drive backplane Cable routing iLO service port LFF SFF Cabling 125 ...

Page 126: ...Cable routing Power supply Non hot plug power supply Power distribution board PDB to system board 126 Cabling ...

Page 127: ...Item Description Orange Power cable Blue Sideband signal cable Cable routing Front I O LFF Item Description Orange Front I O cable Blue Ambient temperature sensor cable SFF Cabling 127 ...

Page 128: ...Item Description Orange Front I O cable Blue Ambient temperature sensor cable Cable routing USB 3 0 LFF SFF 128 Cabling ...

Page 129: ...Cable routing Serial port Cabling 129 ...

Page 130: ...Cable routing Chassis Intrusion Detection switch Cable routing M 2 SSD Slot 1 Slot 2 130 Cabling ...

Page 131: ...tem board Orange SATA cable from M 2 enablement board port 2 to x1 SATA port 4 on system board Cable routing Controller backup power cable Depending on the controller option installed the actual storage controller connectors might look different from what is shown in this section Slot 1 Cabling 131 ...

Page 132: ... Slot 2 Slot 3 132 Cabling ...

Page 133: ...Cable routing Energy pack Cabling 133 ...

Page 134: ...Maximum rate of change is 20 C hr 36 F hr The upper limit and rate of change may be limited by the type and number of options installed System performance during standard operating support may be reduced if operating with a fan fault or above 30 C 86 F Extended ambient operating support For approved hardware configurations the supported system inlet range is extended to be 5 to 10 C 41 to 50 F and...

Page 135: ...t plug Low Halogen Power Supply on page 137 HPE 800W Flex Slot Universal Hot plug Low Halogen Power Supply on page 138 HPE 800W Flex Slot 48VDC Hot plug Low Halogen Power Supply on page 139 HPE 1600W Flex Slot Platinum Hot plug Low Halogen Power Supply on page 140 For detailed power supply specifications see the QuickSpecs on the Hewlett Packard Enterprise website HPE 500W Low Halogen Non hot plug...

Page 136: ...y 50 Hz to 60 Hz Not applicable to 240 VDC Rated input current 5 8 A at 100 VAC 2 8 A at 200 VAC 2 4 A at 240 VDC for China only Maximum rated input power 557 W at 100 VAC 539 W at 200 VAC 537 W at 240 VDC for China only BTUs per hour 1902 at 100 VAC 1840 at 200 VAC 1832 at 240 VDC for China only Power supply output Rated steady state power 500 W at 100 VAC to 127 VAC input 500 W at 100 VAC to 240...

Page 137: ... only BTUs per hour 3067 at 100 VAC 2958 at 200 VAC 2949 at 240 VAC for China only Power supply output Rated steady state power 800 W at 100 VAC to 127 VAC input 800 W at 100 VAC to 240 VAC input 800 W at 240 VDC input for China only Maximum peak power 800 W at 100 VAC to 127 VAC input 800 W at 100 VAC to 240 VAC input 800 W at 240 VDC input for China only HPE 800W Flex Slot Titanium Hot plug Low ...

Page 138: ...China only Maximum peak power 800 W at 200 VAC to 240 VAC input 800 W at 240 VDC input for China only HPE 800W Flex Slot Universal Hot plug Low Halogen Power Supply Specification Value Input requirements Rated input voltage 200 VAC to 277 VAC 380 VDC Rated input frequency 50 Hz to 60 Hz Rated input current 4 4 A at 200 VAC 3 1 A at 277 VAC 2 3 A at 380 VDC Maximum rated input power 869 W at 200 VA...

Page 139: ... input power BTUs per hour 2983 at 40 VDC input 2951 at 48 VDC input nominal input 2912 at 72 VDC input Power supply output Rated steady state power W 800 W at 40 VDC to 72 VDC Maximum peak power W 800 W at 40 VDC to 72 VDC Maximum peak power 800 W at 40 VDC to 72 VDC input WARNING To reduce the risk of electric shock or energy hazards This equipment must be installed by trained service personnel ...

Page 140: ... of earthing of the DC system The DC system must be earthed elsewhere The DC supply source is to be located within the same premises as the equipment Switching or disconnecting devices must not be in the earthed circuit conductor between the DC source and the point of connection of the earthing electrode conductor HPE 1600W Flex Slot Platinum Hot plug Low Halogen Power Supply Specification Value I...

Page 141: ...tibility matrix www hpe com storage spock Storage white papers and analyst reports www hpe com storage whitepapers For additional general support websites see Support and other resources Product websites Product QuickSpecs http www hpe com servers dl325 gen10 HPE ProLiant DL325 Gen10 support page http www hpe com support dl325gen10 HPE ProLiant DL325 Gen10 documents http www hpe com info dl325gen1...

Page 142: ...ort for ClearOS and ClearVM is purchased and delivered by ClearCenter You can purchase single support incidents by submitting a support ticket to ClearCenter or you can purchase a Bronze Silver Gold or Platinum ClearCARE subscription For more information go to the ClearOS website https www clearos com Several levels of professional technical support are available to licensed users For more informa...

Page 143: ...ackard Enterprise strongly recommends that you register your device for remote support If your product includes additional remote support details use search to locate that information Remote support and Proactive Care information HPE Get Connected www hpe com services getconnected HPE Proactive Care services www hpe com services proactivecare HPE Proactive Care service Supported products list www ...

Page 144: ...uct can be found at www hpe com info reach For Hewlett Packard Enterprise product environmental and safety information and compliance data including RoHS and REACH see www hpe com info ecodata For Hewlett Packard Enterprise environmental information including company programs product recycling and energy efficiency see www hpe com info environment Documentation feedback Hewlett Packard Enterprise ...

Reviews: