M 830 LL - M 830 M
User Manual
131
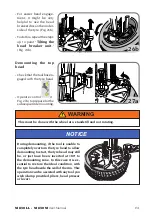
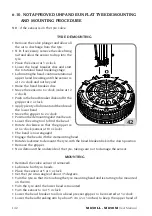
- For easier bead engage-
ment, it might be very
helpful to use the bead
breaker disc on the under-
side of the tyre (Fig. 26b).
- To do this, repeat the steps
up to point “
Tilting the
bead breaker unit
.”
(Fig. 24b).
Demounting the top
bead
- Check that the tool has en-
gaged with the tyre bead.
- Operate control
(1,
Fig. 27a) to prepare for the
subsequent demounting.
This must be done with the wheel at a standstill and not rotating.
WARNING
During demounting, if the tool is unable to
completely overturn the tyre bead to allow
demounting to start, the tyre bead may still
be, or just have been, inserted at 180° to
the demounting zone. In this case it is es-
sential to restore the ideal condition, with
the tyre bead inside the well of the rim. This
operation can be assisted with any tool you
wish (clamp provided, pliers, bead presser
or lever).
NOTICE
26b
1
27a
Summary of Contents for M 830 LL
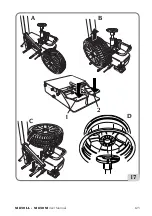
Page 37: ...M 830 LL M 830 M User Manual 123 A B C 1 2 D 17...
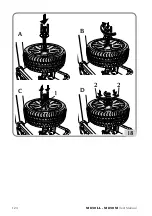
Page 38: ...124 M 830 LL M 830 M User Manual A B C D 1 2 2 18...
Page 49: ...M 830 LL M 830 M User Manual 135 1 2 3 4 30...
Page 76: ...162 M 830 LL M 830 M User Manual M13 M14 M11 M7 M2 M9 A M16 STANDARD RIM...
Page 77: ...M 830 LL M 830 M User Manual 163 M6 M5 M11 M7 M9 B M16 DROPPED CENTRE HOLE RIM...
Page 78: ...164 M 830 LL M 830 M User Manual C M11 M2 REVERSED RIM...
Page 79: ...M 830 LL M 830 M User Manual 165 D M10 M2 M15 M9 PICK UP RIM...
Page 80: ...166 M 830 LL M 830 M User Manual E CLOSED CENTRE RIM...
Page 81: ...M 830 LL M 830 M User Manual 167 F OPEN CENTRE RIM...
Page 84: ...170 M 830 LL M 830 M User Manual...
Page 85: ...M 830 LL M 830 M User Manual 171 49...

