background image


69 

9 Troubleshooting 

Introduction 

If you are having problems installing your HP Tower Server tc2100, there are a 
number of tools available for troubleshooting, including the information provided 
in this chapter. 

• 

HP’s web site at 

http:\\www.hp.com

 to access the most comprehensive 

support material: 

o

Latest support news – Late-breaking product and support information on 
HP Servers.  

o

Drivers and software downloads for HP Servers   

o

HP Instant support – Fast, web-based support that is automated and 
provides quick diagnosis and resolution of most computing problems   

o

Step-by-step guides for your system troubleshooting 

o

Technical information – Data sheets, Application notes, Configuration 
guides, installation tips, product papers, reference material and more  

o

Compatibility issues – HP Accessories, OS/NOS, HP & third party parts 
compatibility information  

o

Manuals – Easy installation and configuration of your HP Server  

o

Parts & service – Information on replacement parts, exploded views, and 
configuration  

o

Tape backup support – Support for HP's SureStore Tape Backup products  

o

HP Server registration  

o

Training programs – HP STAR worldwide training and certification 
program  

o

Warranty & enhanced services – Your guide to warranty service for your 
systems   

o

Proactive notification – HP will e-mail your custom information when it is 
available  

o

Contacts – How to get help or provide feedback  


Summary of Contents for Tc2100 - Server - 128 MB RAM

Page 1: ...HP Server tc2100 Installation Guide HP Part Number P4648 90000 Printed in August 2001 ...

Page 2: ...ies Incorporated Intel Pentium and Celeron are registered trademarks of Intel Corporation Microsoft Internet Explorer Windows Windows NT and Windows 2000 are registered trademarks of Microsoft in the U S and other countries SCSISelect is a registered trademark of Adaptec Incorporated Netscape and Navigator are registered trademarks of Netscape Communications Corporation in the U S and other countr...

Page 3: ...own the Server 13 Connecting AC Power to Multiple Server Configurations 13 Sleep States ACPI 13 3 Opening and Closing the HP Server 17 Introduction 17 Tools Required 17 Removing the Covers 17 Removing the Side Cover 18 Removing the Front Bezel 19 Replacing the Upper Front Bezel 20 Replacing the Left Side Cover 21 4 Installing Mass Storage Devices 23 Introduction 23 Tools Required 23 Mass Storage G...

Page 4: ...5 Tools Required 45 Accessory Board Installation Guidelines 46 IRQ Settings 46 Installing a Disk Array Controller Board 46 Boot Priority 46 Installing Accessory Boards 48 Removing Accessory Boards 53 7 Connecting the Monitor Keyboard Mouse and UPS 55 Introduction 55 Connecting the UPS Uninterruptible Power Supply 56 8 Configuring the HP Server 57 Introduction 57 HP Startup CD ROM 58 Accessing the ...

Page 5: ...ms 79 Monitor Does Not Work 79 Keyboard or Mouse Does Not Work 80 CD ROM Drive Does Not Work 80 SCSI Device Does Not Work 80 Replacing a Battery 81 Problems Running the Setup Utility 82 A Specifications 83 Introduction 83 Requirements 83 System Board Layout 86 B Regulatory Information 87 Regulatory Notices Electromagnetic Compliance 87 Notice for United States 87 Declaration of Conformity US and E...

Page 6: ...Contents vi Warranty 95 HP Software Product License Agreement 95 Non Nuclear Usage 96 Index 97 ...

Page 7: ...d locate the ReadFirst sheet for a quick reference to installing the HP Server tc2100 The ReadFirst sheet parallels this chapter but has the most up to date information concerning installation Verify the contents of the shipping box including the installation kit against the Contents list included with your HP Server tc2100 If anything is missing or damaged call your reseller 2 Save Packaging Stor...

Page 8: ...ore removing the cover always disconnect the power cord and unplug telephone cables Disconnect the power cord to avoid exposure to high energy levels that may cause burns when parts are short circuited by metal objects such as tools or jewelry Disconnect telephone cables to avoid exposure to shock hazard from telephone ringing voltages The following upgrades hard disk drives memory DIMMs and PCI b...

Page 9: ...ed in any combination in any slot but HP recommends starting at slot 1 and filling the slots in order with the largest size first 1 2 and 3 For details refer to Chapter 5 Installing Additional Memory 6d Add PCI Accessory Boards You can install additional accessory boards but don t install third party boards until you have verified the Server s operations The addition of a disk drive controller boa...

Page 10: ... Opening and Closing the HP Server Applying Power to the Server 7 Check Set the Power Supply Input Voltage Check the input voltage switch on the power supply located on the rear of the Server below the power connector as shown below The input voltage switch has two positions 115 or 230 volts 230 volts is default position Switch shown in 115 volts position Input Voltage Switch Power Connector ...

Page 11: ... completes the boot process Check the HP Server s BIOS version against the latest BIOS version listed on HP s web site for this Server at http www hp com If you don t have the latest BIOS version you will need to update the BIOS with the utility on the Startup CD ROM before installing the NOS and its drivers 10 Run the HP Startup CD ROM to create the diskettes Run the HP Startup CD ROM NOS drivers...

Page 12: ...rent BIOS from the HP web site at http www hp com The Startup CD ROM has a flash utility you can use to upgrade the BIOS or backup your BIOS configuration in case the CMOS becomes corrupted later on Refer to the HP Server tc2100 NOS Installation Guide for more information 13 Install the desired NOS Locate and read the desired NOS installation topic in the HP Server tc2100 NOS Installation Guide be...

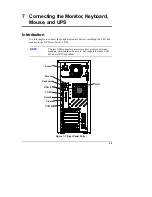
Page 13: ... panel of the HP Server tc2100 provides the controls and indicators commonly used when operating the Server Flexible Disk Drive FDD Backup Tape Drive Optional 3rd Hard Drive Optional CD ROM Drive Power On Off Sleep Switch Power On Off Sleep LED IDE SCSI Device Activity LED Rubber Feet 4 LAN Activity LED Figure 2 1 Front Panel Table 2 1 provides the front panel power switch and the lower bezel LED ...

Page 14: ...not support power management based on the ACPI Advanced Configuration and Power Management Interface standard Refer to Applying Power to the HP Server and Sleep States ACPI later in this chapter Drive Activity LED Flickering orange LED during any IDE or SCSI device activity including the CD ROM drive s IDE hard disk drives and SCSI devices connected to the SCSI controller board Off when there is n...

Page 15: ... loaded activity is occurring Off On Self Test Failed Off or Pulsing Flashing Cartridge loaded but Caution tape may be near end of life or cleaning required Insert different tape for same operation If right LED does not flash with new tape old tape is near end of life and needs to be replaced If right LED does flash with new tape tape heads need cleaning If right LED flashes after using cleaning c...

Page 16: ...ard with a PS 2 connector Two USB ports are provided for printers external modems a keyboard and a mouse but these features are NOS dependent The COM 1 port is a standard serial port The Parallel Port is a standard parallel port which supports Extended Capabilities Port ECP Enhanced Parallel Port EPP The Monitor Port interface specifications are listed in Table A 4 HP Server Hardware Specification...

Page 17: ...he BIOS Setup Utility Power Mouse Keyboard USB 2 LAN COM 2 Parallel Keylock Video COM 1 System Fan Input Voltage Switch External SCSI SCSI Model only Figure 2 3 Rear Panel and Ports Applying Power to the HP Server If you chose to use sleep states in conjunction with the HP Server tc2100 refer to Sleep States ACPI later in this section and your respective NOS before attempting to use sleep states ...

Page 18: ...itch is set for the correct input voltage before connecting the power cord to a voltage source See Figure 2 4 Switch shown in 115 volts position Input Voltage Switch Power Connector Figure 2 4 Input Voltage Selection Switch 2 Ensure the HP Server s power cord is connected to the power source See Figure 2 4 3 Press the Power button on the lower front bezel See Figure 2 1 When you press the power bu...

Page 19: ... first connected to an AC power source This also occurs when the Server is in a standby mode power is turned off but the power cord is plugged into AC power The inrush current is much greater than the Server s normal operating current and generally the AC power source can handle the normal inrush current However if you install several HP Servers on one circuit precautions are necessary If there is...

Page 20: ... a complete rebooting of the Server It still requires running all the start up self tests before starting the NOS but loading the NOS and all the previously opened applications is much faster The Server supports certain types of system activity which is used as wake up events from these sleep states These wake up events can be generated from the power button keyboard or mouse activity and schedule...

Page 21: ...on override is used there is a strong possibility of corrupted or lost data Refer to the BIOS Setup Utility in Chapter 8 Configuring the HP Server and your NOS documentation for instructions on setting up Sleep States and transitioning into and out of the various states ...

Page 22: ......

Page 23: ...nents of the Server Removing the Covers The side cover and the upper front bezel are the only two covers described in this chapter For more information about removing the Server s remaining covers and bezel refer to the HP Server tc2100 Service Guide The left side cover front view must be removed to access the internal components of the Server The left side cover must be removed before removing th...

Page 24: ...ines 3 Insert the key into the lock on the rear of the Server to unlock the cover Initially the keys are found connected to a ring located on the rear of the Server just below the locking mechanism See Figure 3 1 Turn Key to Unlock Figure 3 1 Opening Cover Lock 4 Lift and open the latch on the side of cover as shown in Figure 3 2 5 Open the left side cover pulling the top away from the chassis and...

Page 25: ...nto the upper drive shelves first four shelves or common trays of the Server 1 Once you have removed the left side cover locate the front bezel release tabs just behind the front bezel See Figure 3 3 2 Pull the release tabs outward releasing the front bezel and pulling the tabs front bezel forward This will swing open the front bezel on its hinge teeth as shown in Figure 3 3 3 Swing the front beze...

Page 26: ... both sides and pivots on these when opening or closing the front bezel 1 Hold the front bezel next to the chassis and align the hinge teeth both upper and lower as shown in Figure 3 4 The hinge teeth can only fit together within the space allowed so it should fit in the opening on the first try 2 Close the front bezel swinging it to the left where it will engage the release tabs 3 Push the upper ...

Page 27: ...ion 2 Use two hands to place the left side cover s lower edge at an angle to the hinge tabs along the bottom of the chassis See Figure 3 5 The hinge tabs are keyed to accept only the left side cover See Figure 3 5 3 With the left side cover resting on the hinge tabs tilt the side cover up until it engages the locking mechanism at the top of the chassis 4 Lift the latch to engage the lock and compl...

Page 28: ... Closing the HP Server 22 Hinge Tabs Latch Figure 3 5 Replacing the Left Side Cover 5 If you want the left side cover locked turn the key to re lock the left side cover with the lock at the rear of the Server See Figure 3 1 ...

Page 29: ...SCSI Tools Required The following tools may be needed to attach the mass storage devices to the drive trays or drive cage Check the mass storage device s documentation for additional tool requirements Torx T 15 driver inch flat blade screwdriver Mass Storage Guidelines General Guidelines o Use care when unpacking and handling the hard disk drives The hard disk drives are very susceptible to mechan...

Page 30: ...d optional hard drive but this cable is not provided for the SCSI model The bundled IDE CD ROM and hard disk drive were put on separate IDE connectors to improve performance SCSI Devices o Use only low voltage differential LVD SCSI devices o Do not use high voltage differential HVD SCSI devices in the Server or damage to the controller and other devices may occur o Ensure the SCSI devices you inst...

Page 31: ...4 32 bit slot 8 PCI slot P5 32 bit slot SCSI Model Boot Order 1 Flexible disk drive 2 IDE CD ROM drive 3 IDE hard drive if boot drive 4 SCSI devices 5 PCI slot P1 32 bit slot 6 PCI slot P2 32 bit slot 7 PCI slot P3 32 bit slot 8 PCI slot P4 32 bit slot 9 PCI slot P5 32 bit slot The SCSI Controller in the Server scans for a boot device starting at device ID 0 and works up through the ID numbers 0 1...

Page 32: ... the IDE 1 for the boot drive and the IDE 2 connector for the IDE CD ROM The Setup Utility BIOS can be used to change the boot order of the flexible disk drive and the IDE devices Refer to Chapter 8 Configuring the HP Server for more information IDE Mass Storage Additions Table 4 1 lists the number and types of mass storage devices that may be added to the IDE model of the HP Server Table 4 1 IDE ...

Page 33: ...onnect high voltage differential HVD SCSI devices on the SCSI bus or you will damage the other LVD SCSI devices The single channel Ultra 160 PCI SCSI controller board provided with the SCSI model includes two SCSI connectors and is normally installed in PCI slot P1 The SCSI cable provided has 5 connectors 4 for SCSI devices and 1 for the SCSI controller board and one terminator on the end of the c...

Page 34: ... control up to 15 external SCSI devices The secondary IDE IDE 2 cable is connected to the factory installed CD ROM drive and configured as master unless 3rd hard drive installed and configured as master device The primary IDE connector IDE 1 is available on the SCSI model but is not supported by Hewlett Packard A 50 to 68 pin SCSI adapter is provided with the HP backup tape drive The single channe...

Page 35: ...stall and remove connectors carefully and avoid displacing any of the pins in the connector Shelf 5 2nd Hard Drive Optional Shelf 3 Backup Tape Drive Optional Shelf 2 CD ROM Shelf 1 FDD Latch Release Drive Cage Figure 4 1 Mass Storage Locations 5 Press down and pull out on the latch release of the drive cage located just inside the chassis See Figures 4 1 and 4 2 6 Remove the drive cage from the c...

Page 36: ... IDE hard drive set the second drive for slave The second IDE drive will share the same IDE cable IDE 1 with the first hard disk drive which is set for master Refer to the documentation provided with the hard drive c If mounting a SCSI hard drive ensure it is not terminated and set the SCSI ID jumper for address ID 1 Refer to the documentation provided with the hard drive 8 Slide the drive into th...

Page 37: ...cure the drive to the drive cage See Figures 4 2 and 4 3 NOTE You might find it easier to mount the drive if you turn the drive cage upside down to mount the hard drive Mounting tabs Figure 4 3 Drive Cage Mounting 10 Reinstall the drive cage into the chassis Ensure the tabs at the top of the drive cage slide into the slots provided See Figures 4 2 and 4 3 11 Connect the data cable to the hard disk...

Page 38: ...ting brackets and is different from the second and third drive trays The second and third drive trays are identical and would require mounting brackets 1 If the Server is already installed and operating power down the Server as described in Chapter 2 Controls Ports and Indicators 2 Disconnect the power cables and any external cables connected to the Server If necessary label each one to expedite r...

Page 39: ...g screws is not covered by the HP warranty 7 Install the hard disk drive as described below a Place the hard disk drive into the tray and use the screws provided to secure it to the tray from the bottom See Figure 4 4 b Insert the hard disk drive assembly into the fourth shelf See Figure 4 4 The tabs should snap into place when the drive tray is pushed all of the way into the fourth shelf B A Figu...

Page 40: ... cord and then restore power to the Server The BIOS and SCSISelect utilities automatically detect the new hard drives IDE or SCSI but you should check the BIOS and SCSISelect settings and make changes as necessary Installing an Optional Backup Tape Drive The optional HP SureStore DAT 24i backup tape drive is a single ended device and may slow down the disk access time for the Ultra 160 SCSI drives...

Page 41: ...inch mounting brackets installed on the tape drive If not follow the instructions provided with the tape drive to connect the 5 inch mounting brackets to the tape drive before installing the tape drive into the third drive tray b Insert the backup tape drive mounted in the tray into the third shelf The tabs should snap into place when the third drive tray is pushed all of the way into the third sh...

Page 42: ...r 12 Replace the external cables power cord and then restore power to the Server The SCSISelect Utility automatically detects the new SCSI backup tape drive but you should check the SCSISelect settings and make changes as necessary B A RFI Shield Figure 4 5 Adding the Optional Backup Tape Drive ...

Page 43: ...ut the EDO DIMMs and PC 100 SDRAM will not function properly To ensure you have the correct DIMMs before installation refer to one of the following for a list of qualified DIMMs HP Order Assistant on the HP web site at http www hp com HP Customer Service Tools Required Use an anti static service kit 3M 8501 8502 8503 or equivalent This kit includes a static dissipating work surface a chassis clip ...

Page 44: ...one to expedite re assembly 3 Remove the side cover and lay it aside Refer to Chapter 3 Opening and Closing the HP Server WARNING The power supply will continue to provide standby current to the Server tc2100 until the power cable is disconnected 4 Lay the Server on its side components showing for the best access to the DIMM slots CAUTION The memory modules DIMMs are sensitive to static electricit...

Page 45: ...DIMM Slot Locations 5 Locate the DIMM slots and select a DIMM slot for installation See Figure 5 2 DIMMs may be installed in any combination in any slot but HP recommends starting at slot 1 and filling the slots in order with the largest size first in slots 1 2 and 3 ...

Page 46: ... on System Board 6 Remove a DIMM from its container handling the module by its edges Use only HP PC133 133 MHz buffered ECC SDRAM DIMMs CAUTION The DIMM should be left in the anti static container or placed on an anti static surface until you are ready to install it into the DIMM slot ...

Page 47: ...es on the DIMM with the keys on the slot See Figure 5 3 DIMM Slot Keys Notches Retaining Latches Figure 5 3 DIMM to Slot Alignment 9 Holding the DIMM at 90 degrees to the system board press the DIMM fully into the slot until the retaining latches close See Figure 5 4 If the latches do not close the DIMM is not inserted correctly ...

Page 48: ...MM module to downsize your memory configuration or to replace a defective DIMM 1 If the Server is already installed and working power down the Server Refer to Chapter 2 Controls Ports and Indicators 2 Disconnect the power cables and all external cables If necessary label each one to support re assembly WARNING The power supply will continue to provide standby current to the Server until the power ...

Page 49: ...HP Server 4 Lay the Server on its side with the components up 5 Open the retaining latches 6 Lift the DIMM completely away from the slot 7 Place the DIMM in its anti static container 8 Repeat Steps 5 7 for as many DIMMs as you need to remove 9 When you have completed removal and installation of DIMMs as required close the Server and restore power ...

Page 50: ......

Page 51: ... support CAUTION Some accessory board outputs may exceed U S National Electrical code NFPA 70 Class 2 or limited power source limits and must use appropriate interconnecting cabling in accordance with the National Electrical Code NOTE All Hewlett Packard accessory boards comply with the U S National Electrical code NFPA 70 Class 2 Refer to Chapter 8 Configuring the HP Server for more information T...

Page 52: ...y controller board to the HP Server tc2100 HP recommends installing the HP NetRAID 1M PCI board in slot 1 or 2 depending on the Server model IDE or SCSI When installing a disk array controller board you may alter the Server s boot order to allow the Server to boot off one of the array s drives This boot order can be changed under the Boot menu of the Server s BIOS Setup Utility Boot Priority The S...

Page 53: ... IDE hard drive boot drive 12 PCI slot P1 32 bit slot 13 PCI slot P2 32 bit slot 14 PCI slot P3 32 bit slot 15 PCI slot P4 32 bit slot 16 PCI slot P5 32 bit slot SCSI Model Boot Order 10 Flexible disk drive 11 IDE CD ROM drive 12 IDE hard drive if boot drive 13 SCSI devices 14 PCI slot P1 32 bit slot 15 PCI slot P2 32 bit slot 16 PCI slot P3 32 bit slot 17 PCI slot P4 32 bit slot 18 PCI slot P5 32...

Page 54: ... Wear a wrist strap and use a static dissipating work surface connected to the chassis when handling components Ensure the metal of the wrist strap contacts your skin 4 Lay the Server on its side components showing for the best access to the accessory board slots 5 Read the documentation included with the accessory board and follow any special instructions NOTE Adding a PCI to PCI bridge board to ...

Page 55: ... the HP web site for specific slot recommendations for a particular PCI board type 7 Remove the slot cover latch by a Lift up on the tab of slot cover latch b Raise the slot cover latch up from the slot covers c Remove it from the chassis and keep it for reassembly See Figure 6 2 You may need to lift the slot cover latch out of its retainer before lifting it out of the chassis ...

Page 56: ... Additional Boards 50 Slot Cover Latch Latch Retainer A B C Figure 6 2 Removing the Slot Cover Latch 8 Move the top of the desired slot cover away from the chassis and then lift it up and out of the chassis See Figure 6 3 ...

Page 57: ...gure 6 3 Removing the Slot Cover NOTE Ensure you save the slot covers for use later to prevent EMI interference These slot covers make a better metal to metal contact than previous slot cover designs 9 Slide the accessory board into the slot See Figure 6 4 ...

Page 58: ... 4 Inserting an Accessory Board 10 Replace the slot cover latch to secure the accessory board in the reverse order shown in Figure 6 2 The slot cover latch should snap in place NOTE You may need a plastic extension to secure any full length boards in PCI slots P1 through P5 See Figure 6 5 ...

Page 59: ...of your existing system software or included on a flexible diskette or CD ROM provided with the accessory board Removing Accessory Boards Apply the same steps as the installation procedure in reverse Replace the slot cover See the preceding sections for details NOTE Ensure you use a slot cover to seal the unused board slot to prevent EMI interference These slot covers make a better metal to metal ...

Page 60: ......

Page 61: ...l control devices including the UPS and monitor to the HP Tower Server tc2100 NOTE The two USB connectors are reserved for printers external modems a keyboard and a mouse but support for these USB devices is NOS dependent Power Mouse Keyboard USB 2 LAN COM 2 Parallel Video COM 1 Figure 7 1 Rear Panel Ports ...

Page 62: ... HP Server s power supply set the input voltage selector to the correct input voltage 3 Check the input voltage selector to ensure you have the correct input voltage selected Connecting the UPS Uninterruptible Power Supply If you don t use a UPS with the Server you may experience an arching effect when you plug in the power cord to the AC power source This is normal due to the high inrush current ...

Page 63: ...led all of the optional accessories For more information on the overall process refer to Chapter 1 Setting Up the HP Server HP Startup CD ROM This CD ROM allows you to access and copy the needed utilities and drivers to flexible diskettes which can used to configure the Server Some NOS drivers are copied directly to the Server from the Startup CD NOS Drivers The NOS drivers are copied from the Sta...

Page 64: ...on on the next few pages for more information Accessing the HP Startup CD ROM The HP Startup CD ROM is accessed using two methods which is based on where your are in the installation and verification process Windows method This method allows you to run the HP Startup CD ROM on any Windows PC with an HTML browser to access the contents of the HP Startup CD ROM The CD ROM should auto start but if it...

Page 65: ...ettes In some cases you will use the diskettes to load the appropriate drivers onto the Server or load the drivers directly from the Startup CD ROM onto the Server Refer to the Welcome menu on the Startup CD ROM DiagTools This utility provides an easy to use hardware diagnostic for Server verification burn in and rapid troubleshooting It is launched from the CD ROM when the Startup CD ROM is used ...

Page 66: ...ar The Setup Utility provides a menu bar with several menu selections The menu bar choices are Main Use this menu option to set the Server time date and the following features o Flexible Disk Drive Enable or disable the floppy disk drive controller o IDE Devices Set primary master slave secondary master slave relationships on IDE devices and set the local bus IDE adapter o Memory Shadow Enable dis...

Page 67: ...creen instructions for more details o Reset Configuration Data Set to No as the default Refer to onscreen instructions for more details Security Use this menu option to set BIOS access boot on password protections and hardware security options Two levels of BIOS access Supervisor and User are available under Security o The Supervisor password must be set before setting the User password Once the S...

Page 68: ...AC power loss If the system was off before the AC power loss it will stay off until you power it on Set to Disabled if you want the system to stay off in all cases after an AC power loss o Fan Control Set to By Sensor by default this feature allows the system fan to run at Full Speed all the time or control the fan speed using the heat sensor when set to By Sensor When set to By Sensor the system ...

Page 69: ...Esc key on one of the top level screens the Exit menu appears If you press Esc on a submenu the previous screen appears When you are making selections from a pop up menu use the Esc key to close the pop up without making a selection Changing the System Date and Time Use this topic to change the HP Server s date and time and refer to the following procedure 1 To reach the Setup Utility boot or rebo...

Page 70: ...Choose Exit Saving Changes from the list of exit options then press Enter A dialog appears and asks you to confirm your decision 13 Choose Yes and then press Enter The HP Server reboots and the date and time changes have been accepted Setting Boot Passwords Use this topic to set a password for accessing the BIOS configurations with a Supervisor and User password but the User password has limited B...

Page 71: ...r to Resetting Lost Passwords in Chapter 9 Troubleshooting NOTE You must set the Supervisor password before setting the User password The Supervisor password is the only password required to configure the HP Server to boot with a password 3 Press the Enter key to enter a new Supervisor password A pop up menu appears titled Set Supervisor Password The password is limited to eight alphanumeric chara...

Page 72: ... and save changes 8 If you want to enter a User password use the arrow key to scroll to the Set User Password Enter field and repeat Steps 3 6 for the User password 9 If you want to set a Password for access to the Flexible Disk Drive scroll down to Diskette Access Supervisor or User and select your choice of access control 10 If you want to set a Boot Password scroll down to Password on Boot Disa...

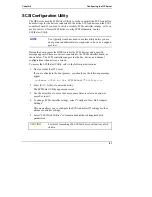
Page 73: ...e SCSI controller board as shown below The SCSI controller can provide the bus device and channel configurations when active on screen To access the SCSISelect Utility refer to the following instructions 1 Boot or reboot the HP Server If you are already in the boot process you should see the following message appear Press Ctrl A for SCSISelect Utility 2 Press Ctrl A keys to enter the utility The S...

Page 74: ......

Page 75: ...r your system troubleshooting o Technical information Data sheets Application notes Configuration guides installation tips product papers reference material and more o Compatibility issues HP Accessories OS NOS HP third party parts compatibility information o Manuals Easy installation and configuration of your HP Server o Parts service Information on replacement parts exploded views and configurat...

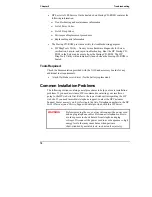
Page 76: ...nal tool requirements inch flat blade screw driver for the battery replacement Common Installation Problems The following sections contain general procedures to help you locate installation problems If you need assistance HP recommends contacting your reseller or going to the HP web site first Refer to the topics listed earlier regarding the HP web site If you need immediate telephone support cont...

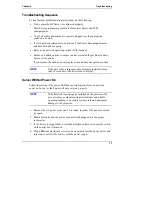
Page 77: ... has a large amount of memory installed it may take 30 seconds for the first screen to display Server Will Not Power On Follow these steps if the power LED does not light green after you press the power on button or the Server will not power on properly NOTE If the heatsink is not properly installed on the processor the processor may overheat causing intermittent or unreliable operation leading to...

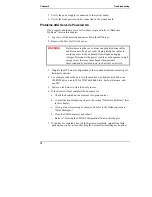
Page 78: ... circuited by metal objects such as tools or jewelry 3 Simplify the HP Server configuration to the required minimum removing all third party options 4 For example reduce the Server to the monitor one flexible disk drive one CD ROM drive one SCSI or IDE hard disk drive keyboard mouse and one NIC 5 Power on the Server to start the boot process 6 If the Server will not complete the boot process a Che...

Page 79: ...e codes listed in Chapter 5 Error Messages of the HP Server tc2100 Service Guide Beep Codes These are a series of audible beeps which occur during the boot process before the video display can initialize allowing the visual messages of the POST routines to appear If you hear a series of audible beeps before the video appears on screen refer to the beep codes listed in Chapter 5 Error Messages of t...

Page 80: ...h accessory board o Check all internal cabling and connections o If you have changed any switches on the system board verify each one is properly set NOTE Only two of the eight switches on configuration switch are used 5 Replace the cover and connect all cables 6 Turn on the monitor and Server 7 If the Server still does not work o Repeat steps 1 2 and 3 of this section o Remove all accessories exc...

Page 81: ...found Verify the desired boot drive has power and its IDE or SCSI cable is connected Verify the IDE or SCSI cable is securely plugged into the IDE or SCSI connector on the system board or SCSI controller Verify the boot device is enabled in the Setup Utility under the Boot menu Verify the boot device has an operating system installed If the problem persists contact your HP support organization Key...

Page 82: ...e error codes POST codes appear in normal video if an error condition occurs during the boot process of the HP Server tc2100 All the codes and the respective descriptions are listed in Chapter 5 Error Messages of the HP Server tc2100 Service Guide The Service Guide is located on the HP Startup CD ROM provided with this HP Server These codes will appear on the display monitor provided it and the su...

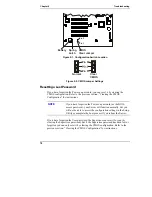
Page 83: ...er 2 Move jumper from its Normal position Pins 1 2 on the system board to the Clear CMOS position Pins 2 3 See Figures 9 1 and 9 2 3 Turn on power to the Server A message displays indicating the configuration has been cleared 4 Turn off power to the Server 5 Return the jumper on the system board to the Normal position Pins 1 2 6 Replace the side cover 7 Turn on power to the Server and the followin...

Page 84: ...or instructions NOTE If you have forgotten the Power on password or the BIOS access password your Server will function normally but you will not be able to access the configuration settings in the Setup Utility or complete the boot process if you reboot the Server If you have forgotten the User password the Supervisor can reset it for you by clearing the Supervisor password but if the Supervisor p...

Page 85: ...each one from the power outlet o Disconnect the video cable from the Server and examine the video cable connector pins to see if any are bent o If any of the pins are bent carefully straighten each one o If you have manually configured any accessories verify each one does not use the same I O address as the integrated video interface 03B0h to 03DFh Refer to the documentation supplied with the acce...

Page 86: ... is configured correctly in the menu located under the Security menu in the Setup Utility 4 If you intend to boot from the CD ensure the option is enabled in the Setup Utility 5 For further information refer to your CD ROM documentation SCSI Device Does Not Work If error messages display on the monitor indicating a failure of a SCSI hard disk or tape backup device perform these checks 1 Verify the...

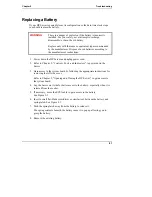
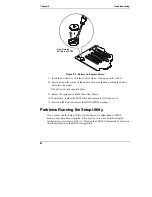
Page 87: ...er 2 Controls Ports and Indicators to power down the Server 3 Gain access to the system board by following the appropriate instructions for removing the left side cover Refer to Chapter 3 Opening and Closing the HP Server to gain access to the system board 4 Lay the Server on it side for better access to the battery especially when it is released from the socket 5 If necessary move the SCSI cable ...

Page 88: ... place 11 Ensure the spring latch holds the battery firmly 12 If necessary replace the SCSI cable and replace the left side cover 13 Power on the Server and reset the BIOS CMOS settings Problems Running the Setup Utility If you cannot run the Setup Utility the HP Server s configuration in CMOS memory may have been corrupted The only way to recover from a corrupted configuration is to clear it Refe...

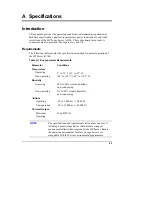
Page 89: ... Requirements Parameter Conditions Temperature Operating 5 to 35 C 41 to 95 F Non operating 40 to 65 C 40 to 149 F Humidity Operating 20 to 80 relative humidity non condensing Non operating 5 to 95 relative humidity non condensing Altitude Operating 30 to 3 000 m 10 000 ft Non operating 30 to 12 000 m 40 000 ft Thermal Output Maximum Operating 1066 BTU hr NOTE The specifications and requirements l...

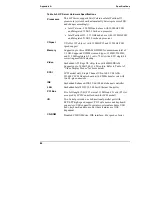
Page 90: ...gle bit correcting multi bit detecting Video Embedded ATI Rage XL chip video with 4MB SDRAM Supports up to 1600x1200 65K colors Refer to Table A 5 Video Display Modes for more details SCSI SCSI model only Single Channel Ultra 160 LVDs AHA 29160LP SCSI Adaptec board at 160 MB s transfer rate with two 68 pin connectors IDE Embedded Enhanced IDE 33 66 100 dual channel controller LAN Embedded Intel 82...

Page 91: ...ual voltage selection 100 to 127 VAC at 50 60 Hz Input Range Maximum 200 to 240 VAC at 50 60 Hz Operating Current 100 to 127 VAC 7 0 A 200 to 240 VAC 3 5 A In rush Current 90 A cold 120 A warm Operating Power 250 W Continuous Table A 5 Video Display Modes Resolution Max Refresh Rate 256 Colors Max Refresh Rate 65K Colors Max Refresh Rate 16 7M Colors 640x480 200 Hz 200 Hz 200 Hz 800x600 200 Hz 200...

Page 92: ... Fan Video L Com 1 L Com 2 Parallel U Mouse U Keyboard L 2 USB L LAN U CPU Fan Power Processor Heatsink Fan 1 2 PCI Slot P5 3 PCI Slot P4 PCI Slot P3 PCI Slot P2 PCI Slot P1 Beep Code Speaker Pin 1 Pin 3 SCSI Controller LED Headers Figure A 1 System Board Components Connectors Illustration Notes L Lower connector s U Upper connector s ...

Page 93: ...er equipment you have purchased has been provided with a compliance label to indicate where it may be used with reasonable protection to the environment in which it is used Additional statements are provided below as required by the requirements of international and domestic regulations NOTE Check the label on your product to determine the level of operation Notice for United States Class AEquipme...

Page 94: ...e to radio communications However there is no guarantee that interference will not occur in a particular installation If this equipment does cause harmful interference to radio or television reception which can be determined by turning the equipment off and on the user is encouraged to correct the interference by one or more of the following measures Reorient or relocate the receiving antenna Incr...

Page 95: ...1 IEC 60825 1 1993 A1 EN 60825 1 A11 Class 1 Laser LED EMC CISPR 22 1997 EN 55022 1998 CISPR 24 1997 EN 55024 1998 IEC 61000 3 2 1995 EN 61000 3 2 1995 A14 IEC 61000 3 3 1994 EN 61000 3 3 1995 Supplementary Information The product herewith complies with the requirements of the Low Voltage Directive 73 23 EEC and the EMC Directive 89 336 EEC and carries the CE marking accordingly Date September 12 ...

Page 96: ...afety United States CAUTION This CD ROM mass storage system contains a laser system and is classified as a Class 1 Laser Product under a U S Department of Health and Human Services DHHS Radiation Performance standard according to the Radiation Control for Health and Safety Act of 1968 To ensure proper use of this product please read this instruction manual carefully and retain for future reference...

Page 97: ...er Dispose of used batteries according to the manufacturer s instructions Accessory Board Safety Statements Accessory Board Safety United States CAUTION Some accessory board outputs may exceed U S National Electrical code NFPA 70 Class 2 limited or power source limits and must use appropriate interconnecting cabling in accordance with the National Electrical Code NOTE All Hewlett Packard accessory...

Page 98: ......

Page 99: ...93 C Service and Support For all service and support information see the HP Server Warranty and Service Support Booklet included with your product ...

Page 100: ......

Page 101: ...anying Software unless you have a separate signed agreement with HP License Grant HP grants you a license to Use one copy of the Software Use means storing loading installing executing or displaying the Software You may not modify the Software or disable any licensing or control features of the Software If the Software is licensed for concurrent use you may not allow more than the maximum number o...

Page 102: ...lure to comply with any of these License Terms Upon termination you must immediately destroy the Software together with all copies adaptations and merged portions in any form Export Requirements You may not export or re export the Software or any copy or adaptation in violation of any applicable laws or regulations U S Government Restricted Rights The Software and any accompanying documentation ha...

Page 103: ...access 61 IDE boot order 62 IDE master slave 60 legacy USB support 61 network boot order 62 password on boot 61 processor idle mode 62 resume on time 62 resume operation on time 62 scheduled events 62 SCSI boot order 62 standby timeout 62 supervisor password 61 system fan speed 11 62 user password 61 boot device priority boot order 25 boot from CD ROM HP DiagTools Utility 70 boot order boot device...

Page 104: ...E CD ROM 24 low voltage differential SCSI 24 duplexing SCSI hard drives 28 E efficient set up 1 Electromagnetic Compliance 87 environmental specifications 83 Environmental specifications 83 error codes POST 73 error codes HP Tape Drive 9 error messages 73 POST 73 75 F fan speed BIOS settings 62 forgotten password 78 front panel power switch 7 front panel LEDs 7 H hard disk drive troubleshooting 80...

Page 105: ...oting 80 L LED indicator Drive activity 8 LAN activity 8 power 8 sleep state 8 LEDs front panel 7 lost BIOS configuration troubleshooting 81 lower bezel LEDs 7 M mass storage installation 23 mass storage devices boot device priority 25 memory installation 37 installation guidelines 37 monitor troubleshooting 79 video connection 55 monitor port 10 mouse 55 mouse troubleshooting 80 N NOS drivers 6 N...

Page 106: ...t Safety 90 Q quick overview 1 R ReadFirst sheet 1 rear panel ports 55 Regulatory Notices Electromagnetic Compliance 87 Regulatory Notices Product Safety 90 retaining latches DIMMs 41 RFI shield 35 S SCSI external connector 10 SCSI controller ID 25 SCSI device troubleshooting 80 SCSI ID setting 30 32 35 SCSISelect Utility change boot order 46 security keylock 10 serial ports 55 serial ports 10 Ser...

Page 107: ...system support 93 T tape backup device troubleshooting 80 tape backup drive 50 to 68 pin adapter 24 troubleshooting battery problems 81 CD ROM drive 80 heatsink problems 71 keyboard 80 mouse 80 process steps 71 troubleshooting basics 70 hardware problems 79 POST error messages 75 tools 69 Web based 69 Troubleshooting service and support 93 U Ultra 160 SCSI speed limitation 34 35 Uninterruptible Po...

Reviews: