background image

11b Planning the SAS con

fi

guration

11805

The server must have a SAS HBA with an external connector. Most SAS

RAID controllers do not support Tape Autoloaders.
If your HBA has a different SAS connector than the one on the cable

supplied with the product, see the HP StorageWorks 1/8 G2 Tape

Autoloader QuickSpecs at

http://www.hp.com/go/tape

for a list of

supported cables.

WARNING!

Do not connect the Autoloader to a SAS RAID controller

unless the EBS compatibility matrix shows that the controller is

quali

fi

ed with the Autoloader. The server might not be able to

boot when the Autoloader is connected to a non-supported

SAS RAID controller. See the EBS compatibility matrix at

http://www.hp.com/go/ebs

/.

12 Changing the SCSI ID

On a parallel SCSI Autoloader, if you need to change the SCSI ID, do

so before connecting the Autoloader to the host computer.

1.

Plug the power cable into the Autoloader and the power outlet.

2.

Power on the Autoloader by pressing the power button on the front

panel.

11807

3.

On the front panel, press

Enter

.

4.

Press

Next

until the display shows

Configuration

. Press

Enter

.

5.

Press

Next

until the display shows

Change Drive SCSI ID

.

Press

Enter

.

6.

Press

Next

until the display shows the new SCSI ID. Press

Enter

.

13a Connecting a parallel SCSI

Autoloader

11135

NOTE:

A parallel SCSI LTO-3 or LTO-4 tape drive should be the only

device on the bus. A maximum of two LTO-2 tape drives can

be on a single Ultra320 bus.

Attach one end of the parallel SCSI cable to one of the connectors on

the tape drive. Attach the other end of the cable to the host bus adapter

(HBA) or to the connector on the previous device on the SCSI bus.
If the Autoloader is the last or only device on the SCSI bus, attach

a terminator to the remaining SCSI connector on the tape drive.

Otherwise, attach a SCSI cable to the next device on the SCSI bus.

Make sure that the last device on the SCSI bus is properly terminated.

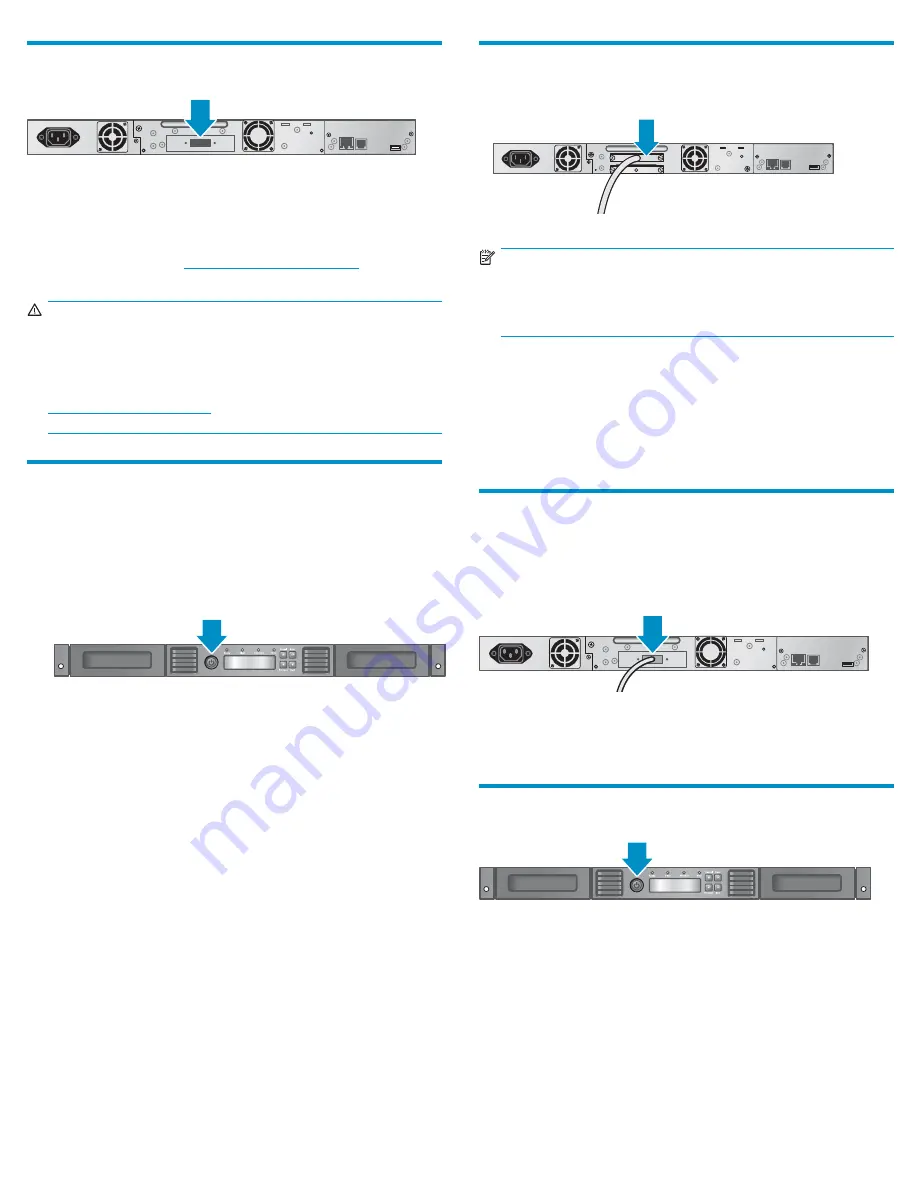
13b Connecting a SAS Autoloader

SAS signal rates require clean connections with a minimum number of

connections between the HBA and the Autoloader. Do not use adapters

or converters between the HBA and the Autoloader. HP recommends a

maximum SAS cable length of six meters.

11804

Attach a mini-SAS connector on the SAS cable to the tape drive. If the

cable has a mini-SAS connector on each end, you may connect either

end to the tape drive. Attach the other connector to the HBA.

14 Powering on the Autoloader

11807

To use the web-based management interface, plug one end of the

Ethernet cable into the Ethernet port on the back of the Autoloader. Plug

the other end of the cable into an Ethernet LAN port.
Plug the power cable into the Autoloader and the power outlet.
Power on the Autoloader using the power button located on the front

panel. Check the LCD screen to make sure the Autoloader is receiving

power.
Power on the host server and all devices you powered off earlier.

Page 7

Summary of Contents for StorageWorks 1/8 G2

Page 1: ...upported for the Autoloader to work properly If you are not mounting the Autoloader in a rack ensure that the feet are properly installed and that all of the feet are standing on a sturdy level surface WARNING The Autoloader weighs 1 1 5 kg 25 4 lb without media and 13 1 kg 28 9 lb with media 8 cartridges When moving the Autoloader to reduce the risk of personal injury or damage to the device Obse...

Page 2: ...et port 6 Serial port Factory use only 7 USB port 8 Shipping lock storage slot 9 68 pin HD SCSI connector 10 Pull out tab containing product information 1 1 Tape drive LED Back panel overview SAS 11238 5 11 6 7 3 4 4 1 2 2 8 9 10 1 Power connector 2 Fan 3 Tape drive 4 Magazine release hole 5 Ethernet port 6 Serial port Factory use only 7 USB port 8 Shipping lock storage slot 9 SAS connector 10 Pul...

Page 3: ...ser HP recommends that when possible the RMI be used as the primary Autoloader interface because the web interface provides access to additional features includes online help and is easier to use However the RMI is not required to use the product except to configure SNMP and IPv6 The only tasks you cannot do from the RMI are Opening the mailslot Initiating the Wellness test Saving and restoring fi...

Page 4: ...ources of particulate contamination Avoid areas near frequently used doors and walkways stacks of supplies that collect dust printers and smoke filled rooms Do not place the Autoloader on the floor or other carpeted surface Do not place the Autoloader on its side or upside down Do not stack items on top of the Autoloader unless it is installed in the tabletop conversion cover 2 Unpacking the Autol...

Page 5: ...r right side up 5 Removing and storing the shipping lock 11133 IMPORTANT Shipping lock The shipping lock must be removed for the robotics to work properly A robot move error is displayed if the shipping lock is not removed The shipping lock prevents the robotic transport mechanism from moving during shipment and must be removed and stored before powering on the Autoloader Locate the adhesive tape ...

Page 6: ... support is enabled for the HBA and operating system Check the EBS matrix at http www hp com go ebs to verify that your HBA is supported on your host computer and qualified with the Autoloader Install the HP Library Tape Tools diagnostic utility available from http www hp com support TapeTools to see what devices are connected to the host verify the installation upgrade firmware and to aid in trou...

Page 7: ...y device on the bus A maximum of two LTO 2 tape drives can be on a single Ultra320 bus Attach one end of the parallel SCSI cable to one of the connectors on the tape drive Attach the other end of the cable to the host bus adapter HBA or to the connector on the previous device on the SCSI bus If the Autoloader is the last or only device on the SCSI bus attach a terminator to the remaining SCSI conn...

Page 8: ...ditional IPv6 settings 6 Press Cancel until the display shows the Home screen If you enabled IPv6 you must continue configuring IPv6 from the RMI after setting the administrator password You can find the IPv6 IP address obtained by the Autoloader from the OCP Information Status Network Information menu item See the HP StorageWorks 1 8 G2 Tape Autoloader Addendum included in the product documentati...

Page 9: ...2 2 1 When possible release the magazines from the control panel or RMI If you must remove the magazines from both sides of the Autoloader at the same time or when the Autoloader is not powered on 1 insert a straightened paper clip or small metal pin about 1 cm 0 5 inch into the magazine release hole while 2 another person pulls out the magazine from that side IMPORTANT Inserting the metal pin mor...

Page 10: ...luded with the product documentation and the HP StorageWorks 1 8 G2 Tape Autoloader User and service guide on the documentation CD for more information about these features and instructions for their configuration Configuring IPv6 networking Enabling and configuring SNMP network management Setting up email event notification Naming the Autoloader If you have the HP StorageWorks LTO 4 Encryption Ki...

Page 11: ... Mailslot Change Admin Password Run Demo Run Slot To Slot Test Run Wellness Test Force Drive To Eject Tape Autoloader Warning Log Autoloader Error Log Download Support Ticket HP Service Area Upgrade Firmware Move Tape Clean Drive Perform Inventory Reboot Autoloader Enable Autoloader Password Locks Set Reserved Slot Count Configure Mailslot Barcode Format Reporting Change Drive SCSI ID Autoloader B...

Page 12: ...mbers Applicable error messages Operating system type and revision level Detailed specific questions For continuous quality improvement calls may be recorded or monitored HP strongly recommends that customers sign up online using the Subscriber s choice website http www hp com go e updates Subscribing to this service provides you with e mail updates on the latest product enhancements newest versio...

Reviews: