background image

7 Determining your rack type

11158

You will need a #2 and #3 Phillips screwdriver, the two rack rails, and

the packet of eight M6 screws appropriate for your rack.

The HP System/E rack has 7.1 mm round holes in the rack column.

Choose the bag labeled

HP Rack System/E

.

The HP 5000 and 10000 racks have 9.5 mm square holes in the

rack column. Choose the bag labeled

HP Rack 5000, 10000

.

8 Securing the rails to the rack

10779

Using two screws from the packet of screws for your rack and a #3

Phillips screwdriver, secure the front of one rail to the front of the rack.

Expand the rail to the depth of the rack and secure the back of the rail

to the rack. Secure the other rail in a similar fashion.
The front of the rails is straight and the back is angled, as shown.

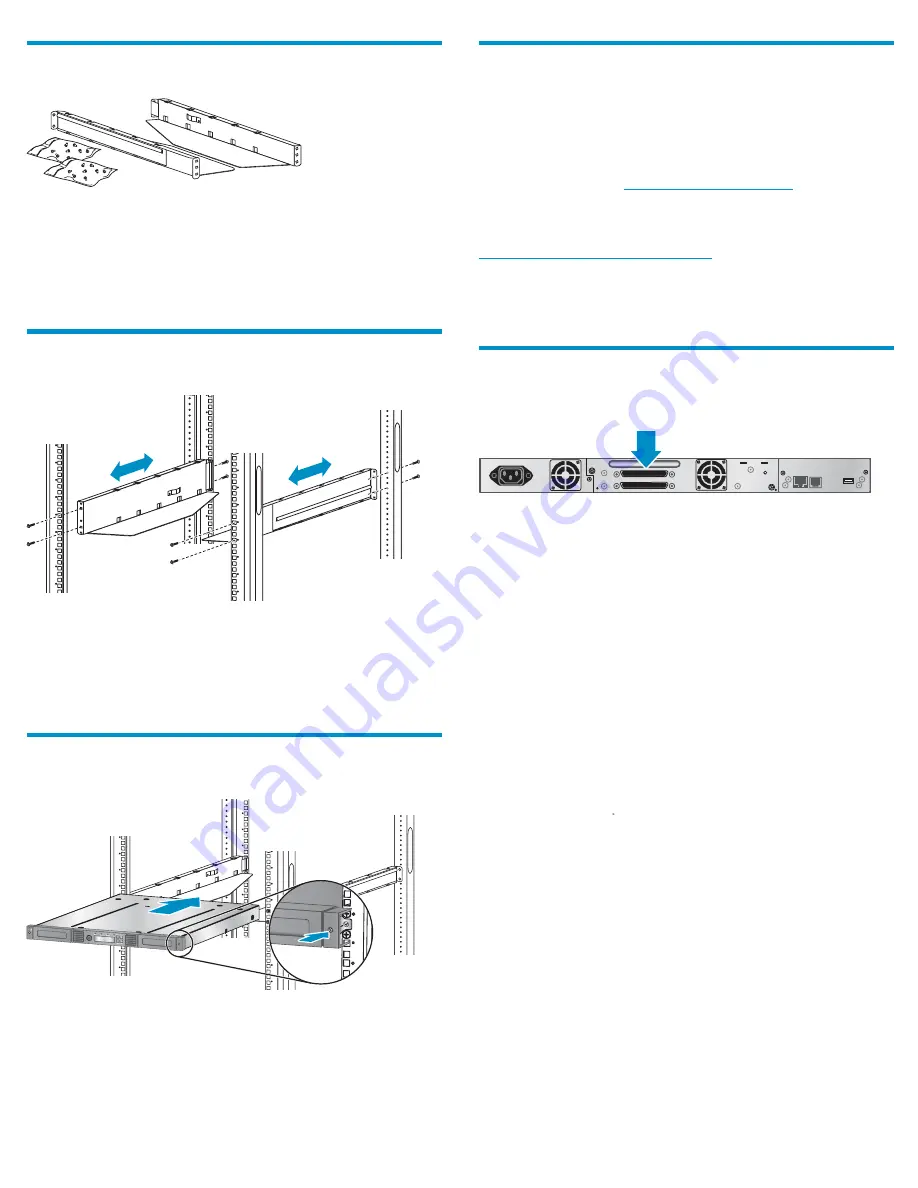
9 Installing the Autoloader

11157m

Slide the Autoloader onto the rails. Secure the front bezel to the rack

using a #2 Phillips screwdriver placed through the small hole in the

mounting bracket to tighten the captive screws on each side of the

Autoloader.

10 Preparing the host

If necessary, install software, a host bus adapter (HBA), and compatible

drivers in the host computer.
Ensure that your HBA supports multiple LUNs. Verify that multiple LUN

support is enabled for the HBA and operating system.
Check the EBS matrix at

http://www.hp.com/go/ebs

to verify that

your HBA is supported on your host computer and quali

fi

ed with the

Autoloader.
Install the HP Library & Tape Tools diagnostic utility available from

http://www.hp.com/support/TapeTools

to see what devices are

connected to the host, verify the installation, upgrade

fi

rmware, and

to aid in troubleshooting.
HP recommends that the host server be powered off before attaching

new devices.

11a Planning the parallel SCSI

con

fi

guration

11806

If you are unfamiliar with con

fi

guring parallel SCSI devices, read the

parallel SCSI con

fi

guration information in the

User and service guide

on the documentation CD.
Follow these general guidelines when planning the parallel SCSI

con

fi

guration:

The LTO-3 and LTO-4 tape drives are Ultra320 parallel SCSI devices.

Only put one LTO-3 or LTO-4 tape drive on an Ultra320 bus. Putting

an LTO-3 or LTO-4 tape drive on a lower performance bus may

degrade its performance. Do not connect an LTO tape drive to an

SE SCSI bus because it will seriously degrade performance.

The LTO2 tape drive is an Ultra160 parallel SCSI device. Up to two

LTO-2 tape drives can share an Ultra320 bus or each tape drive

can be on its own Ultra160 bus.

Avoid putting the Autoloader on the same parallel SCSI bus as a

disk drive or SE device.

The Autoloader’s default SCSI ID is 4.

Page 6

Summary of Contents for StorageWorks 1/8 G2

Page 1: ...upported for the Autoloader to work properly If you are not mounting the Autoloader in a rack ensure that the feet are properly installed and that all of the feet are standing on a sturdy level surface WARNING The Autoloader weighs 1 1 5 kg 25 4 lb without media and 13 1 kg 28 9 lb with media 8 cartridges When moving the Autoloader to reduce the risk of personal injury or damage to the device Obse...

Page 2: ...et port 6 Serial port Factory use only 7 USB port 8 Shipping lock storage slot 9 68 pin HD SCSI connector 10 Pull out tab containing product information 1 1 Tape drive LED Back panel overview SAS 11238 5 11 6 7 3 4 4 1 2 2 8 9 10 1 Power connector 2 Fan 3 Tape drive 4 Magazine release hole 5 Ethernet port 6 Serial port Factory use only 7 USB port 8 Shipping lock storage slot 9 SAS connector 10 Pul...

Page 3: ...ser HP recommends that when possible the RMI be used as the primary Autoloader interface because the web interface provides access to additional features includes online help and is easier to use However the RMI is not required to use the product except to configure SNMP and IPv6 The only tasks you cannot do from the RMI are Opening the mailslot Initiating the Wellness test Saving and restoring fi...

Page 4: ...ources of particulate contamination Avoid areas near frequently used doors and walkways stacks of supplies that collect dust printers and smoke filled rooms Do not place the Autoloader on the floor or other carpeted surface Do not place the Autoloader on its side or upside down Do not stack items on top of the Autoloader unless it is installed in the tabletop conversion cover 2 Unpacking the Autol...

Page 5: ...r right side up 5 Removing and storing the shipping lock 11133 IMPORTANT Shipping lock The shipping lock must be removed for the robotics to work properly A robot move error is displayed if the shipping lock is not removed The shipping lock prevents the robotic transport mechanism from moving during shipment and must be removed and stored before powering on the Autoloader Locate the adhesive tape ...

Page 6: ... support is enabled for the HBA and operating system Check the EBS matrix at http www hp com go ebs to verify that your HBA is supported on your host computer and qualified with the Autoloader Install the HP Library Tape Tools diagnostic utility available from http www hp com support TapeTools to see what devices are connected to the host verify the installation upgrade firmware and to aid in trou...

Page 7: ...y device on the bus A maximum of two LTO 2 tape drives can be on a single Ultra320 bus Attach one end of the parallel SCSI cable to one of the connectors on the tape drive Attach the other end of the cable to the host bus adapter HBA or to the connector on the previous device on the SCSI bus If the Autoloader is the last or only device on the SCSI bus attach a terminator to the remaining SCSI conn...

Page 8: ...ditional IPv6 settings 6 Press Cancel until the display shows the Home screen If you enabled IPv6 you must continue configuring IPv6 from the RMI after setting the administrator password You can find the IPv6 IP address obtained by the Autoloader from the OCP Information Status Network Information menu item See the HP StorageWorks 1 8 G2 Tape Autoloader Addendum included in the product documentati...

Page 9: ...2 2 1 When possible release the magazines from the control panel or RMI If you must remove the magazines from both sides of the Autoloader at the same time or when the Autoloader is not powered on 1 insert a straightened paper clip or small metal pin about 1 cm 0 5 inch into the magazine release hole while 2 another person pulls out the magazine from that side IMPORTANT Inserting the metal pin mor...

Page 10: ...luded with the product documentation and the HP StorageWorks 1 8 G2 Tape Autoloader User and service guide on the documentation CD for more information about these features and instructions for their configuration Configuring IPv6 networking Enabling and configuring SNMP network management Setting up email event notification Naming the Autoloader If you have the HP StorageWorks LTO 4 Encryption Ki...

Page 11: ... Mailslot Change Admin Password Run Demo Run Slot To Slot Test Run Wellness Test Force Drive To Eject Tape Autoloader Warning Log Autoloader Error Log Download Support Ticket HP Service Area Upgrade Firmware Move Tape Clean Drive Perform Inventory Reboot Autoloader Enable Autoloader Password Locks Set Reserved Slot Count Configure Mailslot Barcode Format Reporting Change Drive SCSI ID Autoloader B...

Page 12: ...mbers Applicable error messages Operating system type and revision level Detailed specific questions For continuous quality improvement calls may be recorded or monitored HP strongly recommends that customers sign up online using the Subscriber s choice website http www hp com go e updates Subscribing to this service provides you with e mail updates on the latest product enhancements newest versio...

Reviews: