background image

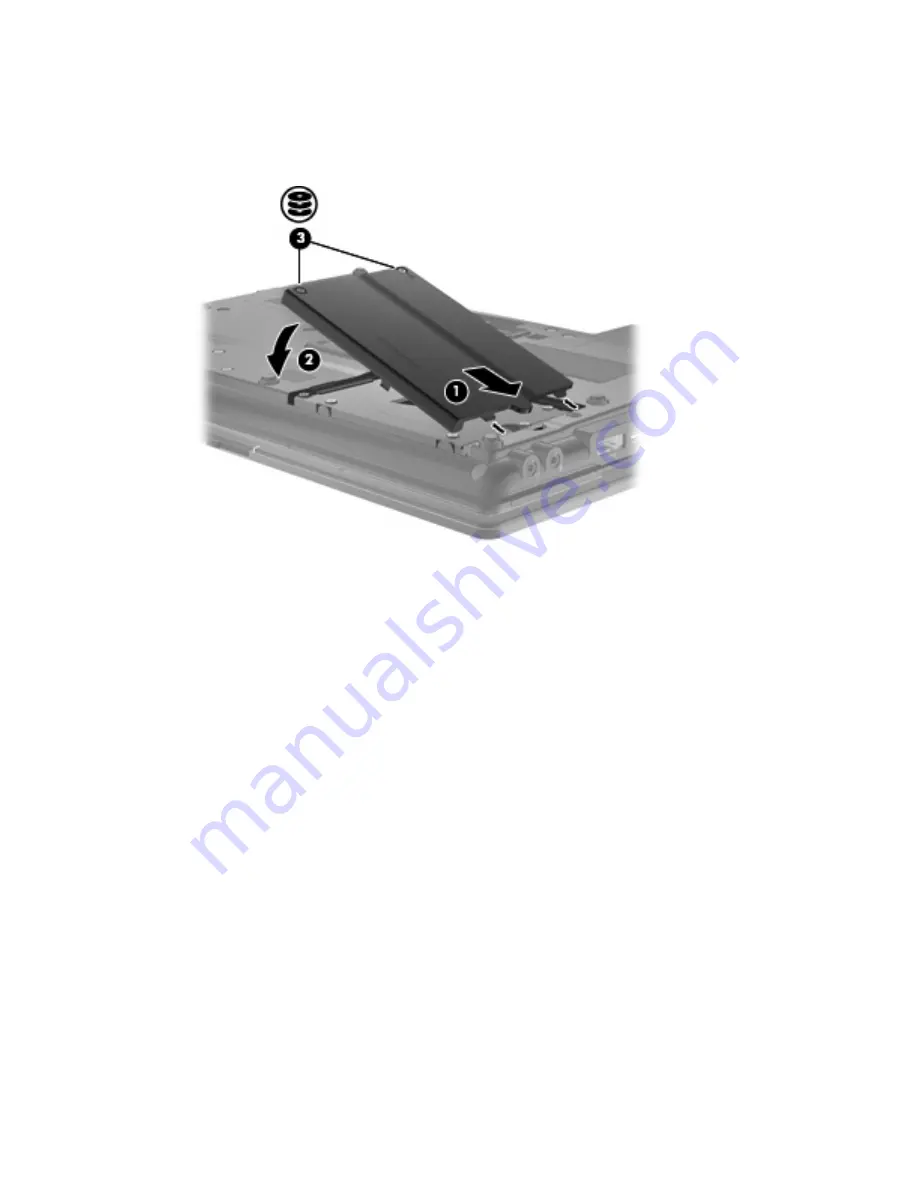
4.

Align the tabs 

(1)

 on the hard drive cover with the notches on the computer.

5.

Replace the cover 

(2)

.

6.

Tighten the hard drive cover screws 

(3)

.

7.

Replace the battery.

8.

Turn the computer right-side up, and then reconnect external power and external devices.

9.

Turn on the computer.

Replacing a hard drive in the hard drive bay

87

Summary of Contents for ProBook 6450b

Page 1: ...HP ProBook User Guide ...

Page 2: ...ademark of its proprietor The information contained herein is subject to change without notice The only warranties for HP products and services are set forth in the express warranty statements accompanying such products and services Nothing herein should be construed as constituting an additional warranty HP shall not be liable for technical or editorial errors or omissions contained herein First ...

Page 3: ...llow another hard surface such as an adjoining optional printer or a soft surface such as pillows or rugs or clothing to block airflow Also do not allow the AC adapter to contact the skin or a soft surface such as pillows or rugs or clothing during operation The computer and the AC adapter comply with the user accessible surface temperature limits defined by the International Standard for Safety o...

Page 4: ...iv Safety warning notice ...

Page 5: ...d network icons 22 Using the wireless controls 22 Using the wireless button 22 Using Wireless Assistant software select models only 23 Using HP Connection Manager select models only 23 Using operating system controls 24 Using a WLAN device select models only 25 Setting up a WLAN 25 Protecting your WLAN 25 Connecting to a WLAN 26 Roaming to another network 27 Using HP Mobile Broadband select models...

Page 6: ...g keypads 43 Using the embedded numeric keypad 43 Enabling and disabling the embedded numeric keypad 44 Switching key functions on the embedded numeric keypad 44 Using the integrated numeric keypad 44 Using an optional external numeric keypad 45 4 Multimedia Multimedia features 46 Adjusting the volume 46 Multimedia software 47 Accessing your preinstalled multimedia software 48 Installing multimedi...

Page 7: ... power plan 66 Selecting a different power plan 66 Customizing power plans 66 Setting password protection on wakeup 66 Using Power Assistant select models only 67 Starting Power Assistant 67 Using external AC power 67 Connecting the AC adapter 68 Using battery power 69 Finding battery information in Help and Support 69 Using Battery Check 69 Displaying the remaining battery charge 70 Inserting or ...

Page 8: ...n the upgrade bay 88 Removing the protective insert 88 Replacing a hard drive 88 Replacing an optical drive 92 7 External devices Using a USB device 95 Connecting a USB device 95 Removing a USB device 96 Using USB legacy support 96 Using a 1394 device 97 Connecting a 1394 device 97 Removing a 1394 device 97 Using a serial device select models only 99 Using external drives 100 Using optional extern...

Page 9: ... protection 125 Using Computer Setup security features 126 Securing system devices 126 Viewing Computer Setup System Information 126 Using Computer Setup System IDs 127 Using antivirus software 128 Using firewall software 129 Installing critical updates 130 Using HP ProtectTools Security Manager select models only 131 Installing a security cable 132 11 Software updates Updating software 133 Updati...

Page 10: ...s prompt 156 Entering MultiBoot Express preferences 156 15 Management and printing Using Client Management Solutions 157 Configuring and deploying a software image 157 Managing and updating software 158 HP Client Manager for Altiris select models only 158 HP CCM Client Configuration Manager select models only 160 HP SSM System Software Manager 161 Using the HP Universal Print Driver select models ...

Page 11: ...ntrol Panel System and Security Device Manager You can also add hardware or modify device configurations using Device Manager NOTE Windows includes the User Account Control feature to improve the security of your computer You may be prompted for your permission or password for tasks such as installing applications running utilities or changing Windows settings Refer to Help and Support for more in...

Page 12: ...uchPad button Functions like the left button on an external mouse 5 Right pointing stick button select models only Functions like the right button on an external mouse 6 TouchPad scroll zone Scrolls up or down 7 Right TouchPad button Functions like the right button on an external mouse This table describes factory settings To view or change pointing device preferences select Start Devices and Prin...

Page 13: ...f The computer is off or in Hibernation 3 Battery light Amber A battery is charging Turquoise A battery is close to full charge capacity Blinking amber A battery that is the only available power source has reached a low battery level When the battery reaches a critical battery level the battery light begins blinking rapidly Off If the computer is plugged into an external power source the light tur...

Page 14: ...QuickWeb must be enabled in Computer Setup 7 Caps lock light On Caps lock is on 8 Num lock light On Num lock is on or the embedded numeric keypad is enabled 9 Volume mute light Turquoise Speaker sound is on Amber Speaker sound is off 10 Volume down light Blinking The volume down button is being used to decrease the speaker volume 11 Volume up light Blinking The volume up button is being used to in...

Page 15: ... 3 Battery light Amber A battery is charging Turquoise A battery is close to full charge capacity Blinking amber A battery that is the only available power source has reached a low battery level When the battery reaches a critical battery level the battery light begins blinking rapidly Off If the computer is plugged into an external power source the light turns off when all batteries in the comput...

Page 16: ...light On Num lock is on or the embedded numeric keypad is enabled 9 Volume mute light Turquoise Speaker sound is on Amber Speaker sound is off 10 Volume down light Blinking The volume down button is being used to decrease the speaker volume 11 Volume up light Blinking The volume up button is being used to increase the speaker volume 12 Calculator light On The Windows calculator function is on The ...

Page 17: ...edures are ineffective press and hold the power button for at least 5 seconds to turn off the computer To learn more about your power settings select Start Control Panel System and Security Power Options 2 QuickLook button When the computer is off press the button to open HP QuickLook When the computer is on press the button to open Software Setup NOTE If Software Setup is not available the defaul...

Page 18: ... instead of a password logon Component Description 1 Power button When the computer is off press the button to turn on the computer When the computer is on press the button to shut down the computer When the computer is in the Sleep state press the button briefly to exit Sleep When the computer is in Hibernation press the button briefly to exit Hibernation If the computer has stopped responding an...

Page 19: ... the computer is off press the button to open HP QuickWeb When the computer is on press the button to open the default Web browser 4 Wireless button Turns the wireless feature on or off but does not establish a wireless connection 5 Volume mute button Mutes and restores speaker sound 6 Volume down button Decreases computer volume 7 Volume up button Increases computer volume 8 Calculator button Ope...

Page 20: ...tem functions when pressed in combination with a function key or the esc key 3 Windows logo key Displays the Windows Start menu 4 Windows applications key Displays a shortcut menu for items beneath the pointer 5 Embedded numeric keypad keys Can be used like the keys on an external numeric keypad 6 Function keys Execute frequently used system functions when pressed in combination with the fn key 10...

Page 21: ...indows Start menu 4 Windows applications key Displays a shortcut menu for items beneath the pointer 5 Integrated numeric keypad keys Can be used like the keys on an external numeric keypad 6 Function keys Execute frequently used system functions when pressed in combination with the fn key Front components Component Description 1 Webcam light select models only On The webcam is in use 2 Display rel...

Page 22: ...ilable power source has reached a low battery level When the battery reaches a critical battery level the battery light begins blinking rapidly Off If the computer is plugged into an external power source the light turns off when all batteries in the computer are fully charged If the computer is not plugged into an external power source the light stays off until the battery reaches a low battery l...

Page 23: ...rd drive 3 USB port Connects an optional USB device 4 1394 port Connects an optional IEEE 1394 or 1394a device such as a camcorder 5 RJ 11 modem jack Connects a modem cable 6 Security cable slot Attaches an optional security cable to the computer NOTE The security cable is designed to act as a deterrent but it may not prevent the computer from being mishandled or stolen Component Description 1 Med...

Page 24: ...er Left side components Component Description 1 ExpressCard slot Supports optional ExpressCards 2 Vent Enables airflow to cool internal components NOTE The computer fan starts up automatically to cool internal components and prevent overheating It is normal for the internal fan to cycle on and off during routine operation 3 DisplayPort Connects an optional digital display device such as a high per...

Page 25: ...atches your computer Component Description 1 RJ 45 network jack Connects a network cable 2 External monitor port Connects an external VGA monitor or projector 3 Power connector Connects an AC adapter Component Description 1 Security cable slot Attaches an optional security cable to the computer NOTE The security cable is designed to act as a deterrent but it may not prevent the computer from being...

Page 26: ...ce 6 Vents 6 Enable airflow to cool internal components NOTE The computer fan starts up automatically to cool internal components and prevent overheating It is normal for the internal fan to cycle on and off during routine operation 7 Hard drive bay Holds the hard drive 8 Memory module compartment Contains an expansion memory module slot 9 Bluetooth compartment Contains a Bluetooth device 10 Upgra...

Page 27: ... Display components NOTE Your computer may look slightly different from the illustration in this section Component Description 1 Internal microphones 2 Record sound NOTE If there is a microphone icon next to each microphone opening your computer has internal microphones 2 Webcam light select models only On The webcam is in use 3 Webcam select models only Records video and captures still photograph...

Page 28: ...as 2 Send and receive wireless signals to communicate with wireless local area networks WLAN The antennas are not visible from the outside of the computer For optimal transmission keep the areas immediately around the antennas free from obstructions To see wireless regulatory notices refer to the section of the Regulatory Safety and Environmental Notices that applies to your country or region Thes...

Page 29: ...s not plugged into external power Batteries and power cords vary in appearance by region and country Identifying the labels The labels affixed to the computer provide information you may need when you troubleshoot system problems or travel internationally with the computer Serial number label Provides important information including the following Component 1 Product name Identifying the labels 19 ...

Page 30: ...bile Broadband Module select models only or an optional Bluetooth device If your computer model includes one or more wireless devices one or more certification labels are included with your computer You may need this information when traveling internationally Wireless certification labels are affixed to the bottom of the computer or inside the battery bay SIM subscriber identity module label selec...

Page 31: ...across entire states regions or even countries Bluetooth device Creates a personal area network PAN to connect to other Bluetooth enabled devices such as computers phones printers headsets speakers and cameras In a PAN each device communicates directly with other devices and devices must be relatively close together typically within 10 meters approximately 33 feet of each other Computers with WLAN...

Page 32: ...led one or more network devices are connected to a wireless network and one or more network devices may be connected to a wired network Network disabled disconnected Indicates that one or more of your network drivers are installed no wireless connections are available or all wireless network devices are disabled by the wireless button or Wireless Assistant and no network devices are connected to a...

Page 33: ...e state of the wireless devices click the Show hidden icons icon the arrow at the left of the notification area and position the cursor over the wireless icon If the wireless icon is not displayed in the notification area complete the following steps to change the Wireless Assistant properties 1 Select Start Control Panel Hardware and Sound Windows Mobility Center 2 Click the wireless icon in the ...

Page 34: ...ng Center that allows you to set up a connection or network connect to a network manage wireless networks and diagnose and repair network problems To access the Network and Sharing Center select Start Control Panel Network and Internet Network and Sharing Center For more information refer to Help and Support Select Start Help and Support 24 Chapter 2 Wireless modem and local area network ...

Page 35: ...or cable 1 and high speed Internet service purchased from an Internet service provider ISP A wireless router purchased separately 2 The wireless computer 3 The following illustration shows an example of a wireless network installation that is connected to the Internet As your network grows additional wireless and wired computers can be connected to the network to access the Internet For help in se...

Page 36: ...t is transmitted Usually you can allow the network to assign the WEP key Alternatively you can set up your own key generate a different key or choose other advanced options Without the correct key others will not be able to use the WLAN WPA Wi Fi Protected Access like WEP uses security settings to encrypt and decrypt data that is transmitted over the network However instead of using one static sec...

Page 37: ...nd Web site links provided in Help and Support For a list of public WLANs near you contact your ISP or search the Web Web sites that list public WLANs include Cisco Internet Mobile Office Wireless Locations Hotspotlist and Geektools Check with each public WLAN location for cost and connection requirements For additional information on connecting your computer to a corporate WLAN contact your netwo...

Page 38: ... PIN personal identification number as well as network information Some computers include a SIM that is preinstalled in the battery bay If the SIM is not preinstalled it may be provided in the HP Mobile Broadband information provided with your computer or the mobile network operator may provide it separately from the computer For information on inserting and removing the SIM refer to the Inserting...

Page 39: ... the computer Removing a SIM To remove a SIM 1 Shut down the computer If you are not sure whether the computer is off or in Hibernation turn the computer on by pressing the power button Then shut down the computer through the operating system 2 Close the display 3 Disconnect all external devices connected to the computer 4 Unplug the power cord from the AC outlet 5 Turn the computer upside down on...

Page 40: ... 1 and then remove it from the slot 2 8 Replace the battery 9 Turn the computer right side up and then reconnect external power and external devices 10 Turn on the computer 30 Chapter 2 Wireless modem and local area network ...

Page 41: ...nd Internet Connection Sharing ICS HP does not recommend setting up one computer with Bluetooth as a host and using it as a gateway through which other computers may connect to the Internet When two or more computers are connected using Bluetooth and Internet Connection Sharing ICS is enabled on one of the computers the other computers may not be able to connect to the Internet using the Bluetooth...

Page 42: ...be prompted for your permission or password for tasks such as installing software running utilities or changing Windows settings Refer to Help and Support for more information 1 Select Start Control Panel System and Security Then in the System area click Device Manager 2 Click the arrow next to Network adapters to expand the list to show all of the installed adapters 3 Identify the WLAN device fro...

Page 43: ...ss router review the router user guide for instructions on setting up the same codes on both the router and the WLAN device For a private network such as a network in an office or at a public Internet chat room contact the network administrator to obtain the codes and then enter the codes when prompted to do so Some networks change the SSID or network keys used in their routers or access points on...

Page 44: ... Start Control Panel Network and Internet Network and Sharing Center 2 Click Manage wireless networks in the left panel A list showing the available WLANs is displayed If you are in a hotspot where several WLANs are active several will be displayed 3 Click a network and then click Remove Cannot connect to the wireless router If you are trying to connect to the wireless router and are unsuccessful ...

Page 45: ...ge the modem Immediately disconnect the modem cable if you accidentally connect it to a digital line If the modem cable contains noise suppression circuitry 1 which prevents interference from TV and radio reception orient the circuitry end 2 of the cable toward the computer Connecting a modem cable WARNING To reduce the risk of electric shock fire or damage to the equipment do not plug a modem cab...

Page 46: ...lephone jack follow these steps 1 Plug the modem cable into the modem jack 1 on the computer 2 Plug the modem cable into the country or region specific modem cable adapter 2 3 Plug the country or region specific modem cable adapter 3 into the telephone wall jack Selecting a location setting Viewing the current location selection To view the current location setting for the modem follow these steps...

Page 47: ...nd Printers 2 Right click the device that represents your computer and click Modem settings NOTE You must set up an initial current location area code before you can view the Dialing Rules tab If you do not have a location set up you will be prompted to enter the location when you click Modem settings 3 Click the Dialing Rules tab 4 Click New The New Location window is displayed 5 In the Location ...

Page 48: ...cks indicate that the telephone line supports pulse dialing Tones indicate that the telephone line supports tone dialing To change the dialing mode in your current modem location setting follow these steps 1 Select Start Devices and Printers 2 Right click the device that represents your computer and click Modem settings 3 Click the Dialing Rules tab 4 Select your modem location setting 5 Click Edi...

Page 49: ...rcuitry 1 which prevents interference from TV and radio reception orient the circuitry end of the cable 2 toward the computer To connect the network cable 1 Plug the network cable into the network jack 1 on the computer 2 Plug the other end of the cable into a network wall jack 2 WARNING To reduce the risk of electric shock fire or damage to the equipment do not plug a modem or telephone cable int...

Page 50: ...t your finger off the TouchPad before moving it to the scroll zone Simply sliding your finger from the TouchPad to the scroll zone will not activate the scrolling function Using the pointing stick select models only Press the pointing stick in the direction you want to move the pointer on the screen Use the left and right pointing stick buttons as you would the left and right buttons on an externa...

Page 51: ...ter initiates Hibernation and the information stored in memory is saved to the hard drive The function of the fn f3 hotkey can be changed For example you can set the fn f3 hotkey to initiate Hibernation instead of Sleep NOTE In all Windows operating system windows references to the sleep button apply to the fn f3 hotkey fn f4 Switches the screen image among display devices connected to the system ...

Page 52: ...Hotkey Description fn f9 Decreases the screen brightness level incrementally fn f10 Increases the screen brightness level incrementally 42 Chapter 3 Pointing devices and keyboard ...

Page 53: ...kLook 3 software Help Using keypads The computer includes either an embedded numeric keypad or an integrated numeric keypad The computer also supports an optional external numeric keypad or an optional external keyboard that includes a numeric keypad Refer to the illustration that most closely matches your computer Using the embedded numeric keypad If the computer includes an embedded numeric keyp...

Page 54: ...n the embedded numeric keypad You can temporarily alternate the functions of keys on the embedded numeric keypad between their standard keyboard functions and their keypad functions by using the fn key or the fn shift key combination To change the function of a keypad key to keypad functions while the keypad is off press and hold the fn key while pressing the keypad key To use the keypad keys temp...

Page 55: ...meric keypads function differently according to whether num lock is on or off Num lock is turned off at the factory For example When num lock is on most keypad keys type numbers When num lock is off most keypad keys function like the arrow page up or page down keys When num lock on an external keypad is turned on the num lock light on the computer is turned on When num lock on an external keypad i...

Page 56: ...e video Preinstalled multimedia software that allows you to play and manage your music movies and pictures NOTE Your computer may not include all of the components listed The following sections explain how to use the multimedia components included with your computer Adjusting the volume You can adjust the volume using the following controls Computer volume buttons To mute or restore volume press t...

Page 57: ...lume by moving the slider up or down You can also mute the volume by clicking the Mute Speakers icon If the Speakers icon is not displayed in the notification area follow these steps to add it a Right click the Show hidden icons the arrow at the left side of the notification area b Click Customize notification icons c Under Behaviors select Show icon and notifications for the Volume icon d Click O...

Page 58: ...th the software on disc or on the manufacturer s Web site Installing multimedia software from a disc To install any multimedia software from a CD or DVD follow these steps 1 Insert the disc into the optical drive select models only or an optional external optical drive 2 When the installation wizard opens follow the on screen instructions 3 Restart the computer if you are prompted to do so NOTE If...

Page 59: ... the device For best results remember the following tips Be sure that the device cable is securely connected to the correct jack on your computer Cable connectors are normally color coded to match the corresponding jacks on the computer Be sure to install any drivers required by the external device NOTE A driver is a required program that acts like a translator between the device and the programs ...

Page 60: ...cording speak directly into the microphone and record sound in a setting free of background noise To confirm or change the audio settings on your computer select Start Control Panel Hardware and Sound Sound 50 Chapter 4 Multimedia ...

Page 61: ... external VGA monitor or a VGA projector to the computer The external monitor port is an analog display interface To connect a VGA display device connect the device cable to the external monitor port NOTE If a properly connected external display device does not display an image press fn f4 to transfer the image to the device Repeatedly pressing fn f4 alternates the screen image between the compute...

Page 62: ... the DisplayPort NOTE If a properly connected external display device does not display an image press fn f4 to transfer the image to the device Repeatedly pressing fn f4 alternates the screen image between the computer display and the device 52 Chapter 4 Multimedia ...

Page 63: ...urfaces and position the disc label side up over the tray spindle NOTE If the tray is not fully accessible tilt the disc carefully to position it over the spindle 5 Gently press the disc 3 down onto the tray spindle until the disc snaps into place 6 Close the disc tray If you have not yet configured AutoPlay as described in the following section an AutoPlay dialog box opens It prompts you to selec...

Page 64: ...g Windows settings Refer to Help and Support for more information 2 Click the plus sign next to DVD CD ROM drives 3 Right click the DVD drive for which you want to change region settings and then click Properties 4 Click the DVD Region tab and change settings 5 Click OK Observing the copyright warning It is a criminal offense under applicable copyright laws to make unauthorized copies of copyright...

Page 65: ... your optical drive is a CD RW DVD RW or DVD RW optical drive you can use software such as Windows Media Player to burn data and audio files including MP3 and WAV music files Observe the following guidelines when burning a CD DVD or BD Before burning a disc save and close any open files and close all programs A CD R or DVD R is usually best for burning audio files because after the information is ...

Page 66: ...ive bezel to release the disc tray and then gently pull out the tray 2 until it stops 2 Remove the disc 3 from the tray by gently pressing down on the spindle while lifting the outer edges of the disc Hold the disc by the edges and avoid touching the flat surfaces NOTE If the tray is not fully accessible tilt the disc carefully as you remove it 3 Close the disc tray and place the disc in a protect...

Page 67: ...e device driver software may be missing or corrupted If you suspect that the DVD CD ROM drive is not being detected verify that the optical drive is listed in the Device Manager utility 1 Remove any discs from the optical drive 2 Select Start Control Panel System and Security Then in the System area click Device Manager 3 In the Device Manager window click the plus sign next to DVD CD ROM drives u...

Page 68: ...ng a disc Otherwise you may see a warning message asking if you want to continue If this message is displayed click No After you click No the computer may behave in either of the following ways Playback may resume or The playback window in the multimedia program may close To return to playing the disc click the Play button in your multimedia program to restart the disc In rare cases you may need t...

Page 69: ...external display 1 If both the computer display and an external display are turned on press fn f4 one or more times to switch between the 2 displays 2 Configure the monitor settings to make the external display primary a Right click on a blank area of the computer desktop and select Screen resolution b Specify a primary display and a secondary display NOTE When using both displays the DVD image wi...

Page 70: ... installed hardware and installs default drivers for anything requiring drivers NOTE If you are prompted to restart the computer save all open files and then continue with the restart 6 Reopen Device Manager if necessary and then verify that the drivers are once again listed 7 Try to use your device If uninstalling and reinstalling the device drivers does not correct the problem you may need to up...

Page 71: ...ograms Windows Update NOTE If you have not previously set up windows update you will be prompted to enter settings before you can check for updates 2 Click Check for updates 3 Follow the on screen instructions Optical drive select models only 61 ...

Page 72: ...ntact your network administrator or IT department Whenever possible place bright light sources behind the webcam and out of the picture area Adjusting webcam properties You can adjust webcam properties using the Properties dialog box which is accessible from various programs that use the integrated webcam usually from a configuration settings or properties menu Brightness Controls the amount of li...

Page 73: ...tically altering the shadows and highlights A lower gamma setting makes grays look black and makes dark colors even darker For information about using the webcam select Start Help and Support Webcam select models only 63 ...

Page 74: ...ng to a disc or an external media card NOTE You cannot initiate any type of networking connection or perform any computer functions while the computer is in the Sleep state or in Hibernation NOTE When HP 3D DriveGuard has parked a drive the computer will not initiate Sleep or Hibernation and the display will be turned off Initiating and exiting Sleep The system is set at the factory to initiate Sl...

Page 75: ...s located in the notification area at the far right of the taskbar The battery meter allows you to quickly access power settings view remaining battery charge and select a different power plan To display the percentage of remaining battery charge and the current power plan move the pointer over the battery meter icon To access Power Options or to change the power plan click the battery meter icon ...

Page 76: ...2 Select a power plan and then click Change plan settings 3 Change the settings as needed 4 To change additional settings click Change advanced power settings and make your changes Setting password protection on wakeup To set the computer to prompt for a password when the computer exits Sleep or Hibernation follow these steps 1 Select Start Control Panel System and Security Power Options 2 In the ...

Page 77: ...rences Usage Details Enables you to enter information about computer use Charts Displays charts and graphs of power consumption About Displays Power Assistant Help and version information For more information about using configuring and managing Power Assistant refer to the Power Assistant software Help Using external AC power External AC power is supplied through one of the following devices WARN...

Page 78: ...mage to the equipment Plug the power cord into an AC outlet that is easily accessible at all times Disconnect power from the computer by unplugging the power cord from the AC outlet not by unplugging the power cord from the computer If provided with a 3 pin attachment plug on the power cord plug the cord into a grounded earthed 3 pin outlet Do not disable the power cord grounding pin for example b...

Page 79: ...cement battery provided by HP or a compatible battery purchased from HP Computer battery life varies depending on power management settings programs running on the computer display brightness external devices connected to the computer and other factors Finding battery information in Help and Support Help and Support provides the following tools and information about the battery Battery Check tool ...

Page 80: ...tiate Hibernation or shut down the computer through Windows before removing the battery To insert the battery 1 Turn the computer upside down on a flat surface with the battery bay toward you 2 Insert the battery 1 into the battery bay until it is seated The battery release latch 2 automatically locks the battery into place To remove the battery 1 Turn the computer upside down on a flat surface wi...

Page 81: ...ry life and optimize the accuracy of battery charge displays follow these recommendations If you are charging a new battery charge it fully before turning on the computer Charge the battery until the battery light turns off NOTE If the computer is on while the battery is charging the battery meter in the notification area may show 100 percent charge before the battery is fully charged Allow the ba...

Page 82: ...eing used or charged Store the battery in a cool dry location Managing low battery levels The information in this section describes the alerts and system responses set at the factory Some low battery alerts and system responses can be changed using Power Options in Windows Control Panel Start Control Panel System and Security Power Options Preferences set using Power Options do not affect lights I...

Page 83: ...ur work and shut down the computer Resolving a low battery level when the computer cannot exit Hibernation When the computer lacks sufficient power to exit Hibernation follow these steps 1 Insert a charged battery or plug the computer into external power 2 Exit Hibernation by briefly pressing the power button Calibrating a battery Calibrate a battery under the following conditions When battery cha...

Page 84: ...mputer to sleep settings to Never 5 Click Change advanced power settings 6 Click the plus sign next to Sleep and then click the plus sign next to Hibernate after 7 Record the On battery setting under Hibernate after so that you can reset it after the calibration 8 Change the On battery setting to Never 9 Click OK 10 Click Save changes Step 3 Discharge the battery The computer must remain on while ...

Page 85: ...turn off the computer 2 Run the computer on battery power until the battery is discharged The battery light begins to blink when the battery has discharged to a low battery level When the battery is discharged the battery light turns off and the computer shuts down Using battery power 75 ...

Page 86: ... plan settings 3 Reenter the settings that you recorded for the items in the On battery column or Click Restore default settings for this plan and then follow the on screen instructions NOTE If you restore default settings omit steps 4 through 8 4 Click Change advanced power settings 5 Click the plus sign next to Sleep and then click the plus sign next to Hibernate after 6 Reenter the setting that...

Page 87: ...spose of in fire or water Refer to the Regulatory Safety and Environmental Notices for battery disposal information These notices are located in Help and Support Replacing the battery Computer battery life varies depending on the power management settings programs running on the computer display brightness external devices connected to the computer and other factors Battery Check notifies you to r...

Page 88: ...stance Shutting down the computer CAUTION Unsaved information will be lost when the computer is shut down The Shut down command closes all open programs including the operating system and then turns off the display and computer Shut down the computer under any of the following conditions When you need to replace the battery or access components inside the computer When you are connecting an extern...

Page 89: ... use the preceding shutdown procedures try the following emergency procedures in the sequence provided Press and hold the power button for at least 5 seconds Disconnect the computer from external power and remove the battery Shutting down the computer 79 ...

Page 90: ...ows includes the User Account Control feature to improve the security of your computer You may be prompted for your permission or password for tasks such as installing applications running utilities or changing Windows settings Refer to Help and Support for more information Handling drives Drives are fragile computer components that must be handled with care Refer to the following cautions before ...

Page 91: ...rting a drive into a drive bay Do not type on the keyboard or move the computer while an optional optical drive is writing to a disc The write process is sensitive to vibration When the battery is the only source of power be sure that the battery is sufficiently charged before writing to media Avoid exposing a drive to temperature or humidity extremes Avoid exposing a drive to liquids Do not spray...

Page 92: ...gment your computer manually at any time NOTE It is not necessary to run Disk Defragmenter on solid state drives To run Disk Defragmenter 1 Select Start All Programs Accessories System Tools Disk Defragmenter 2 Click Defragment disk NOTE Windows includes the User Account Control feature to improve the security of your computer You may be prompted for your permission or password for tasks such as i...

Page 93: ... Hardware and Sound Windows Mobility Center If the software is enabled a green check mark is superimposed over the hard drive icon If the software is disabled a red X is superimposed over the hard drive icon If the drives are parked a yellow moon is superimposed over the hard drive icon NOTE The icon in the Mobility Center may not show the most up to date status for the drive For immediate updates...

Page 94: ...strator group can change privileges for non Administrator users Determine whether a drive in the system is supported To open the software and change settings follow these steps 1 In Mobility Center click the hard drive icon to open the HP 3D DriveGuard window or Select Start Control Panel Hardware and Sound HP 3D DriveGuard NOTE If prompted by User Account Control click Yes 2 Click the appropriate...

Page 95: ...Then shut down the computer through the operating system To remove a hard drive 1 Save your work 2 Shut down the computer and close the display 3 Disconnect all external hardware devices connected to the computer 4 Unplug the power cord from the AC outlet 5 Turn the computer upside down on a flat surface with the battery bay toward you 6 Remove the battery from the computer 7 Loosen the 2 hard dri...

Page 96: ...e 3 out of the hard drive bay To install a hard drive 1 Insert the hard drive into the hard drive bay 1 2 Pull the hard drive tab 2 to the left to connect the hard drive 3 Tighten the hard drive screws 3 86 Chapter 6 Drives ...

Page 97: ... on the computer 5 Replace the cover 2 6 Tighten the hard drive cover screws 3 7 Replace the battery 8 Turn the computer right side up and then reconnect external power and external devices 9 Turn on the computer Replacing a hard drive in the hard drive bay 87 ...

Page 98: ...de down on a flat surface with the upgrade bay toward you 6 Loosen the upgrade bay screw 1 7 Using a flat bladed screwdriver gently push the tab to release the protective insert 2 8 Remove the protective insert 3 from the upgrade bay Replacing a hard drive CAUTION To prevent information loss or an unresponsive system Shut down the computer before removing the hard drive from the upgrade bay Do not...

Page 99: ...vices connected to the computer 4 Unplug the power cord from the AC outlet 5 Turn the computer upside down on a flat surface with the upgrade bay toward you 6 Remove the battery from the computer 7 Remove the protective screw caps 1 and then remove the 4 hard drive screws 2 8 Loosen the upgrade bay screw 1 Replacing a drive in the upgrade bay 89 ...

Page 100: ...9 Using a flat bladed screwdriver gently push the tab to release the hard drive 2 10 Remove the hard drive from the upgrade bay 90 Chapter 6 Drives ...

Page 101: ...To install a hard drive in the upgrade bay 1 Insert the hard drive into the upgrade bay 2 Tighten the upgrade bay screw Replacing a drive in the upgrade bay 91 ...

Page 102: ...e computer is on in the Sleep state or in Hibernation If you are not sure whether the computer is off or in Hibernation turn the computer on by pressing the power button Then shut down the computer through the operating system To remove an optical drive from the upgrade bay 1 Save your work 2 Shut down the computer and close the display 3 Disconnect all external hardware devices connected to the c...

Page 103: ...8 Using a flat bladed screwdriver gently push the tab to release the optical drive 2 9 Remove the optical drive from the upgrade bay Replacing a drive in the upgrade bay 93 ...

Page 104: ...ade bay 1 Insert the optical drive into the upgrade bay 2 Tighten the upgrade bay screw 3 Replace the battery 4 Turn the computer right side up and then reconnect external power and external devices 5 Turn on the computer 94 Chapter 6 Drives ...

Page 105: ... model has 4 USB ports which support USB 1 0 USB 1 1 and USB 2 0 devices An optional docking device or a USB hub provide additional USB ports that can be used with the computer Connecting a USB device CAUTION To prevent damage to a USB connector use minimal force to connect a USB device To connect a USB device to the computer connect the USB cable for the device to the USB port You will hear a sou...

Page 106: ...t on the computer during startup or in an MS DOS based program or utility Starting or restarting from an optional external MultiBay or an optional USB bootable device To disable or reenable USB legacy support in Computer Setup follow these steps 1 Turn on or restart the computer and then press esc while the Press the ESC key for Startup Menu message is displayed at the bottom of the screen 2 Press...

Page 107: ...uctions The 1394 port also supports IEEE 1394a devices Connecting a 1394 device CAUTION To prevent damage to a 1394 port connector use minimal force when connecting a 1394 device To connect a 1394 device to the computer connect the 1394 cable for the device to the 1394 port You will hear a sound when the device has been detected Removing a 1394 device CAUTION To prevent loss of information or an u...

Page 108: ... right of the taskbar NOTE To display the Safely Remove Hardware and Eject Media icon click the Show hidden icons icon the arrow at the left side of the notification area 2 Click the name of the device in the list You are prompted that it is safe to remove the device 3 Remove the device 98 Chapter 7 External devices ...

Page 109: ...mouse or printer Some serial devices may require additional support software which is usually included with the device For more information about device specific software refer to the manufacturer s instructions To connect a serial device connect the device cable to the serial port on the computer Using a serial device select models only 99 ...

Page 110: ...use refer to the manufacturer s instructions To connect an external device to the computer CAUTION To reduce the risk of damage to the equipment when connecting a powered device be sure that the device is turned off and the AC power cord is unplugged 1 Connect the device to the computer 2 If you are connecting a powered device plug the device power cord into a grounded AC outlet 3 Turn on the devi...

Page 111: ...ing device The docking connector connects the computer to an optional docking device An optional docking device provides additional ports and connectors that can be used with the computer Using a docking device 101 ...

Page 112: ...s Memory Stick Memory Stick Pro Memory Stick Duo adapter required Memory Stick Duo Pro adapter required MultiMediaCard MultiMediaCard Plus Secure Digital SD Memory Card SD High Capacity Memory Card microSD Memory Card adapter required xD Picture Card Inserting a digital card CAUTION To prevent damage to the digital card connectors use minimal force to insert a digital card 1 Hold the digital card ...

Page 113: ...igital card NOTE To stop a data transfer click Cancel in the operating system Copying window 2 To remove a digital card a Click the Safely Remove Hardware and Eject Media icon in the notification area at the far right of the taskbar NOTE To display the Safely Remove Hardware and Eject Media icon click the Show hidden icons icon the arrow at the left side of the notification area b Click the name o...

Page 114: ...m Do not install other software such as card services socket services or enablers supplied by the ExpressCard manufacturer Inserting an ExpressCard CAUTION To prevent damage to the computer and external media cards do not insert a PC Card into an ExpressCard slot CAUTION To prevent damage to the connectors Use minimal force when inserting an ExpressCard Do not move or transport the computer when a...

Page 115: ...cedure to safely remove the ExpressCard To remove an ExpressCard 1 Save your information and close all programs associated with the ExpressCard NOTE To stop a data transfer click Cancel in the operating system Copying window 2 Click the Safely Remove Hardware and Eject Media icon in the notification area at the far right of the taskbar NOTE To display the Safely Remove Hardware and Eject Media ico...

Page 116: ... with the smart card reader select models only A personal identification number PIN is needed to gain access to the contents of the microchip For more information about smart card security features refer to Help and Support NOTE Your computer may look slightly different from the illustrations in this chapter Inserting a smart card To insert a smart card 1 Holding the smart card label side up gentl...

Page 117: ... Grasp the edge of the smart card and pull it out of the smart card reader Using smart cards select models only 107 ...

Page 118: ...le to the empty expansion memory module slot or by upgrading the existing memory module in the primary memory module slot WARNING To reduce the risk of electric shock and damage to the equipment unplug the power cord and remove all batteries before installing a memory module CAUTION Electrostatic discharge ESD can damage electronic components Before beginning any procedure touch a grounded metal o...

Page 119: ... power cord from the AC outlet 5 Turn the computer upside down on a flat surface 6 Remove all batteries from the computer 7 Loosen the memory module compartment cover screw 1 8 Lift the memory module compartment cover 2 away from the computer 9 Remove the memory module NOTE If the expansion memory module slot is not populated bypass step 9 and proceed to step 10 a Pull away the retention clips 1 o...

Page 120: ... edge 1 of the memory module with the tab in the memory module slot CAUTION To prevent damage to the memory module hold the memory module by the edges only Do not touch the components on the memory module and do not bend the memory module b With the memory module at a 45 degree angle from the surface of the memory module compartment press the module 2 into the memory module slot until it is seated...

Page 121: ...tabs 1 on the memory module compartment cover with the notches on the computer 12 Close the cover 2 13 Tighten the memory module compartment cover screw 3 14 Replace the batteries 15 Turn the computer right side up and then reconnect external power and external devices 16 Turn on the computer Adding or replacing a memory module in the expansion memory module slot 111 ...

Page 122: ... off or in Hibernation turn the computer on by pressing the power button Then shut down the computer through the operating system 3 Disconnect all external devices connected to the computer 4 Unplug the power cord from the AC outlet 5 Turn the computer upside down on a flat surface 6 Remove all batteries from the computer 7 Loosen the 3 keyboard access screws 8 Turn the computer over and open it 1...

Page 123: ...module tilts up CAUTION To prevent damage to the memory module hold the memory module by the edges only Do not touch the components on the memory module b Grasp the edge of the memory module 2 and gently pull the module out of the memory module slot To protect a memory module after removal place it in an electrostatic safe container Upgrading a memory module in the primary memory module slot 113 ...

Page 124: ...y module b With the memory module at a 45 degree angle from the surface of the memory module compartment press the module 2 into the memory module slot until it is seated c Gently press the memory module 3 down applying pressure to both the left and right edges of the memory module until the retention clips snap into place 12 Align the notched edge 1 of the keyboard with the tabs in the keyboard s...

Page 125: ...a flat surface 15 Tighten the 3 keyboard access screws 16 Replace the batteries 17 Turn the computer right side up and then reconnect external power and external devices 18 Turn on the computer Upgrading a memory module in the primary memory module slot 115 ...

Page 126: ... referred to hereafter as Computer Setup To protect against Use this security feature Unauthorized use of the computer HP ProtectTools Security Manager in combination with a password smart card and or fingerprint reader Unauthorized access to Computer Setup f10 BIOS administrator password in Computer Setup Unauthorized access to the contents of a hard drive DriveLock password in Computer Setup Una...

Page 127: ...rd for a Computer Setup feature and for a Windows security feature You can also use the same password for more than one Computer Setup feature Use the following tips for creating and saving passwords When creating passwords follow requirements set by the program Write down your passwords and store them in a secure place away from the computer Do not store passwords in a file on the computer The fo...

Page 128: ...ttings and system identification information in Computer Setup After this password is set it must be entered to access Computer Setup and to make changes using Computer Setup Note the following characteristics of the BIOS administrator password It is not interchangeable with a Windows administrator password although both passwords can be identical It is not displayed as it is set entered changed o...

Page 129: ...changes and exit and then press enter Your changes go into effect when the computer restarts To delete this password in Computer Setup follow these steps 1 Turn on or restart the computer and then press esc while the Press the ESC key for Startup Menu message is displayed at the bottom of the screen 2 Press f10 to enter BIOS Setup 3 Use a pointing device or the arrow keys to select Security Change...

Page 130: ...protection is applied to a drive a password must be entered to access the drive The drive must be inserted into the computer or an advanced port replicator in order for it to be accessed by the DriveLock password To apply DriveLock protection to an internal hard drive a user password and a master password must be set in Computer Setup Note the following considerations about using DriveLock protect...

Page 131: ...nter 5 Read the warning To continue select YES 6 Type your master password in the New password and Verify new password fields and then press enter 7 Type your user password in the New password and Verify new password fields and then press enter 8 To confirm DriveLock protection on the drive you have selected type DriveLock in the confirmation field and then press enter NOTE The DriveLock confirmat...

Page 132: ...ional docking device or external MultiBay At the DriveLock Password prompt type your user or master password using the same kind of keys you used to set the password and then press enter After 2 incorrect attempts to enter the password you must shut down the computer and try again 122 Chapter 10 Security ...

Page 133: ... hard drive or Use the arrow keys to select an internal hard drive and then press enter 5 Use a pointing device or the arrow keys to select the password you want to change 6 Type your current password in the Old password field type a new password in the New password and Verify new password fields and then press enter 7 To save your changes and exit Computer Setup click Save in the lower left corne...

Page 134: ...Lock password When the Automatic DriveLock password is enabled a random user password and a DriveLock master password will be created for you When any user passes the password credential the same random user and DriveLock master password will be used to unlock the drive NOTE You must have a BIOS administrator password before you can access the Automatic DriveLock features Entering an Automatic Dri...

Page 135: ...inting device or the arrow keys to select Security Automatic DriveLock and then press enter 4 Use a pointing device or the arrow keys to select an internal hard drive and then press enter 5 Use a pointing device or the arrow keys to select Disable protection 6 To save your changes and exit Computer Setup click Save in the lower left corner of the screen and then follow the on screen instructions o...

Page 136: ...n option use a pointing device to click Disabled next to the option or Use the arrow keys to select Disabled next to the option and then press enter 6 To reenable an option use a pointing device to click Enabled next to the option or Use the arrow keys to select Enabled next to the option and then press enter 7 To save your changes and exit Computer Setup click Save in the lower left corner of the...

Page 137: ...on you must create a BIOS administrator password in Computer Setup To manage this feature in Computer Setup follow these steps 1 Turn on or restart the computer and then press esc while the Press the ESC key for Startup Menu message is displayed at the bottom of the screen 2 Press f10 to enter BIOS Setup 3 Use a pointing device or the arrow keys to select Security System IDs and then press enter 4...

Page 138: ...ng protection against newly discovered viruses antivirus software must be kept up to date McAfee Total Protection antivirus software is either preinstalled or preloaded on the computer If the antivirus software is preinstalled select Start All Programs McAfee Managed Services Total Protection If the software is preloaded select Start All Programs HP Software Setup and then follow the on screen ins...

Page 139: ...ll incoming and outgoing traffic For more information refer to the software manufacturer s instructions These instructions may be provided with the software on disc or on the manufacturer s Web site NOTE Under some circumstances a firewall can block access to Internet games interfere with printer or file sharing on a network or block authorized e mail attachments To temporarily resolve the problem...

Page 140: ...e an alert Updates to the operating system and other software may have become available after the computer was shipped To be sure that all available updates are installed on the computer observe these guidelines Run Windows Update monthly to install the latest software from Microsoft Obtain updates as they are released from the Microsoft Web site and through the updates link in Help and Support 13...

Page 141: ...ect computer models This software can be accessed through Windows Control Panel It provides security features that help protect against unauthorized access to the computer networks and critical data For more information refer to the HP ProtectTools software Help Using HP ProtectTools Security Manager select models only 131 ...

Page 142: ... 1 Loop the security cable around a secured object 2 Insert the key 1 into the cable lock 2 3 Insert the cable lock into the security cable slot on the computer 3 and then lock the cable lock with the key NOTE Your computer may look different from the illustration The location of the security cable slot varies by computer model 132 Chapter 10 Security ...

Page 143: ...ify your computer model product category and series or family Prepare for a system BIOS update by identifying the BIOS version currently installed on the computer For details refer to the Determining the BIOS version section If your computer is connected to a network consult the network administrator before installing any software updates especially system BIOS updates NOTE The computer system BIO...

Page 144: ...5 Press enter 6 Follow the on screen instructions 134 Chapter 11 Software updates ...

Page 145: ... or an unsuccessful installation download and install a BIOS update only when the computer is connected to reliable external power using the AC adapter Do not download or install a BIOS update while the computer is running on battery power docked in an optional docking device or connected to an optional power source During the download and installation follow these instructions Do not disconnect p...

Page 146: ... procedures vary Follow any on screen instructions that are displayed after the download is complete If no instructions are displayed follow these steps 1 Open Windows Explorer by selecting Start Computer 2 Double click your hard drive designation The hard drive designation is typically Local Disk C 3 Using the hard drive path you recorded earlier open the folder on your hard drive that contains t...

Page 147: ...n the list of updates is displayed click an update to open a window containing additional information 6 Click Download 7 Click Run to install the updated software without downloading the file or Click Save to save the file to your computer When prompted select a storage location on your hard drive After the file is downloaded navigate to the folder where the file was stored and double click the fi...

Page 148: ...the following options Creating a system repair disc select models only Backing up individual files and folders Creating a system image select models only Scheduling automatic backups select models only Creating system restore points Recovering individual files Restoring the computer to a previous state Recovering information using recovery tools NOTE For detailed instructions perform a search for ...

Page 149: ...eate a screen shot 1 Display the screen you want to save 2 Copy the screen image To copy only the active window press alt fn prt sc To copy the entire screen press fn prt sc 3 Open a word processing document and then select Edit Paste The screen image is added to the document 4 Save the document When backing up to discs use any of the following types of discs purchased separately CD R CD RW DVD R ...

Page 150: ...o improve the security of your computer You may be prompted for your permission or password for tasks such as installing software running utilities or changing Windows settings Refer to Help and Support for more information 140 Chapter 12 Backup and recovery ...

Page 151: ...ay be prompted for your permission or password for tasks such as installing software running utilities or changing Windows settings Refer to Help and Support for more information To recover your information using Startup Repair follow these steps CAUTION Using Startup Repair completely erases hard drive contents and reformats the hard drive All files you have created and any software installed on ...

Page 152: ... displayed on the screen 5 Follow the on screen instructions Using a Windows 7 operating system DVD purchased separately If you are unable to boot start up your computer and you cannot use the system repair discs you previously created select models only you must purchase a Windows 7 operating system DVD to reboot the computer and repair the operating system Make sure that your most recent backup ...

Page 153: ...6 Select Repair your computer 7 Follow the on screen instructions Performing a recovery 143 ...

Page 154: ...accessed from the File Security and System Configuration menus To navigate and select in Computer Setup follow these steps 1 Turn on or restart the computer and then press esc while the Press the ESC key for Startup Menu message is displayed at the bottom of the screen To select a menu or a menu item use the tab key and the keyboard arrow keys and then press enter or use a pointing device to click...

Page 155: ... not changed when you restore the factory settings To return all settings in Computer Setup to the values that were set at the factory follow these steps 1 Turn on or restart the computer and then press esc while the Press the ESC key for Startup Menu message is displayed at the bottom of the screen 2 Press f10 to enter BIOS Setup 3 Use a pointing device or the arrow keys to select File Restore de...

Page 156: ...ry installed in the computer Battery Test Runs a comprehensive test on any batteries installed in the computer Error Log Displays a log file if any errors have occurred Reset BIOS security to factory default Restore the BIOS security settings to the factory default Restore defaults Replace the configuration settings in Computer Setup with the original factory settings Hard drive mode password sett...

Page 157: ... Trusted Platform Module TPM Embedded Security which protects the computer from unauthorized access to owner functions available in Embedded Security for ProtectTools For more information refer to the ProtectTools software Help NOTE You must have a setup password to change this setting Disk Sanitizer Run Disk Sanitizer to destroy all existing data on the primary hard drive or the drive in the upgr...

Page 158: ...e fan always on while connected to an AC outlet disabled by default Enable disable Data Execution Prevention select models only When enabled the processor can disable some virus code execution which helps to improve computer security disabled by default SATA Serial Advanced Technology Attachment device mode The following options are available AHCI Advanced Host Controller Interface IDE Integrated ...

Page 159: ...default Set the wake on LAN state Options include the following Disabled Boot to Network Follow Boot Order Enable disable the Notebook Upgrade Bay device enabled by default Enable disable the Power Monitor Circuit enabled by default Enable disable the audio devices enabled by default Enable disable the fingerprint device enabled by default Enable disable a modem device enabled by default Enable di...

Page 160: ... the ExpressCard slot Enable disable the smart card slot Enable disable the eSATA USB port Set Security Level Change view or hide security levels for all BIOS menu items Restore Security Defaults Restore the default security settings 150 Chapter 13 Computer Setup ...

Page 161: ...hard drive USB diskette drive USB CD ROM USB hard drive Notebook Ethernet Secure Digital SD Memory Card Docking station upgrade bay External SATA drive You can change the order in which the computer searches for a boot device by changing the boot order in Computer Setup You can also press esc while the Press the ESC key for Startup Menu message is displayed at the bottom of the screen and then pre...

Page 162: ...NOTE An optical drive such as a CD ROM drive can boot either as drive A or drive C depending on the format of the boot CD 152 Chapter 14 MultiBoot ...

Page 163: ...B Port option must be enabled in order to use USB legacy support It is enabled at the factory If the port becomes disabled reenable it by selecting System Configuration Port Options and then clicking Enabled next to USB Port or To enable a NIC device select System Configuration Boot Options and then click Enabled next to PXE Internal NIC boot 4 To save your changes and exit Computer Setup click Sa...

Page 164: ...n the boot order However if there are 2 optical devices and the first optical device does not boot either because it does not contain media or the media is not a boot disc the system will try to boot to the second optical device Changing the boot order also changes the logical drive designations For example if you start up from a CD ROM drive with a disc formatted as drive C that CD ROM drive beco...

Page 165: ... press esc while the Press the ESC key for Startup Menu message is displayed at the bottom of the screen 2 Press f10 to enter BIOS Setup 3 Use a pointing device or the arrow keys to select System Configuration Boot Options Confirm that Enabled is selected next to MultiBoot NOTE MultiBoot is enabled at the factory 4 Use a pointing device or the arrow keys to select a device in the list 5 To move th...

Page 166: ...en press enter 4 In the Express Boot Popup Delay Sec field enter the length of time in seconds that you want the computer to display the startup location menu before it defaults to the current MultiBoot setting When 0 is selected the Express Boot startup location menu is not displayed 5 To save your changes and exit Computer Setup click Save in the lower left corner of the screen and then follow t...

Page 167: ... deploying a software image The computer is shipped with a preinstalled system software image The initial software image is configured during the first time setup of the computer After a brief software unbundling occurs the computer is ready to be used A customized software image can be deployed distributed in one of the following ways Installing additional software applications after unbundling t...

Page 168: ...Web accessible reporting of business critical details such as thermal warnings and memory alerts Remote updating of system software such as device drivers and the system BIOS NOTE Additional functionality can be added when HP Client Manager for Altiris is used with optional Altiris Solutions software purchased separately When HP Client Manager for Altiris installed on a client computer is used wit...

Page 169: ...distribution capabilities HP Client Manager for Altiris enables communication with the Altiris Solutions software which can be used to complete new hardware deployment or personality migration to a new operating system using easy to follow wizards HP Client Manager for Altiris is available for download from the HP Web site When Altiris Solutions software is used in conjunction with HP System Softw...

Page 170: ...e inventory across multiple platforms Prepare a software package and conduct impact analysis prior to distribution Target individual computers workgroups or entire populations of computers for deployment and maintenance of software and content according to policies Provision and manage operating systems applications and content on distributed computers from any location Integrate CCM with help des...

Page 171: ...ersions of both hardware and software and then updates designated software from a central repository known as a file store Driver versions that are supported by SSM are denoted with a special icon on the HP driver download Web site To download the SSM utility or to obtain more information on SSM see the HP Web site at http www hp com go ssm English only Using Client Management Solutions 161 ...

Page 172: ...about using it see the HP Web site at http www hp com go universalprintdriver English only To print using the HP Universal Print Driver 1 Select File Print from any application 2 Select HP Universal Printing PS from the list of printers 3 Click Print 4 Enter the printer s IP address or network path NOTE If you cannot identify the printer s IP address or network path contact your IT administrator f...

Page 173: ...16 Routine care 163 ...

Page 174: ...procedures Follow the procedures in this section to safely clean your computer WARNING To prevent electric shock or damage to components do not attempt to clean your computer while it is turned on Turn off the computer Disconnect external power Disconnect all powered external devices CAUTION Do not spray cleaning agents liquids directly on any computer surface Liquids dripped on the surface can pe...

Page 175: ... with one of the cleaning solutions listed previously or use an acceptable germicidal disposable wipe To prevent keys from sticking and to remove dust lint and particles from the keyboard use a can of compressed air with a straw extension WARNING To reduce the risk of electric shock or damage to internal components do not use a vacuum cleaner attachment to clean the keyboard A vacuum cleaner can d...

Page 176: ...reating 55 playing 53 removing 56 BIOS administrator password 146 BIOS update downloading 135 installing 136 Bluetooth compartment identifying 16 Bluetooth device 21 Bluetooth label 20 boot devices enabling 153 boot options 147 boot order 147 built in device audio devices 149 Bluetooth device radio 149 fingerprint reader 149 internal speakers 149 LAN WLAN switching 149 microphone 149 modem 149 Net...

Page 177: ... removing 124 setting 121 DriveLock automatic 147 drives boot order 147 151 diskette 100 external 100 external optical 100 hard 86 100 DVD changing region setting 54 copying 55 creating 55 playing 53 removing 56 DVD region settings 54 E embedded numeric keypad keys identifying 10 encryption 26 eSATA USB port identifying 14 esc key identifying 10 11 Execution Disable 148 expansion memory module ins...

Page 178: ... volume 4 6 webcam 11 17 wireless 3 5 12 logical drive designations 154 low battery level 72 M maintenance Disk Cleanup 82 Disk Defragmenter 82 McAfee Total Protection 128 129 Media Card Reader 13 102 memory module compartment cover removing 109 replacing 111 memory module compartment identifying 16 microphones internal 17 Microsoft Certificate of Authenticity label 20 minimizing interference 34 m...

Page 179: ...gy Attachment devices AHCI Advanced Host Controller Interface 148 IDE Integrated Drive Electronics 148 scrolling regions TouchPad 2 SD Card 102 Secondary Battery Fast Charge 148 security cable slot identifying 13 15 Security menu always prompt for HP SpareKey enrollment 147 Automatic DriveLock 147 change password 147 Disk Sanitizer 147 DriveLock 147 fingerprint reader reset 147 HP Sparekey 147 HP ...

Page 180: ...6 volume down button identifying 8 9 volume lights identifying 4 6 volume mute button identifying 8 9 volume up button identifying 8 9 volume adjusting 46 W Web sites HP System Software Manager 161 HP Universal Print Driver 162 webcam 17 webcam light identifying 11 17 webcam properties adjusting 62 Windows 7 operating system DVD 142 Windows applications key identifying 10 11 Windows logo key ident...

Page 181: ......

Reviews: