background image

Introducing the OmniBook

Setting Up the OmniBook

20

Setup Guide

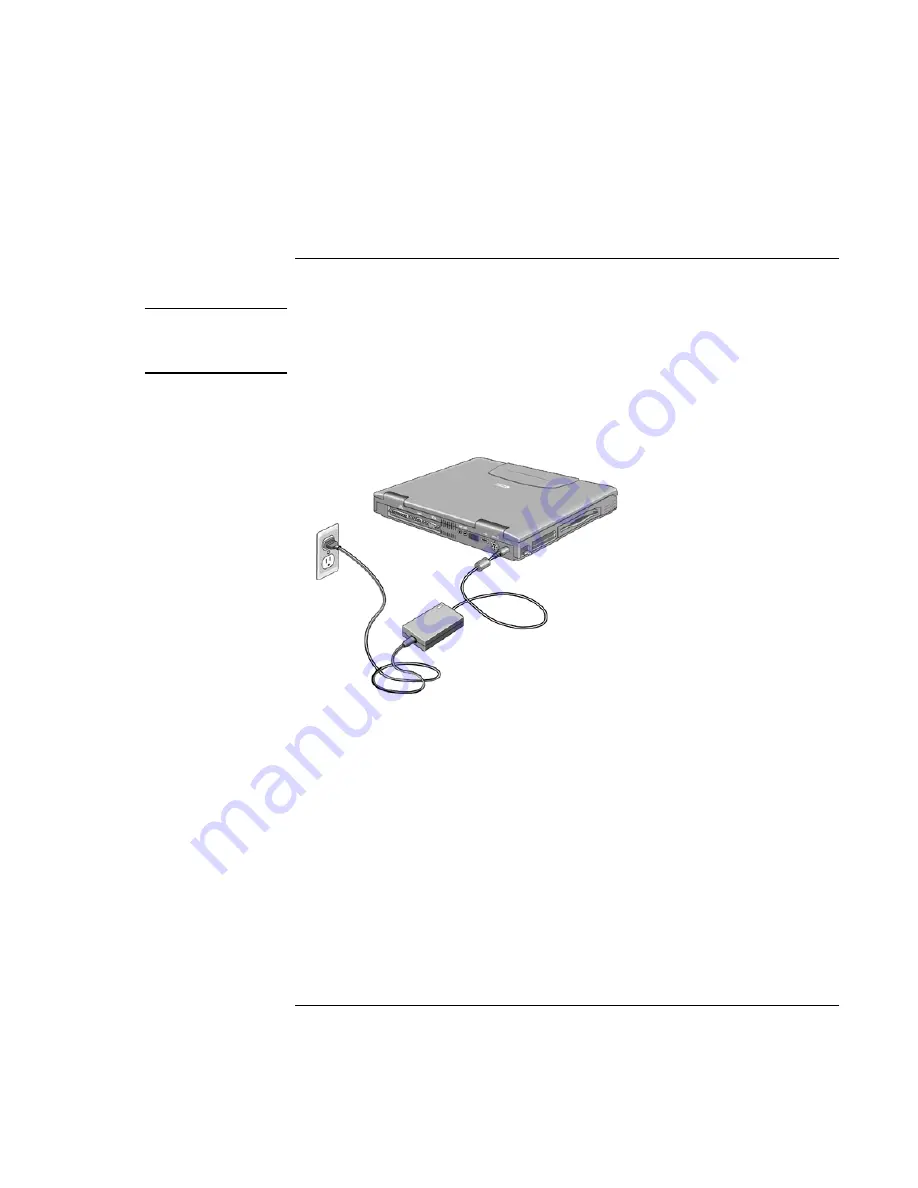
To connect AC power

CAUTION

Use only the HP AC adapters intended for this product, model HP F1740A or

HP F1454A. Using any other AC adapter can damage the OmniBook and may

void your warranty. Refer to the warranty statement for your product.

Plug in the AC adapter, then connect the AC adapter to the rear of the OmniBook,
as shown. The OmniBook battery starts charging.

Summary of Contents for OmniBook XE

Page 1: ...HP OmniBook XE Series Setup Guide ...

Page 2: ...bited without prior written permission of Hewlett Packard Company except as allowed under the copyright laws The programs that control this product are copyrighted and all rights are reserved Reproduction adaptation or translation of those programs without prior written permission of Hewlett Packard Co is also prohibited Portions of the programs that control this product may also be copyrighted by...

Page 3: ... under the Microsoft End User License Agreement EULA contained in the Microsoft documentation The following License Terms govern the use of the software Use Customer may use the software on any one computer Customer may not network the software or otherwise use it on more than one computer Customer may not reverse assemble or decompile the software unless authorized by law Copies and Adaptations C...

Page 4: ...f Hewlett Packard Termination Hewlett Packard may terminate this software license for failure to comply with any of these terms provided Hewlett Packard has requested Customer to cure the failure and Customer has failed to do so within thirty 30 days of such notice Updates And Upgrades Customer agrees that the software does not include updates and upgrades which may be available from Hewlett Packa...

Page 5: ... on the OmniBook 21 To set up Windows 22 To register your OmniBook 23 To connect to an Internet Service Provider 24 Using the OmniBook 25 Operating the OmniBook 26 To use the Fn hot keys 26 To use the Windows keys 26 To use the embedded keypad 27 To adjust the display 27 To adjust the volume 27 To use the touch pad 28 Expanding the OmniBook 29 To install RAM modules 29 To remove RAM modules 30 To ...

Page 6: ...rt 55 Hewlett Packard Limited Warranty Statement 56 Getting HP OmniBook Assistance 58 Support Assistance 58 Electronic Support Services 58 Repair Assistance 59 Customer Care Centers 59 Solving Problems with your OmniBook 61 Troubleshooting Techniques 62 Using the Recovery CD 63 To recover the factory installation of Windows 63 To replace a damaged Recovery CD 64 Obtaining Repair Service 65 Specifi...

Page 7: ...Setup Guide 7 Index 77 ...

Page 8: ......

Page 9: ...Setup Guide 9 Introducing the OmniBook ...

Page 10: ...can be harmful See To set up the VirusScan Utility in the online User s Guide Electronic Registration Permits quick and easy registration of your OmniBook See To register your OmniBook on page 23 for details My Yahoo Provides access to Yahoo website including customizable My Yahoo website in regions where available not included with Windows NT 4 0 HP DiagTools Provides basic and advanced hardware ...

Page 11: ...om omnibook As new accessories become available you ll find them listed here At the time of this printing HP offers the following accessories and replacement modules Port replicator HP F1738A Auto airline adapter HP F1455A AC adapter HP F1454A Primary lithium ion battery HP F1739A Y adapter for mouse and keyboard HP F1469A Additional RAM HP standard 64 MB F1457A 128 MB F1622A ...

Page 12: ... Source Description Online OmniBook User s Guide This online guide introduces the OmniBook and shows you the OmniBook basics Start Programs OmniBook Library or double click the desktop icon OmniBook Notes This document contains late breaking information available after the manuals were completed Start Programs OmniBook Library or double click the desktop icon The introductory Microsoft manual for ...

Page 13: ...k Setup Guide 13 Identifying the Parts of the OmniBook OmniBook front view 1 Latch to open the OmniBook 2 Built in microphone 3 Blue power button 4 Status lights 5 Built in speakers 6 Touch pad pointing device 7 Click buttons 8 CD player power on selected models ...

Page 14: ...k 14 Setup Guide 9 CD player buttons on selected models 10 CD ROM drive 11 Kensington lock slot security connector 12 Modem phone jack on selected models OmniBook side view 13 PC Card eject buttons 14 PC Card and CardBus slots upper and lower 15 Floppy disk drive ...

Page 15: ...ifying the Parts of the OmniBook Setup Guide 15 OmniBook bottom view 16 System off button 17 Hard disk drive latch and locking screw 18 Hard disk drive 19 RAM expansion cover 20 Battery latch 21 Battery 22 Port replicator connector ...

Page 16: ...ntifying the Parts of the OmniBook 16 Setup Guide OmniBook rear view 1 Parallel port 2 Serial port 3 VGA port external monitor 4 Audio out external speaker 5 Microphone jack 6 Infrared port 7 USB port 8 PS 2 port 9 AC adapter jack ...

Page 17: ...e OmniBook Identifying the Parts of the OmniBook Setup Guide 17 Status lights 1 Power 2 AC connected 3 Battery 4 Caps Lock 5 Num Lock 6 Scroll Lock 7 Floppy disk drive access 8 Hard disk drive access 9 CD ROM access ...

Page 18: ...d OmniBook models have CD ROM buttons on the front Use these buttons to play music CDs when the system is off When the system is on use the software controls in the Windows operating system 1 Power slide to turn on or off 2 Previous track 3 Play 4 Stop 5 Next track 6 Volume control down 7 Volume control up ...

Page 19: ...leasing hazardous chemicals A rechargeable battery must be recycled or disposed of properly Insert the OmniBook battery into the battery bay on the bottom of your OmniBook by sliding the battery latch as shown Once you have installed the battery you simply connect the AC adapter to the OmniBook and recharge the battery while you work You can also replace a low battery with another that is more ful...

Page 20: ...dapters intended for this product model HP F1740A or HP F1454A Using any other AC adapter can damage the OmniBook and may void your warranty Refer to the warranty statement for your product Plug in the AC adapter then connect the AC adapter to the rear of the OmniBook as shown The OmniBook battery starts charging ...

Page 21: ...Some of these connections may result in excess electrical voltage and could cause a malfunction in the internal modem Check your telephone line type prior to connecting your phone line To turn on the OmniBook Press the blue power button above the keyboard Windows starts automatically If you are turning on the OmniBook for the first time go to To set up Windows on page 22 The power status light see...

Page 22: ...battery may not be sufficiently charged to complete the Windows setup Also if you have a modem connect the phone line 1 Press the blue power button 2 The Windows Setup program starts automatically 3 Follow the instructions as they appear on the screen During setup you are prompted to Accept the License Agreement Enter the Product ID printed on the Certificate of Authenticity on the Microsoft Windo...

Page 23: ...e not prompted to register but you can register by modem if you double click the HP OmniBook Registration icon on the desktop See that the phone line is connected and follow the onscreen instructions If you choose not to register right away you can register by modem later by double clicking the Registration icon on the desktop This icon disappears after you register By phone You can call your HP C...

Page 24: ...connect to an Internet Service Provider 1 If your computer has a built in modem connect the included telephone cord to the modem If your computer does not have a built in modem you can instead use a PC Card modem or an external modem to connect to an Internet Service Provider 2 Click Start Programs Online Services and select one of the Service Providers listed This begins the registration process ...

Page 25: ...Setup Guide 25 Using the OmniBook ...

Page 26: ... F3 Enters Standby mode Fn F4 Enters Suspend mode Fn F5 Enters Hibernate mode Fn F6 Toggles the sound on and off mutes sound Fn UP ARROW Increases sound volume Fn DOWN ARROW Decreases sound volume Fn F12 Switches among the built in display an external display and simultaneous displays Fn NumLock Toggles Scroll Lock on and off To use the Windows keys The Windows key brings up the Windows Start menu...

Page 27: ...contrast press Fn F2 There is no brightness control To adjust the volume From the keyboard To increase the volume press Fn UP ARROW To decrease the volume press Fn DOWN ARROW To temporarily silence the speaker without changing the volume setting press Fn F6 Press Fn F6 again to restore the speaker output In Windows 1 Click the speaker symbol in the taskbar 2 Drag the volume control bar up or down ...

Page 28: ...r across the touch pad in the direction you want the pointer to move 2 Use the click buttons which function like the left and right buttons on a mouse to make your selection You can also tap on the touch pad instead of clicking a button To open an application move the pointer over the icon then press the left button twice rapidly To make menu selections move the pointer to the item and press the l...

Page 29: ... can permanently damage computer chips It is therefore important to discharge the static electricity from your body before installing the memory module Discharge your body s electricity by touching the metal shielding around the connectors on the rear of the OmniBook computer You ll need a small Phillips screwdriver to complete this procedure 1 Click the Start Button and select Shut down 2 Unplug ...

Page 30: ...es After you remove the RAM expansion cover do the following 1 Release the two latches at the sides of the RAM expansion module by pushing them gently outward away from the sides of the module 2 When you release the latches the free edge of the module pops up 3 Pull the module out of the connector 4 Replace the RAM expansion module door ...

Page 31: ...up 4 Use a screwdriver to remove the hard disk drive locking screw 5 Slide and hold the hard disk drive latch 6 Slide the hard disk drive toward the edge of the OmniBook then lift out 7 Insert the new hard disk drive and the locking screw 8 Insert the battery Note If you are installing a new hard disk drive you should create a Hibernate partition on the drive before loading any software see the in...

Page 32: ...experience discomfort or pain while using any computing equipment discontinue use immediately and consult your physician as soon as possible In addition to the information on RSI given in this chapter you may also consult the online version of Working in Comfort preloaded on the hard disk of the your HP OmniBook or visit HP s Working in Comfort website About Repetitive Strain Injury Because your c...

Page 33: ...ons of an activity or motion Performing an activity in an awkward or unnatural posture Maintaining static posture for prolonged periods Failing to take frequent short breaks Other environmental and psychosocial factors In addition there have been reports associating the occurrence of RSI with the use of computer keyboards mice and other input devices Also certain medical conditions such as rheumat...

Page 34: ...ivity Your Chair It s very important that your chair provides a comfortable sitting position and offers the following features A stable base such as five legs with casters Make sure the casters are designed for the type of floor you have in your workspace whether it is bare or carpeted A height and tilt adjustment feature It should be easy to adjust your chair height from 40 cm to 52 cm 15 5 inche...

Page 35: ...ustable back support in both height and forward and backward tilt It is important that the backrest correctly supports the lower part or lumbar curve of the back A freely rotating swivel so you can move easily from side to side Fully adjustable and padded armrests The chair arms should not interfere with adjusting the chair or moving it close to your work surface Your Work Surface Ideally you shou...

Page 36: ...ands approximately parallel to the floor Wrists Your wrists should be as straight as possible while using the keyboard mouse or trackball They should not be bent sideways or more than 10 degrees up or down Legs Your thighs should be horizontal or angled slightly downward Your lower legs should be near a right angle to your thighs Your feet should rest flat on the floor If necessary use a footrest ...

Page 37: ... help you work comfortably Glare high contrast reflections dirt and dust will interfere with what you see on the screen The recommendations that follow can help you achieve a comfortable arrangement The top of your monitor screen should be at or slightly below eye level Most HP monitors come with a tilt and swivel feature that makes it easy to adjust the screen position To avoid obscuring your vie...

Page 38: ...d be displayed in a structured and well organized way Monitor Use Specifications When viewing your monitor your head should not be tilted more than 15 degrees forward When viewing your monitor your head should not be tilted more than 15 degrees forward You should not have to look up more than 5 degrees above horizontal or down more than 30 degrees below horizontal for normal work tasks such as typ...

Page 39: ... to be sure that your work surface or keyboard tray has sufficient room to accommodate your model The keyboard tray should be wide enough to hold both the keyboard and mouse or trackball 66 to 71 cm 26 to 28 inches Your HP keyboard may have a kickstand that can be opened or closed to raise or lower the keyboard angle If you are in the correct sitting position with your elbows at about the same lev...

Page 40: ...r down Keep your wrists straight by moving your entire hand and forearm over to use the function keys or numeric keypad You may use a palm rest to help keep your hands and wrists in a comfortable and neutral position when you are not typing Some HP keyboards come with an integrated palm rest If you use a palm rest see that it is rounded and padded and flush in height with the front edge of the key...

Page 41: ...gers and hand in a relaxed neutral position when activating the scroll wheel Also this type of mouse features software that can minimize the number of mouse movements or button clicks When using a mouse trackball stylus and graphics tablet or other input device position it as close to the keyboard as possible and keep it at the same level so you do not have to stretch while using it Use a good qua...

Page 42: ...front of you not to the side If you are primarily using the mouse place it in front of your hand or arm If you are using both a mouse and keyboard place them both at the same work surface height and close together If a palm rest is used the height should be flush with the front edge of the keyboard Other items such as your telephone or notepad also should be considered Monitor Place your monitor s...

Page 43: ...ove your body Keeping your body in one position for long periods is unnatural and stressful When prolonged work is required take frequent short breaks As a rule of thumb a five or ten minute break every hour is a good idea Short frequent breaks are more beneficial than longer less frequent breaks Data show that people who work for long periods of time without a break may be more prone to injury Ch...

Page 44: ...Mobile Work Environment Use a chair that provides good support for your lower back If an adjustable chair is not available you can use a pillow or rolled up towel to provide lower back support Try to keep your thighs parallel to the floor and your feet flat on the floor In a mobile environment you can do this by using a phone book or briefcase to support your feet Adjust the height of either your ...

Page 45: ... a built in palm rest you can use a rolled up towel Try to type as lightly as possible The notebook keyboard requires little force to activate Take frequent short rest breaks This is especially important in a mobile computing environment Portable computers weigh between approximately 1 4 and 3 7 kilos 3 and 8 pounds When traveling be sure to carry your computer properly to minimize strain on your ...

Page 46: ...porting it This turns off the hard drive A drop of a few inches onto a rigid surface while the hard drive is operating could cause loss of data or damage to the drive Carry the HP OmniBook in a padded case to protect against bumps and jolts Set down the HP OmniBook gently To take care of your OmniBook Provide adequate ventilation around the HP OmniBook Insure that the laptop is sitting on a flat s...

Page 47: ...ve the following guidelines to extend the life of the backlight in the OmniBook display When working at your desk connect an external monitor and turn off the internal display Fn F12 If you are not using an external monitor set the Turn off monitor timeouts for both AC and battery operation to the shortest comfortable interval To get the most from your batteries Do not leave batteries unused for l...

Page 48: ...with water containing a mild detergent Do not use an excessively wet cloth nor allow water inside the case Do not use any abrasive cleaners especially on the display Do not apply any cleaner directly to the display Instead apply the cleaner to a soft cloth and then gently wipe the display You can clean the keyboard with a vacuum cleaner to remove accumulated dust ...

Page 49: ...Setup Guide 49 Traveling with Your OmniBook ...

Page 50: ...nt options can also be set to occur automatically based on timeout values that you have entered See Managing Power Consumption in the online User s Guide To use manual power management with Windows 98 You can shut down your OmniBook manually whenever you need to with any of the following three levels of shutdown Note Windows NT 4 0 and Windows 95 Consult OmniBook Notes and the OmniBook website for...

Page 51: ...s 2 hours after System standby occurs Off Action Turning off your OmniBook provides maximum power savings The current session is not saved and unsaved data will be lost When Start Shut Down Shut down Resume Press the blue power button to start a new session This will take several seconds Sometimes the system stops responding and you are not able to turn off the OmniBook as described above To recov...

Page 52: ...ng Red AC attached battery will not accept charge From the Windows taskbar The System Tray on the Windows taskbar includes a power icon that allows access to more detailed battery status information The icon looks like a battery when AC is not connected Place pointer over the power icon to display a percentage of remaining time Right click the power icon to view the options for displaying power in...

Page 53: ...beep Then if you have not taken restorative action within a short time the system hibernates You won t be able to turn the computer on again until you restore power by one of the following actions Plug in the AC adapter see To connect AC power on page 20 or Replace the battery with one that is charged see To install the battery on page 19 Note If you plug in the AC adapter you can continue to work...

Page 54: ......

Page 55: ...Setup Guide 55 Service and Support ...

Page 56: ... will be uninterrupted or error free If HP is unable within a reasonable time to repair or replace any product to a condition as warranted you will be entitled to a refund of the purchase price upon prompt return of the product 4 HP products may contain remanufactured parts equivalent to new in performance or may have been subject to incidental use 5 Warranty does not apply to defects resulting fr...

Page 57: ...NCIDENTAL CONSEQUENTIAL INCLUDING LOST PROFIT OR DATA OR OTHER DAMAGE WHETHER BASED IN CONTRACT TORT OR OTHERWISE Some countries states or provinces do not allow the exclusion or limitation of incidental or consequential damages so the above limitation or exclusion may not apply to you THE WARRANTY TERMS CONTAINED IN THIS STATEMENT EXCEPT TO THE EXTENT LAWFULLY PERMITTED DO NOT EXCLUDE RESTRICT OR...

Page 58: ...nty repair processes 3 HP authorized resellers Local support assistance Referral to Customer Care Center or HP approved support provider Electronic Support Services HP OmniBook World Wide Web download technical information drivers and software from the web at www hp com omnibook HP PC Peripheral Self Help and Direct Help Tools Visit the web at www hp com cpso support guide home html Choose Self He...

Page 59: ...vice The support provider will help qualify your unit for warranty repair based on the warranty applicable to your unit and original purchase date and will provide you with repair processes in your area Warranty service includes the cost of shipping handling duties taxes freight or fees to or from the service location Out of Warranty Contact one of the support providers listed in items 2 or 3 in t...

Page 60: ...e software operating systems or usage not intended for or included by HP with the product How to repair the product yourself Product development custom installations Consulting US Canada English 970 635 1000 French 800 387 3867 Asia Pacific 1 970 635 1000 Europe Belgium Dutch 02 626 8806 Belgium French 02 626 8807 Denmark 3929 4099 Finland 0203 47 288 France 01 43 62 34 34 Germany 0180 52 58 143 I...

Page 61: ...Setup Guide 61 Solving Problems with your OmniBook ...

Page 62: ...ou will find solutions to common problems and troubleshooting techniques on the HP OmniBook website www hp com omnibook or www europe hp com omnibook European mirror You will also find information on the OmniBook website describing BIOS settings system specifications and advanced capabilities and procedures ...

Page 63: ...ows 98 or Nt4 for Windows NT 4 0 On the OmniBook website at www hp com omnibook This website contains the latest updates of software drivers for all three operating systems Note You will find drivers for the operating system that was shipped with your OmniBook on the hard drive and on the Recovery CD If you want drivers for one of the other Windows operating systems please check the website To rec...

Page 64: ...The recovery process can take up to an hour Do not interrupt the process or unplug the AC adapter until the process is completed Note The file system for Windows 95 and for Windows 98 is FAT32 To replace a damaged Recovery CD If you lose or damage the Recovery CD take your OmniBook and Certificate of Authenticity to an HP Service Center to be replaced If you mail your OmniBook for this service you...

Page 65: ...atted 2 Hewlett Packard cannot guarantee the return of removable components Please remove the following prior to sending your OmniBook in for service PC cards AC adapter and power cord CDs in the CD player Floppy disks in the floppy disk drive RAM modules that you have added 3 When sending your OmniBook to Hewlett Packard please use the original product packaging or other substantial packaging in ...

Page 66: ......

Page 67: ...Setup Guide 67 Specifications and Regulatory Information ...

Page 68: ...ormation Hardware and Software Specifications 68 Setup Guide Hardware and Software Specifications For the most up to date information on OmniBook hardware and software specifications go to the HP OmniBook website at www hp com omnibook ...

Page 69: ...ou should use one of the power cords listed below To purchase a power cord including one for a country not listed below or a replacement AC adapter HP F1454A contact your local Hewlett Packard dealer or Sales and Service office Country Rated Voltage and Current HP Part Number Canada Mexico Philippines Taiwan United States 125 Vac 3 A 8120 6313 Europe Egypt Saudi Arabia 250 Vac 2 5 A 8120 6314 Hong...

Page 70: ... Handle a damaged or leaking battery with extreme care If you come in contact with the electrolyte wash the exposed area with soap and water If it contacts the eye flush the eye with water for 15 minutes and seek medical attention Do not expose the battery pack to high storage temperatures above 60 C 140 F When the battery is not in use store it in the battery pouch provided When discarding a batt...

Page 71: ...nd Service section of this Setup Guide Do not attempt to make any adjustment of the unit Avoid direct exposure to the laser beam do not open the unit LED Safety The infrared port located on the back panel of the OmniBook is classified as a Class 1 LED light emitting diode device according to International Standard IEC 825 1 EN60825 1 This device is not considered harmful but the following precauti...

Page 72: ...the unlikely event that there is interference to radio or television reception which can be determined by removing the unit s batteries and AC adapter try the following Reorienting or relocating the receiving antenna Relocating the OmniBook with respect to the receiver Connecting the OmniBook AC adapter to another power outlet Connections to Peripheral Devices To maintain compliance with FCC Rules...

Page 73: ...itions 1 This device may not cause harmful interference and 2 This device must accept any interference received including interference that may cause undesired operation Canada This digital apparatus does not exceed the Class B limits for radio noise emissions from digital apparatus as set out in the radio interference regulations of the Canadian Department of Communications Le présent appareil nu...

Page 74: ...e Ave Cupertino CA 95014 U S A declares that the following product Product name HP OmniBook XE Series Options All conforms to the following product specifications Safety IEC 950 1991 A1 A2 A3 A4 EN 60950 1992 A1 A2 A3 A4 GB4943 1995 IEC 825 1 1993 EN60825 1 1994 EMC CISPR 22 1993 EN 55022 1994 Class B 1 GB9254 1988 EN 50082 1 1992 IEC 801 2 1991 prEN 55024 2 1992 4kV CD 8kV AD IEC 801 3 1984 prEN ...

Page 75: ...es Operation is subject to the following two conditions 1 this device may not cause harmful interference and 2 this device must accept any interference received including interference that may cause undesired operation The HP F1740A and F1454A AC DC adapter used with this product is designed to operate on all power systems other than IT power systems 1 The product was tested in a typical configura...

Page 76: ......

Page 77: ...10 F1739A battery 11 F1740A AC adapter 10 11 floppy disk drive access light 17 location 14 Fn key DOWN ARROW volume 26 F1 contrast 26 F12 display 26 F2 contrast 26 F3 suspend 26 F3 System standby 50 F4 suspend 26 F4 System standby 50 F5 hibernate 26 51 F6 mute 26 NumLock scroll lock 26 UP ARROW volume 26 H hard disk drive access light 17 location 15 protecting 46 replacing 31 hibernate 51 hibernat...

Page 78: ...S safety laser 71 LED 71 power 69 voltage 69 scandisk 47 Scroll Lock status light 17 serial port location 16 service HP service center 71 shut down 50 51 software 10 license 3 speakers location 13 Start menu 50 51 status lights battery 52 location 17 power 21 support 71 System standby 50 system off button location 15 using 51 T touch pad 28 47 location 13 using 28 turning off manually 50 turning o...

Reviews: