


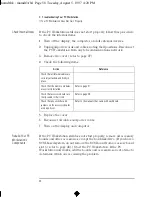


2 Installing Accessories in Your PC Workstation
Installing Accessory Boards
50
English
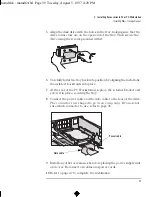
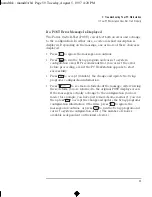
Installing the Board
The procedure described below assumes that you are installing an
accessory board in slot 1, 2, 3 or 4. If you are installing a board in slot 5,
the supplementary slot, after removing the cover (step 2, below), you
need to move the power supply unit (refer to page 29) so that you can
access the slot. The position of the retaining bracket (step 3, below) is
also different.
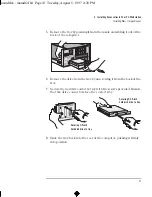
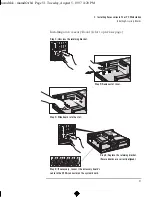
1
Turn off the display and computer, and disconnect the power supply
cords and any connection to a telecommunications network.
2
Remove the computer’s cover (refer to page 27).
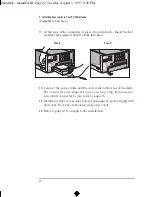
3
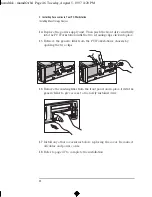
At the rear of the PC Workstation, unscrew the retaining bracket
(you can use a coin to do this) and remove it. (Refer to diagram on
facing page.)
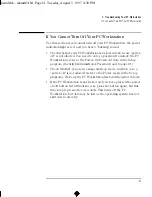
4
Find a free slot. Some boards may have preferred locations and
special installation instructions detailed in their manuals.
5
Remove the slot cover. Store it in a safe place.
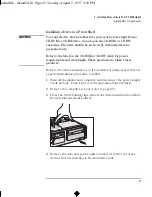
6
Hold the board horizontally by its “top” edge. Slide it into the board
guide of the chosen slot. (Refer to diagram on facing page.)
7
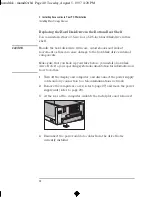
Align the board’s connector with the slot’s socket and firmly press
into the socket. Do not bend the board. Ensure the board’s connector
engages completely with the socket and does not touch components
on other boards.
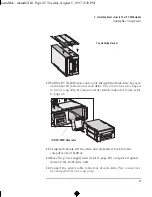
8
Secure the board by replacing the retaining bracket at the rear of the
PC Workstation. Ensure that all accessory boards and slot covers are
correctly aligned and firmly secured by the bracket.
9
If you have installed a VESA-standard graphics adapter board,
connect the accessory board’s cable to the VESA pass-through
connector on the system board.
10
Install any other accessories before replacing the cover. Reconnect
all cables and power cords.
mamdt.bk : mamdt2.fb4 Page 50 Tuesday, August 5, 1997 4:20 PM
Summary of Contents for Kayak XA
Page 3: ...User s Guide mamdt bk title fb4 Page iii Tuesday August 5 1997 4 20 PM ...
Page 64: ...mamdt bk mamdt2 fb4 Page 54 Tuesday August 5 1997 4 20 PM ...
Page 86: ...mamdt bk mamdt3 fb4 Page 76 Tuesday August 5 1997 4 20 PM ...
Page 87: ...4 Technical Information mamdt4 fb4 Page 77 Tuesday August 5 1997 5 25 PM ...
Page 112: ...mamdt4 fb4 Page 102 Tuesday August 5 1997 5 25 PM ...
Page 128: ...mamdt bk mamdt5 fb4 Page 118 Tuesday August 5 1997 4 20 PM ...
Page 132: ...mamdt bk glossary fb4 Page 122 Tuesday August 5 1997 4 20 PM ...
Page 136: ...mamdt bk mamdt ix Page 126 Tuesday August 5 1997 4 20 PM ...
Page 148: ...mamdt bk mamdtsp fb4 Page 138 Tuesday August 5 1997 4 20 PM ...