background image


Enclosure options  25 

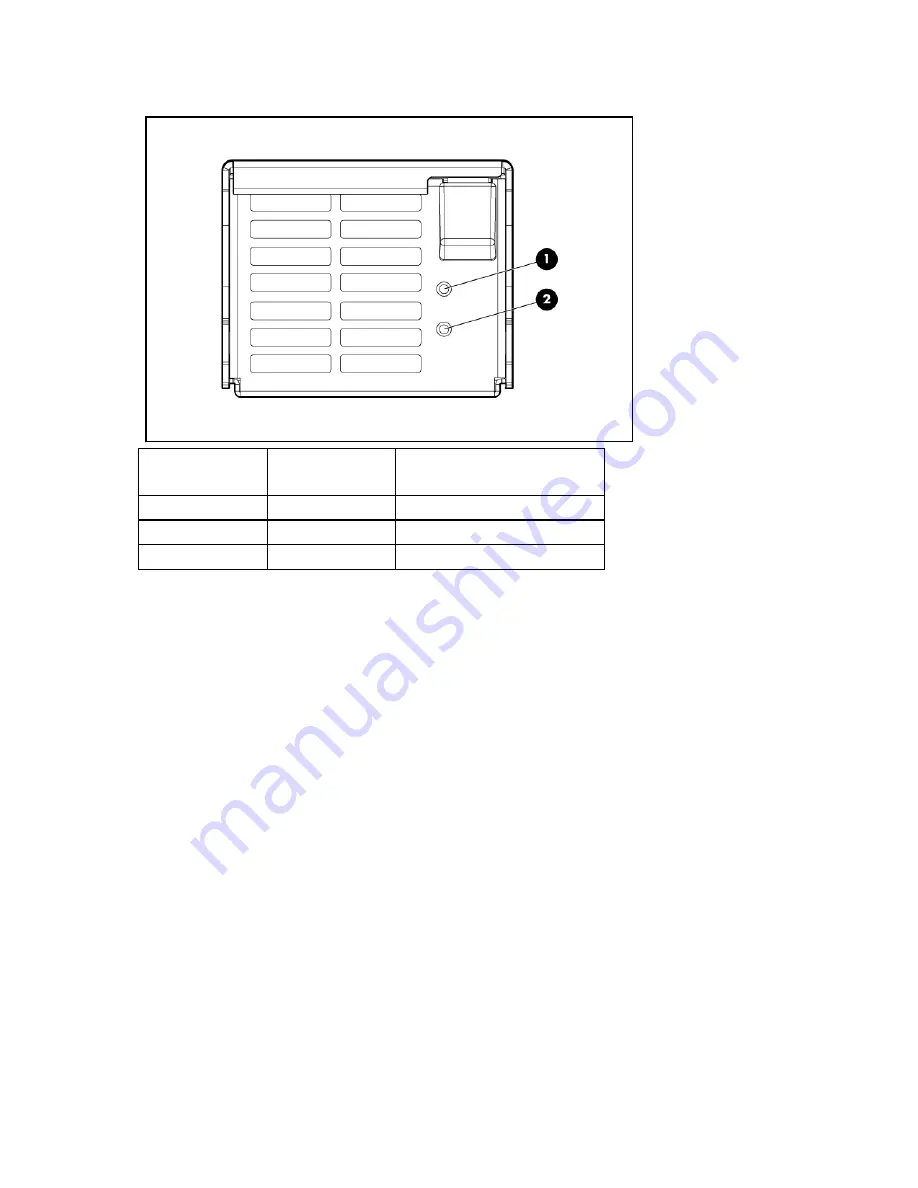
Power supply LEDs 


Power LED 1 

(green) 

Fault LED 2 

(amber) 

Condition 

Off 

Off 

No power to the power supply 

On Off Normal 
Off 

On 

Power supply failure 


Installing a power supply 

Install the power supplies based on the total number of supplies needed: 


Two power supplies: Bays 1 and 4 


Three power supplies: Bays 1, 2, and 4 


Four power supplies: Bays 1, 2, 4, and 5 


Five power supplies: Bays 1, 2, 3, 4, and 5 


Six power supplies: All bays 

Install power supply blanks in any unused power supply bays. 
To install a power supply: 

1.


To gain access to all power supply bays, slide the HP BladeSystem Insight Display to the right or left. 

Summary of Contents for Integrity BL870c

Page 1: ...HP BladeSystem c7000 Carrier Grade Options Installation Guide Part Number 5991 8062 September 2009 Second Edition ...

Page 2: ...oducts and services Nothing herein should be construed as constituting an additional warranty HP shall not be liable for technical or editorial errors or omissions contained herein Intended audience This document is for the person who installs administers and troubleshoots servers and storage systems HP assumes you are qualified in the servicing of computer equipment and trained in recognizing haz...

Page 3: ...ray 12 Routing cables through the cable management tray 13 Securing cables 13 HP BladeSystem Breaker Panel 15 Shipping carton contents 15 Required tools 16 Installing the sheet metal grommet 16 Installing the breaker panel brackets 16 Installing the breaker panel into the rack 17 Power cable connections for the breaker panel 17 Grounding the breaker panel 22 Servicing an individual breaker 22 Brea...

Page 4: ...over smooth hard surfaces or short pile carpeting Carrier grade racks do not support the use of an unloading ramp Shipping carton contents Seismic rack casters 4 Documentation Required tools The following tools are required for installation Adjustable wrench 5 16 inch Allen wrench Installing the seismic casters l WARNING To reduce the risk of personal injury or damage to equipment heed all warning...

Page 5: ... jack screw 3 Caster support bolts 4 Backing plate 5 Mounting plate To install the seismic casters 1 Retrieve the appropriate caster left or right from the kit o Install the right casters on the right side of the rack when facing the front of the rack ...

Page 6: ... holes closest to the edge are o Toward the right side of the rack for the right casters o Toward the left side of the rack for the left casters 4 Place the mounting plate against the rack so the mounting screw holes line up in the center of the plates and the alignment pins insert into the holes that are off center 5 Position the caster support against the mounting plate 6 Install and tighten the...

Page 7: ... sides of the rack Push from the front or rear of the rack only Verify that the area where you intend to install the rack and the path to the area are clean and that the floor surface is smooth To move the seismic rack 1 Verify that the eight leveling feet are set to the maximum height The leveling feet are shipped from the factory in the fully raised position but can be adjusted using a 5 16 inch...

Page 8: ...llowing tools are required for installation Torx screwdriver Installing the rack mount bracket NOTE The U locations are noted in the following procedure for enclosures installed in the lower portion of the rack When installing multiple enclosures into the rack use the U locations in parentheses for the top enclosure 1 Use a Torx screwdriver to screw the rack mount brackets into the top and middle ...

Page 9: ... cable management system NOTE The U locations are noted in the following procedure for enclosures installed in the lower portion of the rack When installing multiple enclosures into the rack use the U locations in parentheses for the top enclosure 1 Install one cage nut into the bottom holes of U5 or U9 U16 and U20 in the rear mounting rails ...

Page 10: ...that ships with the enclosure HP Business Support Center website http www hp com support HP Technical Documentation website http docs hp com Installing the seismic brace NOTE The U locations are noted in the following procedure for enclosures installed in the lower portion of the rack When installing multiple enclosures into the rack use the U locations in parentheses for the top enclosure 1 Insta...

Page 11: ... tab rests on the top brace 6 Insert the top front brackets into the slots in the front of the enclosure 7 Secure the brackets to the top brace using the provided screws HP BladeSystem Cable Management Tray The HP BladeSystem Cable Management Tray enables you to pass cables from the front of the enclosure through the tray to the back of the rack If you do not install the cable management tray you ...

Page 12: ...oles on the rail bracket o For the lower tray installation use 12U and 13U o For the upper tray installation use 25U and 26U 2 Secure the rail bracket to the rack with the screws provided 3 Align the cable management tray with the end of the rail brackets 4 Slide the tray into the brackets until it reaches the back of the rack TIP If you have any difficulty sliding the cable management tray into t...

Page 13: ...ental kinks snags or overbending dress and secure all cables CAUTION Do not use cable ties or wire ties on fiber cables Use hook and loop straps to keep spooled cable in place The enclosure has four cable guides on each side of the switch bays Each bay has its own cable guide and can hold the following types of cables Ten fiber optic cables Four SAS cables Eight Ethernet cables To secure cables fr...

Page 14: ...s 14 2 Install a wire tie for copper wire or a hook and loop strap for fiber cable Ties or fasteners cannot exceed 1 3 cm 0 5 in wide or 12 7 cm 5 0 in long 3 Secure each guide to the cable management system frame ...

Page 15: ...internal parts To install the breaker panel 1 Install the sheet metal grommet Installing the sheet metal grommet on page 16 2 Install the breaker panel brackets Installing the breaker panel brackets on page 16 3 Install the breaker panel into the rack Installing the breaker panel into the rack on page 17 4 Connect cables to the breaker panel Shipping carton contents HP BladeSystem Breaker Panel Br...

Page 16: ...ts Installed on each side of the rack To install the breaker panel brackets 1 Using the M4 screws provided install the front mounting locking brackets by attaching the two front mounting locking brackets to the front of the breaker panel 2 Using the remaining screws install the rack support brackets by attaching the two rack support brackets to each side of the breaker panel 3 Install the slider r...

Page 17: ...breakers 1 3 For connections up to 50A use breakers 4 7 Each module connecting to the breaker panel has a dedicated connection on Side A and Side B Each module connects to the same terminal number on each side Verify that the breaker installed in the front of the breaker is the correct amp size Installing Breaker Panel Output Power Cables Lugs that connect to the breaker panel output terminals mus...

Page 18: ...can accommodate up to 500 kcmil Input lugs must have two hole 3 8 inch 1 inch spacing To install the breaker panel site input power cables 1 To access the breaker panel main input studs and nuts slide the breaker panel back 2 From the rear remove the rear covers from the breaker panel 3 With the flathead screwdriver remove the rear ID panel from the rack The site power cables run behind it 4 With ...

Page 19: ...tion panel routing the site input power cables behind it 12 Reinstall the breaker panel rear cover Connecting the breaker panel to the power supplies The HP BladeSystem Breaker Panel contains six red source 48 DC volt cables and six black return cables The ends of each cable are labeled with the location which describe where to connect the cable to the breaker panel and to the DC input module The ...

Page 20: ...es one for 48V DC and one for return Breaker Panel DC Input Module Power and return Enclosure power supply A1 red source A1 black return PS1 A2 red source A2 black return PS2 A3 red source A3 black return PS3 B1 red source B1 black return PS4 B2 red source B2 black return PS5 B3 red source B3 black return PS6 NOTE Remove the rack side panels for easier cable routing if necessary For more informati...

Page 21: ...e connect the red source cable from the breaker panel to the top portion of the DC input module at a 45 angle with a 45 lug 2 Referring to the DC cable connection configuration table connect the black return cable from the breaker panel to the bottom portion of the DC input module at a 45 angle with a 45 lug 3 Connect the remaining cables according to the DC cable connection configuration table 4 ...

Page 22: ...le to the ground rail 5 Install a star lock washer between the ground rail and the lug using an M6x16mm self threading screw Servicing an individual breaker The individual breakers can be serviced with telecom equipment connected to the rear output terminals CAUTION For safety purposes a breaker must be switched off when removed or inserted 1 Switch the breaker off 2 Remove the breaker a Unscrew t...

Page 23: ...is included with the breaker panel The cover consists of a top cover and a bottom cover Both covers can be removed with the breaker panel installed Each cover is secured with three screws To access the output connections only remove the bottom cover To access the input connections remove both the top and bottom covers ...

Page 24: ...0c Server Blade http www hp com support Integrity_BL860c_Server_Blade_USG_en HP BladeSystem BL460c Server Blade http www hp com support BL460c_Server_Blade_UG_en HP StorageWorks MSA2324 Carrier Grade Storage Array http www hp com support StorageWorks_CG_2324fc_MSA_UG_en HP BladeSystem DC Power Supply Shipping carton contents HP BladeSystem DC Power Supply Documentation ...

Page 25: ...plies based on the total number of supplies needed Two power supplies Bays 1 and 4 Three power supplies Bays 1 2 and 4 Four power supplies Bays 1 2 4 and 5 Five power supplies Bays 1 2 3 4 and 5 Six power supplies All bays Install power supply blanks in any unused power supply bays To install a power supply 1 To gain access to all power supply bays slide the HP BladeSystem Insight Display to the r...

Page 26: ...ket HP Seismic Rack Mounting Kit for the MSA2324 CG The HP Seismic Rack Mounting Kit for the MSA2324 CG supports installation of the HP StorageWorks MSA2324 Carrier Grade Storage Array in the HP Seismic Rack Shipping carton contents Rear brackets right and left Rear bracket screws 4 Bracket assemblies right and left Bolt ...

Page 27: ...ack rail 3 Attach the right bracket assembly to the left right rail 4 Insert cage nuts into the rack holes 5 Align the MSA2324 CG with the rails and then slide it into the rack until the ears of the MSA2324 CG are about 1 to 2 inches from the rack front rails 6 Attach a flat washer between the right mounting ear bottom hole and the rack and then loosely attach the bracket to the rear bracket assem...

Page 28: ... washer 2 Screw 3 Flat washer 4 Bolt 5 Ground cable lug Position between ear and rail cable not shown 8 Loosely attach the rear brackets to the rear bracket assemblies 9 Attach the loose end of the ground cable to the front rack ground rail 10 Verify that the MSA2324 CG is evenly spaced between the right and left rack rails and then tighten the front and rear bracket screws ...

Page 29: ...Enclosure options 29 ...

Page 30: ...Acronyms and abbreviations 30 Acronyms and abbreviations CG carrier grade DC domain controller MSA Modular Smart Array SAS serial attached SCSI ...

Page 31: ...stallation enclosure 10 installation rack mount bracket 8 installation seismic brace 10 installation seismic rack casters 4 installation sheet metal grommet 16 installing the seismic rack mounting kit 27 L LEDs power supply 25 P power cables 17 18 19 power supplies 24 25 power supplies connecting to breaker panel 19 power supply bay numbering 24 power supply LEDs 25 power supply installing 25 R ra...

Reviews: