background image

Menu


Settings


 47 

EN2H-0402GE51 

R0316 


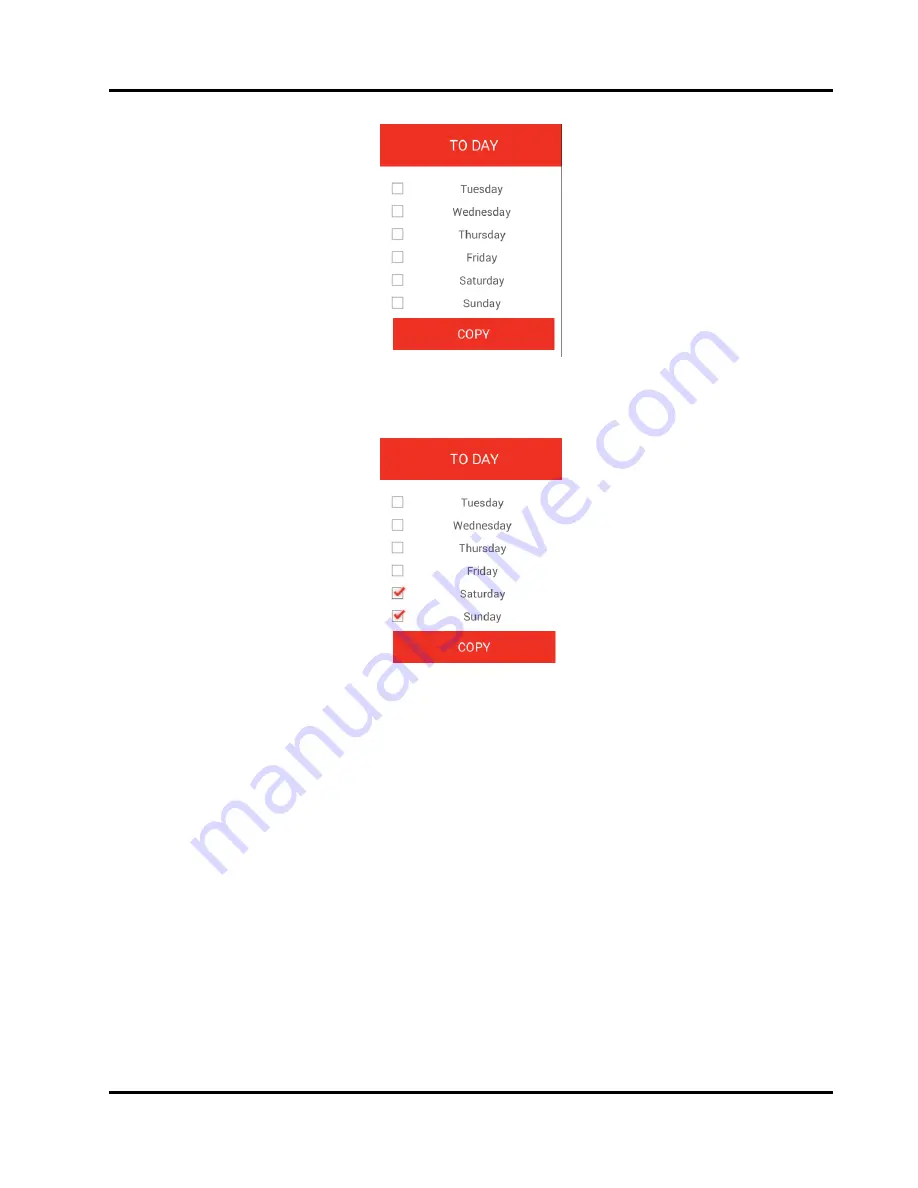
6.  Tap the check box in the listed target days to which you want to copy the time 

schedules of the selected day.


7.  Tap on the 

Copy

 button. 


Summary of Contents for Smile

Page 1: ...Honeywell EN2H 0402GE51 R0316 Operating Instructions Smile Connect System ...

Page 2: ...EN2H 0402GE51 R0316 ...

Page 3: ...e App 10 7 System Log on Log off 11 7 1 Selection of Heating System 11 7 1 1 User Roles and Access Rights 13 7 1 2 Picture Rights 14 7 2 The Home Screen 14 8 Room Temperature Adjustment 16 9 Operating Modes and Quick Actions 17 9 1 Operating Modes of the Time Program 17 9 2 Actions 17 9 2 1 Applying an Action 20 10 Menu Settings 23 10 1 Editing the User Profile 23 10 2 Adapting the Design of the S...

Page 4: ...Table of Contents EN2H 0402GE51 R0316 4 ...

Page 5: ...f the system is used in an improper fashion 1 3 Personnel Qualification The electrical installation initial operation and servicing of the device must be performed by qualified electrical technicians who have been authorized by the operator The technicians must have read and understood these operating instructions and must follow the procedures set forth therein The requirements of a qualified ele...

Page 6: ...N 15232 by using a boiler connection The single room control is available for heating systems with wall radiators and underfloor heating systems regardless of the manufacturer The Smile Connect System can be connected to the heat source the boiler via a 0 10V interface The Smile Connect System supports gas and oil heating with heat pumps pellet fed installations and solar heating 3 Components 3 1 ...

Page 7: ...he Smile controller The Smile Connect communicates via Smile Bus with the SDC controller 3 3 Smile App The App is installed on mobile end devices such as Smartphones or Tablets iOS or Android and is used to control the Smile Connect system 3 4 WLAN LAN Router provided by customer The customer s WLAN LAN Router provides operation and communication with the SDC controller and with the Smile Connect ...

Page 8: ...e g hydraulic code and reset If supply circuits are controlled via a room sensor at the variable input VE or via the Bus remote operation tool SDW10 or SDW30 then these supply circuits cannot be controlled via Smile App In order to control the supply circuits via Smile App the room sensors or the remote controls have to be removed 4 2 Smile App The Smile App represents the user interface of the Sm...

Page 9: ...GE51 R0316 4 Make sure that the device is connected to the home network View the WLAN settings of your Apple iOS device and or Android device and check if the WLAN is online and connected to the correct network 5 Start the Smile App ...

Page 10: ...are only for emergency operation without Smile Connect The Info button is available Emission test function and manual operation function is available 5 1 End Devices Operating Systems and User Interfaces The Smile App can be used on Tablet and Smartphone devices with Android or IOs operation system In these Operating Instructions operation with a Tablet with Android operation system is described T...

Page 11: ...icon to display the terms of use of the Smile App Tutorial Tap on the icon to display the tutorial of the Smile App 7 System Log on Log off 7 1 Selection of Heating System On the start screen all available heating systems and displayed and can be selected Normally only one heating system is available and can be selected Exceptions are You are operating multiple Smile systems The user of the device...

Page 12: ...ppear To log off from the system please tap the icon Login via direct entry of the Smile Connect IP address In rare cases it could happen that no Smile Connect can be found In this case you can log into the system by entering the IP address of the Smile Connect Note You will find the IP address of the Smile Connect under Network in the Setup wizard see Installation instructions MU1H 0603GE51 Alter...

Page 13: ...s are available User The user can control the rooms for which he is authorizated The user has access to the settings My Profile Time Schedules Design and Trends Owner The owner can manage all rooms The owner has access to all settings to the menu Smile Connect The owner has limited rights in the Expert area By using the Expert role the owner can edit delete and create users Expert The expert has t...

Page 14: ...show up on the left side and can be selected By tapping on the gray icon more rooms will appear In a scroll field in the middle you can adjust the desired temperature for a selected room The quick actions will show up on the right side and can be selected Rooms Rooms will show up on the left side with their room pictures if they are attached Below a room picture the current temperature will appear...

Page 15: ...ules Preheating of the hot water reservoir to comfort set point value and of the rooms to the comfort temperature Warm up boost When activated the rooms will be preheated as quickly as possible to the adjusted comfort temperature including a fixed temporary increase Only the installer can make the temperature adjustment in the menu Expert Standby Operation Switches off the heating Antifreeze prote...

Page 16: ...xiting the Home Screen Tap on the button to return to the start screen 8 Room Temperature Adjustment 1 Log on and open the Home screen if not already done 2 Tap on the room on the left side The selected room is marked with a red frame The current room temperature will appear on the right side below the picture 3 In the middle of the Temperature scroll field wipe up to increase the temperature or w...

Page 17: ...rature is valid until the end of the cycle time point but is at least still 3 hours active It is not possible to extend the actual cycle time heating by setting an earlier comfort temperature Rather the extension can be pre adjusted only using the Party action During the heating phase a premature change into the setback phase is possible ecological During the setback phase a premature change into ...

Page 18: ...dicated rooms Each action can be stopped at any time by tapping on the Stop button Note Multiple actions can be executed simultaneously per room Activated actions are displayed in red color The heating circuit demand is always carried out according to the principle of comfort before efficiency i e the action with the higher set point is executed first Example If the Party and Holidays actions are ...

Page 19: ... until a maximum of 30 days Party Action The Party action provides an overlay of the set time schedules for the dedicated rooms As long as the Party action is active the corresponding comfort temperature is valid for the dedicated rooms This action is deactivated after the set run time has expired The run time of the action can be set in steps of one hour until max 12 hours Example Normally at 10 ...

Page 20: ...fast achievement of the comfort temperature in the dedicated rooms When activated the comfort temperature plus a fixed temporary temperature increase will heat up the rooms as quick as possible The duration of the function is defined or can be made visible by tapping again on the icon The run time of the action can be adjusted in 30 minute steps until a max of 120 minutes Standby Action The Standb...

Page 21: ...to the particular automatic operation 1 Log on and open the Home screen if not already done 2 Tap on the left side on the room The selected room is marked with a red frame The corresponding icon on the left side below the picture shows the current operating mode time program or quick action manual selection 3 On the right side tap on the quick action A dialog window will appear for defining the ac...

Page 22: ...w for those rooms which you want to exclude from the action The rooms excluded from the action are marked with a gray frame By default the selection you make here is permanently saved If you want to apply this action only once to a dedicated number of rooms then tap on the enabled save permanently check box to remove the check mark 5 Tap on the Save button The Economy dialog window redisplays ...

Page 23: ...0 Menu Settings By tapping on the gearwheel icon you will reach the Settings operating level The Settings operating level provides access to extended functions menus The My Profile Design Time schedules and Trends menu points are available to all users Experts and owners have additional access to the Rooms User Devices Quick Actions and System menu points 10 1 Editing the User Profile In the My Pr...

Page 24: ...ap on the user s picture 2 Then tap on the source Camera generate a photo or Gallery picture selection of data volume from which you want to assign the new picture to the user Changing the password 1 Tap on the Change password button in order to change the password of the currently signed in user ...

Page 25: ...a minimum of 5 digits in upper case and lower case letters 4 Tap on the Save button Editing the User Profile 1 Tap on the Change Profile button in order to change the user data of the currently signed in user You can change the title the email address and the first names and surnames The role of the user below the picture cannot be changed ...

Page 26: ... icon On the right side the Design area appears Figure 6 The Design area Changing the Background Picture From the gallery you can select a background picture or directly generate a picture via the device s camera device dependent Alternatively you can also select one of the four Smile System standard background pictures provided 1 Tap on the Background picture icon in order to change the App s bac...

Page 27: ...e Standard and then select the source Sound 1 Tap on the Sound icon to switch the acoustical feedback for the temperature scroll field on or off 2 Tap on the check box on the right side to switch on the sound checkmark or switch off no checkmark 3 Tap on the Save button ...

Page 28: ...ill appear Figure 7 The Rooms area Note The available rooms are created during startup by the expert Within this procedure the names of the rooms are also defined The Rooms area is available only to users with the Expert or Owner user role During the first use all rooms appear in this view No room groups are yet created for the creation of room groups see chapter Creating Room Groups on page 32 Wi...

Page 29: ...the picture of a room assign rooms to particular users Changing Room Names 1 In the Rooms area tap on the room The Room Settings dialog window will appear 2 Tap into the field of the room name and insert the desired name The change has no effect on the standard name provided by the Setup wizard of Smile Connect The standard name can be changed only via professional mode Settings System Expert of t...

Page 30: ...sers not authorized to control this room are shown with a gray frame By tapping on the respective user the rights for the given room can be issued or revoked 2 Tap on the user 3 Tap on Save to adapt the settings for the room Changing Room Pictures To change the room picture tap on the room picture on the top left You can create a picture via the camera of the device or select one from the gallery ...

Page 31: ... of Owner Deleting Rooms Rooms can be deleted only via the setup wizard The delete procedure always affects the selected room and all following rooms that have already been created If several rooms have been created then it is not possible to delete a single room in between these created rooms ...

Page 32: ...Groups 1 In the Rooms area tap on the icon A menu appears that specifies the rooms and room groups 2 Tap on the Roomgroups tab The Edit Group dialog window will appear In the Roomgroups area you can edit change name add and delete room groups 3 To work on a room group tap on the icon The Edit Group dialog window will appear 4 Change the name 5 Tap on the OK button The Roomgroups dialog field will ...

Page 33: ...K button The room group is generated and added to the room group list 9 To delete a room group tap on the icon in the Rooms Roomgroups dialog window The Delete Group dialog window will appear 10 Tap on the OK button The room group then is deleted from the room group list 11 To move a room group tap on the icon in the Rooms Roomgroups dialog window and move the room group into the resultant menu ...

Page 34: ...r with the exception of the user currently signed in Figure 8 The User area In the User area all created users show up with the exception of the user currently signed in You can create new users and edit existing user data Beside this you can send invitations for Smile Connect to other users To each user a user role is assigned that determines the rights of the users The following user roles are a...

Page 35: ...ers 1 In the User area tap the icon The Create User dialog window will appear 2 Select the user role for the new user by tapping on User 3 Type in the personal data first name surname user name and password 4 Tap on the rooms you will assign to the user ...

Page 36: ...dit User dialog window will appear A user is edited in the same way as a user is created There are two additional buttons the Password button for changing the password and the User button for deleting the user 2 Perform the desired changes 3 Tap on the Save button Note The user data of the currently signed in user must be changed in the My Profile area ...

Page 37: ... will appear 2 Scan the QR Code with another operating unit or tap on the Send E Mail button 3 Enter the desired E Mail address and tap on the OK button The invited user connects the system to the App by tapping on the Accept invitation button in the E Mail or by scanning the QR Code in the E Mail with its operating unit Note The App has to be downloaded separately for each device Smartphone Table...

Page 38: ...Menu Settings EN2H 0402GE51 R0316 38 the system The user s access data must be conveyed to him her separately The invited user must have installed the App on his her device in order to use Smile Connect ...

Page 39: ... menu bar on tap the Devices icon On the right side the users and devices which the users have used to log on to Smile Connect will appear Figure 9 The Devices area Operating Unit Log Out 1 Tap on the control device that you want to delete The Edit Control Device dialog window will appear The user name and the control device description will be shown ...

Page 40: ...ecessary 10 7 Working with Actions Rooms are assigned to the actions in the Actions area 1 In the menu bar tap on the Quick Actions icon On the right side the assignable actions Economy Holiday etc will appear Figure 10 The Quick Actions area 1 Tap on an action e g Economy The dialog window of the relevant action in this case Edit Quick Action Economy will appear ...

Page 41: ...ssigned rooms are marked with a gray frame 3 Tap on the Save button Note An enabled quick action is applied only to those rooms that are assigned to the user Example The action Warm up boost is assigned to all rooms The user has assigned only the Living room and Kitchen rooms If the user enables the quick action Warm up boost the action is enabled only for the Living room and Kitchen rooms ...

Page 42: ...r day can be created The following default settings are pre adjusted Comfort temperature comfort hi Sun icon 21 0 C Comfort temperature comfort low Sun icon 20 0 C Setback temperature night Moon icon 12 0 C Heating times Monday through Sunday between 06 00 a m and 10 00 p m 1 In the menu bar tap on the Devices icon On the right side the rooms will be displayed for which time schedules can be edite...

Page 43: ... on the room The Room Settings for dialog window will appear 2 Do the changes as follows To change a time cycle tap on the start or the end of the cycle time and with your finger pressed drag the start or the end to the desired time The currently selected time will appear temporarily ...

Page 44: ...nu Settings EN2H 0402GE51 R0316 44 To move a time period tap on the middle of the bar and with your finger pressed drag the bar to the desired position The currently selected times will appear temporarily ...

Page 45: ... delete a period pull the ends of the cycle time together 3 Tap on Save to save the settings for the room Switching between Comfort Hi and Comfort Lo By simply tapping on the period you can switch from comfort temperature Comfort Hi to Comfort Lo and vice versa 1 Tap on the period for about 2 to 3 seconds The period changes from Comfort Hi red to Comfort Lo green and vice versa ...

Page 46: ... 1 In the Time area tap on a room The Room Settings for dialog window will appear 2 Tap on the icon at the room name if you want to transfer the time schedules of the selected room to other rooms The Copy Time Schedules of Room dialog window appears 3 Tap on the rooms to which you want to copy the time schedules 4 Tap on the Copy button 5 Tap on the icon before the day if you want to transfer the ...

Page 47: ...Menu Settings 47 EN2H 0402GE51 R0316 6 Tap the check box in the listed target days to which you want to copy the time schedules of the selected day 7 Tap on the Copy button ...

Page 48: ...ms hot water production and heating generator are shown Figure 12 The Trends area 1 In the Settings menu tap on the Trends icon 2 Select the rooms of which the trends shall be displayed 3 Tap on Save to memorize the trend data Note A maximum of five rooms for simultaneous display can be selected so that the display will not get too confusing 10 10 System The System area is available only to expert...

Page 49: ...Menu Settings 49 EN2H 0402GE51 R0316 ...

Page 50: ...Menu Settings EN2H 0402GE51 R0316 50 ...

Page 51: ...Menu Settings 51 EN2H 0402GE51 R0316 ...

Page 52: ...lle Z A La Pièce 16 Switzerland by its Authorized Representative Automation and Control Solutions Honeywell GmbH Böblinger Stra e 17 71101 Schönaich Germany Phone 49 0 7031 637 01 Fax 49 0 7031 637 740 http ecc emea honeywell com Printed Germany All rights and changes reserved EN2H 0402GE51 R0316 Art 0450079520 ...

Reviews: