9-4
Date of Issue: April 2008
WDP30X
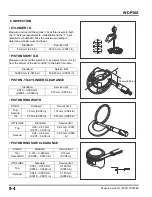
b. INSPECTION
• CYLINDER I.D.
Measure and record the cylinder I.D. at three levels in both
the “X” axis (perpendicular to crankshaft) and the “Y” axis
(parallel to crankshaft). Take the maximum reading to
determine cylinder wear and taper.
• PISTON SKIRT O.D.
Measure and record the piston O.D. at a point 10 mm (0.4 in)
from the bottom of the skirt and 90° to the piston pin bore.
• PISTON -TO-CYLINDER CLEARANCE
• PISTON RING WIDTH
• PISTON RING SIDE CLEARANCE
Standard
Service limit
60.0 mm (2.36 in)
60.165 mm (2.3687 in)
Standard
Service limit
59.985 mm (2.3616 in)
59.845 mm (2.3561 in)
Standard
Service limit
0.015 ~ 0.050 mm
(0.0006 ~ 0.0020 in)
0.12 mm (0.005 in)
K1QX2
Standard
Service limit
Top/
Second
1.5 mm (0.059 in)
1.37 mm (0.054 in)
Oil
2.5 mm (0.098 in)
2.37 mm (0.093 in)
UT1(2)QX2
Standard
Service limit
Top
0.95 ~ 0.97 mm
(0.037 ~ 0.038 in)
0.93 mm (0.037
in)
Second
0.94 ~ 0.96 mm
(0.037 ~ 0.038 in)
0.92 mm (0.036
in)
K1QX2
Standard
Service limit
Top/
Second/Oil
0.015 ~ 0.045 mm
(0.0006 ~ 0.0019 in)
0.15 mm
(0.006 in)
UT1(2)QX2
Standard
Service limit
Top
0.035 ~ 0.070 mm
(0.0014 ~ 0.0028 in)
0.150 mm
(0.0059 in)
Second
0.045 ~ 0.080 mm
(0.0018 ~ 0.0031 in)
0.150 mm
(0.0059 in)
10 mm (0.39 in)
Revised: April 2012 (PSV61TDP00E2)
Summary of Contents for WDP30X
Page 3: ...ii Revised April 2012 PSV61TDP00E2 WDP30X...
Page 9: ...1 6 Date of Issue April 2008 WDP30X...
Page 19: ...2 10 Date of Issue April 2008 WDP30X...
Page 43: ...6 2 Date of Issue April 2008 WDP30X...
Page 47: ...7 4 Date of Issue April 2008 WDP30X...
Page 55: ...8 8 Date of Issue April 2008 WDP30X...


