


Page 19
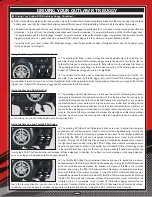
ChASSIS TUNING GUIDE
n
Adjusting the Slipper Clutch, Continued....
resetting the slipper clutch to the factory setting
q
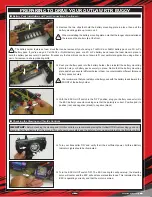
To reset the slipper clutch to the factory setting, the flanged lock nut should be adjusted so that there is a 3mm space between the
back of the flanged lock nut and the front of the motor mount.
Running the slipper clutch too tight can result in damage to the transmission.
Do not tighten the slipper clutch any more
than necessary.
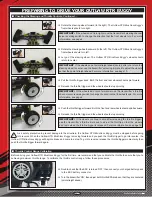
The front upper camber links can be moved up or down on the shock tower to adjust bump steer. Generally, if you move the camber
links into a lower position, this will increase bump steer, which can be helpful on tight tracks. For a larger track, you may want to move
the camber links to a higher position to decrease bump steer.
n
Adjusting Bump Steer - Front
recommended initial settings
l
We recommend initially leaving the front upper camber links in the factory locations.
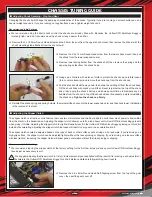
q
Remove the two 2.5 x 12mm Round Head screws and the two 2.5mm lock nuts from
the upper inner camber links, then remove the camber links from the shock tower.
q
Reinstall the camber links into a different hole in the stock tower, either higher or lower,
making sure to tighten the lock nuts securely. Installation is the reverse of removal.
q
After making the desired adjustment, reinstall the gear cover. Installation is the reverse of removal.
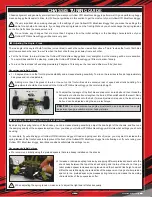
q
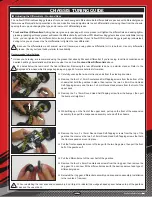
While holding the spur gear with your finger to keep it from turning, use a 7mm
open-end wrench and tighten the flanged lock nut (turn clockwise) to tighten the
slipper clutch (less slip) or loosen the flanged lock nut (turn counter-clockwise) to
loosen the slipper clutch (more slip).
PRO TIP:
Remove the battery mounting plate to give you more room to get your
wrench on the flanged lock nut.
Continued On Next Page
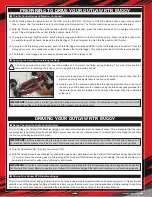
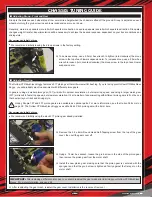
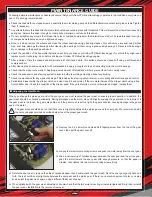
q
Remove the 3 x 18.5mm Round Head screw and the 2.5mm lock nut from the upper
shock mount, then remove the shock (with the shock mounting stud attached) from
the shock tower.
q
Reinstall the shock and the shock mounting stud into the desired mounting hole,
making sure to tighten the screw and lock nut securely. Installation is the reverse
of removal.
The
Outlaw RTR Brushless Buggy
shock towers feature several different mounting positions for the shocks. By changing the location
of the upper shock mounts you can make the shock feel stiffer or softer as the buggy rolls from side-to-side. In general, moving the
shocks toward the outside will make the shock stiffer and moving the shock toward the inside will make the shock softer. You will need
to experiment with these settings to find something that suits both your track and driving style. A good starting point is to adjust the rear
shocks. Moving the rear shocks toward the outside will give more 'bite' (traction) in the turns. However, depending on how you drive,
you might want to move the shocks toward the middle. This will give a more 'plush' suspension.
n
Adjusting Shock Mounting Positions - Front and Rear
recommended initial settings
l
We recommend initially leaving the shock mounting positions in the factory locations.
Summary of Contents for Outlaw 4WD
Page 1: ...Page 1 Kit Product 143400...
Page 37: ...Page 37 NOTES Continued On Next Page...
Page 38: ...Page 38 NOTES...


