background image

5. Function Menu Screen Display

18

 A11766820A

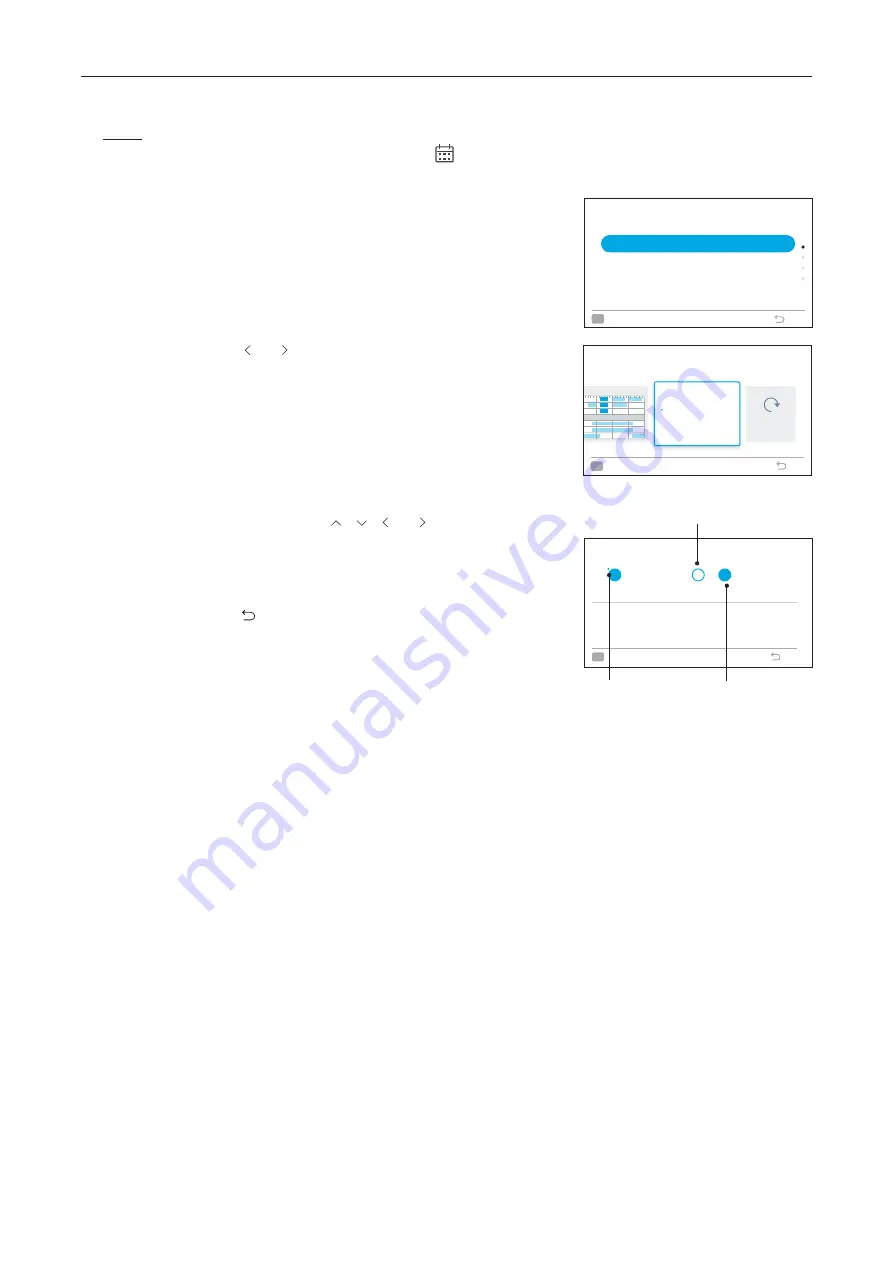
5.2.3 Schedule Holiday Setting

NOTE:

• 

For holiday setting, the schedule setting indicator 

 turns off.

1.  Set schedule holiday

Step1.  Select "Operation Schedule" on the "Function Menu" 

screen and press "OK".

• 

If the current time is not set, the "Adjusting Date/

Time" setting screen is displayed.

• 

If no schedule or holiday has been set, Step3 is 

displayed.

Step2.  Press " " or " " to select "Verify Holiday Settings", and 

then press "OK" .

Function Menu

Power Saving/Night Quiet Schedule

Power Savings Setting
Night Quiet Operation

Operation Schedule

Simple Timer

OK


Select

Back

(Mon) 16:30

Operation Schedule

Verify Holiday Settings

ON

Reset All

Reset All

Mon

Tue

Wed

Thu

Fri

Sat

Sun

0

6

12

18

Holiday

Dec 16 - Dec 23

M


T


W

3

3


T


F


S


S

Turn OFF 

Schedule

Back

OK

Select

(Mon) 16:30

Step3.  Select the day of the week (from Mon. to Sun.) to set as a 

holiday by pressing " " " " " " or " ". 

Press "OK" to select "Holiday setting" or "Cancel". 

"

" indicates the current day of the week. 

"

Ο

" indicates the holiday to be selected.  

"

" indicates the holiday already set. 

Press " " to confirm the setting and return to Step2.

Holiday Setting

Mon

16

17

18

Tue

Wed

Thu

Fri

Sat

Sun

Holiday settings available for next 

6

 days, not including today. 

(Mon) 16:30

20

21

22

19

Back

OK

Select

    Holiday 

already set 

      Holiday 

to be selected

Current day 

of the week

Summary of Contents for PC-ARFG1-A

Page 1: ... OPERATION MANUAL Advanced Color Wired Remote Controller MODELS PC ARFG1 A PC ARFG1 M PC ARFG1 U A11766820A 26 0 Conference Room Cool Fan Speed Louver Temp Menu 26 0 ...

Page 2: ...3 5 5 Power Saving Night Quiet Schedule Setting 24 5 6 Power Consumption Display 27 5 7 Autoboost Setting 28 5 8 Comfort Setting 29 5 9 Setback Setting 30 5 10 Elevating Grille Setting 32 5 11 Filter Reminder Reset Setting 33 5 12 FrostWash 34 5 13 Individual Louver Setting 40 5 14 Louver Open Close 42 5 15 Ventilation 42 6 Screen Display Setting 43 6 1 Adjusting Date Time 43 6 2 Run Indicator Bri...

Page 3: ...If the unit is not installed appropriately correctly injuries may occur because of a falling unit Use appropriate Personal Protective Equipment PPE such as gloves protective goggles and electrical protection equipment and tools suited for electrical operation purposes When transporting be careful when picking up moving and mounting these units Although the controller may be packed using plastic st...

Page 4: ...operation temperature boundary in the manual If there is no specified temperature use the unit within the operation temperature boundary of 32 F to 104 F 0 C to 40 C Perform properly electrical wiring work The details of the electrical wiring connection are described in the Electrical Wiring of corresponding Installation and Maintenance Manual The advanced color wired remote controller has near fi...

Page 5: ...ure to wait at least five minutes before turning off the main power switch to the indoor or outdoor units Otherwise water leakage or electrical breakdown may result Do not open the service cover or access panel to the indoor or outdoor units without turning OFF the main power supply Before connecting or servicing the controller or cables to indoor or outdoor units open and tag all disconnect switc...

Page 6: ...o turn on the backlight is not functional Make sure to press the buttons lightly with your fingertips Do NOT press the buttons or anything with sharp points such as a ball point pen The operational functionality of the controller may become damaged Temp 26 0 Conference Room Fan Speed Louver Menu Cool 26 0 Directional Key ON OFF Button Run Indicator Room Name Set Temperature Fan Speed Operation Mod...

Page 7: ...3 Air Conditioner ON When air conditioner is on press or to switch below items Temperature Mode Fan Speed Louver Menu Temperature Mode Fan Speed Fan Speed Louver Menu Main Cool A C 26 0 Temp 26 0 A A Cool Mode Cool Fan Speed Louver Temp Menu Low Fan Speed Low Mode Fan Speed Louver Temp Menu Louver Menu Cool Fan Speed Louver Temp Menu INDV Louver Indirect air Cool Fan Speed Louver Menu Service Inst...

Page 8: ...ibutor for details Dry mode may not be available depending on the type of indoor unit 3 3 Temperature Setting 1 Temperature setting Step1 Press or to select Temp Fan Speed Louver Menu Main Cool A C 26 0 Temp 26 0 Step2 By pressing the temperature is increased by 1 F 0 5 o C to a maximum of 86 F 30 o C By pressing the temperature is decreased by 1 F 0 5 o C Cool Dry Fan operation A minimum of 66 F ...

Page 9: ...e fan speed changes as follows High2 High Med Low2 Low Breeze Auto A NOTES During dry operation the fan speed is automatically changed to Low and cannot be changed to another fan speed Low is NOT displayed on the liquid crystal display LCD at this time The present setting status is displayed on the LCD Some of the fan speed settings as High2 or Auto may not be available depending on the indoor uni...

Page 10: ...e indoor unit without the auto louver mechanism the indication of Louver is NOT available on the LCD The air flow angle is different for each indoor unit type Check for detailed information in each Operation Manual for indoor unit The louver position on the LCD and the actual louver position may not match during the Auto Swing To set the louver positions set the angle after checking the position o...

Page 11: ... Page 7 3 6 1 Operation Start 1 Operation starts Step1 Press On Off The run indicator turns on and the operation starts Fan Speed Louver Menu Cool 26 0 Temp 26 0 Conference Room 3 6 2 Operation Stop 1 Operation stops Step1 Press On Off The run indicator turns off and the operation stops OFF Main A C 26 0 Temp NOTE After the heating operation is stopped it may continue to FAN operation for about 2 ...

Page 12: ...r stop 19 Radiant Sensor In order to efficiently heat the room when the radiant temperature is low the wind direction and air volume are automatically controlled 20 Cold draft restrained In order to prevent indoor temperature from being too low 21 Noise reduction The operation noise reduction control of the outdoor unit is set 22 FrostWash is complete Indicates the frostWash is performed 23 IU tem...

Page 13: ...the operation light or the run indicator goes out but the operation continues and stops after the defrosting is completed 39 Heat Storage It cannot be operated due to the heat storage operation time 40 Dust collection It is time to collect dust in the dust box of the automatic filter cleaning unit indicates the unit to be collected 41 Central control Displayed when using the central controller Rem...

Page 14: ... The Menu screen is displayed Cool Fan Speed Louver Menu Service Installation Screen Display Setting Function Menu Menu Contact Information Temp Mon 16 30 When the air conditioner is OFF OFF A C Main Menu 26 0 Select Menu and press OK The Menu screen is displayed About the Function Menu please refer to 5 Function Menu Screen Display About the Display Settings please refer to 6 Screen Display Setti...

Page 15: ...u display please refer to the Operation Manual of the indoor unit 1 Display the function menu Step1 Select the Function Menu and press OK The Function Menu screen is displayed Step2 Press or to select the item to set and press OK Press to return to the Menu screen If the Menu screen remains unchanged for approximately 10 minutes the screen returns to the home screen Various settings are retained e...

Page 16: ...Execute ON Time OFF Time Step3 Press or to set each setting data for the selected items After setting press to confirm the settings and the screen returns to the Function Menu screen When Execute is selected press or to switch the setting items as follows Not Used Once Everyday When ON Time or OFF Time is selected the setting time can be adjusted in 30 minute increments by pressing or When is sele...

Page 17: ... 30 Back OK Select Schedule day and time setting Page 16 The desired time and temperature can be set Set up to 5 times a day on each day Schedule turn ON OFF setting Page 17 This function temporarily prevents the schedule from running Schedule operation is not performed while the schedule is disabled This setting is normally applied during long vacation Schedule holiday setting Page 18 Holidays ca...

Page 18: ...e OFF Time Set Temp By pressing or ON OFF Time and Set Temp can be set 5 different schedule timers maximum can be set for each day of the week Press OK to display the schedule time setting screen for the next day of the week Select and press OK to delete the settings of ON OFF Time and Set Temp Press to return to Step3 Operation Schedule Mon Tue Wed Thu Fri Sat Sun Back OK Select 0 6 12 18 Mon 16 ...

Page 19: ...or and then press OK Confirm the schedule enable disable setting and return to Step2 The display turns on when the schedule is ON The display turns off when the schedule is OFF Function Menu Power Saving Night Quiet Schedule Power Savings Setting Night Quiet Operation Operation Schedule Simple Timer OK Select Back Mon 16 30 Operation Schedule Turn OFF Schedule Turn OFF Schedule Turn OFF Schedule M...

Page 20: ...ion Schedule Simple Timer OK Select Back Mon 16 30 Operation Schedule Verify Holiday Settings ON Reset All Reset All Mon Tue Wed Thu Fri Sat Sun 0 6 12 18 Holiday Dec 16 Dec 23 M T W 3 3 T F S S Turn OFF Schedule Back OK Select Mon 16 30 Step3 Select the day of the week from Mon to Sun to set as a holiday by pressing or Press OK to select Holiday setting or Cancel indicates the current day of the ...

Page 21: ...K All schedule and holiday settings are reset and the screen returns to the Step3 of 5 2 1 Schedule Day and Time Setting Function Menu Power Saving Night Quiet Schedule Power Savings Setting Night Quiet Operation Operation Schedule Simple Timer OK Select Back Mon 16 30 Reset All Reset All Operation Schedule Reset All Schedule Settings Mon Tue Wed Thu Fri Sat Sun 0 6 12 18 Holiday Turn ON Schedule ...

Page 22: ...he power savings ON OFF and power savings level cannot be changed When the power savings mode is Outdoor capacity control and sub the power savings ON OFF and power savings level cannot be changed When the power savings mode is switched power savings ON OFF is set to OFF When using the power savings function the cooling and heating capacity may decrease Detailed settings can be changed from the po...

Page 23: ...Power Savings Setting screen Function Menu Power Saving Night Quiet Schedule Power Savings Setting Night Quiet Operation Operation Schedule Simple Timer OK Select Back Mon 16 30 Power Savings Setting Level ON OFF Low ON OK Select Back Mode Selection Capacity Control Power Savings ON OFF OFF ON OK Select Back When power savings is ON power savings level is displayed to indicate the power savings se...

Page 24: ...s follows Low Med High Select the level and press OK Press the screen returns to the Power Savings Setting screen You may not be able to select from the settings in the power saving details setting Function Menu Power Saving Night Quiet Schedule Power Savings Setting Night Quiet Operation Operation Schedule Simple Timer OK Select Back Mon 16 30 Power Savings Setting Level ON OFF Low ON OK Select B...

Page 25: ...g 3 Low Med and High represents the amount of noise reduction For the amount of reduction please contact related local distributor When using the operation noise reduction setting the cooling heating capacity can be decreased 1 Set the night quiet operation Step1 Select Night Quiet Operation on the Function Menu screen and press OK Step2 Press or the level changes as follows Not Set Low Med High S...

Page 26: ...nd Schedule Setting Example 1 Ο Example 2 Schedule day and time setting Page 25 You can set the desired time and level You can set up to five times a day on each day Schedule turn ON OFF setting Page 26 Schedule operation is not performed while the schedule is disabled This is a function that temporarily prevents the schedule from running It is used when there is a long vacation MED LOW HIGH OFF O...

Page 27: ...1 to No 5 and press or to select ON Time OFF Time Level By pressing or ON OFF Time and Level can be set Five different schedule timers maximum can be set for each day of the week Press OK to display the schedule time setting screen for the next day of the week Select and press OK to delete the setting of ON OFF Time and Level Press to return to Step4 Function Menu Power Saving Night Quiet Schedule...

Page 28: ...isplayed Step3 Press or to select Turn ON OFF Schedule and then press OK When the schedule is ON Turn OFF Schedule confirmation screen is displayed When schedule is OFF Turn ON Schedule confirmation screen is displayed Step4 Press or to select Yes and then Press OK Confirm the schedule ON OFF and the screen returns to Step3 Function Menu Power Saving Night Quiet Schedule Power Savings Setting Nigh...

Page 29: ...y shows an approximate value It cannot be used for tariff prorata OK Back OK Select Step3 Press or to select the display period and then press OK It switches in the order of 1 day 24 hours 1 week 7 days 1 year 12 months Power Consumption dd kWh Daily 50 100 Today 1d bef 0 2 4 6 8 10 12 14 16 18 20 22 5000 10000 1 2 Weekly 500 1000 This W 1w ago Mon Tue Wed Thu Fri Sat Sun Back OK Select Power Consu...

Page 30: ...s and is locked as Auto for 30 minutes at the longest regardless of the current setting While in this operation fan speed Auto fan level may drop as low as Low when the room temperature gets close to the setting temperature The operation starts regardless of the fan speed 1 Set the autoboost Step1 Select Autoboost on the Function Menu screen and press OK Step2 Press or the selected items changes a...

Page 31: ...Step1 Select Comfort Setting on the Function Menu screen and press OK Step2 Press or to select GentleCool Comfort and then press OK For other settings please refer to the Operation Manual of the indoor unit Step3 Press or the selected comfort level changes as follows Not Set Low Med High Select the GentleCool Comfort during cooling and press OK Press to return to the Function Menu screen Function ...

Page 32: ...en When ON Time OFF Time is selected The time changes every 30 minutes Do not set the same time for ON Time and OFF Time It s unavailable if ON time or OFF time is not set When is selected the confirmation screen is displayed Select Yes and press OK to delete the settings and the screen returns to Step2 If select Cancel the screen returns to the Setback Setting screen Function Menu Setback Setting...

Page 33: ...tion Setback Setting OK Select Back ON OFF Step1 Select Setback Setting on the Function Menu screen and press OK Step2 Press or to select ON Press OK and the screen returns to the Function Menu screen The indicator turns on when schedule operation is ON The indicator turns off when schedule operation is OFF Function Menu Setback Setting Comfort Setting Motion Sensor Setting Autoboost Power Consump...

Page 34: ...on screen in Step3 is displayed Step2 Press or to select the indoor unit of which indoor unit grille needs to be raised or lowered Press OK Step3 Press to lower the grille until it s lowered to the set distance If need to lower the distance further than the set distance press again Each press lowers the grille by 20in 50cm Pressing can stop it at any position in lowering process Step4 After cleani...

Page 35: ...hen press OK The screen returns to the Function Menu screen depending on the type of the indoor unit Step3 Press OK and the screen returns to the Function Menu screen Function Menu Individual Louver Setting Filter Cleaning FrostWash Setting Reset Filter Reminder Time Elevating Grille OK Select Back Mon 16 30 Back Cancel Yes Reset Filter Reminder Time Filter Usage Time 120 h Reset Filter Reminder T...

Page 36: ... using this feature in a VRF system For more information please refer to the outdoor unit service manual for FrostWash function 5 12 1 Function 1 Function 1 Auto FrostWash It is a function that automatically starts FrostWash when the operation is stopped after the total time that the indoor unit has been operated Auto FrostWash Flow ForstWash preparation Cooling or other mode Operate Stop Operate ...

Page 37: ...the available time slot Auto Frost Wash Schedule Available Time Slot Weekday Back 22 00 23 00 1 2 3 4 5 Press Up and Down to adjust Sunday Mon PM05 34 Set the schedule for Auto FrostWash as the following Available time slot Up to five time slots can be set Weekday Monday to Sunday and Everyday can be selected FrostWash Operation History Page 39 This function is used to check and delete the FrostWa...

Page 38: ... to select interval time and press OK FrostWash Setting FrostWash Start Enable Disable Auto FrostWash Set FrostWash Intervals Auto FrostWash Schedule FrostWash Operation History OK Select Back FrostWash Setting FrostWash Start Enable Disable Auto FrostWash Set FrostWash Intervals Auto FrostWash Schedule FrostWash Operation History OK Select Back Enable Disable Auto FrostWash OK Select Back Disable...

Page 39: ...s OK Manual FrostWash is started FrostWash Setting FrostWash Start Enable Disable Auto FrostWash Set FrostWash Intervals Auto FrostWash Schedule FrostWash Operation History OK Select Back Auto FrostWash Schedule Available Time Slot Weekday Back 08 30 10 30 13 00 17 00 17 30 19 00 1 2 3 4 5 Press Up and Down to adjust Monday Monday Monday Every Day 19 30 22 00 Mon 16 30 FrostWash Setting FrostWash ...

Page 40: ...pear when one of the remote controllers is operated after the backlight is turned on FrostWash in preparation FrostWash in progress Complete FrostWash FrostWash is Starting During FrostWash a freezing sound and fog may occur this is a normal occurrence Press OK to Stop the FrostWash operation OK Stop FrostWash Operation FrostWash in Progress During FrostWash a freezing sound and fog may occur this...

Page 41: ...on screen Select Yes and press OK to clear the FrostWash history and return to Step2 Select Cancel the screen returns to Step2 FrostWash Setting FrostWash Start Enable Disable Auto FrostWash Set FrostWash Intervals Auto FrostWash Schedule FrostWash Operation History OK Select Back FrostWash Operation History Date Start Time Result 2019 11 30 23 56 Done 2019 01 22 00 30 Done 2019 07 31 23 33 Paused...

Page 42: ...13 1 Individual Louver Setting 1 Individual louver setting Step1 Select Individual Louver Setting on the Function Menu and press OK Step2 Select Individual Louver Setting and press OK NOTE If there is one indoor unit connected with the controller Step4 is displayed Step3 Press or to select the indoor unit to change the louver direction and press OK NOTE The indoor unit displayed on the screen flas...

Page 43: ...ed on the screen flashes if an individual louver is set Step4 Press or to select Yes and press OK Cancel the individual louver setting and return to Step3 NOTE All the individual louver settings are canceled 00 00 Adjust air direction louver angle Indv OK Back 1 2 3 4 Indv Indv Indv 26 0 Cool Fan Speed Louver Temp Menu 26 0 Indv A C Individual Louver Setting Cancel Individual Louver Setting Indivi...

Page 44: ...exchanger is connected 1 Ventilation Step1 Select Ventilation on the Function Menu and press OK Step2 Press or to select the operation mode and press OK to confirm The item changes as follows A C Ventilation A C Ventilation Press to return to Function Menu 1 Louver Open Close Step1 Select Louver Open Close on the Function Menu and press OK Step2 Press or to select Yes and press OK to open close ai...

Page 45: ...time When adjusting time from the main controller the sub controller of the same refrigerant cycle will be set at the same time NOTE It is possible to adjust time from the sub controller If more than two minutes modification is done the main controller will be set at the same time Please check the main and sub display on the home screen If it is not displayed check 8 Main Remote Setting in the Ins...

Page 46: ... Format AM PM or 24Hour OK Select Back Mon 16 30 Time Format 12Hour 11 04 AM 24Hour 11 04 OK Select Back Screen Display Setting Language Setting Display Adjustment Temperature Run Indicator Brightness Adjusting Date Time OK Select Back Mon 16 30 6 1 3 Daylight Savings Time This function adjusts time forward or backward an hour when daylight savings time starts or ends 1 Set daylight savings time S...

Page 47: ...Back 8 OK Back 6 3 Display Adjustment Function Action Backlight Brightness Adjust the brightness of the backlight Backlight Dim Time Change the time when the backlight turns dim after inactivity Backlight Off Time Change the time when the backlight turns off after inactivity Screen Theme Select the screen theme as light or dark NOTE When connecting with two remote controllers the maximum backlight...

Page 48: ...off time Step1 Select Display Adjustment on the Screen Display Setting screen and press OK Step2 Select Backlight OFF and press OK Step3 Press or to select the off time intervals and press OK Press to return to Step2 Screen Display Setting Language Setting Display Adjustment Temperature Run Indicator Brightness Adjusting Date Time OK Select Back Mon 16 30 Display Adjustment OK Select Back Brightne...

Page 49: ...s 8 Backlight OFF 10 min Screen Theme Light Screen Theme Light Dark OK Select Back 26 0 26 0 6 4 Temperature Function Action Unit and Width Change temperature unit and width Display of Thermistor Temperature Show hide the thermistor temperature display on the home screen 6 4 1 Temperature Unit and Width 1 Set temperature unit and width Step1 Select Temperature on the Screen Display Setting screen ...

Page 50: ...on 16 30 Temperature Display of Thermistor Temperature Unit and Width OK Select Back Display of Thermistor Temperature OK Select Back Not Display Display 26 0 Cool Fan Speed Louver Temp Menu 26 0 Conference Room Cleaning Filter 26 C AC off in 0 5 hrs Sav Low Main The icon indicates that the thermistor temperature is set to be displayed Unit and Width Unit Width C 0 5 Back OK Step3 Press or to selec...

Page 51: ...s function is to change the touch sound on keypad 1 Set keypad touch sound Step1 Select Keypad Touch Sound on the Screen Display Setting screen and press OK Step2 Press or to select the sound volume and press OK Press to return to Screen Display Setting screen 7 Contact Information The screen displays service contact information and the latest alarm code 1 Set contact information Step1 Select Cont...

Page 52: ... C Main 26 0 Temp Cool Fan Speed Louver Temp Language A C Main 26 0 26 0 OFF A C Main Language 26 0 Cool Fan Speed Louver mp Language Off Timer Indv Louver Cool OFF A C Main 26 0 A A Cool Mode Cool Fan Speed Louver Temp Language OFF A C Main Off Timer ol Fan Speed Louver Language Off Timer Menu Language C 本語 English English English F 简体中 繁體中 OFF A C Main Low 26 0 Low Fan Speed Low Mode Fan Speed Louv...

Page 53: ...ge Screen Display Setting Make settings for screen display Please refer to 6 Screen Display Setting Reset Controller Setting The off timer is reset to not set the language setting is reset to English and the temperature setting unit is reset to C When the wired controller is used in a hotel the settings are easily initialized after checking out More Settings More Settings has same features with Me...

Page 54: ...ase 30 minutes of each step for 0 5 to 9 5 hours 1 hour of each step for 10 to 23 hours 8 3 Reset Controller Setting 1 Reset controller setting Step1 Press or to select Reset Controller Setting in the Menu screen and press OK Step2 Press or to select Reset and press OK return to Menu screen The default settings are as table below Off Timer Not Set Language English Unit C Not Set Off Timer Mon 16 30...

Page 55: ...ough power recovers Perform the starting procedures again If the power recovers within 2 seconds the air conditioner starts again automatically 9 2 Electromagnetic Interference EMI There could be an instance where all the indications are OFF and the unit is stopped This can occur through activation of the microcomputer for the air conditioner protection from the Electromagnetic Interference EMI Pe...

Page 56: ...2021 10 Ver A Printed in China 2021 Johnson Controls Hitachi Air Conditioning Inc ...

Reviews: