background image

91

ENGLISH

FEATURES (continued)

Power Swivel

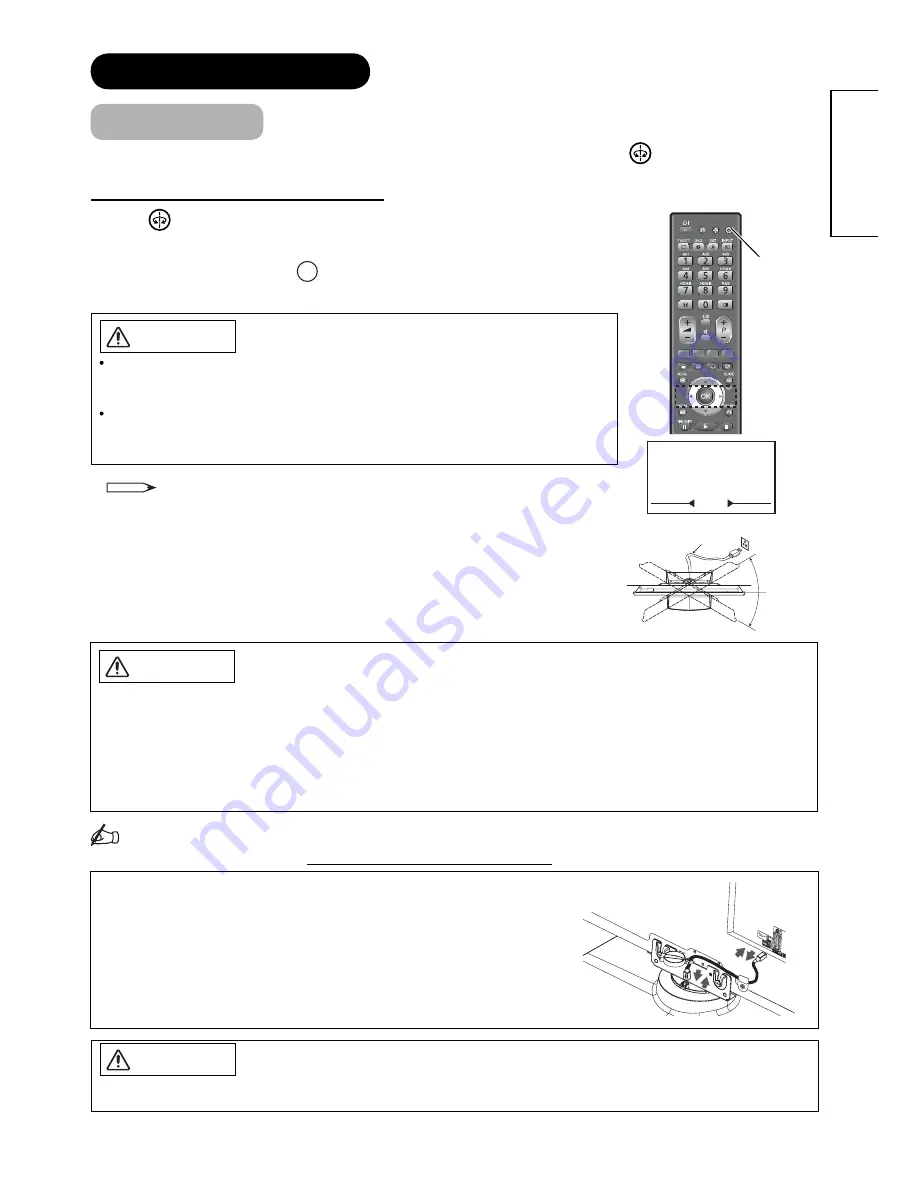
With the Desktop stand, you can adjust the angle of the panel side to side by pressing

 button on the remote 

control.

Power Swivel is not available for 60” model.

Swivel

CAUTION

• Do not push the panel with your hands whilst operating the Swivel. It could damage the panel and/or stand.
• Do not allow children to play or hang on the TV. These actions may tip it over, causing personal injury.
• Do not swing the unit back and forth.
• Do not place any fragile objects around the unit. The unit would hit the object(s) during the Swivel operation and 

could cause the breakage of the objects and/or the stand.

• To operate the Swivel function correctly, place the unit on the stable surface.
• When you use the unit as wall-mounting, disconnect the stand cable from the unit before installation.

Swivel
button

Information

About Swivel terminal connection (

*This is available only for 50” model.

)

CAUTION

• Turn Off the Main Power of the unit when connecting or disconnecting the stand cable to the unit.

Slack

1.

Press

 button on the remote control. 

The Swivel Display (as shown in the fi gure on the right) will appear on the screen.

2.

Adjust the angle of the panel with

◄►

 button whilst Swivel Display is on the screen.

The unit will be able to rotate ±30 degrees to each side.

CAUTION

 When you use the Power Swivel function, make sure that the Power Cord, cord 

or chain connected to the wall is loose enough to operate the Swivel function 
securely.

 Do not put hands or face near the unit whilst operating the Swivel.  It could 

cause personal injury. Beware especially when small children are around the 
unit.

NOTE

• If the stand cable is not connected to the unit, the message “Not Available” will 

appear on the screen.

• The Swivel Display will automatically disappear when no operation has been 

made for a few seconds.

The Swivel Display

• To connect the Desktop stand to the unit. 
  Connect the designated stand cable to the Swivel terminal on the 

rear side of the unit.

• To disconnect the stand from the unit. 
  Before detaching the stand from the unit, make sure to disconnect 

the stand cable from the Swivel terminal on the rear side of the unit.

30°

30°

Summary of Contents for P50XR01E

Page 1: ...d under license from Gemstar Development Corporation SHOWVIEW is a registered trademark of Gemstar Development Corporation The SHOWVIEW system is manufactured under license from Gemstar Development Corporation Colour Plasma Television Model Name P50XR01U P50XR01E P60XR01U P60XR01E The above is the image of each model Speaker System is option for P60XR01U and P60XR01E USER S MANUAL MANUEL UTILISATE...

Page 2: ...ision Please read this user s manual carefully before operating this product To ensure proper operation please read and follow ALL the instructions especially the IMPORTANT SAFETY INSTRUCTIONS and SAFETY PRECAUTIONS Please keep this user s manual for future reference Ver 1 ...

Page 3: ...Information Banner 56 Copyright Protection 57 Recording Another Broadcast 57 Time Shift 57 Quick Timer Recording 58 Recording Timer 59 Recording Timer with Electronic Programme Guide EPG 59 VIDEO Plus SHOWVIEW System 60 Manual Recording Timer 61 Confirming Changing and Deleting of Recording Timer Setting 62 Timer Event History 62 Enjoying the Recorded Programmes 63 Playing the Recorded Programme by...

Page 4: ...dealer or our Customer Service Centre Before operating this set please fully understand the prerequisite such as specifications or constraints of the hardware and software We are not responsible and have no liability for any loss damage or injury as a result of misuse Reproduction copying use modification and or transmission in whole or in part of this manual are prohibited without any prior written...

Page 5: ...ced an ASTA or BSI approved BS 1362 fuse must be used of the same rating If the fuse cover is detachable never use the plug with the cover omitted If a replacement fuse cover is required ensure it is of the same colour as that visible on the pin face of the plug Fuse covers are available from your dealer DO NOT cut off the mains plug from this equipment If the plug fitted is not suitable for the po...

Page 6: ... as water metals etc get inside the unit Do not continue using the product under these abnormal conditions Turn off the Main Power unplug the Power Cord and contact your dealer immediately For your safety never try to repair the product by yourself ʄ Do not insert liquids or any foreign objects such as metals or flammable items inside the unit In case it happens turn off the main power unplug the P...

Page 7: ...it breaks you may be injured by the broken pieces In case that you drop the unit or the cabinet is damaged turn off the Main Power unplug the Power Cord and contact your local dealer immediately Continuing use of the product with above conditions may cause fire or electrical shock ʄ Clean dust or metals on or around the blade of the power plug regularly Continuing use of the product with above cond...

Page 8: ...nd sturdy location capable of supporting its weight Do not install the unit on an uneven or sloped surface a carpet a mat or a warped surface etc ʄ Do not place a CRT based television near the speakers of the Plasma Television It could cause the partial discolouration or blurring of the image on a CRT based television Please install it away from the speakers of the unit ʄ Disconnect all of the ext...

Page 9: ...coaxial cable for the antenna ʄ About infrared communication devices The infrared communication devices such as cordless microphones or cordless headphones may not operate properly around the unit It is because of communication failure Please note that this is not malfunction ʄ When you dispose of this product at the end of its life follow the regulations in your residential area For more informat...

Page 10: ...ibration may be produced This is not a malfunction ʄ If there is no power supply such as the power outage during recording or playback the recorded data could be damaged ʄ In case of malfunction If playback is unexpectedly freezing or there is noticeable block noise mosaic frequently in the picture it is possible that they may be the signs of HDD failure If HDD fails it will be necessary to replac...

Page 11: ...e can be used to reduce the image retention by displaying a completely white screen for about 1 2 hours In addition Luminance Manager function works when displaying images such as TV station logos or clock displays in the corners of the screen Use in combination with moving images Since the entire screen has relatively even degradation of the phosphor in moving images it can reduce the partial ima...

Page 12: ...ure Motorized Power Swivel feature only for 50 model Enjoy recording and playback TV programmes with built in HDD Provided 2000 pages for Teletext SUPPLIED ACCESSORIES Check the supplied accessories before installation In case of missing or damaged please contact the dealer immediately User s Manual Remote Control AA size battery X2 Power Cord UK only The type of power plug provided is different d...

Page 13: ... 9 Speaker Option for 60 model 1 Terminal board External Device Connection 2 Power Cord Socket 3 Handgrips 4 Terminals for speaker cables on television 5 Terminals for speaker cables on speaker Please refer to user manual of speaker system about the installation Please refer to 20 28 for the detailed information for the connections Rear Panel 1 2 6 50 model 3 4 8 7 1 2 6 60 model 3 4 8 7 9 35 7 2 ...

Page 14: ...on 0 Sub Power button CAUTION for 60 model Do not place your fingers into the gap at the opened door If your fingers are caught in the front door you may be injured A Push the bottom centre of the front door to unlock B Pull down the upside of the door Push here to open the door B A 1 234 56789 0 A Push here to open the door 50 model 60 model 50 model 60 model A Push the bottom centre of the front d...

Page 15: ...14 t y u i Remote Control COMPONENT NAMES Continued o p a s d t y u i o p a s d for XR01E model for XR01U model ...

Page 16: ...n 0 Menu 35 49 Press this button to select Main Menu Cursor Item Select 79 OK Function VIDEO Plus XR01U model SHOWVIEW XR01E model Press this button to select Function Menu 50 54 Pause TIME SHIFT Play Rewind and Forward Rec TITLE LIST Recall 34 Press this button to show the input signal status Picture Mode 42 Picture mode can be changed each time pressed in the following sequence DynamicĺNaturalĺC...

Page 17: ...t drop or cause impact to the remote control Do not spill water or any liquid on the remote control Do not place the remote control on a wet object Do not place the remote control under the direct sunlight or near sources of excessive heat 2 Install the batteries Install 2 AA batteries included making sure the polarities match the indication inside the compartment 3 Close the battery compartment c...

Page 18: ...the damage of speaker disassemble the speaker from the unit in advance when moving the unit ƔDo not use the handgrip for the purposes other than holding the unit with hands Also do not disassemble the handgrip or reassemble it to the other place such as screw holes of wall mounting mounting holes of speaker and so on Caution Do not use the handgrips as fixing for installation and anti tumble measur...

Page 19: ...ing Mounting In case of Wall or Ceiling Mounting please ask your local dealer to arrange professional installation Never attempt to install it by yourself It could cause injuries or damages Please leave adequate space around this unit in order to avoid increasing the internal temperature and keep safety whilst using swivel function if your TV has Swivel function Make sure not to block any ventilat...

Page 20: ...location where it does not expose anyone to the danger of knocking into the unit causing injury to themselves or the Plasma TV Cord or Chain Hook Screw Cord or Chain Wall or Pillar Clamp PREPARATION continued Anti Tumble Measures Install in a stable place and implement safety measure against overturning Hook Cord or Chain Wall or Pillar Clamp CAUTION Do not use handgrips to secure a wall or pillar...

Page 21: ... Mini stereo for Audio Sub woofer Front AV5 Headphone terminal HDMI 1 q SD Memory Card slot w Photo Input terminal SUB WOOFER w q Rear 1 Power Cord Socket 2 Aerial Socket 3 AV1 4 AV2 5 AV3 6 AV4 7 Monitor Out 8 Service use only 9 Service use only 0 Optical Out Digital Audio HDMI 2 HDMI 3 Common interface slot PC Terminals Mini stereo for Audio Sub woofer Front AV5 Headphone terminal HDMI 1 Photo I...

Page 22: ...more external devices to connect 1 Use RF cable to connect between each equipment and aerial 2 Connect the Aerial Lead to the Aerial Input socket of an external device such as a VCR 3 Connect the RF cable from the equipment Out to the other equipment In 4 Then connect from the equipment Out to ANT on the plasma screen Socket SUB WOOFER IN OUT IN OUT IN OUT Example Connecting aerial through STB and...

Page 23: ...io output The output signal can support not only Analogue but also Digital Terrestrial TV signals INPUT Composite S Video Audio If STB is connected to AV1 in France it descrambles some of the Pay TV images by resending the signal again In Out OUTPUT Composite Audio While View Timer is on the active programme is output from AV1 See 74 for View Timer AV2 and 3 can be connected to the equipment with ...

Page 24: ...unit on another monitor When this output terminal is connected to an external monitor with a 75 Ohm terminal the same image from composite AV1 5 or RF signal can be displayed to the external monitor NOTE Video output is not available from component or HDMI RGB input Optical Out Digital Audio This provides Digital Audio Output for your audio device that is Dolby Digital and PCM compatible such as a...

Page 25: ... without any degradation You are provided with three HDMI terminals on side and rear If your external device has a HDMI terminal HDMI connection is recommended for higher quality picture and sound NOTE When the signal format is 1080p use a cable of less than 5 metres Common Interface Slot allows you to receive Pay TV service with detachable modules Before inserting the module make sure to turn off...

Page 26: ...n Front Since the following terminals are located on front it is very convenient to connect an extra device on a temporary basis after completing the connections on the rear panel Headphone In case of setting Headphone Select in Audio Menu to H Phone only the audio from the speaker will be muted when connecting the headphone to this terminal Refer to 49 CONNECTION continued Connecting Procedure co...

Page 27: ...ority HDMI 1 terminal can be connected to the devices with HDMI output If the external device has DVI output this can be available with HDMI DVI cable In case of using the HDMI DVI cable connect to audio terminal on the rear besides HDMI input terminal Refer to 24 for details about HDMI2 and HDMI3 terminal on the rear NOTE When the signal format is 1080p use a cable of less than 5 metres IN OUT IN...

Page 28: ...rent from this drawing for some countries IN SD Card MMC OUT Example Digital Camera USB Card reader CAUTION Use only the Power Cord provided Do not use a power supply voltage other than that indicated AC220 240V 50Hz It may cause fire or electric shock For the plasma television a three core power cord with a ground terminal is used for efficiency protection Always be sure to connect the Power Cord t...

Page 29: ... of the large clamp depends on model When you secure the cables please be careful not to tighten too much CONNECTION continued Connecting Procedure continued How to secure the large clamp 50 model To set To unfasten 60 model To set To unfasten Knob Push the clamp in the direction of the arrow until it clicks Whilst pushing the knob pull it in the direction of the arrow Set the clamp in the directi...

Page 30: ...en View Timer is in operation 1 After turning on the Power Indicating Lamp pulses for an instant and then starts lighting Also the Power Indicating Lamp blinks whilst using remote control In case you do not want it to pulse blink select Off in LED Mode from Configuration menu Refer to 40 for the details 2 About Power Save mode see Power Save Mode and When Following Messages Appear on the Screen on ...

Page 31: ... scan with button For XR01U model Please note that the country of digital scan is automatically set as United Kingdom which is shown as grey unavailable to select the other countries 6 The auto tuning screen appears and your TV will now search channels through the frequencies storing them in order Select Enter Cancel Easy Setup English Svenska Français Norsk Deutsch Suomi Italiano Dansk Español Če...

Page 32: ...el is switched along with the information banner If the entered number is not valid for one of the setup channels it automatically selects the closest channel Stepping through the Channel Selecting from the On screen Channel List Selecting by Number Using the Electronic Programme Guide EPG DTT mode only 1 Press MENU button on the remote control 2 Select Channel Manager from Main Menu to show chann...

Page 33: ...creen will shift left Mute 1 To mute the sound press button on the remote control The sound of the unit is temporarily turned Off The colour of the Volume Indicator will turn into grey whilst muting the volume 2 To bring the sound back press button again or Volume Up button on either remote control or the control panel The colour of the Volume Indicator will turn back to white NOTE You can decreas...

Page 34: ...witching Banner 2 Select the input mode Each time button on the remote control or Input Select button on the control panel is pressed the screen displays the corresponding mode by following order DTT RGB AV1 AV2 AV3 TV HDMI 1 AV5 AV4 HDMI 2 HDMI 3 Also you can change the input mode back and forth by using button on the remote control or Volume Up Down button on the control panel z Input Mode butto...

Page 35: ... If time signal is received from DTT broadcasting or the time is set in Timers the current time is displayed See 50 for details Audio A2 NICAM mode BASIC OPERATION continued Input Signal Screen Display The input signal status can be displayed on the screen by pressing the button of the remote control If button is pressed again in DTT mode it can show the information banner Refer to 76 about the in...

Page 36: ... button on the remote control or Main Menu button on the control panel of the unit The Main Function Menu is displayed on the screen as shown on the right 2 To select the item press button The selected item will be highlighted in Orange 3 Press OK button to set your selection The selected menu page will be displayed on the screen 4 Use button to choose the item on the Menu page Press OK button to ...

Page 37: ...Depending on the type of the signal the display may not be adjusted in its optimum condition with this function In that case please adjust each item manually Horizontal Position 63 63 Adjust the display position horizontally When the position exceeds the possible range the display colour will turn into Magenta Vertical Position 31 31 Adjust the display position vertically When the position exceeds...

Page 38: ...er Lock Key New Lock Key The default Lock key is 0000 Confirm If you forget the Lock key enter 7777 in Current Lock Key to reset VIDEO Plus Channel XR01U model ShowView Channel XR01E model Set the same channel number of each Position as the one of GUIDE Ch by using or Channel Up Down button After selecting all the channel numbers press OK button to set Menu Language This can select preferred OSD la...

Page 39: ...t frequency MHz by pressing Green button MHz Use button for Up Down search S MHz Descrambler Off Set this to Off normally When you want to restore the picture and sound of a scrambled channel set this to On Connect a Descrambler to AV1 On Name 1 Move the cursor to the first digit with Ź button and select a letter with button or numeric button 2 Move to the next digit with Ź button 3 Press OK button...

Page 40: ...n to select channels This function will automatically skip unavailable channels when set to on By selecting On the channel will be cancelled the Favourite setting if the channel sets as Favourite previously On Lock Off Set Lock On Off by using button on the remote control To activate this function set On Channel Lock of Lock Rating from Function menu See 51 page On OK Store the changes for Name Sk...

Page 41: ...n AV4 HDMI1 2 and 3 RGB and standby mode in other AV input See 93 in details On Panoramic This allows you set how a 4 3 picture will be displayed if you have selected Auto from the Zoom mode 4 3 Default Zoom Full 14 9 Zoom Off This can reduce the power consumption by decreasing brightness ECO Mode 1 2 Quick Start Options Off Set On if you want to turn TV On quickly If it is set On the value of pow...

Page 42: ...correctly for example because of living near a border select another area as below West Europe West European countries and Turkey This is normal setting for use in Europe East Europe East European countries Russian Countries neighboring Russia and East Europian countries Farsi Middle Eastern countries This is not available for MHEG Digital Teletext Subtitle Off This can set DVB subtitle Off On On ...

Page 43: ...Brightness 0 100 Adjust according to personal preference by using button Colour 0 100 Adjust according to personal preference by using button Hue 0 100 Pressing Ż button enhances red and weakens green whilst pressing Ź button weakens red and enhances green The setup hint is adjusting for the realistic skin colour Sharpness 0 100 Preferred sharpness can be adjusted by pressing Ż button for softer i...

Page 44: ...the smooth motion Smooth2 Reproduce the clear moving image when the input signal is 50Hz Off Set to Off if the image does not look natural This is not available in the following case OSD is displayed Game Mode is On TV is in Multi picture mode Panel Mode sets as 2 except when Original is selected in Smooth Movie See 44 for the detailed note Original Smooth1 Smooth2 3D Comb Filter Off This is avail...

Page 45: ...n Drive On When you want to set specific adjustments in each of the 4 Colour Temperature modes You can adjust on the Drive and Cutoff The settings reflect on the Colour Temperature Drive Subdue the following colours on the brighter parts Cutoff Subdue the following colours on the darker parts Reset Each item on Colour Temp Adjust can be restored to the original factory setting Red Green Blue Cutoff ...

Page 46: ...akens red and enhances green The setup hint is adjusting for the realistic skin colour Sharpness 0 100 Preferred sharpness can be adjusted by pressing Ż button for softer image or Ź button for sharper image Colour Temperature Cool You can select from 4 settings default depending on the colour condition with button Normal Warm Black White Colour Temp Adjust On Drive On When you want to set specific ...

Page 47: ...preference by using button Hue 0 100 Pressing Ż button enhances red and weakens green whilst pressing Ź button weakens red and enhances green The setup hint is adjusting for the realistic skin colour Sharpness 0 100 Preferred sharpness can be adjusted by pressing Ż button for softer image or Ź button for sharper image Colour Temperature Cool You can select from 4 settings default depending on the ...

Page 48: ...ng on the user s preference The settings reflect in each of the 4 Colour Temperature modes Reset Each item on Colour Management can be restored to the original factory setting Off Remains as default setting Red Yellow Green Cyan Blue Off Colour Temp Adjust On Drive On When you want to set specific adjustments in each of the 4 Colour Temperature modes You can adjust on the Drive and Cutoff The settin...

Page 49: ...tores clarity and presence for better speech intelligibility and musical realism Select it depending on your preference Low High FOCUS Off This gives you more natural and realistic sound by shifting up audio image sound image By making clear outline of sound it gets easier to hear speaking voice such as news Low High Perfect Volume Off It will automatically adjust the volume to its average level e...

Page 50: ...is setting will be fed into optical output Dolby Digital provides six independent track channels and PCM provides two independent soundtrack channels PCM DRC Dynamic Range Compression Off Use this function to compress the range of sound volume It is possible not only to suppress the output of loud sound at night but also to raise the volume of low sound The default setting is ON On Reset Each item...

Page 51: ... min This function automatically sets the power to Standby mode when the selected time period has elapsed 30min 60min 90min 120min On Timer h m This function automatically sets the power from standby mode to On when the specified time period has elapsed Input the desired time within the range of 00h01m to 11h59m by using button on the remote control Auto Clock DTT Select if the date and time inform...

Page 52: ...le information which depends on the module inserted Please ask the service provider if the module type is suitable for TV The TV supports module meeting DVB standard This is available only in DTT mode Zoom You can select the most suitable display size The selectable size varies depending on the input mode See 80 82 for the details Stop Timer Event You can stop the running timer event This menu ite...

Page 53: ...formation Data broadcasting channels XR01U model only Favourite1 6 Channels registered in each page of Favourite See 76 All Favourites Channels registered in all Favourite pages Except channels that Skip On is set in Channel Manager menu Programme Search Channel Category You can search for programmes When you select Programme Search and press OK button Search Condition screen is displayed Select a...

Page 54: ...search for programmes When you select Search Condition and press OK button Search Condition screen is displayed Select a search condition Category Programme Type Date by using button and select the value of each items by using button After setting the search condition select Search In case that time is not acquired from DTT broadcast or no channel is stored in DTT channel list this is not availabl...

Page 55: ...d Items Setup hint Rotate The selected picture is rotated in the sequence of the following 90 180 270 0 Slideshow 5Sec Select a preferred interval time 10Sec 30Sec Select Device A SD Select one device which you want to use C I USB Available if more drive on USB J USB Might appear depending on the type of connected digital still camera B USB C I USB J USB Function Menu Rotate Slideshow Select Devic...

Page 56: ...cording 5 To stop recording press button NOTE Most of the programmes that are received by the TV tuner are available for recording however programmes received in bad condition e g much noise or block noise or the following signals cannot be recorded Game pictures special pictures such as VTR AV4 HDMI1 3 RGB input pictures of copy controlled video tape or DVD or digital programmes of which recordin...

Page 57: ... record for less than 15 seconds Pause button is not available during recording The following can not be recorded 1 HDMI 1 3 AV4 and RGB input 2 Radio broadcast and data broadcast 3 Copy guarded programme 4 On Screen Display OSD If Sub Power button is pressed and TV turns into standby mode during recording recording will stop except Recording Timer and Quick Timer Recording If start time of Record...

Page 58: ...rogramme and stop at this scene The playback will start in one minute Will you continue Continue Cancel 3 Press button or button to start playback 4 Press button to return to the live broadcast The message appears as Exit the Time shift Do you need to save as recorded programme If you want to keep the programme as the recorded programme select OK If you select Cancel the programme is deleted when ...

Page 59: ...pears to confirm 2 Select OK by using and press OK button NOTE About Quick Timer Recording The remaining time of recording appears if you press button during Quick Timer Recording You can change the length of recording time by pressing button during Quick Timer Recording Recording continues even if the Power button is turned Off whilst Quick Timer Recording or Recording Timer is in operation Quick ...

Page 60: ...tegory All Channels Channel 9 00 9 30 10 00 10 30 801 DTT 1 Natural Life Creative Live Morning News 802 DTT ch10 Morning News Morning News Small Town 3 DTT ch03 Breakfast Time News 30 min news Cool 01 G12 116 DTT ch06 Cool 00 Cool 01 One hour Morning Show 208 DTT ch03 Sunrize Information A B Smith Car Detector 10 Cinema Normal T Morning Movie Sea 20 Super20 Reset Morning Song Ball ABCDEF 30 Trains...

Page 61: ...If you want to correct the timer recorded programme correct by using button select Set and press OK button See Confirming Changing and Deleting of Recording Timer Setting in 62 about how to change the timer recorded programme NOTE If you already set Recording Timer for 33 programmes Not enough memory appears The recording time of programmes may be set longer than actual broadcast time depending on ...

Page 62: ...n to set up the title Limit 40 characters See 75 for the selectable characters by using numeric button To delete a character use Red button Channel Change the channel by using button If necessary switch between TV and DTT with button Date Set the date by using button up to 30 days Start End 1 Use button to change the position to input 2 Change the time by using button 3 Press OK button to set up t...

Page 63: ... can confirm the result of recording timer operation from Timer Event History 1 Press FUNCTION button 2 Select Timers by using button and press OK button 3 Select Programme Timers by using button and press OK button Timer List is displayed 4 Press Yellow button and Timer Event History screen is displayed 5 Icons appear at the top left of each lines ż Recording is completed Ƒ Recording was cancelled...

Page 64: ...time for creating may be delayed for several seconds See 37 The programme in the middle of recording is not displayed on the list of recorded programmes Playback is available during recording When playback and recording are in operation simultaneously once press button and playback stops Press button again recording stops Except Timer Recording and Quick Timer Recording When Photo Input Function o...

Page 65: ...1 Press button during recording the programme Playback starts from the beginning of the programme Several operations are available such as fast forward or playback at 0 8 times speed during playback 2 To stop playback press button Recording continues NOTE When coming close to the scene recorded in fast forward play it turns to pause Then if you do not press any button pause is reset 1 minute after...

Page 66: ...r is not set playback starts from the beginning a programme h 30 second Skip During normal playback fast forward play at 1 5 times speed or playback at 0 8 times speed press button Each press makes the programme skip 30 seconds i 10 second Back During normal playback fast forward play at 1 5 times speed or playback at 0 8 times speed press REC MODE button Each press makes the programme return 10 s...

Page 67: ...d at the scene within 15 seconds from the beginning and from the end 2 divided programmes have the same title If divided just before the chapter point thumbnail of that chapter point may not be displayed If the number of recorded programmes is 999 programmes can not be divided Delete Lock Protecting the programme not to be deleted You can lock the program not to be deleted 1 Press button and the l...

Page 68: ...elect the programme and delete it 1 Press button and the list of recorded programmes is displayed 2 Select the programme you want to delete and press Red button 3 When the message appears select Continue by button and press OK button NOTE Even during recording in HDD other recorded programmes can be deleted Deleting All Recorded Programmes 1 Press button and the list of recorded programmes is disp...

Page 69: ...Select your favourite scene by using and buttons 5 Press OK button The paused scene is edited as a chapter point The start scene of chapter is displayed If pressing OK button during playback a chapter point is also edited When you delete a chapter point Select a chapter point by button and press Red button 6 Edit chapter points you need by repeating 4 and 5 7 Press button to end editing chapter NO...

Page 70: ... programme by button and press FUNCTION button 3 Select Rename by button and press OK button 4 Input the title by using and numeric buttons on the remote control Refer to Name in 39 about input of characters 5 When you finish inputting the title press OK button The new title is displayed on the programme list HDD FUNCTIONS continued Editing the Recorded Programme continued ...

Page 71: ...nel List 1 Press Yellow button whilst selecting the channel which you wish to sort 2 Select the destination by using button 3 Press OK button 5 You can use the detailed setting by using setting section shown on the lower right Hide You can hide show the channel which sets as Skip On by pressing OK button whilst selecting Hide On If set as Skip On the channel is not displayed on Channel List The in...

Page 72: ...u can adjust channel list with the following remote control keys Select items of Channel List The picture of selected channel is displayed at upper right screen Move to the next previous page of Channel List if the number of channel is more than 11 OK Jump to Channel Edit Switch between Channel List and setting section at the lower right Red Del Delete the selected channel from the list If you sel...

Page 73: ...ly auto search Select Continue press OK button to start scanning all Digital channels Once Full Scan is applied the setting for channel list Favourite Channel View Timer Recording Timer and Channel Lock will be restored to the original setting Scan Setting XR01E model only In Standby Off If set On this operates Auto Scan whilst TV is in Standby Off The default setting is On On In Operate Off If se...

Page 74: ... name and details In that case only channel names are displayed If selected programme is already set as View Timer or Recording Timer the confirmation screen will be displayed See 60 and 74 for confirmation screen FEATURES continued Electronic Programme Guide EPG DTT mode only Sat 01 Dec Category All Channels Channel 9 00 9 30 10 00 10 30 801 DTT 1 Natural Life Creative Live Morning News 802 DTT ch1...

Page 75: ...This is available only for editing the item which previously set timer Press OK button to delete Set Press OK button to set the timer Cancel Press OK button to cancel the timer 9 The message as View Timer will start shortly appears 20 seconds before the desired programme starts and the channel is switched automatically Timer Programming is available not only to record multiple programme but also t...

Page 76: ... check timer history Press Yellow button whilst the Timer List is displayed z To check timer execution Press Blue button whilst the Timer List is displayed This can switch between executed and unexecuted items z To stop the running timer event Press FUNCTION button whilst running timer event Select Stop Timer Event and press OK button NOTE You can set a timer up to 33 programmes You can also acces...

Page 77: ...elect Return or button again to go back to normal screen NOTE If pressing button during recording Recording Information Banner appears See 56 for Recording Information Banner Press button again to go back to normal screen Icon For Conditions Visually impaired If the programme provides audio subtitle DVB service for the visually impaired or the hearing impaired the icons will appear Hearing impaire...

Page 78: ...r the details The available Audio Language provided in the current programme can be selected 1 Press I II button on the remote control during DTT mode 2 You can select one of the languages by using button NOTE If no audio is provided from the programme No Language appears on the banner The audio language which is preferentially selected as changing channel can be set up in Configuration menu See 41...

Page 79: ...VB subtitle Subtitle To display hidden text ex The answers of the Quiz or the Game page Press again to close the revealed answer Reveal To return to actual broadcast temporarily whilst searching for the Teletext page you request When the search is done the designated page will be displayed on the upper left of the screen Press again to return to Teletext page X Cancel To access the link pages whic...

Page 80: ...r full screen TV HOME SHORTCUTS BACK BBCi MENU B B C 1 Weather B B C Weather BBC ONE Operation Press This switches the receiver between TV mode and TELETEXT mode TV TEXT Each of these buttons selects the link page displayed at the lower part of the screen Colour This selects items on the screen Item Select This jumps to the indicated page if the instructions appear on the screen Page Select NOTE W...

Page 81: ...uto Play a image with the suitable format by automatically selecting depending on the picture format or programme being broadcast Default Zoom setting in the Configuration menu will be selected if WSS signal or size switching signal is not detected in DTT TV and AV mode 4 3 Play a 4 3 image on screen faithfully Blanking occurs on both sides 4 3 Signal Panoramic 1 Play a 4 3 image which enlarges hor...

Page 82: ...ion of position if available 3 Adjust the position by button Adjustment range of each picture size are as shown below Panoramic 1 12 to 12 Zoom 31 to 31 C14 9L and 14 9 Zoom 16 to 16 CAUTION Using a wide screen television This television has a screen mode selection feature If an incompatible screen mode is selected to play certain software such as a TV programme the image would appear different fr...

Page 83: ...ay Display Full Normal Real 640 X 480 VGA 800 X 600 SVGA 1024 X 768 XGA 1280 X 1024 SXGA 640 X 400 VGA 1280 X 768 WXGA In the signal display chart shown above some compression or stretching has taken place The resolution reflects the input signal display Real cannot be selected in the resolution other than VGA 640 x 480 or 640 x 400 for 50 model Real cannot be selected in the resolution of 1280 x 1...

Page 84: ...th sides simultaneously You cannot select the same AV input on both sides simultaneously You cannot select HDMI input on both sides 5 Only when the 1080i or 1080p signal is received on the left screen Main screen PinP mode is available To switch to PinP mode press button Each time button is pressed the picture mode is changed as below 2 Picture Split 2 Picture PinP To change the selected picture p...

Page 85: ...n When the selected picture is the small screen Sub screen in PinP mode the frame of the sub screen is shown in yellow When the selected picture is the large screen Main screen in PinP mode there is no yellow frame shown on Main screen 3 To change the channel of the sub screen press button 4 To change the input mode of the sub screen press button on the remote control 5 To change the position of t...

Page 86: ...al picture It displays 2 pictures from the same source One is active left whilst the other is still picture right This is very useful in order to avoid missing something or to make a note of something such as a recipe This function is not available during recording or playback This function is not available in RGB input mode Active Freeze Freeze button ...

Page 87: ... the USB cable to the input terminal or insert the SD card MMC into the slot as shown 4 Turn ON the TV after the USB cable is connected or the SD card MMC is inserted 5 Press button on the remote control to activate Photo Input mode Then turn ON the DSC Refer to the user s manual of your DSC for the timing 6 Each time button is pressed you can switch the mode as follows Photo Normal Screen Make su...

Page 88: ... selected automatically Rotation Function A A OK OK A A A A Prev Next Thumbnail Jump 0 9 Function Menu Rotate Slideshow Select Device 23 60 30 Nov 2007 1600 x 1200 ABCDEF 23 60 30 Nov 2007 1600 x 1200 ABCDEF Prev Next Thumbnail Jump 0 9 Function Menu Rotate Slideshow Select Device OK OK By using button the picture is rotated in the sequence of the following This returns to the default setting when...

Page 89: ... start with the selected file You can stop the slide show halfway by pressing or OK button NOTE Contrast will decrease automatically to reduce image retention if stationary images such as still photos are left on the screen for more than about 3 minutes Please note that it is not malfunction Selecting Device 20 24 28 32 19 23 27 31 18 22 26 30 17 21 25 29 Function Menu Rotate Slideshow Select Devic...

Page 90: ...available media No device containing pictures was found Specification Application Digital Still Camera corresponding to DCF standard USB Card Reader with the memory containing pictures had taken by camera SD card MMC card containing picture had taken by camera Photo Max number of photo file 999 Max number of pixel 3072 x 2304 DCF JPEG format The picture may not be displayed if it is taken with high ...

Page 91: ... each image contents when switching pages and loading files The OSD message No device containing pictures was found is displayed in case of the incomplete connection with USB cable or SD card MMC and connection to a digital still camera or USB card reader without the memory card The functions of the multi picture CH selection freeze mode aspect mode display and so on are not available Whilst displa...

Page 92: ...g or disconnecting the stand cable to the unit Slack 1 Press button on the remote control The Swivel Display as shown in the figure on the right will appear on the screen 2 Adjust the angle of the panel with button whilst Swivel Display is on the screen The unit will be able to rotate 30 degrees to each side CAUTION When you use the Power Swivel function make sure that the Power Cord cord or chain ...

Page 93: ...ode display appears in yellow as shown Also when receiving NICAM signals NICAM display will appear Each time I II button is pressed the display is switched in the sequence of following Sound multiplex signal received NICAM signal received Audio Audio NICAM Audio NICAM Audio Audio Audio I Main language Primary Sound II Sub language Secondary Sound ź force mono This selects main language or primary ...

Page 94: ...rom Configuration menu which leads to the power save mode in AV4 HDMI1 HDMI2 HDMI3 RGB and the Standby mode in other AV input Please see the table below for details Refer to 40 about Video Power Save When no signal is detected When signal is input during On in Video Power Save Condition Indicating Lamp AV4 HDMI1 2 3 RGB Power Save Pulsing Blue Turns On automatically AV1 2 3 5 Standby Red Remains as...

Page 95: ...asonic ZENITH GREEN TOSHIBA THOMSON YELLOW Philips SHINCO BLUE JVC SKYWORTH SAMSUNG BUBUKO Sony DENON Sharp YAMAHA SAT Selection Manufacturer of STB Player Set Manufacturer Set type Hitachi TOSHIBA DGTEC Panasonic NOTE Please note that not all models of the listed manufacturers can be operated using this remote control When you replace remote control batteries the settings may be changed In that c...

Page 96: ...corded programme is being deleted Please operate after the message disappears The number of programmes reached maximum please delete Recorded programmes are already 999 Please delete unnecessary recorded programmes 56 Recording can not be done Programme is copyguarded Copyguarded programmes cannot be recorded HDD is not ready Please wait HDD is starting up or HDD Power Save is On Please operate HD...

Page 97: ...14 15 Normal picture but no colour normal sound Check the connection of the external equipments Check the Colour System in Initial Setup menu Check the AV Input in Initial Setup menu 22 26 36 No picture The Power Indicating Lamp ĺ Off Check if the Power Cord is plugged into the socket firmly Check if the Main Power is On 28 29 No picture The Power Indicating Lamp ĺ Pulsing blue It means that the un...

Page 98: ...part of the image is lacking RGB mode only AAAAA Check if Screen Saver is Off Try Auto Adjust 36 40 The horizontal stripes are moving vertically with flickering screen RGB mode only Check the Signal status of the PC by pressing button on the remote control When the characters are displayed on the whole screen the vertical stripes appear and some of the characters are blurred RGB mode only ABCDEFGHI...

Page 99: ... picture has block noise Reception environment deteriorates due to bad weather If the programme is recorded in lower recording quality mode e g EP block noise tends to appear Picture processing cannot work properly depending on the picture Built in HDD may cause physical error There may be malfunction if excess block noise is visible if there is no problem with the recording mode or recorded conte...

Page 100: ...grammes disappear Power is turned Off during recording or playback due to the power outage or unplugged Lost programmes cannot be compensated The rear of the unit makes a buzzing sound This could be the sound produced by the motor fan or HDD when it is in operation This is not a malfunction Cooling fan sounds in standby mode If Recording Timer is On the motor fan may be turning even in standby mod...

Page 101: ...erminal RCA component video input terminal RCA L R audio input terminal RCA AV5 composite video input terminal RCA S video input terminal Mini DIN L R audio input terminal RCA HDMI 1 2 3 HDMI input terminal Audio input terminal 3 5mm Stereo Mini Jack PC RGB input D sub 15 pin connector Photo Input Photo Input terminal SD card slot Input signals Composite video PAL SECAM NTSC3 58 NTSC4 43 PAL60 Com...

Page 102: ...Clock Shield 2 TMDS Data2 Shield 12 TMDS Clock 3 TMDS Data2 13 CEC 4 TMDS Data 1 14 Reserved N C on device 5 TMDS Data1 Shield 15 SCL 6 TMDS Data1 16 SDA 7 TMDS Data0 17 DDC CEC Ground 8 TMDS Data0 Shield 18 5V Power 9 TMDS Data0 19 Hot Plug Detect 10 TMDS Clock SCART connector pin specifications Pin Input signal Pin Input signal 1 AUDIO OUT RIGHT 12 Not Used 2 AUDIO IN RIGHT 13 RGB R GND 3 AUDIO O...

Page 103: ...s Signal Name Resolution Vertical frequency Hz 1 VGA 640 X 400 70 08 31 47 25 18 2 640 X 480 59 94 31 47 25 18 3 VESA 640 X 480 72 81 37 86 31 50 4 640 X 480 75 00 37 50 31 50 5 640 X 480 85 01 43 27 36 00 6 800 X 600 56 25 35 16 36 00 7 800 X 600 60 32 37 88 40 00 8 800 X 600 72 19 48 08 50 00 9 800 X 600 75 00 46 88 49 50 10 800 X 600 85 06 53 67 56 25 11 1024 X 768 60 00 48 36 65 00 12 1024 X 7...

Page 104: ...by the Free Software Foundation Inc The operating system software incorporated in this Hitachi TV is shown in the table below and the applicable license s are detailed on the following pages of this Owner s Guide Software Module Applicable Software License Linux Kernel busybox dhcpcd ifupdown net tools optables libstdc 5 GNU GENERAL PUBLIC LICENSE Version 2 glibc libposixtime GNU LESSER GENERAL PU...

Page 105: ... they know their rights We protect your rights with two steps 1 copyright the software and 2 offer you this license which gives you legal permission to copy distribute and or modify the software Also for each author s protection and ours we want to make certain that everyone understands that there is no warranty for this free software If the software is modified by someone else and passed on we wan...

Page 106: ...s apply to the modified work as a whole If identifiable sections of that work are not derived from the Program and can be reasonably considered independent and separate works in themselves then this License and its terms do not apply to those sections when you distribute them as separate works But when you distribute the same sections as part of a whole which is a work based on the Program the distr...

Page 107: ...ble for enforcing compliance by third parties to this License 7 If as a consequence of a court judgment or allegation of patent infringement or for any other reason not limited to patent issues conditions are imposed on you whether by court order agreement or otherwise that contradict the conditions of this License they do not excuse you from the conditions of this License If you cannot distribute...

Page 108: ...NY COPYRIGHT HOLDER OR ANY OTHER PARTY WHO MAY MODIFY AND OR REDISTRIBUTE THE PROGRAM AS PERMITTED ABOVE BE LIABLE TO YOU FOR DAMAGES INCLUDING ANY GENERAL SPECIAL INCIDENTAL OR CONSEQUENTIAL DAMAGES ARISING OUT OF THE USE OR INABILITY TO USE THE PROGRAM INCLUDING BUT NOT LIMITED TO LOSS OF DATA OR DATA BEING RENDERED INACCURATE OR LOSSES SUSTAINED BY YOU OR THIRD PARTIES OR A FAILURE OF THE PROGR...

Page 109: ...ng other than show w and show c they could even be mouse clicks or menu items whatever suits your program You should also get your employer if you work as a programmer or your school if any to sign a copyright disclaimer for the program if necessary Here is a sample alter the names Yoyodyne Inc hereby disclaims all copyright interest in the program Gnomovision which makes passes at compilers writt...

Page 110: ...ibute copies of the library whether gratis or for a fee you must give the recipients all the rights that we gave you You must make sure that they too receive or can get the source code If you link other code with the library you must provide complete object files to the recipients so that they can relink them with the library after making changes to the library and recompiling it And you must show ...

Page 111: ...ributed under the terms of this Lesser General Public License also called this License Each licensee is addressed as you A library means a collection of software functions and or data prepared so as to be conveniently linked with application programs which use some of those functions and data to form executables The Library below refers to any such software library or work which has been distribut...

Page 112: ...th a work based on the Library on a volume of a storage or distribution medium does not bring the other work under the scope of this License 3 You may opt to apply the terms of the ordinary GNU General Public License instead of this License to a given copy of the Library To do this you must alter all the notices that refer to this License so that they refer to the ordinary GNU General Public Licen...

Page 113: ...e Library as object code and or source code so that the user can modify the Library and then relink to produce a modified executable containing the modified Library It is understood that the user who changes the contents of definitions files in the Library will not necessarily be able to recompile the application to use the modified definitions b Use a suitable shared library mechanism for linking with ...

Page 114: ...ou then the only way you could satisfy both it and this License would be to refrain entirely from distribution of the Library If any portion of this section is held invalid or unenforceable under any particular circumstance the balance of the section is intended to apply and the section as a whole is intended to apply in other circumstances It is not the purpose of this section to induce you to in...

Page 115: ...are that everyone can redistribute and change You can do so by permitting redistribution under these terms or alternatively under the terms of the ordinary General Public License To apply these terms attach the following notices to the library It is safest to attach them to the start of each source file to most effectively convey the exclusion of warranty and each file should have at least the copyr...

Page 116: ... or communal use This guarantee does not cover the replacement of exhausted batteries the adjustment of user controls or aerial alignment Any parts replaced under this guarantee shall become the property of Hitachi Europe Ltd Please note that evidence of the date of purchase will be required before any service under this guarantee is carried out Use the boxes provided below to record your TV s Mod...

Page 117: ...er er koblet til fjernsynsapparatet slå på Sky News Dette gjør at alt eksternt utstyr stilles inn under den automatisk innstillingsprosessen av fjernsynsapparatet sett i kontakten VIKTIG Hvis du ikke overholder følgende retningslinjer kan fjernsynsapparatet overopphetes eller ta fyr Sørg for at det er en avstand på minst 100 mm 10 cm over og på sidene av fjernsynsapparatet dersom det skal plassere...

Page 118: ...e Hvis du vil endre rekkefølgen må du se i den fullstendige brukerhåndboken OK OK Merk For XR01U modell stilles landet for digital skanning automatisk inn som United Kingdom som vises i grått Start den automatiske innstillingen A A B C D E F G H I J Après avoir mis le téléviseur sous tension le premier écran qui apparaît vous demande de choisir la langue de l affichage Choisissez votre langue préf...

Page 119: ...understand how to use the stand Ɣ After you have read this manual keep it in a safe place for future reference Ŷ To the dealer As precise work is required to install this television stand read this manual carefully before assembling and installing it We bear no liability for accidents or injuries due to faulty assembly or installation After performing the assembly and installation please give this...

Page 120: ...tions for Use Please use this television safely and correctly Warning Caution Take caution Indicates Caution A prohibited action Indicates Prohibited A required action Indicates Required Safety Precautions Installing the Television Ɣ Please install the television on a flat and sturdy location capable of supporting its weight Do not install the television on an uneven or sloped surface carpet mat or...

Page 121: ...both side from back of the stand Hexagonal wrench Please turn off the Main Power when the power code the cables and the speaker cables are being connected and removed Ensure that the speakers are assembled after assembling the stand is completed Warning back Please ensure that screws are tightened firmly after the braces are attached to the stand Failure to do so could cause the unit to tip over o...

Page 122: ... Securing the television to a rack Secure the stand side with the installation screws and the rack side with the wood screws TV rack stand television Watch the direction of the stand Hexagonal wrench 4 installation screws M6 x 25 screw After attaching the stand please ensure that the screws are tightened firmly Failure to do so could cause the unit to tip over or become damaged Warning installatio...

Page 123: ...sesteenweg 421 1600 Sint Pieters Leeuw BELGIUM Tel 0032 2 363 99 01 Fax 0032 2 363 99 00 Email info hitachi be HITACHI EUROPE LTD Kodaňská46 101 00 Praha 10 CZECH REPUBLIC Tel 234 064 512 Fax 234 064 213 Email dmg eeu hitachi eu com HITACHI EUROPE S A 364 Kifissias Ave 1 Delfon Str 152 33 Chalandri Athens GREECE Tel 210 6837200 Fax 210 6835694 Email DMGService GR hitachi eu com HITACHI EUROPE S A ...

Reviews: