6 - 5
6-1-4 Settings when Creating Reference Data
When the connections for creating reference data are complete, set the DVD video camera/recorder
and test equipment as follows:
1) Make sure that no disc or card is inserted: Neither is necessary when creating reference data.
2) Set the power switch to “VIDEO”, and set the DVD video camera/recorder to the recording pause
status: After that operate the DVD video camera/recorder while watching the LCD monitor
screen.
3) Press the MENU button to display the menu screen.
4) Use the joystick to choose “Initial Setup”, and then press the playback/pause button (the center
of joystick).
5) Use the joystick to choose “Reset”, and then press the playback/pause button: The screen for
verifying reset will appear.
6) Use the joystick to choose “ENTER”, and then press the playback/pause button: Reset will be
executed.
7) When reset is complete, operate the joystick by the above procedure to set the items on menu
screens as follows:
a) Specify Dig. Zoom “Off” in Camera Functions Setup menu.
b) Specify OSD Output “Off” in Record Functions Setup menu.
c) Specify Demo Mode “Off” in Initial Setup menu. Failing to specify Demo Mode “Off” will
interfere with adjustment.
8) Press the MENU button to restore the normal display.
Information:
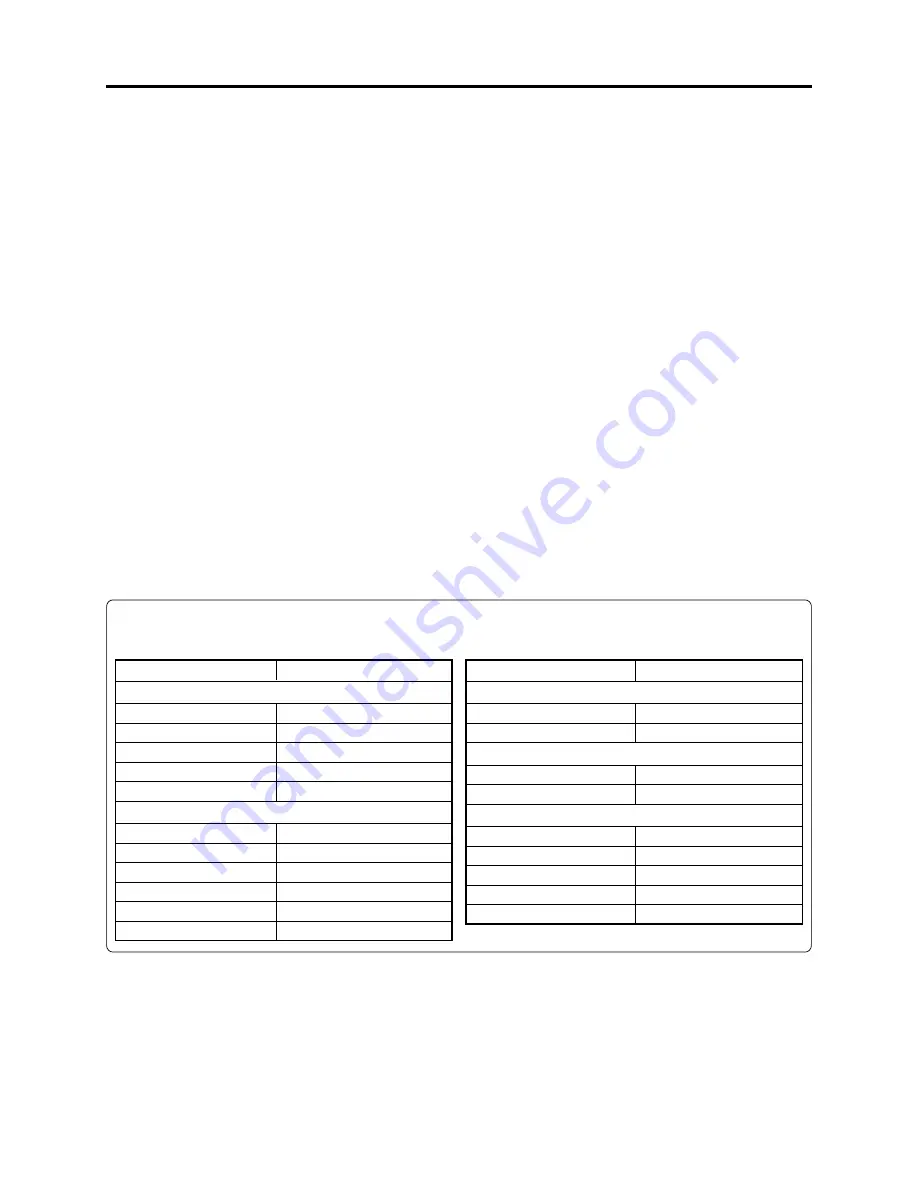
The following table shows the menu status after the above settings:
Item
Program AE
White Balance
EIS
Dig. Zoom
MIC Filter
VIDEO Mode
Quality
Input Source
PHOTO Input
Self Timer
OSD Output
Setting
Auto
Auto
On
Off
Off
FINE
FINE
CAMERA
Field
Off
Off
Item
Date Mode
Date Set
Brightness
Color Level
Beep
Power Save
Record LED
Language
Demo Mode
Setting
month/day/year
-------
Center
Center
On
Off
On
English
Off
Camera Functions Setup
Recording Functions Setup
Date Setup
LCD Setup
Initial Setup
Adjustment > Creating Reference Data