DC Motor Removal and Replacement 11
DC MOTOR REMOVAL AND REPLACEMENT
WARNING: Disconnect Vehicle Battery
prior to performing this procedure to
avoid electrical shock or burns.
1
2
PHOTO NO. 1000322A
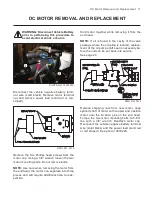
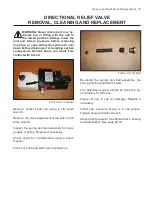
Disconnect the vehicle negative battery termi-
nal wire (solid black). Remove motor terminal
nut and remove power lead (solid red or red-
striped).
MOUNT BOLTS
PHILLIPS HEAD SCREWS
MOTOR CAP
MOTOR
DWG NO. 3512
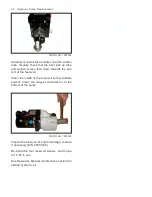
Remove the two Phillips head screws from the
motor cap. Using a 3/8” wrench loosen the two
motor mounting bolts. Do not remove bolts.
NOTE:
Use care when removing the motor from
the endhead, the motor can separate into three
pieces and will require additional time to reas-
semble.
Hold motor together while removing it from the
end head.
NOTE:
If oil is found in the cavity of the valve
passage where the coupling is located, replace-
ment of the oil pump shaft seal is necessary be-
fore the unit can be put back into service.
See page 20.
PHILLIPS HEAD SCREWS
MOTOR CAP
MOTOR
MOTOR TERMINAL
(POS)
GROUND SCREW
(NEG)
COUPLING
PUMP SHAFT
VALVE PASSAGE
SHIPPING NUTS
(REMOVE)
DWG NO. 3513
Remove shipping nuts from new motor, align
splined shaft of motor with coupler and position
motor onto the location pins on the end head.
Torque the two motor mounting bolts to 5-8 ft.
lbs. with a 3/8” wrench. Reattach motor cap.
Reconnect the vehicle negative battery terminal
wire (solid black) and the power lead (solid red
or red striped). See photo 1000322A.

