background image

Panic Alarm Station Configuration Guide 

37 


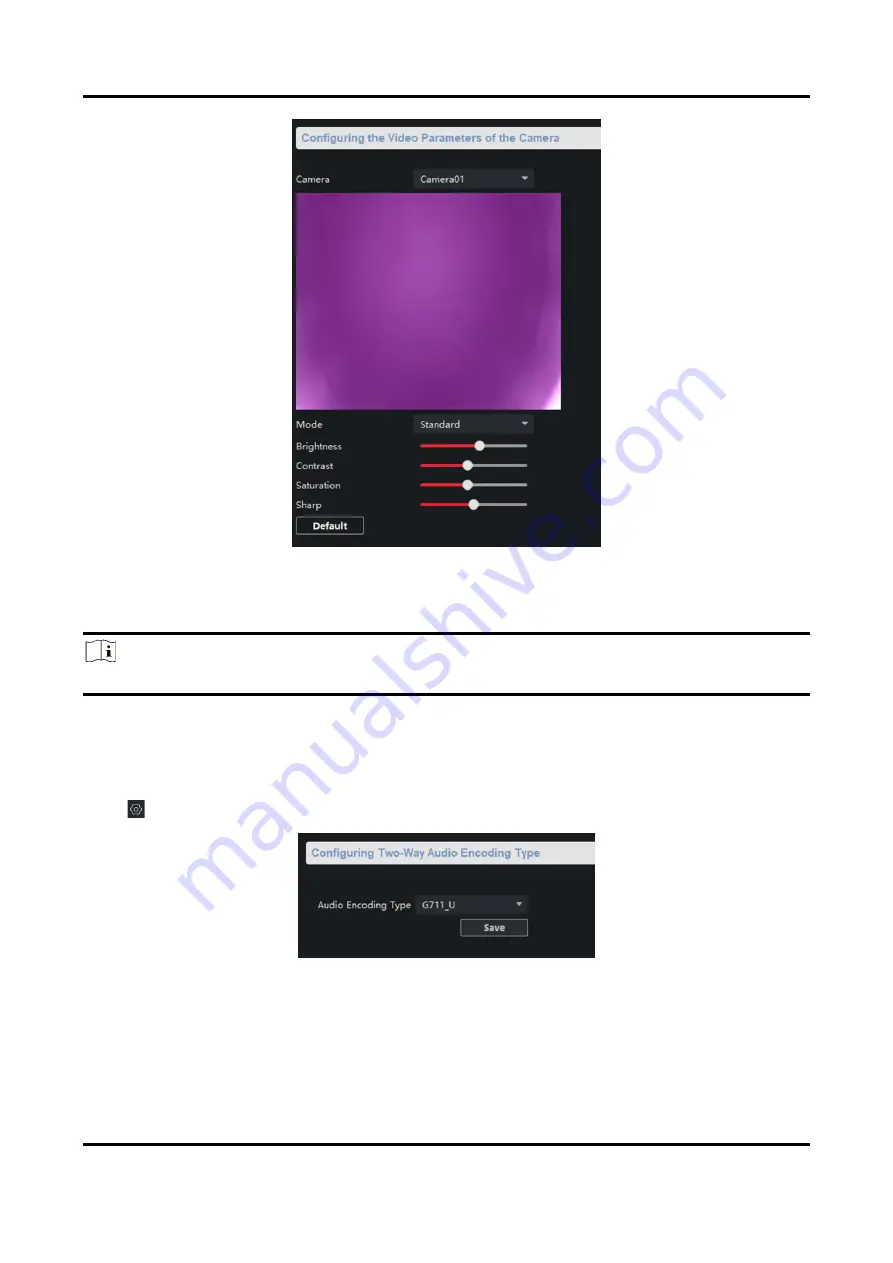
Figure 3-30 Picture Settings Page 

Select a camera to configure the video parameters, including brightness, contrast, saturation and 
sharp. 

Note 


By default, the brightness is 6, the contrast is 5, the saturation is 6, and the sharp is 50. 


Click Default, you can restore all video parameters to default. 

3.6.4 Set Intercom Audio 

Click 

  to enter the Remote Configuration page, go to Image → Intercom Audio


Figure 3-31 Intercom Audio Configuration Page 

Select the Audio Encoding Type as G711_U, PCM, ADPCM, AAC, or OPUS from the drop-down 
box. And click Save to save the settings. 

Summary of Contents for DS-PEA Series

Page 1: ...Panic Alarm Station Configuration Guide...

Page 2: ...THOUT LIMITATION MERCHANTABILITY SATISFACTORY QUALITY OR FITNESS FOR A PARTICULAR PURPOSE THE USE OF THE PRODUCT BY YOU IS AT YOUR OWN RISK IN NO EVENT WILL HIKVISION BE LIABLE TO YOU FOR ANY SPECIAL...

Page 3: ...erienced radio TV technician for help FCC Conditions This device complies with part 15 of the FCC Rules Operation is subject to the following two conditions 1 This device may not cause harmful interfe...

Page 4: ...w Voltage and the Limited Power Source 100 120 200 240 VAC Refer to the appropriate documentation for detailed information DO NOT connect multiple devices to one power adapter to avoid over heating or...

Page 5: ...ironments the appropriate temperature is 40 to 60 Place the device in a dry and well ventilated environment Keep non waterproof devices away from liquids Keep the device in original or similar packagi...

Page 6: ...figuration 6 3 2 1 Basic Settings 6 3 2 2 Set DNS 8 3 2 3 Set NAT 8 3 2 4 Set Alarm Center 10 3 2 5 Set SIP 11 3 2 6 Set Hik Connect 13 3 2 7 Access the Platform 14 3 2 8 Set Call Center Parameters 15...

Page 7: ...3 7 1 Set Time 38 3 7 2 Set System Parameters 38 3 7 3 Set Security 39 3 7 4 Set Password 39 3 7 5 Set User 40 3 7 6 Search for Log 41 3 7 7 Maintain the System 42 3 7 8 Check Video Audio Status 44 3...

Page 8: ...Panic Alarm Station Configuration Guide vi 3 10 4 Check Alarm Lamp Status 50...

Page 9: ...o realize alarm aid in emergency Key Features Network adaptive and video and audio adaptive Audio and video file storage H 264 H 265 G 711U AAC OPUS Video collection and all day monitoring with 2MP HD...

Page 10: ...steps show how to activate a device and modify its IP address For batch activation and IP addresses modification refer to User Manual of SADP for details Steps 1 Run the SADP software and search the o...

Page 11: ...address modification 2 2 Activate Device via Client Software Before You Start Get the iVMS 4200 client software from the supplied disk or the official website http www hikvision com en Install the so...

Page 12: ...ularly especially in the high security system resetting the password monthly or weekly can better protect your product 7 Click OK to start activation Device status will change to Active after successf...

Page 13: ...vation to activate the device You need to add the device to the client software before configure it See Add Device via Client Software Get the client software from the technical support and install th...

Page 14: ...subnet as the computer IP address You can edit the network parameters through the SADP software or the client software The SADP software is taken as an example for explanation Steps 1 Run the SADP so...

Page 15: ...ttings Page 2 Select the NIC and the NIC type 3 Set the network address Automatically obtain the network address Check Auto obtain the device automatically obtains the network address IPv4 Address Sub...

Page 16: ...and it can be changed to any port No ranges from 1 to 65535 Default Route The default Route is NIC 1 and it can be set to NIC 1 or NIC 2 5 Click Save to save the settings 3 2 2 Set DNS When the device...

Page 17: ...to connect seamlessly and to simplify the implementation of networks in the home and corporate environments 1 Click to enter the Remote Configuration page go to Network NAT Figure 3 4 NAT Setting Page...

Page 18: ...enter the server port number on the login page when you log in the device by client software RTSP Port Real time transport protocol port please make sure that the port you modified is available By def...

Page 19: ...ccording to the server type you set Port No The port number of the upload center The HIK protocol defaults to 7200 Protocol Type The default is HIK User Name Supports numbers and letters The HIK proto...

Page 20: ...Local Listening Port The local port of the device SIP function By default the local listening port is 5060 The available port number should be between 1024 and 65535 5 Configure the SIP parameters ac...

Page 21: ...red network is normal when you select a wireless network only the wireless network is used Register User Name The user name which the device registers to the SIP server Registration Password The passw...

Page 22: ...ss Note The default server address is litedev hik connect com 4 Select Network Mode 5 Enter a verification code and click Generate QR code There will be a QR code displaying on the page 6 Click Save 7...

Page 23: ...ain name of the platform Access to Server Port Enter the port number of the platform Panel ID Panel ID is the unique identification of the device Communication Network Select the network mode for comm...

Page 24: ...center type center name phone number dialing times communication protocol transfer mode and receiver ID 3 Click Save 3 2 9 Set Intercom Parameters Steps 1 Click to enter the Remote Configuration page...

Page 25: ...s Steps Note The default zone has a default zone type default audio file and the default zone will automatically upload an alarm recovery report These three parameters Zone Type Audio File and Upload...

Page 26: ...armed state as long as the detector connected to the zone is triggered an alarm is generated immediately without delay Fire Zone The fire zone must be set to a 24 hour alarm zone When the fire zone i...

Page 27: ...at is when the zone is triggered the trigger outputs a signal and the trigger will turn off the output after the output delay time ends Please refer to the user manual for the output delay time settin...

Page 28: ...Set Call Waiting Configure the call waiting parameters include the maximum ring duration and waiting time Steps 1 Click to enter the Remote Configuration page go to Output Settings Waiting Figure 3 1...

Page 29: ...Click and drag the mouse on the time bar to draw the scheduled time period 3 Optional Edit the time period Modify the time period Click and select the added time period drag to modify the time period...

Page 30: ...tion page go to Alarm Management Relay Figure 3 17 Relay Management Page Check the relays that need to be turned on off Click Enable Locked to change the relay switch status Click Refresh you can refr...

Page 31: ...e spkOut is the device s own audio input output lineOut1 are 3 5mm hole interfaces which can connect to the external microphones and speakers The device defaults to micIn and spkOut 3 Click Save 3 4 3...

Page 32: ...er the Remote Configuration page go to Alarm Management Alarm Lamp Figure 3 20 Alarm Light Management Page 2 Check the strobe light in the list and click Enable Locked to open or close the selected st...

Page 33: ...n spaces at the beginning and end The length of the file name should be not more than 31 and the file name cannot contain symbols Each audio file size up to 2MB and up to 16 audio files are uploaded A...

Page 34: ...strobe light flicking Click Alarm Lamp Flicking Check Enable Alarm Lamp Flicking to enable flicking and set the duration and interval of the strobe light flicking Figure 3 22 Strobe Light Flicking Pag...

Page 35: ...ou can delete the drawn time period Select a time period and click Delete to delete it Click Clear to delete all time period 3 Click Save 3 5 Event Settings 3 5 1 Schedule Settings Configure the recor...

Page 36: ...Type Main Stream and Sub Stream is optional Recording Schedule Click the drop down box of Recording Schedule and configure the recording schedule There are three schedules The schedule template not ed...

Page 37: ...record audio can be set as Yes or No If you select Yes record file will contain audio Capture schedule configuration Capture Settings Check Capture Settings to enable the capture schedule Capture Sche...

Page 38: ...ality Interval Timed capture based on this time interval Event capture configuration Check Event Capture to enable the event capture function which can capture multiple pictures when an event is trigg...

Page 39: ...ction button you can skip this step 4 Move the mouse to the time bar When the cursor changes to a pen click and drag the mouse within the time bar to draw the schedule time period 5 Edit the schedule...

Page 40: ...Page 2 According to actual needs select and check Enable Sudden Increase of Sound Intensity Enable Sudden Decrease of Sound Intensity And set the parameters Note Sensitivity 50 and Sound Intensity Thr...

Page 41: ...nal is linked when the audio exception is detected 3 6 Video Audio Settings 3 6 1 Video Audio Settings Configure the image quality resolution and other parameters of the camera Click to enter the Remo...

Page 42: ...ty the higher the resolution the higher the bandwidth requirement for the network Frame Rate Video frames per second According to the actual bandwidth setting the higher the video frame rate the highe...

Page 43: ...arameters the video file size of the whole day will be automatically calculated Note After the video and audio parameters are changed the device won t reboot Please combine the actual demand and stora...

Page 44: ...nformation will be displayed with a certain transparency and will flash Editing the display content You are able to select the display content optionally edit the camera name and add the custom displa...

Page 45: ...rightness is 6 the contrast is 5 the saturation is 6 and the sharp is 50 Click Default you can restore all video parameters to default 3 6 4 Set Intercom Audio Click to enter the Remote Configuration...

Page 46: ...ce Information Time Figure 3 32 Time Setting Page You can set the time zone NTP DST on the Time page You can also click Synchronization to implement SDK synchronization 3 7 2 Set System Parameters Set...

Page 47: ...disable SSH service which is used to provide security configuration for remote debugging Click to enter the Remote Configuration page go to System Security Figure 3 34 Security Parameters Configurati...

Page 48: ...ck parameters including maximum password attempts and lock duration Max Password Attempts The maximum times that the user attempts to enter the password By default it is 7 the available value is 3 to...

Page 49: ...and confirm it 3 Click Save Figure 3 36 Edit Admin User 3 7 6 Search for Log Search and view the alarm logs exception logs operation logs and event logs Click to enter the Remote Configuration page go...

Page 50: ...e 42 Figure 3 37 Search and View the Log Note You can click Backup and download the search result 3 7 7 Maintain the System System management and remote upgrade Click to enter the Remote Configuration...

Page 51: ...rs of the device will be restored to factory default settings Restore All Restore all the parameters to factory default settings and the device needs to be reactivated after restoring the parameters t...

Page 52: ...rading file And click Upgrade to upgrade the device Note An invalid upgrade occurs when using a mismatched upgrade file and then the device program is still the program before the upgrade Caution Do n...

Page 53: ...time on this day of the week Manual check Click Verity to start the check and the check results are displayed in the list Table 3 1 Description of Check Results Check results Description Normal Video...

Page 54: ...he camera Steps Note Only one network camera can be added to the device 1 Click to enter the Remote Configuration page go to System Camera Figure 3 41 Camera 2 Add a camera 1 Click Add and enter the I...

Page 55: ...lick Save 3 8 3 Set WDR When WDR is enabled the device automatically balances the brightest and darkest parts of the camera picture improving the dynamic range of the overall picture to see more detai...

Page 56: ...frame rate is 25 fps and when selecting Video Standard as NTSC 60HZ the highest frame rate is 30 fps 3 Click Save to save settings Result The changed video standard parameters take effect after resta...

Page 57: ...card is formatted the status of the MicroSD card will display Active 3 9 2 Search for File Search and download the record file and captured picture Steps 1 Click to enter the Remote Configuration page...

Page 58: ...alarm 3 10 2 Check Relay Status Click to enter the Remote Configuration page go to Status Relay you can view the relay status 3 10 3 Check Siren Status Click to enter the Remote Configuration page go...

Page 59: ...UD19463B...

Reviews: