


HIKVISION DS-8100-S User‟s Manual
13
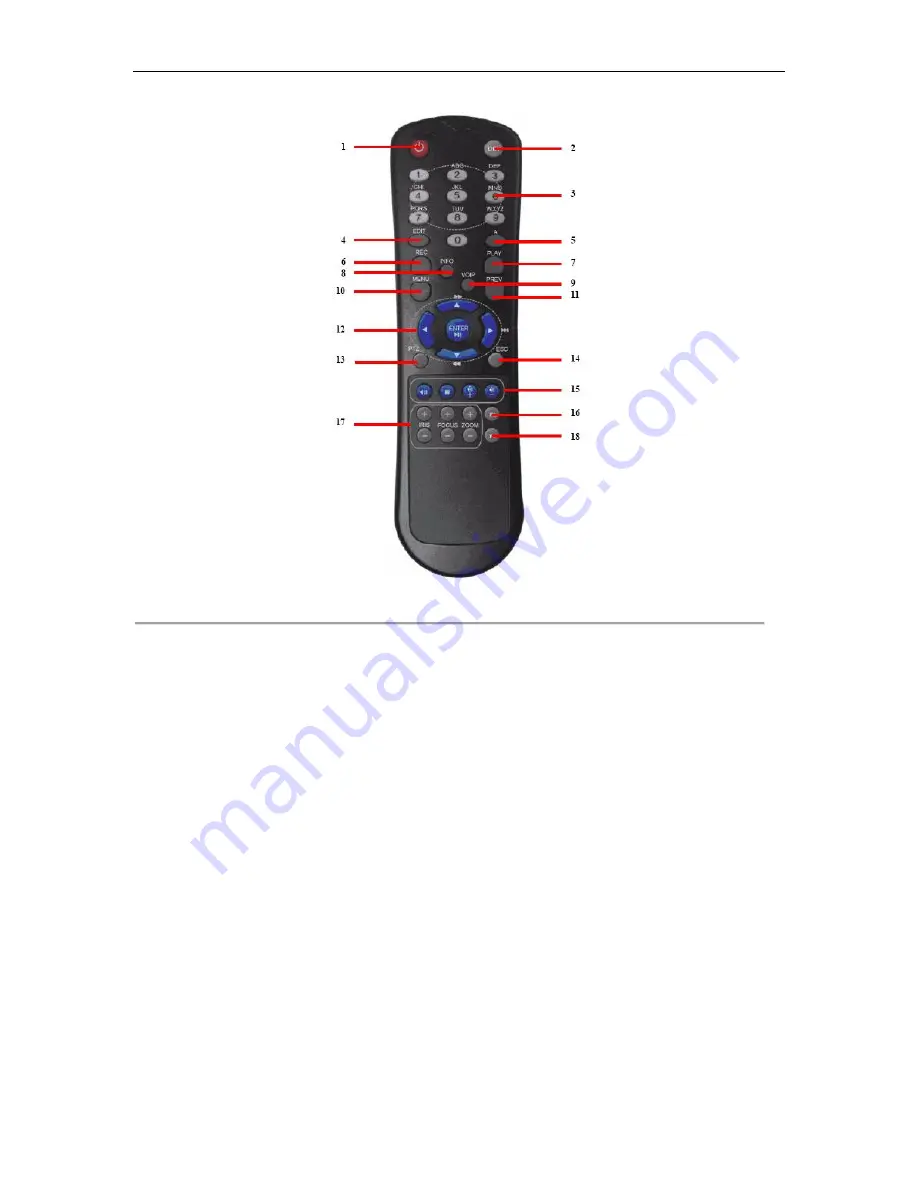
Figure 4. IR Remote Control
The keys on the remote control closely resemble the ones found on the front panel. Referring to Figure 5, they include:
1.
POWER Button:
Same as POWER button on front panel
2.
DEV Button:
Enables/Disables Remote Control.
3.
Alphanumeric Buttons:
Same as Alphanumeric buttons on front panel.
4.
EDIT Button:
Same as EDIT/IRIS+ button on front panel.
5.
A Button:
Same as A/FOCUS+ button on front panel.
6.
REC Button:
Same as REC/SHOT button on front panel.
7.
PLAY Button:
Same as PLAY/AUTO button on front panel.
8.
INFO Button:
Same as ZOOM+ button on front panel.
9.
VOIP Button:
Same as MAIN/SPOT/ZOOM- button on front panel.
10.
MENU Button:
Same as MENU/WIPER button on front panel.
11.
PREV Button:
Same as PREV/FOCUS- button on front panel.
12.
DIRECTION/ENTER Buttons:
Same as DIRECTION/ENTER buttons on front panel.
13.
PTZ Button:
Same as PTZ/IRIS- button on front panel.
14.
ESC Button:
Same as ESC button on front panel.
15.
RESERVED:
Reserved.
16.
F1 Button:
Same as F1/LIGHT button on front panel.
17.
PTZ CONTROL Buttons:
Buttons to adjust the iris, focus and zoom of a PTZ camera.
18.
F2 Button:
It is also used to cycle through tab pages.
Aim the remote control at the IR receiver located at the front of the unit to test operation. If there is no response:
1.
Using the front control panel or the mouse, go into Menu > Settings > General > More Settings.
2.
Check and remember DVR ID#. The default ID# is 255. This ID# is valid for all IR controls.
3.
Press the DEV button on the remote.
4.
Enter the DVR ID# from step 2.
5.
Press the ENTER button on the remote.
If the Status indicator on the front panel turns blue, the remote control is operating properly. If the Status indicator does
Summary of Contents for DS-8100-S Series
Page 1: ...HIKVISION DS 8100 S User s Manual 1 DS 8100 S Series DVR USER S MANUAL ...
Page 7: ...HIKVISION DS 8100 S User s Manual 7 C H A P T E R 1 Introduction ...
Page 17: ...HIKVISION DS 8100 S User s Manual 17 C H A P T E R 2 Getting Started ...
Page 24: ...HIKVISION DS 8100 S User s Manual 24 C H A P T E R 3 Live Preview ...
Page 29: ...HIKVISION DS 8100 S User s Manual 29 C H A P T E R 4 Record Settings ...
Page 38: ...HIKVISION DS 8100 S User s Manual 38 C H A P T E R 5 Playback ...
Page 43: ...HIKVISION DS 8100 S User s Manual 43 Figure 7 Digital Zoom Area Selection ...
Page 44: ...HIKVISION DS 8100 S User s Manual 44 C H A P T E R 6 Backup ...
Page 49: ...HIKVISION DS 8100 S User s Manual 49 C H A P T E R 7 Alarm Settings ...
Page 59: ...HIKVISION DS 8100 S User s Manual 59 C H A P T E R 8 Network Settings ...
Page 67: ...HIKVISION DS 8100 S User s Manual 67 C H A P T E R 9 PTZ Controls ...
Page 73: ...HIKVISION DS 8100 S User s Manual 73 6 Click OK to save and exit from menu ...
Page 74: ...HIKVISION DS 8100 S User s Manual 74 C H A P T E R 1 0 Camera Management ...
Page 78: ...HIKVISION DS 8100 S User s Manual 78 C H A P T E R 1 1 HDD Management ...
Page 84: ...HIKVISION DS 8100 S User s Manual 84 C H A P T E R 1 2 DVR Management ...
Page 96: ...HIKVISION DS 8100 S User s Manual 96 C H A P T E R 1 3 Appendix ...


