background image

CHAPTER 12


Global Functions: Collage Generator™

98

DLHD Digital Light User Manual

NOTE:

You can find other configurations and information on sizing and 

compressing media to use with the Collage Generator at the High End 

Systems website (www.highend.com/support/digital_lighting).

Collage Parameters

Collage Type

The Collage Type global parameter has eighteen collage options including 14  modes:

In Standard Collage and Standard Collage with 360° Wrap options, the content is 
automatically divided into cell segments by the graphics engine after you define the array size. 
This yields good results in situations where moderate output resolution is suitable. 

In Multipane Collage options where you pre-configure the content into cells and project each 
cell from a separate server, you can project a 1024x768 from each server.

In situations where you require extremely high resolution output of custom content, the 
Multipane Collage options’ resolution capabilities is greatly increased because the graphics 

DMX Value 

Action

1

Standard Collage divides content for projection onto a flat surface

2

Standard Collage with 360° wrap divides the content into an array and edge blending for 
projection onto a 360° surface

3

Multipane Collage pre-configures the content into cells that are then arranged into an 
array for projection onto a flat surface

4

Multipane Collage with 360° wrap pre-configures the content into cells that are then 
arranged into an array for projection onto a 360° surface.

10

Standard collage plus blend right outside edge

11

Standard collage plus blend left outside edge

12

Standard collage plus blend bottom outside edge

13

Standard collage plus blend top outside edge

14

Standard collage plus blend right and bottom outside edges

15

Standard collage plus blend left and bottom outside edges

16

Standard collage plus blend right and top outside edges

17

Standard collage plus blend left and top outside edges

18

Standard collage plus blend left and right outside edges

19

Standard collage plus blend bottom and top outside edges

20

Standard collage plus blend right, left and bottom outside edges

21

Standard collage plus blend right, left and top outside edges

22

Standard collage plus blend right, bottom and top outside edges

23

Standard collage plus blend left, bottom and top outside edges

24

Standard collage plus blend right, left, bottom and top outside edges.

Summary of Contents for DLHD High Definition Digital Light

Page 1: ...Belden is a registered trademark of Belden Inc Microsoft DirectX and Windows are either registered trademarks or trademarks of Microsoft Corporation in the United States and or other countries Super...

Page 2: ...6 256 136 US 6 261 636 US 6 278 542 US 6 278 545 US 6 278 563 US 6 288 828 US 6 326 741 US 6 327 103 US 6 331 756 US 6 346 783 US 6 421 165 US 6 430 934 US 6 459 217 US 6 466 357 US 6 502 961 US 6 51...

Page 3: ...amended by 92 31 EEC and 93 68 EEC Equipment referred to in this declaration of conformity was first manufactured in compliance with the following standards in 2005 Safety EN 60598 1 1997 EN 60598 2...

Page 4: ...digital device pursuant to part 15 of the FCC rules These limits are designed to provide reasonable protection against harmful interfer ence when the equipment is operated in a commercial environment...

Page 5: ...written explanation of the alleged problem or malfunction Ship returned Product units or parts to 2105 Gracy Farms Lane Austin TX 78758 USA Note Freight Damage Claims are invalid for fixtures shipped...

Page 6: ...ows parties and raves are all examples of public performance and permission must be obtained Suppose I want to use a still photo or a magazine cover or a television clip Do I have to obtain permission...

Page 7: ...tellectual property issues How much does it typically cost to license copyrighted material The answer depends entirely on what material you want to use and how you plan to use it Prices can range from...

Page 8: ...viii DLHD Digital Light User Manual...

Page 9: ...ation software Features 1 System 1 Graphics Engine 2 Content Management Application 3 Hardware 3 Related Products and Accessories 4 Chapter 2 Setup and Configuration Hardware setup includes mounting c...

Page 10: ...DL 3 Fixture to a Wholehog Console 19 Viewing Output 19 Shutting Down the Fixture 19 Recommended Shutdown Options 19 Placing Fixture in Road Case 20 Chapter 3 The Digital Light Menu System DLHD digita...

Page 11: ...Start If you are new to DMX programing this chapter gives you a brief overview on programming DLHD DL 3 Axon HD and Axon media servers and an example of using a Wholehog console to patch and display o...

Page 12: ...s use virtually the same graphic engine software to control content selection and playback as well as 3 D Object and Global manipulation Protocol Options 49 Image Optimizing Controls 49 Graphics Contr...

Page 13: ...Descriptions 64 Media File 65 Defining a Media File Segment 65 In Frame and Out Frame Parameters 65 Segment Selection Examples 66 Defining Playback 67 Playback Mode 67 Scrubbing 67 Playback Speed 68 C...

Page 14: ...pe Select and Strobing 90 Mask Shapes 90 Strobing Mask Shapes 90 Mask Size 91 Mask Edge Fade 92 Image Edge Fade 93 Keystone Correction Parameters 94 Keystone X Ratio 95 Keystone Y Ratio 95 Framing Par...

Page 15: ...ls 112 Color Cycle 113 Color DeConverge 113 Colorize Gray Scale 114 Color to Alpha 115 Color to Alpha Inverted 116 Color to B W 117 DotP and Resample 117 Edge Detect Black and White 118 Edge Detect Bl...

Page 16: ...50 Transparent Color 150 Transparent Color Coarse 150 Transparent Color Fine 150 Transparent Color Medium 150 Transparent Color Invert 151 Transparent Color Invert Coarse 151 Transparent Color Invert...

Page 17: ...cture in Picture 184 Prerotation Translation 185 Pixelate 186 Pixel Twist 187 Prism 188 Raindrop 189 Scene Change 190 ShakeNBake 191 Sinewave Circular 192 Sinewave Circular w X Axis Wobbulation 192 Si...

Page 18: ...aphic Object on the master in terms of playback time rotation or both Network Synchronization Overview 205 Network Synchronization Requirements 205 Network Synchronization Capabilities 206 Programming...

Page 19: ...s 220 Moving User Content Files and Folders 221 Downloading Content from a Media Server to Your Local Drive 222 Uploading Content from Your Local Drive to a Media Server 223 Content Scanning 223 CMA I...

Page 20: ...A Warp Editor User Warps are applied globally to modify the output display shape This chapter describes the Warp Editor and includes a step by step example for creating a custom warp graphic object Ov...

Page 21: ...g System 264 Filter Warnings 264 Cleaning and Replacing Filters 264 Cleaning the Base Housing Filter 265 Replacing the Fixture Filter 265 Replacing the Lamp 267 Removing the Projector 268 Replacing th...

Page 22: ...86 Projector 286 Operation 287 Environmental 287 Cables and Connectors 287 Video Connectors 287 Peripheral Network Connectors 287 DMX and RS 485 Projector Link 288 Appendix B MSpeed Conversion Table T...

Page 23: ...r 1500 high resolution lighting optimized video and still images The Collage Generator feature allows you to create seamless vertical horizontal or central panoramic media projections using multiple A...

Page 24: ...o allow for crossfading or dissolves between media streams Full control of image Rotation Positioning and Scaling on X Y and Z axes Black Level and Contrast control to optimize content Global paramete...

Page 25: ...stem Log File Download available in All Servers view in the CMA to provide troubleshooting information to customer service if a problem occurs Logs are saved with a dlf digital log file extension Hard...

Page 26: ...cement Standard Zoom lens 99310481 Accessory Long Zoom Lens kit 68060002 Accessory Wide Angle Zoom Lens kit 68060003 Accessory Ultra Long Zoom Lens kit 68060001 5 amp slow blow fuse 90403012 Replaceme...

Page 27: ...ure to a DMX controller via DMX cabling or Art Net on the Ethernet network 6 Connect the fixture to power Unpacking the Fixture Your DLHD fixture ships in a road case specifically designed to protect...

Page 28: ...to assist with troubleshooting SDI conections for video input output Serial Digital Interface options for input from the internal camera to the media server and output to another DL 3 fixture or othe...

Page 29: ...ote that the cores in the mains lead are coloured according to the following code green and yellow earth blue neutral brown live Installing a Line Cord Cap U K Only In the United Kingdom core colours...

Page 30: ...operation of the fixture Air filters both fixture and projector should be checked and cleaned on a regular basis When used in a closed or fixed environment where fog or haze is used we recommend at l...

Page 31: ...ure and a safety cable attached using the mounting bracket to the fixture s base Use the following steps to mount a DLHD fixture on a standard truss 1 Due to its size and weight at least two people sh...

Page 32: ...s base and to the support 4 Run the safety cable through the loop on the fixture s base and around the truss NOTE High End Systems does not recommend operating the DLHD fixture with the base perpendic...

Page 33: ...the remaining fixtures connecting a cable from the Data Out connector of each fixture to the Data In connector of the next fixture on the link 4 Connect a male terminator to the Data Out connector of...

Page 34: ...et Hub DMX Universe 1 DMX Universe 2 Road Hog Fullboar Console Configuration Option 1 DMX 512 Data Cabling Ethernet Cabling DMX Universe 1 DMX Universe 2 Road Hog Fullboar Console Laptop Computer Ethe...

Page 35: ...ibes the menu system configuration options in detail NOTE Most configuration features are also available through the Content Management Application CMA see Viewing Server Configuration on page 276 WAR...

Page 36: ...twork is linking DL 3 and DLHD fixtures only you will need to run the CMA on a computer connected to the Ethernet link you have established The following are the minimum hardware requirements for a re...

Page 37: ...ur fixture may not be the most up to date The latest fixture and CMA software are always available at the High End Systems website CMA software version is noted upon installation and can be accessed a...

Page 38: ...he DLHD fixture s menu DMX Screen For detailed information on using the DLHD Menu System see Chapter 3 The Digital Light Menu System on page 23 Select a Source 1 DMX Source defines the source of DMX d...

Page 39: ...nt Application CMA on page 249 All the setup configuration selections for DL 3 and DL 2 fixtures can be made in the Server tab To view configuration information for a individual server click on All Se...

Page 40: ...n 3 Select the number of Graphic Object Layers required for your application in the drop down field next to the protocol 4 Enter a valid Start Channel in the Start Channel field DLHD Channel Range and...

Page 41: ...any Media File value between 1 and 37 displays a media loop from the HES Core folder Media Folder 1 on a flat 4x3 rectangle Object 1 The Dimmer Global Intensity and Object Opacity parameters all need...

Page 42: ...ion as shown for packing in the road case 2 Secure with the pan lock located on the yoke base NOTE This is the only pan position that locks 3 Move the tilt lock peg to the upper left locked position 4...

Page 43: ...el see Control Function Options on page 46 Menu Panel Components The LCD screen displays the menu system arranged with a series of Menu Tabs along the side for accessing configuration screens and opti...

Page 44: ...CD Power button Holding it down for two seconds turns the Menu display on or off Use this in situations when you need to turn the Menu display completely off instead of dimming it to video black If yo...

Page 45: ...ction button to move left right up down to a field The currently selected field will be highlighted Press the Enter button to go into edit mode for the selected field A list box will open to show all...

Page 46: ...on Displays current fixture Movement parameter values Global Displays current parameter values for the composite image 1 9 graphic objects Displays current parameter values for the selected graphic ob...

Page 47: ...es sent by the console Set value manually from 0 255 Off Default Focus Override On Overrides the DMX values sent by the console Set value manually from 0 255 Off Default Projector Ceiling On Rotates t...

Page 48: ...Status Projector Air Filter Hardware CPU Identifies the currently loaded hardware components Motherboard Video Adapter Hard Drive Projector Type SDI Capture Test Home Motion All Clicking the Home but...

Page 49: ...er Clicking Restart reboots the internal media server Delete User Content Clicking Delete erases all User Content on server Upgrade Factory Content Clicking Upgrade installs updates to factory content...

Page 50: ...ion 2 protocol retains the original DL 3 DMX protocol footprint and is compatible with legacy shows HD High Definition protocol and can control up to ten graphic objects Edit the DMX Start Channel fie...

Page 51: ...tegrated camera functionality For more information on specific Motion parameters see Chapter 6 Fixture Motion Functions on page 45 DMX_Protocol _Global Screen The Global sub tab display the current va...

Page 52: ...ing of each line indicates the first DMX channel with a value displayed on that line Use the scroll bar at the left of the offset number to scroll through all the values The Refresh Rate is the rate a...

Page 53: ...as Long 5 minutes or Short 5 seconds Short is the default setting After 10 minutes of no data the fixture will shut down the projector and the motion functions Fans remain on to maintain the temperat...

Page 54: ...the lamp On or Off Use the Projector Powerup field to choose the control option for turning the lamp on The options are Always On Manual and DMX This only takes effect when the fixture powers up Alwa...

Page 55: ...an external source and bypasses the internal graphics engine When Internal is selected the projector takes input directly from the graphics engine Internal is the default configuration setting Projec...

Page 56: ...fixture hours for a show or a rental period The number field displays the number of hours the fixture has been operating since the last reset Pressing the Fixture Hours Reset returns the value to 0 I...

Page 57: ...splays status errors and warnings on items including Temperature Filter life Lamp life USB and Camera Communication USB Security For more detailed information see Chapter 17 Maintenance and Troublesho...

Page 58: ...ical functionality of Pan Tilt Iris Zoom and Focus assemblies on the fixture head Select On to start the test sequence The Video Test option opens the mechanical iris and provides test patterns to che...

Page 59: ...e Video The DLHD fixture has video connectors for SDI on its rear panel as shown in the following figure Configuring the SDI Video Input Source SDI capture is another option for input and output to th...

Page 60: ...n Note the following when using the SDI video input and output option While capturing SDI anything that is being fed to the In SDI port will be mirrored on the Out port Therefore it is possible to dai...

Page 61: ...ng 256 values of control 0 255 This is known as 8 bit DMX Although most parameters use 8 bit DMX several require a more accurate range of values than can be provided with a single DMX channel By utili...

Page 62: ...f Graphic objects you select DL 3 and Axon media servers running Version 2 0 fixture software all provide individual and composite graphical control for up to nine Graphic Objects DL 2 fixtures can co...

Page 63: ...he various DMX protocol options The Motion fixture type controls the actual moving yoke projector and integrated camera in DL 2 and DL 3 fixtures The Global fixture type controls the global graphic en...

Page 64: ...in the DL 3 or DL 2 DMX Protocol Play Modes Opacity Using the Graphic fixture type press the Mode button to view the play mode options By default all modes trigger normally You can select Media Trigg...

Page 65: ...ing steps to get to the point of displaying output Add one of each type in the Fixture Schedule shown in the Fixture Window After adding each type assign it to a DMX universe The simplest setup would...

Page 66: ...CHAPTER 5 DMX Programming Basics and Quick Start 44 DLHD Digital Light User Manual...

Page 67: ...its programmed position If a physical obstruction prevents the fixture from correcting its position this correction feature times out to prevent wear on the motors If the fixture s position correction...

Page 68: ...sfades For a listing of exact MSpeed times see Appendix B MSpeed Conversion Table Control Function Options The Control parameter remotely initiates various fixture operations and allows access to the...

Page 69: ...ection Projector Rear Projection Input from External RGBHV to Projector Video input can be utilized with either RGBHV or VGA but not both You can select between RGBHV and VGA in the menu system see DM...

Page 70: ...ey will result in unpredictable performance Optional If the projector is mounted on the ceiling flip the display by selecting a Control parameter DMX value from 209 212 4 Set the Dimmer parameter DMX...

Page 71: ...hic Layer You select the protocol level in the fixture s onboard menu system for DLHD and DL 3 fixtures from the onboard menu systems or through the CMA for both fixtures and Axon media servers see Vi...

Page 72: ...Framing Shutters Audio Balance Global Intensity Graphic Functions are applied to each object Mask Warp Selection Collage Object Content Contrast Playback Opacity Effect 2 Effect 3 Effect 1 Rotation P...

Page 73: ...s Global controls are applied to composite image created by multiple 3 D images For the combined image you can Adjust the composite image intensity level Apply visual effects including colormixing and...

Page 74: ...CHAPTER 7 Graphics Engine Overview 52 DLHD Digital Light User Manual...

Page 75: ...n adjust the opacity of an individual 3 D object from completely transparent to full opacity using this parameter Increase opacity from not visible at a value of zero to full opacity at a value of 255...

Page 76: ...f the selected Graphic Object Default DMX Value 128 no black level adjustment to content image of Value Range Function 0 Black level adjustment off 1 127 Black level set from minimum toward no adjustm...

Page 77: ...rs for both the Global and Graphic fixture types The default for Effect Mode 1 is set to CMY1 as well Effect Mode 2 and 3 Modifier channels are labeled Mod 1 Mod 2 and Mod 3 DMX value Name Description...

Page 78: ...ransparent Color Invert Medium selects key color using Modifier channels Red Green Blue 31 Transparent Color Invert Coarse selects key color using Modifier channels Red Green Blue 32 Scan Line convert...

Page 79: ...to Alpha Inverted varies the transparency level of an image s inverted color values Inverted Red to alpha Inverted Green to alpha Inverted Blue to alpha 51 Texture Mixing crossfades between the curre...

Page 80: ...he image transparent except for a selected UV chroma coordinate U Coordinate V Coordinate Tolerance 86 UV Select to Transparent turns a selected UV chroma coordinate transparent with the rest of the i...

Page 81: ...d1 Sample distance Mod2 Edge threshold comparison Mod3 Detected edge scaler Sample Distance Edge Threshold Compare Detected Edge Scaler 105 Digital Mspeed 2 Mod1 keystone speed Mod2 framing speed Mod3...

Page 82: ...d3 not used Expand Contract Color Color Shift Not Used 253 Special value used with global spherical mapping effect 142 Defaults to 0 otherwise NA NA NA 254 Special value used with global spherical map...

Page 83: ...ntent Every DL 3 DL 2 and Axon media server has a file system that holds the movies images and 3 D objects that make up the content that the server uses These files folders and their associated DMX va...

Page 84: ...the 3 dimensional object component of an image Object files are the 3 D object shapes used to build a total image The graphics engine supports a combined total of 255 stock and user created object fil...

Page 85: ...eter DMX values for folders are assigned as follows DMX values 1 39 are used or reserved for Stock Content DMX values 40 240 are reserved for User Content DMX value 255 is reserved for live video inpu...

Page 86: ...rs 15 Apollo Glass Digital Gobo Patterns promotional 16 Artbeats Digital video loops promotional 17 DHA_TopMac Digital patterns promotional 18 Beacon DigiGobos Digital video loops promotional 19 Amorp...

Page 87: ...g of the media file and the Out Frame is the end of the file Media files can have different lengths NOTE Media that is not properly encoded may still play but may have issues when using In Frame and O...

Page 88: ...edia file segment as a percentage of the file length Segment Selection Examples You can create a segment anywhere between the beginning and the end of a media file The In Frame does not have to preced...

Page 89: ...ion 0 Play forward looping Plays the media segment from In Frame setting to Out Frame setting looping continuously 1 Play forward once Plays the media segment from In Frame setting to Out Frame settin...

Page 90: ...e Playback Speed for a media file is used whenever the Playback Mode Parameter s DMX value is assigned to any Play Forward option Default DMX Value 128 Playback at normal speed A DMX value of 0 or 128...

Page 91: ...provide the easiest and most reliable content selection rendering and output Rotating a 3 D Object The Rotation parameters for each object control 3 D object rotation with 16 bit precision You can ro...

Page 92: ...n the object begins rotating continuously Additional adjustment to the DMX values increases the speed of continuous rotation NOTE Global and Graphic Effects Mode parameters contain a Prerotation Trans...

Page 93: ...space for the composite image see Global Viewpoint Mode on page 130 Default DMX Value 32768 50 No X Rotation Tip Using this parameter you can turn one object through another of Value Range Function 1...

Page 94: ...ing this parameter you can turn one object through another Z Rotation The Z Rotation parameter rotates or indexes the selected Graphic Object around the Z axis with 16 bit precision You can index the...

Page 95: ...p Using this parameter you can turn one object around another of Value Range Function 1 24 Continuous variable speed counterclockwise image rotation around Z axis fast to slow 25 Continuous rotation s...

Page 96: ...nlarge or shrink a 3 D object proportionally X Scale The X Scale parameter uses two channels to scale the selected 3 D object along the X axis either expanding it or making it smaller Use it when you...

Page 97: ...Z axis either expanding or shrinking it Use it when you want to size the object s thickness A DMX value of 32768 50 sets the object at its normal size Values less than 50 shrink the the object thickne...

Page 98: ...D images in relation to each other X Position The X Position parameter moves your object along the X axis with 16 bit precision The midpoint of the 16 bit DMX value range centers the image on the X ax...

Page 99: ...cision The midpoint of the 16 bit DMX value range centers the image on the Y axis Values below the DMX midpoint move the object down and values above the DMX midpoint move the object up Default DMX Va...

Page 100: ...and appears to become smaller and object above the DMX midpoint move the object toward the viewer and appears to become larger Default DMX Value 32768 50 object centered in frame Tip This parameter c...

Page 101: ...nship between individual objects Use this parameter to adjust the intensity of a composite image over the separate Graphic Object s Opacity parameter settings Increase intensity from not visible at a...

Page 102: ...he default for Effect Mode 1 is set to CMY1 as well Other Effect Mode Modifier channels are labeled Mod 1 Mod 2 and Mod 3 DMX Value Effect Mode Name Description Adjustments Modifier 1 Modifier 2 Modif...

Page 103: ...olor using Modifier channels Red Green Blue 28 Transparent Color Coarse selects key color using Modifier channels Red Green Blue 29 Transparent Color Invert Fine selects key color using Modifier chann...

Page 104: ...transparent Selects Color Scheme Sets Intensity bandwidth Controls Transparency 46 Raindrop simulates raindrops falling on a liquid surface Controls size speed Seeds random generator Controls raindrop...

Page 105: ...renders the image in offset horizontal slats Number of Slats Horizontal Displacement Fade from Normal to Slats 80 Downward Vertical Streaks pulls the image down Vertical Start Position Streak Angle F...

Page 106: ...nts to Effect 95 Number of Particles Particle Size Emitter Size 97 Particle System 3 adds adjustments to Effect 95 Effect 96 Initial Particle Velocity Particle Rotation Particle Lifetime 98 Prism Numb...

Page 107: ...oth the selected Mask and Image Edge Fade parameters Red Green Blue 131 Background Color selects background color Red Green Blue 132 Background Color Cycle sequences the background color Red Speed Gre...

Page 108: ...projecting on curved surface Adjusts Correction Sets Horizontal Centerpoint Not Used 149 Curved Surface Horizontal Concave Cylinder corrects shape projecting on curved surface Adjusts Correction Sets...

Page 109: ...rameter is set to a DMX value 252 Spherical Control Statistics are displayed and the Global Control Modifier parameter selects text color page 324 Performance Statistics When the Global Control parame...

Page 110: ...ic object in the Global Control Modifier parameter DMX Value Global Control Modifier Option Global Control parameter 253 0 Displays each defined Graphic Object with no effects applied As the next effe...

Page 111: ...89 Spherical Effect or Collage Effect Composite Image displaying the object with graphic effects applied Graphic Object 1 Graphic Object 2 Graphic Object 3 Graphic Object 4 Graphic Object 5 Graphic O...

Page 112: ...A Global Effect Mode parameter option lets you define a Mask color see Global Effect Mode Channels on page 80 and Mask Color on page 131 DMX value Strobe DMX Value Mask Shapes 0 128 Round iris closin...

Page 113: ...ter is set at a value of 255 100 the mask is sized to leave the image 100 visible When Mask Size is set at 0 the mask totally covers the composite image Tip Crossfading the Mask Size parameter can cre...

Page 114: ...de adjusts the amount of fading from a DMX value of 0 no edge fade to 255 100 maximum edge fade When the Mask Select parameter value 128 50 to 255 100 the strobing masks are selected and Mask Edge Fad...

Page 115: ...eft and right When projecting abutting images adjusting the Edge Fade parameter lets you smooth the line between two images and also allows you to change an object s boundary Default DMX Value 0 all e...

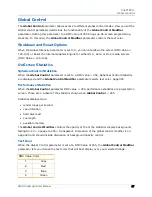
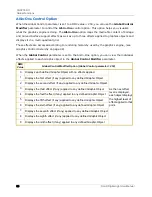
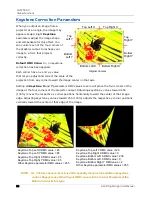
Page 116: ...s toward 255 100 moves the respective x corner positions horizontally toward the center of that image edge Adjusting keystone y values toward 255 100 adjusts the respective y corner positions vertical...

Page 117: ...ve the midpoint of the range expand the image horizontally from 128 no expansion to 255 100 maximum expansion Keystone Y Ratio The Keystone Y Ratio parameter shapes the output to adjust for keystone e...

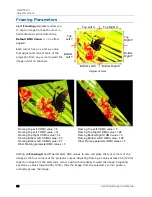
Page 118: ...values across 255 100 clips the image from the selected x corner position horizontally toward the image Adjusting keystone y values toward 255 100 clips the image from the selected y corner position...

Page 119: ...Generator has streamlined this process The Collage Generator is no longer a part of Global Effects but is defined using dedicated parameters You can configure multiple media server outputs to display...

Page 120: ...2 Standard Collage with 360 wrap divides the content into an array and edge blending for projection onto a 360 surface 3 Multipane Collage pre configures the content into cells that are then arranged...

Page 121: ...ingle file is divided by the number of parts in the collage To equal the same resolution in standard collage mode the single file would have to be 4 times larger and it would have a negative impact on...

Page 122: ...53 8 x 3 78 10 x 7 103 13 x 8 4 3 x 1 29 6 x 3 54 3 x 8 79 10 x 8 104 14 x 1 5 1 x 3 30 3 x 6 55 8 x 4 80 11 x 1 105 14 x 2 6 3 x 2 31 6 x 4 56 4 x 8 81 11 x 2 106 14 x 3 7 2 x 3 32 4 x 6 57 8 x 5 82...

Page 123: ...meter lets you select from a variety of blend curves to control the edge blending of the adjacent projections DMX Value Action 0 Standard color blend curve No adjustment 1 33 Standard color blend curv...

Page 124: ...Variable Edge Blend Horizontal parameters allow 16 bit control of the horizontal blend region width from 0 hard edge up to 50 of the image size The default fixture library value has been chosen to giv...

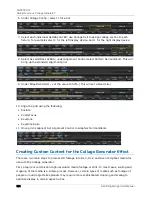
Page 125: ...rd Collage DMX 1 3 In the Alignment Control parameter on the Global Layer show the collage selection grid by selecting the Grid Cell Selection option DMX 6 4 In the Collage Config Selection parameter...

Page 126: ...is will set a blend size 10 Align the grid using the following Position Zoom Focus Keystone Keystone Ratio 11 Once grid is aligned Set Alignment Control to Graphics Normal Blend Creating Custom Conten...

Page 127: ...software For more information on creating Digital Lighting content and selecting encoder software go to www highend com support digital_lighting Collages Using Live S Video and SDI Input DL 3 Axon and...

Page 128: ...CHAPTER 12 Global Functions Collage Generator 106 DLHD Digital Light User Manual...

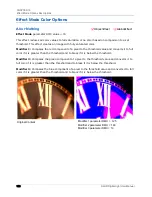
Page 129: ...ive effects at the global level This lets you choose for example whether to apply a color effect to an individual object or to the composite image at the global level After you select a mode using eit...

Page 130: ...nverts it to full color if it is greater than the threshold and to black if it is below the threshold Modifier 2 Compares the green component of a pixel to the threshold value and converts it to full...

Page 131: ...point and position This effect allows you to cycle a color sequence on the background controlling the transition speed Modifier 1 Defines the red color component speed A DMX value of 128 50 default cy...

Page 132: ...ent to 255 100 maximum cyan saturation Modifier 2 Increases magenta color component from 0 no adjustment to 255 100 maximum magenta saturation Modifier 3 Increases yellow color component from 0 no adj...

Page 133: ...on Modifier 2 Increases magenta color component from 0 no adjustment to 255 100 maximum magenta saturation Modifier 3 Increases yellow color component from 0 no adjustment to 255 100 maximum yellow sa...

Page 134: ...tion Modifier 2 Increases magenta color component from 0 no adjustment to 255 100 maximum magenta saturation Modifier 3 Increases yellow color component from 0 no adjustment to 255 100 maximum yellow...

Page 135: ...ifier 3 Increases blue color component from 0 no adjustment to 255 100 maximum blue saturation Color DeConverge Effect Mode parameter DMX value 39 This effect separates the different color components...

Page 136: ...specially effective effect when applied to input from the internal camera Modifier 1 Selects from color schemes along a range of values from 0 255 Modifier 2 Sets the zero point of the color intensity...

Page 137: ...intensity from 0 no adjustment to 255 100 full red opacity intensity Modifier 2 Increases the green component opacity or intensity from 0 no adjustment to 255 100 full green opacity intensity Modifie...

Page 138: ...ity from 0 no adjustment to 255 100 full green and blue opacity intensity Modifier 2 Increases the green component opacity or intensity from 0 no adjustment to 255 100 full red and blue opacity intens...

Page 139: ...ve 50 reveals more of the image in black and white to complete at a value of 255 100 Modifier 2 Not Used Modifier 3 Not Used DotP and Resample Effect Mode parameter DMX value 13 This effect applies an...

Page 140: ...k Modifier 1 Adjusts horizontal edge search size from 0 no adjustment to 255 100 maximum adjustment Modifier 2 Adjusts vertical edge search size from 0 no adjustment to 255 100 maximum adjustment Modi...

Page 141: ...djusts sample distance from 0 no adjustment to 255 100 maximum adjustment Modifier 2 Adjusts comparison edge threshold from 0 no adjustment to 255 100 maxi mum adjustment Modifier 3 Sets the detected...

Page 142: ...fier 1 Adjusts horizontal edge search size from 0 no adjustment to 255 100 maximum adjustment Modifier 2 Adjusts vertical edge search size from 0 no adjustment to 255 100 maximum adjustment Modifier 3...

Page 143: ...ample distance from 0 no adjustment to 255 100 maximum adjustment Modifier 2 Adjusts the edge threshold comparison from 0 no adjustment to 255 100 maximum adjustment Modifier 3 Sets the edge from 0 no...

Page 144: ...color component from 0 no adjustment to 255 100 maximum red saturation Modifier 2 Increases blue color component from 0 no adjustment to 255 100 maximum blue saturation Modifier 3 Increases green col...

Page 145: ...odifier 3 Not Used Tip All the factory content provided has been optimized already This parameter and the Content Optimization option are especially useful for optimizing user content or camera captur...

Page 146: ...ion to view a 3 D object without displaying the associated texture Modifier 1 Increases red color component from a DMX value of 0 no adjustment to 255 100 maximum red saturation Modifier 2 Increases b...

Page 147: ...option to view a 3 D object without an associated texture Modifier 1 Defines the red color component speed A DMX value of 128 50 default cycle speed DMX Values above the midpoint increase cycle speed...

Page 148: ...o effect applied but Modifier 2 can still affect image contrast Modifier 1 At a DMX value of 0 the image will be full color As you increase the DMX value more gray is introduced until at a DMX value o...

Page 149: ...level and contrast Modifier 1 Adjusts the black level of the grayscale image from a DMX value of 0 Full brightness to 255 completely black Modifier 2 Adjusts contrast of the grayscale image from 0 no...

Page 150: ...ffect Maps a selected color coordinate to an HSI color space and turns everything else gray Modifier 1 Adjusts the Hue color component from 0 no adjustment to 255 100 maximum hue Modifier 2 Adjusts th...

Page 151: ...olerance from 0 minimum to 255 100 maximum HS to Transparent Effect Mode parameter DMX value 88 Maps a selected color coordinate to a HSI color space and turns everything else transparent and shows gr...

Page 152: ...nsity Modifier 2 Selects intensity bandwidth from a DMX value of 0 narrowest bandwidth to 255 widest bandwidth Modifier 3 Turns selected intensity range transparent from 0 no change to 128 fully trans...

Page 153: ...of 0 no adjustment to 255 100 maximum red saturation Modifier 2 Increases blue color component from a DMX value of 0 no adjustment to 255 100 maximum blue saturation Modifier 3 Increases green color c...

Page 154: ...creases red color component from a DMX value of 0 no adjustment to 255 100 maximum red saturation Modifier 2 Increases blue color component from a DMX value of 0 no adjustment to 255 100 maximum blue...

Page 155: ...ge and then lets you adjust the amount of color and the red and green color components Modifier 1 Adjusts the color level from full at a DMX value of 0 to the lowest level at a DMX value of 255 Modifi...

Page 156: ...t color but expanding it only to the border of that color There is no bleeding or blending of colors Modifier 1 Adjusts color polarization level The higher the value the more color detail will be remo...

Page 157: ...es Modifier 1 Fades from original color at a DMX value 0 to a range of sepia shades at a value of 255 100 Modifier 2 Adjusts color saturation from no adjustment at a DMX value 0 to full saturation at...

Page 158: ...values Modifier 1 Fades from original color at a DMX value 0 to a range of red tones at a value of 255 100 Modifier 2 Adjusts color saturation from no adjustment at a DMX value 0 to full saturation at...

Page 159: ...r component from a DMX value of 0 no adjustment to 255 100 maximum red saturation Modifier 2 Increases blue color component from a DMX value of 0 no adjustment to 255 100 maximum blue saturation Modif...

Page 160: ...MX value of 0 no adjustment to 255 100 maximum green saturation RGB Add to Non black Pixels Effect Mode parameter DMX value 6 This effect adds color to all pixels except black using the RGB color mode...

Page 161: ...the red component from no adjustment at a DMX value 0 to cyan at a value of 255 100 Modifier 2 Transitions the green component from no adjustment at a DMX value 0 to magenta at a value of 255 100 Mod...

Page 162: ...ns the red component from no adjustment at a value of 0 to yellow at a value of 255 100 Modifier 2 Transitions the green component from no adjustment at a value of 0 to cyan at a value of 255 100 Modi...

Page 163: ...ons the red component from no adjustment at a DMX value 0 to magenta at a value of 255 100 Modifier 2 Transitions the green component from no adjustment at a DMX value 0 to yellow at a value of 255 10...

Page 164: ...lues over 128 increase color value Modifier 3 Scales Blue in the Media file A DMX Value of 128 no adjustment DMX values below 128 50 reduce color value DMX values over 128 increase color value RGB Swa...

Page 165: ...blue values become green Modifier 1 Transitions red color component to blue from 0 no color change to 255 100 blue Modifier 2 Transitions green color component to red from 0 no color change to 255 100...

Page 166: ...l blue values become red Modifier 1 Transitions red color component to green from 0 no color change to 255 100 green Modifier 2 Transitions green color component to blue from 0 no color change to 255...

Page 167: ...n values become blue Blue values are unaffected Modifier 1 Transitions red color component to green from 0 no color change to 255 100 green Modifier 2 Transitions green color component to red from 0 n...

Page 168: ...blue from 0 no color change to 255 100 blue Modifier 3 Transitions blue color component to green from 0 no color change to 255 100 red Scan Line Effect Mode parameter DMX value 32 Maps image color int...

Page 169: ...255 Modifier 2 Selects the number of filter passes from a minimum at a DMX value 0 to a maximum at a DMX value 255 Modifier 3 Selects the scale sharpen coefficients at DMX values from 0 255 Object Ef...

Page 170: ...es below the threshold are converted to cyan Modifier 2 Increases blue color component from 0 no adjustment to 255 100 maximum blue saturation Blue color values below the threshold are converted to ma...

Page 171: ...Solarize 2 Effect Mode parameter DMX value 10 Solarize 3 Effect Mode parameter DMX value 11 Solarize 4 Effect Mode parameter DMX value 12 Original Content Modifier 1 parameter DMX 212 Modifier 2 param...

Page 172: ...sparent color in terms of Red Green and Blue values set in the Modifier parameters Modifier 1 Defines the red color component from DMX values of 0 no red to 255 100 maximum red saturation Modifier 2 D...

Page 173: ...red to 255 100 maximum red saturation Modifier 2 Defines the green color component from 0 no green to 255 100 maximum green saturation Modifier 3 Defines the blue color component from 0 no blue to 25...

Page 174: ...ter DMX value 84 Maps a selected color coordinate to a YUV color space and turns everything else gray Modifier 1 Adjusts the U color component from 0 no adjustment to 255 100 maximum Modifier 2 Adjust...

Page 175: ...er 3 Adjusts the color tolerance from 0 minimum to 255 100 maximum UV to Transparent Effect Mode parameter DMX value 85 Maps a selected color coordinate to a YUV color space and turns everything else...

Page 176: ...mum luminance Modifier 2 Scales the x chrominance component The default DMX value of 128 50 no adjustment Values below the midpoint scale the x chrominance component down as you approach 0 minimum Val...

Page 177: ...endered effect Modifier 1 Adjusts Color reduction from 0 no adjustment to 255 100 maximum Modifier 2 Adjusts contrast enhancement from 0 no adjustment to 255 100 maximum Modifier 3 Adjusts ion sensiti...

Page 178: ...he color components right to a maximum at a value of 0 Values above the midpoint shift the color components left to a maximum at a value of 255 100 Modifier 2 The default DMX value of 128 50 no adjust...

Page 179: ...Collage Generator Effect see Global Functions Collage Generator Effect on page 133 Use these adjustments in conjunction with Keystone parameters and Ratio parameters to refine the output shape on any...

Page 180: ...eases as you increase value to maximum at 255 100 Modifier 2 In situations where you are projecting from any angle other than perpendicular to the surface you can use the Modifier 2 to adjust the vert...

Page 181: ...s are applied to all the Graphic Objects Digital MSpeed applied at the Graphic Object level takes precedence over digital mspeed applied at the Global level This means you can apply a global value to...

Page 182: ...he image from the bottom up to 255 100 the full image converted to streaks Modifier 2 The default DMX value of 128 50 no adjustment Values below the midpoint move the edge of the streaked portion of t...

Page 183: ...width Values above the midpoint move the shadow left to a maximum horizontal shadow width at a value of 255 100 Modifier 2 The default DMX value of 128 50 no adjustment Values below the midpoint move...

Page 184: ...e framing option with Modifier 2 selecting the frame pattern A Modifier 3 DMX value 10 designates the Frame texture as Graphic Object 2 s media file content minus any applied effects NOTE Global Image...

Page 185: ...ted at Frame texture using Modifier 3 parameter 2 Image clipping changing operation of the Global Image Edge Fade parameters to Emulate Framing Shutters Modifier 1 DMX Value Modifier 3 DMX value Actio...

Page 186: ...arger LEDs will also result in reduced color variation Adjusts the grid spacing and color around each LED A DMX value of 0 the minimum black line between cells The spacing increases to a maximum at a...

Page 187: ...100 NOTE A small number of larger tiles will also result in reduced color variation Modifier 2 Adjusts the grid spacing and color around each tile A DMX value of 0 the mini mum black line between tile...

Page 188: ...st to 0 fastest unburn Values in the upper half of the range create the burn pattern without flames from 192 slowest to 255 fastest burn rate A value of 191 unburns the patterns from 191 slowest to 12...

Page 189: ...int adjust the rate from 0 fastest to 127 slowest Values above the midpoint adjust the rate from 129 slowest to 255 100 fastest Modifier 2 Shifts the color to a sepia tint 128 no adjustment 0 to 127 f...

Page 190: ...odifier 1 The default DMX value of 128 50 no adjustment Values below the midpoint scroll left increasing in speed as you approach 0 Values above the midpoint scroll right increasing in speed to 255 10...

Page 191: ...bject it overlays Modifier 1 DMX values from 0 127 have no effect DMX values of 128 50 to 255 100 flips the image horizontally Modifier 2 DMX values from 0 127 have no effect DMX values of 128 50 to 2...

Page 192: ...of 0 no adjustment Increasing DMX values blur the image horizontally to a maximum at a DMX value of 255 100 Modifier 2 The default DMX value of 0 no adjustment Increasing DMX values blur the image ver...

Page 193: ...effect When Modifiers 1 and 2 both have a value less than 0 there is no Blur Increasing Modifier 1 and Modifier 2 values increases the sample distance and number of filter passes Modifier 3 Applies a...

Page 194: ...est results with the least CPU demand Modifiers 1 Increases the sample distance to determine the smoothness of the blurring from 0 minimum to 255 100 maximum Modifier 2 Increases the number of filter...

Page 195: ...sets the center point of the edge where the duplicate images meet at the center of the screen Values below the midpoint move the center point toward the left as you approach 0 Values above the midpoin...

Page 196: ...ue of 0 no adjustment As you increase the DMX value to 255 100 the single image scales to an increasing number of multiple images similar to tiling Modifier 2 Sets the texture rotation angle A DMX val...

Page 197: ...fication and edge shading of the lenses over the image Modifier 1 Controls the horizontal position of the lens centerpoint from 0 left edge to 255 100 right edge of output Modifier 2 Controls the edge...

Page 198: ...of the lens and move it over different areas of the image Modifier 1 Controls the horizontal position of the lens centerpoint from 0 left edge to 255 100 right edge of output Modifier 2 Controls the...

Page 199: ...ifferent areas of the image Modifier 1 Controls the horizontal position of the lens centerpoint from 0 left edge to 255 100 right edge of output Modifier 2 Controls the vertical position of the lens c...

Page 200: ...ifier 1 This parameter determines transparency and color effects for the selected matte DMX value Modifier 1 Action 0 Black transparent use matte color 1 Black transparent inverting matte color 2 Whit...

Page 201: ...cluding its first two applied Effects 3 Graphic Object 1 texture including its first three applied Effects 10 Graphic Object 2 texture without applied Effects 11 Graphic Object 2 texture including its...

Page 202: ...50 no adjustment Modifier 2 Adjusts the vertical pan position from 0 bottom edge to 255 100 top edge of the image The default DMX value of 128 50 no adjustment Modifier 3 The default DMX value is 0 n...

Page 203: ...iling of each particle as it moves across the image from 0 shortest trail to 255 100 longest DMX value Modifier 1 Action DMX value Modifier 1 Action 0 RandomWithinRectangle 17 SequentialRightToLeft 1...

Page 204: ...ault Values on each side of the midpoint increase the particle acceleration from 0 slowest to 127 49 fastest and from 129 51 slowest to 255 100 fastest Original Content Content with Particle 1 effect...

Page 205: ...hape you selected in the Particle System 1 effect by spreading the source area from 0 the smallest source area to 255 100 the largest Particle System 3 Effect Mode parameter DMX value 97 If you have a...

Page 206: ...lane Modifier 1 Controls the horizontal position of the subpicture s centerpoint from 0 left edge to 255 100 right edge of output Modifier 2 Controls the vertical position of the subpicture s centerpo...

Page 207: ...s for the object are applied the image will orbit around each axis from this new position NOTE When this option is applied as a Global effect it will include any prerotation translation selected as an...

Page 208: ...ivisions Fewer larger boxes will also result in reduced color variations Modifier 2 Reduces the box size horizontally to centerpoint from 0 no reduction to 255 100 full reduction At that point the ima...

Page 209: ...ertical position of the twisted area s centerpoint from 0 top edge to 255 100 bottom edge of output Modifier 3 Controls the direction and amount of twist At the midpoint of the range there is no chang...

Page 210: ...ts The number of facets increase from 10 three facets to 255 100 maximum 16 facets Modifier 2 Sets the refraction index from 0 minimum to 255 maximum Modifier 3 Rotates the prism The default value is...

Page 211: ...ximum size Modifier 2 Sets the random number generator seed number This lets you create a repeatable random sequence that will synchronize correctly when using the Collage Generator effect see page 15...

Page 212: ...previous frame from 0 maximum to 255 minimum scaling Modifier 2 Derives an alpha value from color difference between current frame and the result of modifier 1 DMX 0 to 127 act to make darker colors t...

Page 213: ...m the shortest refresh rate at a value 0 to to a maximum at a DMX value of 255 100 Modifier 2 Adjusts random vertical shake from the shortest refresh rate at a value 0 to a maximum at a DMX value of 2...

Page 214: ...imum rate Modifier 3 Adjusts the offset phase of the wobble from 0 no adjustment to 255 100 maximum offset Sinewave Horizontal Sinewave Horizontal w X Axis Wobbulation Effect Mode parameter DMX value...

Page 215: ...value 72 This effect creates a Vertical sinewave pattern and then varies the boundaries of the underlying object along the X axis without affecting the media file that is applied as a texture Modifier...

Page 216: ...t to 255 image completely removed from screen Modifier 3 When the DMX value for Modifier 1 0 Modifier 3 fades from the original image to the slatted image A DMX value of 0 the original image with no e...

Page 217: ...a sphere Modifier Parameter Adjustments When Spherical Mapping is selected the associated Global Effect Modifier parameters adjust as follows Modifier 1 Adjusts the longitude horizontal angle A value...

Page 218: ...e of 0 no adjustment Values below the midpoint bend the horizontal lines toward the equator to a maximum at 255 Modifier 2 Adjusts the center of the vertical bend A DMX value of 128 50 no adjustment A...

Page 219: ...e original file without effects If effects have been applied to the image A DMX value 1 includes the first applied effect DMX 2 includes the first two effects and DMX 3 includes the first three effect...

Page 220: ...test speed DMX values below the midpoint increase speed in a backward direction from no adjustment to 0 fastest speed Texture Ripple Circular Effect Mode parameter DMX value 24 This effect varies the...

Page 221: ...speed DMX values below the midpoint increase speed in a backward direction from no adjustment to 0 fastest speed Texture Ripple Vertical Effect Mode parameter DMX value 23 This effect varies the dista...

Page 222: ...o right Modifier 2 Shifts the texture up to down Modifier 3 Selects a color and scales the shift Red and green color values cyan shift from 0 maximum to 84 a minimum shift Red and blue color values ma...

Page 223: ...255 100 maximum Modifier 2 Adjusts the size and number of tiles along the y axis A value of 128 50 no adjustment Values below the midpoint size a single image to 0 maximum image magni fication Values...

Page 224: ...alue of 0 to the largest at a value of 255 100 Modifier 2 Selects the center of a wipe effect s separation Modifier 3 Selects the wipe option Each option occupies a portion of the DMX value range see...

Page 225: ...l center of the zoom left to 255 maximum Modifier 2 The default DMX value of 128 50 no adjustment Values below the midpoint move the vertical center of the zoom down as you approach 0 maximum Values a...

Page 226: ...CHAPTER 13 Effect Mode Options Descriptions 204 DLHD Digital Light User Manual...

Page 227: ...the appropriate DMX channels for all the slave fixtures and the master fixture must be set to the same values Network Synchronization Requirements In order for Network Synchronization to function prop...

Page 228: ...should be chosen as the master This will ensure that all of the servers have the ability to playback content as well as the master server Sync To Parameter Once you have chosen your master server the...

Page 229: ...a server No special Sync Mode setting is needed Synchronizing a Server to Itself Movie playback and effects can be synchronized between a Graphic Object on a single fixture for example making sure al...

Page 230: ...CHAPTER 14 Synchronizing Content 208 DLHD Digital Light User Manual...

Page 231: ...n HD media server is used to Upload and download custom digital content to digital light fixtures Configure units to use in a DMX environment Edit warping of output for display on diverse surfaces Upd...

Page 232: ...bit Microsoft Net 2 100 1000 base Ethernet card a Gigabit Ethernet card is recommended for fast content uploading of large files To automatically install the CMA on your computer s hard drive insert t...

Page 233: ...sages These messages are received by other media servers on the link as well as the CMA software The messages contain information that allows the media servers to communicate with each other and the C...

Page 234: ...ft pane Information is displayed in the right pane for any item selected Access options through the menus at the top of the window or by right clicking in the right pane NOTE You cannot drag folders o...

Page 235: ...in the CMA or in the DL 3 or DL 2 fixture s Menu system Server Name is a name you assign to a Digital Light fixture or Axon server IP Address is assigned to that unit by the router or Auto IP Software...

Page 236: ...ice if needed Identify will cause a fixture to strobe so you can find it in the rig Content Organization The media server on each fixture has a file system that holds the movies images 3 D objects and...

Page 237: ...our own content for Axon HD media servers Stock Media Files Inside User Image and Stock Image folders are Library folders containing collections of media files Media files can be still images or video...

Page 238: ...e Selecting All Configuration displays the combined configuration values for all the servers on the network For more information on server configuration see Viewing Server Configuration on page 233 Vi...

Page 239: ...tent See Naming and Deleting User Content Files and Folders on page 219 Type indicates the file format extension DMX is the currently assigned DMX value for the folder This value can be auto assigned...

Page 240: ...ement Application CMA 218 DLHD Digital Light User Manual You can access several options for displaying files in the right pane through the drop down menu or by right clicking in the right pane when fi...

Page 241: ...the media server is playing it Assigning DMX Values to User Content The DMX Value associated with each file and folder makes it easy to use the DMX control protocol to identify a unique media file or...

Page 242: ...can manually assign any valid DMX value to your files or folders by selecting the file or folder in the right pane and then using the pull down menu or the right click popup selecting Edit DMX A dial...

Page 243: ...and Paste commands Cloning transfers the User Content files and their DMX value assignments from one media server to one or more server s on the fixture network Creating a Content Archive Deploying a...

Page 244: ...y the Folder or File that you wish to move in the right pane of the CMA window 2 If the destination for the file on your local drive is visible you can simply drag and drop the folder or file to that...

Page 245: ...ded content can cause issues with playback performance network synchronization and graphics engine stability To prevent this the CMA automatically scans content locally on your computer or the Axon me...

Page 246: ...s are found the CMA compiles the list of issues in the bottom half of the Copy Files Progress dialog NOTE Since the CMA executes the scanning copying process for the entire group of folders files in a...

Page 247: ...iles will not be copied on to the server Files with warnings will be copied They will show up highlighted in yellow when viewed in the Details view in the CMA to indicate to the user that this file is...

Page 248: ...an rename these folders with a single click on the folder name 3 After creating a folder and renaming it if you wish highlight the folder to add media files 4 Click Add Media This will bring up a file...

Page 249: ...ntaining all the User Content from a single fixture along with the assigned DMX values for folders and files To create a Content Archive 1 In the CMA Client Window select All Server in the left pane 2...

Page 250: ...he fixtures used in that show with one operation To clone user content 1 In the CMA Client Window select All Server in the left pane 2 Select the Server with the content you want to clone in the right...

Page 251: ...tion DMX Summary The DMX Summary lets you view all the content for a single server in a table format with the following details Whether the content is a User Media file folder a Stock Media file folde...

Page 252: ...CHAPTER 15 Content Management Application CMA 230 DLHD Digital Light User Manual 4 Press the Create Table button on the screen to build the summary table...

Page 253: ...pgrade software 1 Download the latest version of the application from the Support section of the High End Systems website www highend com A download wizard simplifies installation on your personal com...

Page 254: ...ect Upgrade Software The Upgrade Wizard will prompt you to browse to the location where you saved a copy of latest version 5 After locating the upgrade file press Next The Upgrade Wizard displays a li...

Page 255: ...mpare all the Configuration Items of a certain type for a group of fixtures For example viewing the DMX Start Channels of all the fixtures on a network Control monitor display settings for Axon media...

Page 256: ...also have the option to change the order that the columns are displayed Left click on the head of the column you wish to move hold down the mouse button and drag the column to the desired position Re...

Page 257: ...ation options are grouped under a Server Display Connectors Art Net I O Info and Menu Display tabs Server Tab DMX Settings Configuration Item Configuration Value Options DMX Start Channel 1 512 Identi...

Page 258: ...olution Options in the drop down lists are automatically populated by the Axon software for the specific display device attached Refresh Rates Video Pattern 1 displays graphic object with texture for...

Page 259: ...ure name of up to 26 characters IP Address Read only assigned to that unit by the router or Auto IP Unique Number Read only assigned by factory Disk Free Space Read only in MB Configuration Item Confi...

Page 260: ...LHD Digital Light User Manual Miscellaneous Configuration Item Configuration Value Options Fixture Defaults On restores fixture defaults Off displays whenever defaults has been changed Reboot Server C...

Page 261: ...APTER 15 Content Management Application CMA DLHD Digital Light User Manual 239 ArtNet and I O Tab ArtNet Settings Configuration Item Configuration Value Options Art Net Subnet 0 16 Art Net Universe 0...

Page 262: ...em Configuration Value Options Display Device Read Only Resolution Refresh Rate Configuration Item Configuration Value Options CPU Utilization Gauges display available resources remaining This can hel...

Page 263: ...y this Axon on the Ethernet link required if you will be synchronizing output between fixtures Assign a valid Start Channel the first channel in the unique range of DMX channels designated by the cons...

Page 264: ...from the drop down list in the option field and then select the number of Graphic Object layers for your application The Protocol you select is based on how many DMX channels are required for your ap...

Page 265: ...t can extend to more complicated forms such as rectangular grids with sections cut out cylindrical surfaces and spherical surfaces 2 You can import and edit an obj file you have created through anothe...

Page 266: ...ser Warps file is selected a popup will display a list of user warps already created To open the Warp Editor Right click on the User Warps file in the Content list for the selected server and select W...

Page 267: ...ton Remove portions of the grid by right clicking on an individual triangle portion of the mesh Editing Fields This section describes the editing fields from the left panel of the Warp Editor screen i...

Page 268: ...ve surface You can choose the x y and z coordinates as the spherical mesh s centerpoint Define the Latitude and Longitude to choose a portion of the sphere Note Once you click New the Curved Geometry...

Page 269: ...he sphere as a concave surface You can choose the x y and z coordinates as the cylinder s centerpoint Define the Latitude to choose a portion of the cylinder Note Once you click New the Curved Geometr...

Page 270: ...he sphere as a concave surface You can choose the x y and z coordinates as the cylinder s centerpoint Define the Longitude to choose a portion of the cylinder Note Once you click New the Curved Geomet...

Page 271: ...he sphere as a concave surface You can choose the x y and z coordinates as the cone grid s centerpoint Define the Latitude and Longitude to choose a portion of the cone Note Once you click New the Cur...

Page 272: ...outside of the editing mode Camera Options The Camera Options field lets you select the way you want to view the editing grid The perspective view is the option most associated with sketching An orth...

Page 273: ...rotate a selection of control points in the x y and z direction First set the degrees of rotation for each step from 01 to 359 Then you can press the corresponding button to increase or decrease the...

Page 274: ...d the Spline grids in the Resolution field Click on Vertical and Horizontal buttons to increase or decrease the number of grid sections in either direction or click on Full or Full to increase the res...

Page 275: ...all existing warps on the selected server When you create a new warp it s automatically assigned name is added to this field Elasticity When no elasticity is applied moving selected points on the gri...

Page 276: ...actively modifying it Note Be aware that Force Output has the potential to override the output of the control board To display the warp edited output 1 With the warp editor enabled select the file fro...

Page 277: ...ndo and Redo as many steps back and forward in the editing process according to the number set in the History Size field Clicking the Reset button in Reset View defaults the grid to the original posit...

Page 278: ...d in the center window You will notice there are three control points along each edge of the rectangle that has just appeared these are the control points of the warp 4 Select the top center control p...

Page 279: ...TER 16 CMA Warp Editor DLHD Digital Light User Manual 257 To delete a triangle right mouse click over the triangle you wish to delete The triangle will disappear and a black area will show up on the m...

Page 280: ...CHAPTER 16 CMA Warp Editor 258 DLHD Digital Light User Manual More complex meshes can be created by continuing this deletion process while editing control points...

Page 281: ...warp editor Using the example mesh below we can illustrate ways to add faces By using Shift Right Mouse Click geometry can be added and the location is determined in multiple ways 3 points are always...

Page 282: ...t User Manual 2 When selecting 3 points the face will be created between the three selected points 3 When selection zero points the face will be created by subdividing the adjacent lines This only wor...

Page 283: ...CHAPTER 16 CMA Warp Editor DLHD Digital Light User Manual 261 Complex forms can be created by combining and deleting faces...

Page 284: ...CHAPTER 16 CMA Warp Editor 262 DLHD Digital Light User Manual...

Page 285: ...hillips screwdriver Gloves Protective eyewear Mild glass cleaner containing no ammonia and a soft lint free cotton cloth Pan and Tilt Locking The DLHD fixture is equipped with mechanical pan and tilt...

Page 286: ...ncerning the large format Error Warning filter message The following messages will give you information regarding the status of the DLHD filter system Filter Missing Error A filter not present or is n...

Page 287: ...bezel assembly 3 Loosen the two captive phillips head screws on the top cover and remove the top cover 4 Slide the top cover back to free it from the front bezel Inspect the filters 5 Lift the prefilt...

Page 288: ...ates replace it with the part listed in Related Products and Accessories on page 4 Reassemble the Fixture 10 Reinstall the HEPA Filter with the rubber gasket down 11 Reattach the filter bracket with t...

Page 289: ...d Products and Accessories on page 4 10 Close the lamp cover and tighten the two lap cover screws 11 Reconnect to power The fixture will begin to home WARNING Allow the projector to cool for at least...

Page 290: ...the top bezel and remove it from the unit 4 Disconnect Zoom HD1 and the Focus HD2 plugs from the head logic board 5 Tilt and lock the head at 90 horizontal with the head logic card facing toward the f...

Page 291: ...om the projector 6 Fit the new lens to the projector Make sure that the lens is fully inserted to the projector to re engage the latch Adjusting the Iris Plate for the Accessory Long Zoom lens If you...

Page 292: ...the projector mounting holes to the holes on the projector mounting plate 6 Using a 5mm Allen Wrench reattach the 4 projector screws to the mounting plate NOTE Tighten screws once they are all in the...

Page 293: ...e to cool before handling 2 Loosen the 2 Phillips head screws on the top cover of the connector side of the box 3 Tilt the connector panel away from the box 4 Remove the fuse from the fuse holder 5 Re...

Page 294: ...the washers 4 Clean the front window using a mild glass cleaner containing no ammonia and a soft lint free cotton cloth 5 If the window needs replacement use the part specified in Related Products and...

Page 295: ...remove the addressing screws and star washers 4 Position new board against module aligning the center top standoff Place contact screw s in the appropriate position NOTE When installing a replacement...

Page 296: ...xture leaving the harness cabling attached 4 The driver board for pan functions and fans is located directly behind the display 5 After detaching all cabling pull board out and replace 6 Reattach cabl...

Page 297: ...olding down the second from the top and second from the bottom Tab Select buttons for more than two seconds opens the iris when the fixture software is not running to allow navigation for content upgr...

Page 298: ...associated with that error Supported Error Warning Messages Issue Large Format Message Message Detail Notes Projector Temperature Status Info_Status tab only This message does not appear in large form...

Page 299: ...communication with the box card Contact High End Systems Customer Support USB port Security Error USB SECURE ERROR USB failed to pass the hardware security test Name Color State Description Projector...

Page 300: ...take effect However you might have selected an invalid input using projector controls Try setting the projector back its defaults see Reset Screen on page 36 Or use DMX to exit the projector menu syst...

Page 301: ...Check that the connectors for the composite video cable at the LCD Screen and the Video card are seated securely Fixture behaves erratically or won t respond to DMX control Verify that the last unit o...

Page 302: ...IP The generation of IP addresses is handled just as IP addresses are handled for Window networks Is there a limit to the Ethernet cable run length from the fixtures to the CMA Ethernet Cat 5 limit i...

Page 303: ...ystem restore you will also need External USB CD drive for DL 3 and DL 2 fixtures only USB keyboard Optional USB mouse which may require the addition of a USB hub for DL 2 fixtures Performing the Syst...

Page 304: ...USB drive it will take between 3 5 minutes load During this time a number of small windows will appear and disappear Wait until you see a full screen menu titled Axon System Restore Menu or DL 2 Syst...

Page 305: ...Restoring the System DLHD Digital Light User Manual 283 8 Allow the restore to run This will take between 10 30 minutes depending on the speed of your USB drive Status will be displayed throughout th...

Page 306: ...few minutes for the media server to reconfigure the upgrade is complete you may remove all your external USB devices NOTE If you encounter an error press the Return to Main Menu button and start the r...

Page 307: ...l Fixture Dimensions 594mm x 690mm x 950mm 23 4in x 24 8in x 38 4in Weight 63 5 kg 140 lbs Road Case Dimensions 711mm x 737mm x 1168mm 28in x 29in x 46in Weight Fixture Roadcase 118kg 260 lbs 950 mm 3...

Page 308: ...on HD7750 SDI Capture Card BlackMagic Decklink SDI HD Operating System Windows 7 embedded Projector Model Sanyo PCL HP7000L Aspect ratio 16 9 native Brightness uniformity 90 Contrast ratio 2700 1 full...

Page 309: ...ithin approximately 01 Control Options DMX512 Art Net Minimum Focus Distance 1 4 meters 4 6 ft Scanning Frequency H sync 15 100 KHz V sync 50 100 Hz Compliances CE CSA ETL Environmental Ambient Operat...

Page 310: ...Two 5 pin male and female XLR connectors Pin 1 Ground Pin 2 Data Pin 3 Data Pin 4 Secondary data Pin 5 Secondary data Terminator 5 pin male XLR connector with a 120 Ohm terminating resistor fitted be...

Page 311: ...95 76 C3 15 07 194 76 C2 15 56 193 76 C1 16 06 192 75 C0 16 57 191 75 BF 17 09 190 75 BE 17 61 189 74 BD 18 14 188 74 BC 18 68 187 73 BB 19 23 186 73 BA 19 79 185 73 B9 20 36 184 72 B8 Time sec Value...

Page 312: ...33 54 118 73 83 33 53 120 12 82 32 52 121 5v 81 32 51 122 91 80 31 50 124 31 79 31 4F 125 73 78 31 4E 127 15 77 30 4D 128 58 76 30 4C 130 02 75 29 4B 134 39 72 28 48 135 86 71 28 47 137 34 70 27 46 13...

Page 313: ...tter E or by the earth symbol or coloured green or green and yellow the core which is coloured blue must be connected to the terminal which is marked with the letter N or coloured black the core which...

Page 314: ...uer des r parations Cet quipement doit tre uniquement utilis dans des endroits secs Ne pas l exposer la pluie ou l humidit l int rieur de l quipement il n y a pas de pi ces rempla ables par l utilisat...

Page 315: ...oder vor Wartungsarbeiten stets den Netzstecker ziehen Diese Ger te sind nur zum Einbau in trockenen Lagen bestimmt und m ssen vor Regen und Feuchtigkeit gesch tzt werden Servicearbeiten sollten nur v...

Page 316: ...star servicio de reparaci n Este equipo esta disenado para usarce en lugares secos no lo exponga a la lluvia o humedad Derive el servicio de reparaci n de este equipo al personal calificado El interio...

Page 317: ...adatta Mantenere una distanza minima di 1 0 metri 3 28 piedi dagli oggetti accesi Questa apparecchiatura e da collegarsi ad un circuito con una protezione da sovraccarico massima di 20 ampere Vigtig...

Page 318: ...APPENDIX C Safety Information 296 DLHD Digital Light User Manual...

Reviews: