background image

WARNING: To reduce the risk of electric shock, fire, and damage to the equipment, you must install this product in
accordance with the following guidelines:

• This power supply is intended only for installation in Hewlett Packard Enterprise systems located in a restricted

access location.

• This power supply is not intended for direct connection to the DC supply branch circuit. Only connect this power

supply to a power distribution unit (PDU) that provides an independent overcurrent-protected output for each DC
power supply. Each output overcurrent-protected device in the PDU must be suitable for interrupting fault current
available from the DC power source and must be rated no more than 40A.

• The PDU output must have a shutoff switch or a circuit breaker to disconnect power for each power supply. To

completely remove power from the power supply, disconnect power at the PDU. The end product may have multiple
power supplies. To remove all power from the product, disconnect the power for each power supply.

• In accordance with applicable national requirements for Information Technology Equipment and

Telecommunications Equipment, this power supply only connects to DC power sources that are classified as SELV or
TNV. Generally, these requirements are based on the International Standard for Information Technology Equipment,
IEC 60950-1. In accordance with local and regional electric codes and regulations, the DC source must have one pole
(Neutral/Return) reliably connected to earth ground.

• Connect the power supply ground screw located on the front of the power supply to a suitable ground (earth)

terminal. In accordance with local and regional electric codes and regulations, this terminal must be connected to a
suitable building ground (earth) terminal. Do not rely on the rack or cabinet chassis to provide adequate ground
(earth) continuity.

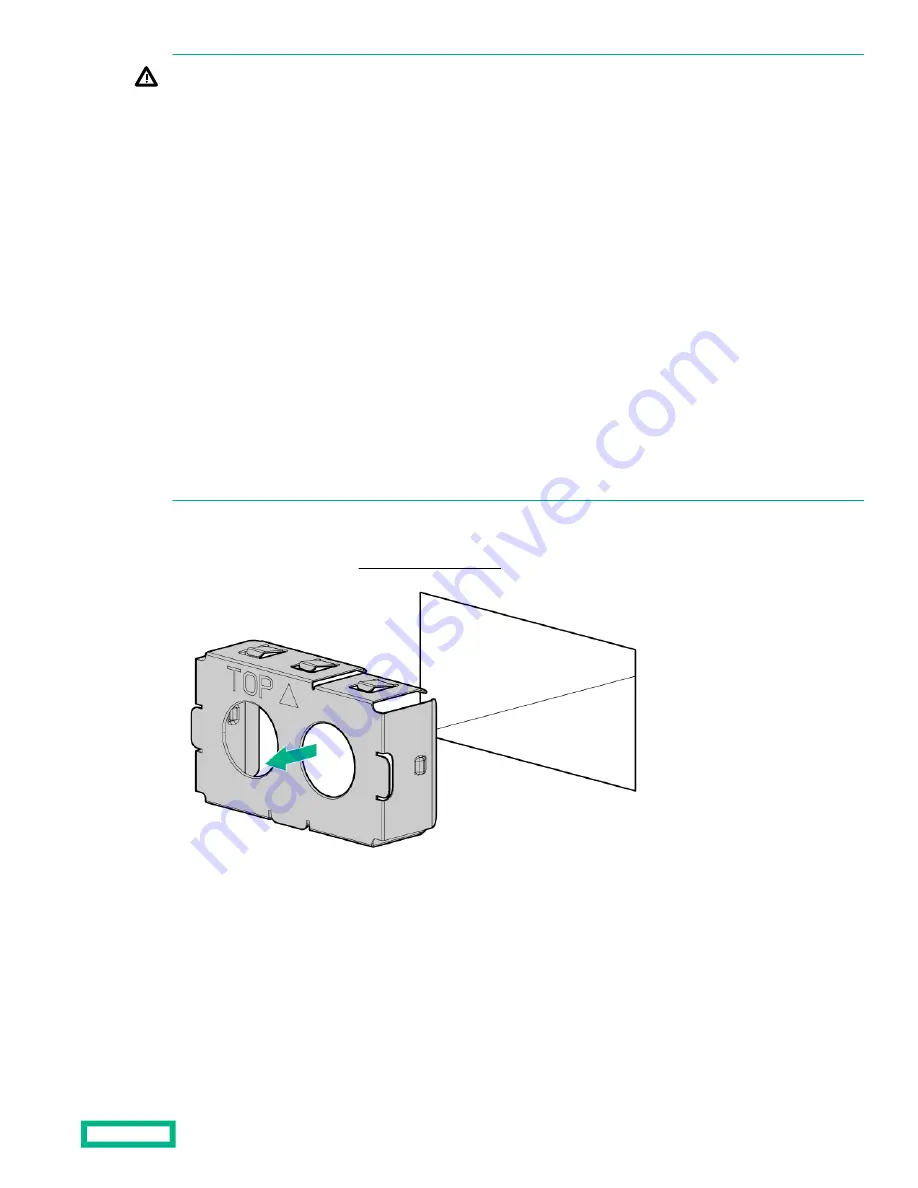
Procedure

1.

Remove the power supply blank (

Rear panel components).

2.

Remove the ring tongue.

Hardware options installation

103

Summary of Contents for Apollo 4200 Gen10

Page 1: ...tion 6 Abstract This document is for the person who installs administers and troubleshoots servers and storage systems Hewlett Packard Enterprise assumes that you are qualified in the servicing of com...

Page 2: ...the U S Government under vendor s standard commercial license Links to third party websites take you outside the Hewlett Packard Enterprise website Hewlett Packard Enterprise has no control over and i...

Page 3: ...SSD slot numbering 31 HPE Smart Array P824i p MR Gen10 Controller 31 HPE InfiniBand HDR Ethernet 940QSFP 56x16 adapter LEDs 32 DSC 25 2 port SFP28 card ports and LEDs 33 HPE NS204i p NVMe OS Boot Dev...

Page 4: ...age 69 Installing the two bay SFF hot plug rear drive cage and two slot PCIe riser cage 70 Installing the six bay SFF NVMe rear drive cage 73 Installing the six bay SFF rear drive cage SAS SATA 75 M 2...

Page 5: ...Battery cabling 133 iLO ports to network cabling 133 Fan assembly cabling 134 Front panel cabling 135 Software and configuration utilities 136 Server mode 136 Product QuickSpecs 136 Active Health Sys...

Page 6: ...stem battery 150 Electrostatic discharge 152 Specifications 153 Environmental specifications 153 Mechanical specifications 153 Power supply specifications 154 Hot plug power supply calculations 155 We...

Page 7: ...ponents 12LFF dual cage configuration Item Description 1 LFF hot plug drives 2 USB 2 0 port 3 iLO Service Port 24SFF dual cage configuration Item Description 1 SFF hot plug drives 2 USB 2 0 port 3 iLO...

Page 8: ...file standup expansion board or riser cage options2 6 PCIe3 x16 slot 1 for low profile standup expansion board2 7 Hot plug power supply bay 1 8 Power supply blank bay 2 9 Video connector 10 NIC 2 port...

Page 9: ...12 NIC 2 port 13 NIC 1 port 14 USB 3 0 ports 15 iLO Management port 2 16 UID LED 17 iLO Management port 1 1 The PCIe3 expansion slots 5 7 are associated with processor 2 2 The PCIe3 expansion slots 1...

Page 10: ...ss through riser Item Description 1 PCIe3 x16 slot 7 for low profile standup expansion board1 2 PCIe3 x24 slot 6 for low profile standup expansion board1 3 PCIe3 x8 slot 5 for low profile standup expa...

Page 11: ...ctivity 3 UID LED Solid blue Activated Flashing blue 1 flash per second Remote management or firmware upgrade in progress 4 flashes per second iLO manual reboot sequence initiated 8 flashes per second...

Page 12: ...link Off No network link 9 NIC port 2 activity LED Solid green Link to network Flashing green Network active Off No network activity 10 Power supply LED Solid green Normal Off One or more of the foll...

Page 13: ...cessor 2 DIMM slots 13 System battery 14 Processor 1 DIMM slots 15 Fan signal connector 16 Energy pack connector 17 Fan power connector 18 Internal drive cage backplane power connector 19 Controller b...

Page 14: ...system DIMM label identification To determine DIMM characteristics see the label attached to the DIMM The information in this section helps you to use the label to locate specific information about t...

Page 15: ...400 MT s 2666 MT s 6 CAS latency P CAS 15 15 15 T CAS 17 17 17 U CAS 20 18 18 V CAS 19 19 19 for RDIMM LRDIMM V CAS 22 19 19 for 3DS TSV LRDIMM 7 DIMM type R RDIMM registered L LRDIMM load reduced E U...

Page 16: ...ns and compatibility see the product QuickSpecs on the Hewlett Packard Enterprise website https www hpe com support persistentmemoryQS System maintenance switch descriptions Position Default Function...

Page 17: ...ystem Utilities screen appears 3 Select System Configuration BIOS Platform Configuration RBSU System Options SATA Controller Options Embedded SATA Configuration and then press Enter 4 Select Enable SA...

Page 18: ...erate a crash dump log do one of the following Use the iLO Virtual NMI feature Short the NMI header For more information see the Hewlett Packard Enterprise website http www hpe com support ilo docs Fr...

Page 19: ...sec iLO is rebooting Flashing amber System degraded3 Flashing red 1 flash per sec System critical3 4 NIC status LED1 Solid green Link to network Flashing green 1 flash per second Network active Off N...

Page 20: ...le provides a list of power fault codes and the subsystems that are affected Not all power faults are used by all servers Subsystem LED behavior System board 1 flash Processor 2 flashes Memory 3 flash...

Page 21: ...n where it is connected Item Drive numbering Internal drive cage 49 51 HPE Smart Storage S100i SR Gen10 controller RAID 49 50 HPE Smart Storage S100i SR Gen10 controller HBA mode 1 3 Directly attached...

Page 22: ...Storage S100i SR Gen10 controller HBA mode 1 2 3 4 Directly attached to controller 49 149 50 150 6SFF NVMe rear drive numbering 6SFF rear drive numbering SAS SATA Drive LEDs LFF SFF NVMe and uFF driv...

Page 23: ...ert has been received for this drive Replace the drive as soon as possible 2 Online Activity Solid green The drive is online and has no activity Flashing green 4 flashes per second The drive is operat...

Page 24: ...rasing Flashing amber green The drive is a member of one or more logical drives and predicts the drive will fail Flashing amber The drive is not configured and predicts the drive will fail Solid amber...

Page 25: ...t allowing the device and bus to complete and cease the signal traffic flow CAUTION Do not remove an NVMe drive from the drive bay while the Do not remove LED is flashing The Do not remove LED flashes...

Page 26: ...and predicts the drive will fail Solid amber The drive has failed Off The drive is not configured by a RAID controller 4 Do not remove Solid white Do not remove the drive The drive must be ejected fro...

Page 27: ...y a RAID controller or a spare drive Solid green The drive is a member of one or more logical drives Flashing green 4 Hz The drive is operating normally and has activity Flashing green 1 Hz The drive...

Page 28: ...NVMe or uFF 2 Internal drive cage 3 Front drive cage Drive cage backplane identification 4LFF rear drive cage backplane Item Description 1 x4 Mini SAS connector 2 Power input connector 2SFF rear drive...

Page 29: ...SAS connector 2 Power input connector Six bay SFF rear drive cage backplane SAS SATA Item Description 1 P2 connector 2 P1 connector 3 Power input connector Six bay SFF NVMe rear drive cage backplane C...

Page 30: ...5 NVMe port 2 connector 6 NVMe port 3 connector Front and internal LFF drive cage backplane Item Front drive cage backplane Internal drive cage backplane 1 P1 connector P1 connector 2 P2 connector P2...

Page 31: ...ckplane 1 P3 connector reserved P3 connector 2 P1 connector P1 connector 3 P2 connector P2 connector M 2 SSD slot numbering Item Description 1 M 2 slot 1 port 1i 2 M 2 slot 2 port 2i HPE Smart Array P...

Page 32: ...56x16 adapter LEDs Link LED status1 Description Off A link has not been established Solid amber Active physical link exists Blinking amber 4 Hz blinking amber indicates a problem with the physical lin...

Page 33: ...alf length HHHL SFP28 network adapter It has LEDs for Link L and Activity A for each port A half height bracket is shown in the following illustration with SFP28 ports and LEDs Table 2 LED indicators...

Page 34: ...fault 4 SFP Port 2 Link Activity LED Off A link has not been established Solid green Valid Ethernet link Flashing green Passing traffic flashing frequency indicates traffic intensity Solid amber Link...

Page 35: ...ner 4 M 2 drive retaining latches HPE NS204i p NVMe OS Boot Device LED definitions Item Description Fault LED status 1 Bay 1 LED Off Normal Flashing 1Hz Drive predictive failure Amber Drive failure 2...

Page 36: ...NVMe rear drive cage fan numbering Component identification 36...

Page 37: ...and the OS If an application stops responding you can use this method to force a shutdown Use a virtual power button selection through iLO 5 This method initiates a controlled remote shutdown of appl...

Page 38: ...ith the front drive cages extended When the front drive cages are extended while the system is powered on monitor the status of the front drive temp sensor 08 HD Max in iLO If the iLO temp sensor 08 H...

Page 39: ...w profile LFF drive LEDs Low profile LFF drive LED definitions b Wait until the Online Activity LED stops flashing c To open the release lever press the latch d Pull the release lever to disengage the...

Page 40: ...elease the release lever d Pull the release lever to disengage the drive from the backplane and slide the drive out of the drive bay Remove a uFF drive a Observe the LED status of the drive and determ...

Page 41: ...one component is extended a rack might become unstable Procedure 1 Back up all system data 2 Power down the system Power down the system 3 Remove all power a Disconnect each power cord from the power...

Page 42: ...l system components to cool before touching them Procedure 1 Power down the system Power down the system 2 Remove all power a Disconnect each power cord from the power source b Disconnect each power c...

Page 43: ...s panel on top of the system and then insert the tabs into the corresponding slots on the system 2 Tighten the access panel screws Open the cable management holder Procedure 1 Power down the system Po...

Page 44: ...Storage Battery NOTE System ROM and firmware messages might display energy pack in place of Smart Storage Battery Energy pack refers to both HPE Smart Storage batteries and HPE Smart Storage Hybrid c...

Page 45: ...r down the system Power down the system 2 Remove the system from the rack Remove the system from the rack 3 Place the system on a flat level work surface 4 Remove the access panel Remove the access pa...

Page 46: ...ins on the front edge of the air baffle into the holes located on the rear edge of the fan cage 2 If applicable reinstall the HPE Smart Storage Battery on the air baffle Installing the HPE Smart Stora...

Page 47: ...affle Install the air baffle Remove the rear drive cage blank Procedure 1 Power down the system Power down the system 2 Remove all power a Disconnect each power cord from the power source b Disconnect...

Page 48: ...ocker Procedure 1 Power down the system Power down the system 2 Remove all power a Disconnect each power cord from the power source b Disconnect each power cord from the system 3 Remove the system fro...

Page 49: ...rostatic discharge Procedure 1 Power down the system Power down the system 2 Remove all power a Disconnect each power cord from the power source b Disconnect each power cord from the system 3 Remove t...

Page 50: ...Prerequisites Before you perform this procedure make sure that you have the components included with the hardware kit Procedure 1 Power down the system Power down the system 2 Remove all power a Disco...

Page 51: ...Two bay SFF hot plug rear drive cage removal Six bay SFF NVMe drive cage removal Operations 51...

Page 52: ...Six bay SFF rear drive cage SAS or SATA To replace the component reverse the removal procedure Operations 52...

Page 53: ...our Call to Repair 4 Hour 24x7 Next Business Day Proactive Care Help prevent service incidents and get you to technical experts when there is one 6 Hour Call to Repair 4 Hour 24x7 Next Business Day St...

Page 54: ...d mouse Remotely connect to the iLO web interface and run a remote console a Verify the following iLO is licensed to use the remote console feature If iLO is not licensed visit http www hpe com info i...

Page 55: ...o create arrays For procedures on creating arrays with MR controllers see the following guide in the information library HPE Smart Array P824i p MR Gen10 User Guide If no controller is installed do on...

Page 56: ...requirements When installing the system in a rack select a location that meets the environmental standards described in this section Space and airflow requirements To allow for servicing and adequate...

Page 57: ...nal equipment to impede airflow around the server or to increase the internal rack temperature beyond the maximum allowable limits Do not exceed the manufacturer s TMRA Power requirements Installation...

Page 58: ...either permanently wired to the branch circuit of the building or includes a nondetachable cord that is wired to an industrial style plug NEMA locking style plugs or plugs complying with IEC 60309 ar...

Page 59: ...arnings and cautions WARNING When all components are removed the system weighs 22 34 kg 49 25 lb When all components are installed the system can weigh up to 40 60 kg 89 51 lb Before configuring your...

Page 60: ...tinue to populate the rack from the bottom to the top CAUTION Before installing the system in a rack be sure to properly scope the limitations of the rack Before proceeding with the installation consi...

Page 61: ...njury or damage to the equipment Observe local occupational health and safety requirements and guidelines for manual material handling Get help to lift and stabilize the product during installation or...

Page 62: ...in gray Install the chassis retention brackets on the non shelf portion of the rack rail 3 Install the system into the rack 4 Tighten the rack ear thumbscrews 5 Make sure the pins on the chassis reten...

Page 63: ...ne or telecommunications connectors into RJ 45 connectors 9 Connect peripheral devices to the system For information on identifying connectors see Rear panel components 10 Install the power supply 11...

Page 64: ...erforming Maintenance in the HPE Intelligent Provisioning User Guide and online help For additional system software and firmware updates download the Service Pack for ProLiant from the Hewlett Packard...

Page 65: ...Registering the server To experience quicker service and more efficient support register the product at the Hewlett Packard Enterprise Product Registration website Setup 65...

Page 66: ...ar steps and streamline the installation process WARNING To reduce the risk of personal injury from hot surfaces allow the drives and the internal system components to cool before touching them CAUTIO...

Page 67: ...operate the system with any of the front or rear drive cage bays empty To maintain proper airflow and sufficient cooling all drive bays in the front and rear cage must have a drive or a drive blank P...

Page 68: ...LFF drive SFF drive NVMe drive rear drive cage only uFF drive rear drive cage only Hardware options installation 68...

Page 69: ...k Hewlett Packard Enterprise recommends installing at least one drive in the rear drive cage before operating the system Installing the four bay LFF hot plug rear drive cage IMPORTANT Hewlett Packard...

Page 70: ...stalling the two bay SFF hot plug rear drive cage and two slot PCIe riser cage CAUTION For proper cooling do not operate the system without the access panel baffles expansion slot covers or blanks ins...

Page 71: ...ct each power cord from the power source b Disconnect each power cord from the system 3 Remove the system from the rack Remove the system from the rack 4 Place the system on a flat level work surface...

Page 72: ...k Remove the system from the rack 4 Place the system on a flat level work surface 5 Remove the access panel Remove the access panel 6 Remove the air baffle Remove the air baffle 7 Remove the rear opti...

Page 73: ...s required If the NVMe rear drive cage will connect to PCIe slots 2 and 6 or only to slot 6 then two processors are required Prerequisites Before you perform this procedure make sure that you have the...

Page 74: ...will be connected d Replace the plastic cover 10 Connect the cables to one of the following A pass through board installed in slot 2 NVMe rear drive cage cabling A pass through board installed in slot...

Page 75: ...rive numbers 49 54 Drive numbering The six bay SFF rear drive cage connects only to PCIe slot 2 Prerequisites Before you perform this procedure make sure that you have the following items available Th...

Page 76: ...stallation two slot PCI riser cage option required PCIe3 x 8 riser board slot 3 and 4 For more information about product features specifications options configurations and compatibility see the produc...

Page 77: ...board PCIe expansion slot cover from the appropriate PCIe expansion slot b Install the M 2 SSD enablement board Verify that the board is firmly seated in the slot M 2 SSD enablement board installed in...

Page 78: ...e cable management holder 8 To install the M 2 SSD enablement board in the PCI riser cage do the following a Remove the PCI riser cage Remove the PCIe riser cage b Remove the riser slot cover c Instal...

Page 79: ...12 Install the air baffle Install the air baffle 13 Install the access panel Install the access panel 14 Install the system into the rack Installing the system into the rack 15 Power up the system Po...

Page 80: ...ontroller Procedure 1 Power down the system Power down the system 2 Remove all power a Disconnect each power cord from the power source b Disconnect each power cord from the system 3 Remove the system...

Page 81: ...oller Cabling e If installing a type p controller connect the controller backup power cable to the system board Cabling IMPORTANT To enable SmartCache or CacheCade in a P class type p Smart Array cont...

Page 82: ...ge option is required To install an expansion board or type p controller in this riser cage do the following a Remove the PCIe riser cage Remove the PCIe riser cage b Remove the riser slot cover c If...

Page 83: ...e equipment remove power from the system by removing the power cord The front panel Power On Standby button does not shut off system power Portions of the power supply and some internal circuitry rema...

Page 84: ...e the system from the rack 4 Place the system on a flat level work surface 5 Remove the access panel Remove the access panel 6 Remove the air baffle Remove the air baffle 7 Remove the PCIe riser slot...

Page 85: ...eled WHITE CABLE and BLACK CABLE respectively The cable latch door must be open when connecting the cables Close the cable latch door after connecting the cable c Slide the cable retention clip up and...

Page 86: ...n both cards are angled in the same direction after installation CAUTION Avoid routing the cables over any components in the system that may become hot such as the heatsink 9 Install the adapter in th...

Page 87: ...the riser cage 10 Install the auxiliary card in the appropriate slot for processor 2 PCIe slots 6 or 7 11 Install the air baffle Install the air baffle 12 Install the access panel Install the access p...

Page 88: ...requisites Before beginning installation ensure that the server is updated with the latest operating system firmware and drivers Procedure Installing drives onto the boot device 1 Remove the liner fro...

Page 89: ...ss the expansion slot 12 Install the access panel Install the access panel 13 Do one of the following Slide the server into the rack Install the server into the rack 14 Power up the server Deploying a...

Page 90: ...ace the system on a flat level work surface 5 Remove the access panel Remove the access panel 6 Remove the PCIe riser cage if applicable NOTE Image may differ from actual product 7 Install the Pensand...

Page 91: ...through System Utilities and configured through HPE Smart Storage Administrator Intelligent Provisioning Type a controllers Type a controllers install in the type a Smart Array connector Type p contro...

Page 92: ...e either an expansion slot cover or an expansion board installed CAUTION Hewlett Packard Enterprise recommends performing a backup of all server data before installing or removing a controller or adap...

Page 93: ...er features select the relevant user documentation on the Hewlett Packard Enterprise website http www hpe com info enterprise docs Installing a processor heatsink assembly CAUTION THE PINS ON THE SYST...

Page 94: ...n Scalable processors at this time For more information see the product QuickSpecs on the Hewlett Packard Enterprise website https www hpe com info qs Prerequisites Before installing this option be su...

Page 95: ...ions IMPORTANT This system does not support mixing LRDIMMs and RDIMMs Attempting to mix any combination of these DIMMs can cause the server to halt during BIOS initialization All memory installed in t...

Page 96: ...M characteristics see the label attached to the DIMM The information in this section helps you to use the label to locate specific information about the DIMM Item Description Example 1 Capacity 8 GB 1...

Page 97: ...ations and compatibility see the HPE DDR4 SmartMemory QuickSpecs on the Hewlett Packard Enterprise website https www hpe com support DDR4SmartMemoryQS Installing a DIMM Procedure 1 Power down the syst...

Page 98: ...effective memory and storage to transform big data workloads and analytics by enabling data to be stored moved and processed quickly HPE Persistent Memory modules use the standard DIMM form factor and...

Page 99: ...from Hewlett Packard Enterprise Windows Server 2016 with persistent memory drivers from Hewlett Packard Enterprise Windows Server 2019 Red Hat Enterprise Linux 7 6 and later Red Hat Enterprise Linux...

Page 100: ...ot all DIMMs or HPE Persistent Memory modules will face in the same direction CAUTION Electrostatic discharge can damage electronic components Be sure you are properly grounded before beginning this p...

Page 101: ...UEFI System Utilities Access System Utilities through the Remote Console to configure the system by pressing the F9 key during POST iLO RESTful API Use the iLO RESTful API through tools such as the RE...

Page 102: ...m WARNING To reduce the risk of injury from electric shock hazards do not open power supplies Refer all maintenance upgrades and servicing to qualified personnel WARNING To reduce the risk of personal...

Page 103: ...nd product may have multiple power supplies To remove all power from the product disconnect the power for each power supply In accordance with applicable national requirements for Information Technolo...

Page 104: ...3 Crimp the ring tongue to the ground cable from the 48 V DC power source 4 Remove the terminal block connector Hardware options installation 104...

Page 105: ...l block connector 6 Attach the ground earthed wire to the ground screw and washer and tighten to 1 47 N m 13 lb in of torque The ground wire must be connected before the 48 V wire and the return wire...

Page 106: ...of the terminal block connector and then tighten the screw to 1 3 N m 10 lb in of torque 8 Insert the return wire into the right side of the connector and then tighten the screw to 1 3 N m 10 lb in of...

Page 107: ...the power supply handle a Unwrap the strain relief strap from the power supply handle CAUTION Avoid tight bend radii to prevent damaging the internal wires of a power cord or a system cable Never bend...

Page 108: ...the risk of electric shock or energy hazards This equipment must be installed by trained service personnel as defined by the NEC and IEC 60950 1 Second Edition the standard for Safety of Information T...

Page 109: ...tor and also the point of earthing of the DC system The DC system must be earthed elsewhere The DC supply source is to be located within the same premises as the equipment Switching or disconnecting d...

Page 110: ...trap attached to the power supply handle a Unwrap the strain relief strap from the power supply handle CAUTION Avoid tight bend radii to prevent damaging the internal wires of a power cord or a server...

Page 111: ...ver supports the 96W HPE Smart Storage Battery with the 145mm cable Installing the HPE Smart Storage Battery CAUTION In systems that use external data storage be sure that the system is the first unit...

Page 112: ...en the cable management holder Open the cable management holder 8 Install the HPE Smart Storage Battery on the air baffle 9 Secure the HPE Smart Storage Battery cable under the air baffle clips and th...

Page 113: ...ion Overview Use these instructions to install and enable an HPE TPM 2 0 Gen10 Kit in a supported system This option is not supported on a Gen9 and earlier system This procedure includes three section...

Page 114: ...alled TPM Once installed the TPM becomes a permanent part of the system board When installing or replacing hardware Hewlett Packard Enterprise service providers cannot enable the TPM or the encryption...

Page 115: ...OM version from the Hewlett Packard Enterprise Support Center website http www hpe com support hpesc To update the system ROM follow the instructions on the website 4 Power down the system a Shut down...

Page 116: ...the TPM board To seat the board press the TPM board firmly into the connector To locate the TPM connector on the system board see the system label on the access panel 3 Install the TPM cover a Line up...

Page 117: ...le configuration can be changed between TPM 1 2 and TPM 2 0 default but only TPM 1 2 operation is supported Enabling the Trusted Platform Module as TPM 2 0 Procedure 1 During the system startup sequen...

Page 118: ...ies do one of the following If in graphical mode click Yes If in text mode press the Y key 7 Press the ESC key to exit System Utilities The system reboots a second time without user input During this...

Page 119: ...or crimped Front drive cage cabling Front drive cage P1 and P2 cables connected to P1 and P2 on one of the following options installed on the system board HPE Smart Array E208i a SR Gen10 controller...

Page 120: ...Unused front drive cage P2 cable folded and stored in the narrow slot of the cable guard Unused internal drive cage P2 cable folded and stored in the wider slot of the cable guard Cabling 120...

Page 121: ...routed through either slot on the cable guard Internal drive cage cabling Internal drive cage P1 and P2 connected to P3 and P4 on an HPE Smart Array P816i a SR Gen10 controller installed on the syste...

Page 122: ...Unused P3 cable not routed through either slot on the cable guard Internal drive cage P1 and P2 connected to P1 and P2 on a PCIe card in slot 1 Cabling 122...

Page 123: ...Unused P3 cable not routed through either slot on the cable guard Internal drive cage P1 and P2 connected to P1 and P2 on a PCIe card in slot 5 Cabling 123...

Page 124: ...Unused P3 cable not routed through either slot on the cable guard Internal drive cage P1 and P2 connected to P1 and P2 on a PCIe card located in slot 3 or 4 in riser Cabling 124...

Page 125: ...Unused P3 cable not routed through either slot on the cable guard Internal drive cage P3 connected to rear LFF drive cage Cabling 125...

Page 126: ...Internal drive cage P3 connected to the rear SFF drive cage Rear LFF drive cage cabling Rear LFF drive cage connected to system board Cabling 126...

Page 127: ...Rear LFF drive cage connected to PCIe card in slot 1 or 2 Rear SFF drive cage cabling Rear SFF drive cage connected to the system board Cabling 127...

Page 128: ...Rear SFF drive cage connected to PCIe card in riser slot 4 Rear six bay SFF drive cage cabling SAS SATA Rear six bay SFF drive cage connected to PCIe card in riser slot 2 Cabling 128...

Page 129: ...nstalled in slot 2 slot 6 or slots 2 and 6 NVMe rear drive cage cabling to pass through board in slot 2 NVMe P1 to pass through P1 in slot 2 NVMe P2 to pass through P2 in slot 2 NVMe P3 to pass throug...

Page 130: ...through P2 in slot 2 NVMe P3 to pass through P3 in slot 2 M 2 SSD Enablement option cabling The M 2 SSD Enablement option is supported in the following slots Expansion slot 1 on the system board Expan...

Page 131: ...tion 1 M 2 SSD 1 SATA cable 2 M 2 SSD 2 SATA cable M 2 SSD cabling from the onboard PCIe x24 expansion slot 2 Item Description 1 M 2 SSD 1 SATA cable 2 M 2 SSD 2 SATA cable M 2 SSD cabling from the on...

Page 132: ...P824i p MR Gen10 cabling HPE Smart Array P824i p MR Gen10 controller connected to pass through board installed on the system board IMPORTANT Hewlett Packard Enterprise supports only one HPE Smart Arra...

Page 133: ...HPE Smart Storage Battery cabling iLO ports to network cabling Connecting multiple systems to the network using the iLO management ports The arrow indicates the connection to the network Cabling 133...

Page 134: ...Fan assembly cabling Item Description 1 Fan assembly power cable 2 Fan assembly signal cable Cabling 134...

Page 135: ...Front panel cabling Item Description 1 Front I O cable 2 Front USB 2 0 cable Cabling 135...

Page 136: ...t Storage Administrator Online and Offline HPE MR Storage Administrator Offline StorCLI Offline Product QuickSpecs For more information about product features specifications options configurations and...

Page 137: ...does not parse or change OS data from third party error event log activities for example content created or passed through the OS Active Health System Log The data collected by the Active Health Syst...

Page 138: ...caps for a group of servers Group firmware update Update the firmware of a group of servers Group license installation Enter a license key to activate iLO licensed features on a group of servers Group...

Page 139: ...l Interface Tool The RESTful Interface Tool iLOREST is a scripting tool that allows you to automate HPE server management tasks It provides a set of simplified commands that take advantage of the iLO...

Page 140: ...ut of the box with a foundation of secure embedded management applications and firmware The management security provided by HPE embedded management products enables secure support of modern workloads...

Page 141: ...use certain options including Secure Boot UEFI Optimized Boot Generic USB Boot IPv6 PXE Boot iSCSI Boot and Boot from URL Fibre Channel FCoE Scan Policy NOTE The boot mode you use must match the opera...

Page 142: ...restore certificates For more information see the Hewlett Packard Enterprise website https www hpe com info redfish Using the secboot command in the Embedded UEFI Shell to display Secure Boot databas...

Page 143: ...ching the host operating system For more information see HPE Smart Array SR Gen10 Configuration Guide at the Hewlett Packard Enterprise website HPE MR Storage Administrator HPE MR Storage Administrato...

Page 144: ...ed and using HPE InfoSight for servers go to https www hpe com info infosight servers docs StorCLI The Storage Command Line Interface StorCLI tool is the command line management software designed for...

Page 145: ...Update system maintenance tools that systematically update HPE ProLiant HPE BladeSystem HPE Synergy and HPE Apollo servers and infrastructure SPP can be used in an online mode on a server running Win...

Page 146: ...dates and then reboots the servers iLO 5 with integrated Smart Update Gen10 or later servers only Performs iLO Repository based updates by downloading the components from iLO Repository when iLO Insta...

Page 147: ...file 8 Flash the system ROM by entering fwupdate d BIOS f filename 9 Reboot the server A reboot is required after the firmware update in order for the updates to take effect and for hardware stabilit...

Page 148: ...eed through Hybrid IT by simplifying and enriching the on premise experience informed by public cloud qualities and attributes Operational Support Services enable you to choose the right service level...

Page 149: ...terpreting and resolving error messages Error Message Guide for HPE ProLiant Gen10 Plus servers and HPE Synergy provides a list of error messages and information to assist with interpreting and resolv...

Page 150: ...the system 3 Remove all power a Disconnect each power cord from the power source b Disconnect each power cord from the system 4 Remove the system from the rack Remove the system from the rack 5 Place...

Page 151: ...Properly dispose of the old battery For more information about battery replacement or proper disposal contact an authorized reseller or an authorized service provider System battery replacement 151...

Page 152: ...itive component or assembly Use one or more of the following methods when handling or installing electrostatic sensitive parts Use a wrist strap connected by a ground cord to a grounded workstation or...

Page 153: ...tem inlet temperature range is extended 5 C to 10 C 41 F to 50 F and 35 C to 40 C 95 F to 104 F at sea level with an altitude derating of 1 0 C per every 175 m 1 8 F per every 574 ft above 900 m 2 953...

Page 154: ...F rear drive cage option SAS or SATA maximum 36 87 kg 81 28 lb Power supply specifications Depending on the installed options and or the regional location where the system was purchased the system is...

Page 155: ...o all available features all power supplies in the same system must have the same output and efficiency ratings Hot plug power supply calculations For hot plug power supply specifications and calculat...

Page 156: ...s www hpe com info EIL Single Point of Connectivity Knowledge SPOCK Storage compatibility matrix https www hpe com storage spock Storage white papers and analyst reports https www hpe com storage whit...

Page 157: ...updates Some software products provide a mechanism for accessing software updates through the product interface Review your product documentation to identify the recommended software update method To...

Page 158: ...PE Proactive Care service Supported products list https www hpe com services proactivecaresupportedproducts HPE Proactive Care advanced service Supported products list https www hpe com services proac...

Page 159: ...com info ecodata For Hewlett Packard Enterprise environmental information including company programs product recycling and energy efficiency see https www hpe com info environment Documentation feedb...

Reviews: