background image

70

RO

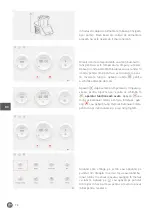
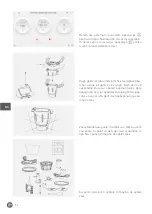
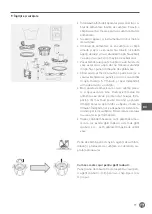
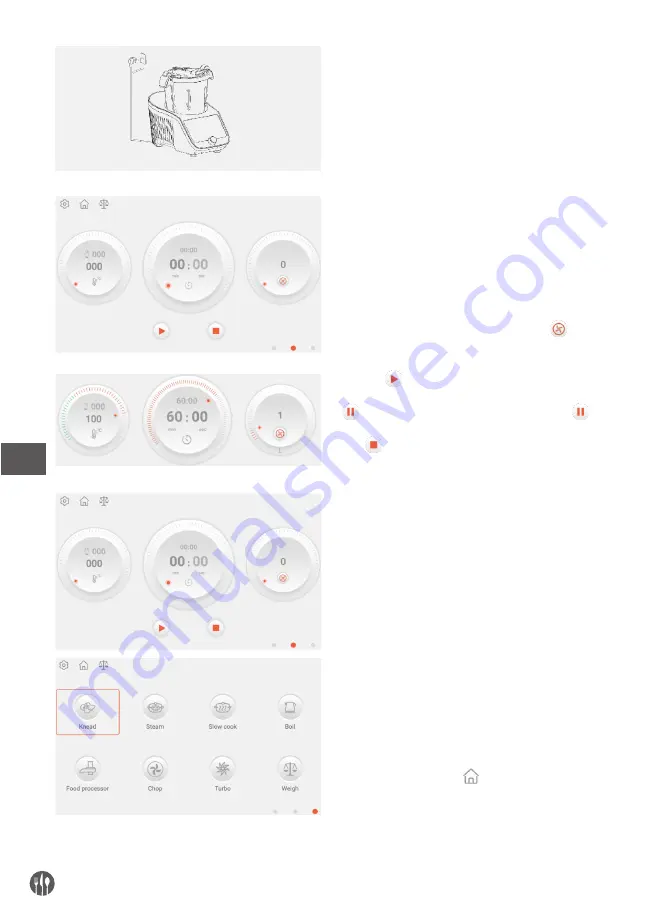
Introduceți cablul de alimentare în baza principală, 
apoi porniți. Dacă baza are cablul de alimentare 
atașată, nu este nevoie să îl mai conectați.

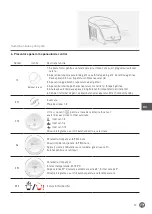
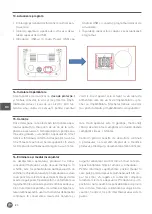
Glisați iconița corespondentă sau rotiți butonul ro-
tativ pentru a seta temperatura, timpul și vitezele. 
Apăsați iconița aferentă minutului sau secundei în 
iconița pentru timp pentru a seta rapid ora exac-
tă. Inversare funcție: apăsați iconița 

 pentru  

a schimba direcția de rotire.

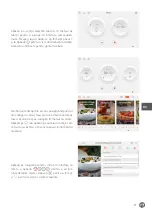
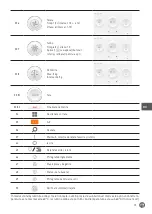
Apăsați 

 după setarea temperaturii, timpului și 

vitezei, pentru a porni, apoi iconița se schimbă în 

aparatul funcționează acum

. Apăsați 

sau 

mijlocul butonului rotativ pentru a întrerupe, apă-
sați 

 sau apăsați lung mijlocul butonului rotativ 

pentru a opri funcționarea și a ieși din program.

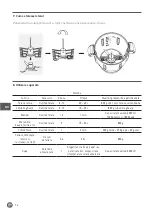
Glisând spre stânga pe ecran sau apăsând pe 
punctul din dreapta în cercul roșu sau rotind bu-
tonul rotativ în sensul ceasului, ajungeți în meniul 
cu funcții. Apăsați pe 

 sau apăsați pe punctul 

din mijloc din cercul roșu pentru a reveni la pasul 
inițial pentru resetare.

Summary of Contents for HendiChef IPC

Page 1: ...rwenden PL Przed u yciem urz dzenia nale y uwa nie przeczyta niniejsz instrukcj obs ugi RO Ar trebui s citi i cu aten ie acest manual de utilizare nainte de a utiliza aparatul RU GR CZ P ed uveden m s...

Page 2: ...u ytku w pomieszczeniach RO Numai pentru uz interior RU GR CZ Pouze pro vnit n pou it CONTENTS 1 SAFETY REGULATIONS 3 2 SPECIAL SAFETY REGULATIONS 4 3 INTENDED USE 5 4 PRODUCT DESCRIPTION 6 5 INSTALL...

Page 3: ...contact the retailer Warning Do not immerse the electrical parts of the appliance in water or other liquids Never hold the appliance under running water Regularly check the power plug and cord for any...

Page 4: ...e bowl will remain hot long after the heating has stopped Use caution when handling and use a work surface protection mat when placing the bowl on heat sensitive surfaces Be careful of steam escaping...

Page 5: ...Ensure that the appliance is switched off before removing it from the stand WARNING THIS APPLIANCE MUST BE EARTHED 3 Intended use This multifunction appliance is designed for com mercial or household...

Page 6: ...ord 17 Steamer basket deep 2 Blender Lid 10 Main switch 18 Steamer basket shallow 3 Blender lid seal 11 Base unit 19 Lid for steamer basket 4 Whisk 12 Knob 20 Driving shaft 5 Stir paddle 13 Display sc...

Page 7: ...7 EN 4 2 Display and control panel a User interface manual settings 30 31 32 26 27 25 28 29 b User interface auto programs 33 c User interface recipe 38 6 3 37 35 4 3...

Page 8: ...rature Button 32 Weight Button 39 Setup UI 26 Timer Button 33 Function Button 40 Recipes UI 27 Speed Button 34 Sort managment 41 DIY UI 28 Star Pause Stop Button 35 A Z 42 Auto program UI 29 Interface...

Page 9: ...place LOGO in front Max in back Choose difference accessories for difference cook ing purpose Note The whisk should be used with the blade Add the ingredients or water to the jug If need food processo...

Page 10: ...the icon for shift rotating direction Click after set the temperature time and speed to start then the icon will change to the ma chine is working now Click or push button in knob to pause working cli...

Page 11: ...face This icon is for steaming By sliding right in screen or click the left dot in red circle or turn the knob in anticlockwise to go to recipe menu Click the or click the middle dot in red circle to...

Page 12: ...otary knob and it will stop cooking If you want to suspend during cooking Press the rotary knob Then press again and the cooker will continue cooking The cooker will stop cooking if you long press the...

Page 13: ...long push the knob during setting 6 When finish cooking Press the knob and the cooker will into standby mode 27 1 Reverse The speed rang 1 3 27 2 Speed Click to shift between clockwise and reverse Spe...

Page 14: ...inutes Temp 000 Range 000 37 C Speed 1 Range 1 2 33 2 Steam Time 20 Range 1 60 minutes Steam flow Fast Medium Slow Time count down starts form 95 C 33 3 Slow Cook Time 60 Range 10 90 minutes Temp 100...

Page 15: ...rch 37 More Favourite collection recipe and history 44 Exit 45 Favourite recipe History 46 Ingredients Picto 47 Cooking step 48 Chef s tips 49 Accessories Picto 50 Check recipe info including During s...

Page 16: ...don Ice Crush Chopping blade 8 12 10 20 s 800 g ice cube Blender Chopping blade 12 1 min Maximum capacity 3000 ml 1200 g carrot 1800 g water Chopping Onion Shallot Celery etc Chopping blade 5 15 30 s...

Page 17: ...lemons into water heat 5 7 minutes then remove the burn mark with a mop Bowl stirring paddle blade Wash the parts then dry thoroughly If food sticks or burns on the in side of the bowl remove as much...

Page 18: ...th antenna gain 20 dBm Modulation mode OFDM CCK Antenna gain 2 0 dbi Note If you are Having a problem with your appliances with cannot be solved by above mentioned please contact authorised service 11...

Page 19: ...hat need to heat 1 2 As per need As per need Blade Meat chopping 8 12 30 60 s Ice crush sugar 8 12 10 20 s Blender 8 12 1 2 min Chopping onion shallot celery etc 5 7 15 60 s Bean soybean nut peanut co...

Page 20: ...ay Your statutory rights are not affected If the appli ance is claimed under warranty state where and when it was purchased and include proof of pur chase e g receipt In line with our policy of contin...

Page 21: ...21 EN...

Page 22: ...INSTALLATION UND EINRICHTUNG VOR GEBRAUCH 29 6 BERSICHT BER DIE SYSTEMSTEUERUNG 33 7 WIE MAN DEN SCHNEEBESEN BENUTZT 36 8 EMPFOHLENE VERWENDUNG 36 9 PFLEGE UND REINIGUNG 37 10 TECHNISCHE DATEN 38 11...

Page 23: ...von qualifiziertem Personal durchzuf hren Verwenden Sie niemals ein besch digtes Ger t Wenn es besch digt ist trennen Sie das Ger t von der Steckdose und wenden Sie sich an den H ndler Warnung Tauche...

Page 24: ...Klinge bevor Sie den Inhalt aus der Sch ssel gie en Halten Sie H nde und Utensilien von der Sch ssel fern w hrend Sie an die Stromver sorgung angeschlossen sind berschreiten Sie nicht den auf der Inn...

Page 25: ...n Sie vorsichtig wenn hei e Fl ssigkeit in die K chenmaschine oder den Mixer ge gossen wird da diese aufgrund eines pl tzlichen Dampfens aus dem Ger t ausgesto en werden kann Das Ger t darf nur mit de...

Page 26: ...9 Netzkabel 17 Dampfkorb tief 2 Mixerdeckel 10 Hauptschalter 18 Dampfkorb flach 3 Mixerdeckeldichtung 11 Grundeinheit 19 Deckel f r Dampfkorb 4 Schneebesen 12 Knopf 20 Antriebswelle 5 Paddel umr hren...

Page 27: ...27 DE 4 2 Anzeige und Steuertafel a Benutzerschnittstelle Manuelle Einstellungen 30 31 32 26 27 25 28 29 b Benutzerschnittstelle Auto Programme 33 c Benutzerschnittstelle Rezept 38 6 3 37 35 4 3...

Page 28: ...chten 26 Timer Taste 33 Funktionstaste 40 Benutzeroberfl che Rezept 27 Geschwindigkeitstaste 34 Sortierverwaltung 41 Benutzeroberfl che Manuelle Einstellungen 28 Stern Pause Stopp Taste 35 AZ 42 Eine...

Page 29: ...x hinten W hlen Sie Differenzzubeh r f r unterschiedliche Kochzwecke Hinweis Der Schneebesen sollte mit dem der Klinge verwendet werden Geben Sie die Zutaten oder das Wasser in den Krug Wenn Sie eine...

Page 30: ...n Sie nach dem Einstellen von Temper atur Zeit und Geschwindigkeit um zu starten Das Symbol ndert sich dann zu die Maschine arbeitet jetzt Klicken oder dr cken Sie die Taste im Knopf um die Arbeit zu...

Page 31: ...zum D mpfen Schieben Sie den Bildschirm nach rechts oder klicken Sie auf den linken Punkt im roten Kreis oder drehen Sie den Knopf gegen den Uhrzeigersinn um zum Rezeptmen zu gelangen Klicken Sie auf...

Page 32: ...en Drehknopf und der Garvorgang wird beendet Wenn Sie w hrend des Garvorgangs anhalten m chten Dr cken Sie den Drehknopf Dr cken Sie dann erneut und der Herd kocht wei ter Der Herd h rt auf zu kochen...

Page 33: ...w hrend der Einstellung lange dr cken 6 Wenn Sie mit dem Garen fertig sind dr cken Sie den Knopf und der Herd wechselt in den Standby Modus 27 1 Umkehren Die Geschwindigkeit klingelte 1 3 27 2 Geschw...

Page 34: ...zu Hause Seite 32 Gewicht Taste 33 1 Kneten Zeit 3 Bereich 2 4 Minuten Temp 000 Bereich 000 37 C Geschwindigkeit 1 Reichweite 1 2 33 2 Dampf Zeit 20 Bereich 1 60 Minuten Dampfstrom Schnell Mittel Lan...

Page 35: ...ara 33 8 2 Ende des Wiegens 34 Sortierverwaltung 35 A Z 36 Suche 37 Mehr Lieblingssammlungsrezept und Geschichte 44 Ausgang 45 Lieblingsrezept Geschichte 46 Zutaten Picto 47 Kochschritt 48 Tipps des K...

Page 36: ...ch ohne Knochen Sehne Eisw rfel Klinge hacken 8 12 10 20 s 800 g Eisw rfel Mixer Klinge hacken 12 1 min Maximale Kapazit t 3000 ml 1200 g carrot 1800 g water Hacken Zwiebel Schalotte Sellerie usw Klin...

Page 37: ...ronen in das Wasser erhitzen Sie es 5 bis 7 Minuten und entfernen Sie den Brandfleck mit einem Mopp Sch ssel R hren Paddel Klinge Teile wa schen dann gr ndlich trocknen Wenn Lebens mittel an der Innen...

Page 38: ...engewinn 2 0 dbi Hinweis Wenn Sie ein Problem mit Ihren Ger ten haben das durch die oben genannten Probleme nicht behoben werden kann wenden Sie sich bitte an einen autorisierten Kundendienst 11 Tempe...

Page 39: ...en m ssen 1 2 Nach Bedarf Nach Bedarf Klinge Fleisch hacken 8 12 30 60 s Ice Crush Zucker 8 12 10 20 s Mixer 8 12 1 2 min Hacken Zwiebel Schalotte Sellerie usw 5 7 15 60 s Bohne Sojabohne Nuss Erdnuss...

Page 40: ...ine Steckdose gesteckt werden die ordnungsgem installiert und geerdet ist 15 Garantie Alle innerhalb von einem Jahr nach dem Kaufda tum festgestellten Defekte oder M ngel die die Funktionalit t des Ge...

Page 41: ...allentsorgung bestraft werden Die getrennte Sammlung und das Recycling der Altger te tr gt zur Schonung der nat rlichen Ressourcen bei und sorgt f r eine umwelt und gesundheitsschonende Verwertungs we...

Page 42: ...PIS PANELU STEROWANIA 53 7 JAK KORZYSTA Z R ZGI KUCHENNEJ 56 8 SUGEROWANY SPOS B EKSPLOATACJI 56 9 KONSERWACJA I CZYSZCZENIE 57 10 SPECYFIKACJA TECHNICZNA 58 11 RESET USTAWIE TEMPERATURY 58 12 OPIS AK...

Page 43: ...ny personel Nigdy nie u ywaj uszkodzonego urz dzenia Po uszkodzeniu od cz urz dzenie od gniazda i skontaktuj si ze sprzedawc Ostrze enie Nie zanurzaj cz ci elektrycznych urz dzenia w wodzie lub innych...

Page 44: ...ub dotykania ka dej z cz ci urz dzenia pracuj cego w trybie gotowania lub po jego zako czeniu Dotyczy to w szczeg lno ci pojemnika pokrywy i akcesori w pozostan one GOR CE przez d u szy czas po wy cze...

Page 45: ...nag e parowanie Z urz dzenia mo na korzysta wy cznie w po czeniu z do czon podstaw Nie wymontowuj podstawy pojemnika w tym obudowy z uchwytami nie podlega ona konserwacji przez u ytkownika Powierzchni...

Page 46: ...y 18 Kosz do gotowania na parze p ytki 3 Uszczelka pokrywy blendera 11 Jednostka bazowa urz dzenia 19 Pokrywa kosza do gotowania na parze 4 R zga kuchenna 12 Pokr t o 20 Wa nap dowy 5 Mieszad o 13 Wy...

Page 47: ...47 PL 4 2 Wy wietlacz i panel sterowania a Panel u ytkownika ustawienia manualne 30 31 32 26 27 25 28 29 b Panel u ytkownika programy automatyczne 33 c Panel u ytkownika przepisy 38 6 3 37 35 4 3...

Page 48: ...tawienie czasu 33 Wyb r funkcji 40 Panel u ytkownika przepisy 27 Ustawienie pr dko ci 34 Zarz dzanie sortowaniem 41 Panel u ytkownika ustawienia manualne 28 Start Pauza Stop 35 Ustawianie alfabetyczne...

Page 49: ...maksymalnego z ty u Wybierz akcesoria odpowiednie do realizowanego procesu gotowania Uwaga R zga kuchenna po winna zosta zamontowana wraz z no em W pojemniku umie produkty ywno ciowe lub wod Je li kon...

Page 50: ...nij ikonk by odwr ci kierunek obrot w Po ustawieniu warto ci temperatury czasu i pr d ko ci pracy wci nij ikonk by rozpocz goto wanie W wczas ikonka zmieni si na Wci nij lub przycisk pokr t a by zatr...

Page 51: ...kropk znaj duj c si po lewej stronie kropki czerwonej lub przekr caj c pokr t o w kierunku przeciwnym do ruchu wskaz wek zegara przejdziesz do menu z przepisami Wci nij lub rodkow kropk aby wr ci do...

Page 52: ...a wi si stosowna informacja Je li chcesz zawiesi proces gotowania wci nij przycisk na pokr tle Wci nij przycisk ponownie a urz dzenie wznowi prac Urz dzenie zatrzyma prac po wci ni ciu i przytrzymaniu...

Page 53: ...e anulowane 6 Po zako czeniu gotowania wci nij przycisk pokr t a by urz dzenie wesz o w tryb czuwania 27 1 Funkcja odwr cenia kierunku pracy Zakres pr dko ci 1 3 27 2 Pr dko Wci nij by prze czy kierun...

Page 54: ...i Fi wersji systemu ustawie j zyka itp 31 Przycisk strony g wnej Strona g wna 32 Przycisk wagi 33 1 Ugniatanie Czas 3 Zakres 2 4 minuty Temperatura 000 Zakres 000 37 C Pr dko 1 Zakres 1 2 33 2 Gotowan...

Page 55: ...35 Wyb r od A do Z 36 Wyszukiwanie 37 Wi cej opcji lista ulubionych przepis w i historia 44 Wyj cie 45 Ulubione przepisy historia 46 Zdj cia sk adnik w 47 Etap procesu przyrz dzania 48 Wskaz wki szefa...

Page 56: ...zenie lodu N do krojenia 8 12 10 20 s 800 g kostek lodu Blendowanie N do krojenia 12 1 min Maksymalna pojemno 3000 ml 1200 g marchewek 1800 g wody Szatkowanie cebula szalotka seler itp N do krojenia 5...

Page 57: ...pnie za pomoc uzyskanego roztworu i cie reczki wyczy lady spalenizny Pojemnik mieszad o n Umyj cz ci a na st pnie dok adnie wysusz Je li resztki produk t w ywno ciowych przylgn y lub przypali y si na...

Page 58: ...na u anten 2 0 dbi Uwaga Je li przy eksploatacji urz dzenia wyst puje problem kt y nie mo e zosta rozwi zany na pod stawie wiedzy uzyskanej z powy szych informacji zadzwo na nasz infolini lub odwied n...

Page 59: ...potrzeby N Krojenie mi sa 8 12 30 60 s Kruszenie lodu na drobne kryszta ki 8 12 10 20 s Blendowanie 8 12 1 2 min Szatkowanie cebula szalotka seler itp 5 7 15 60 s Fasola soja orzechy orzeszki ziemne z...

Page 60: ...by pod czona do gniazdka kt re jest prawid owo za instalowane i uziemione 15 Gwarancja Ka da wada b d usterka powoduj ca niew a ciwe funkcjonowanie urz dzenia kt ra ujawni si w ci gu jednego roku od d...

Page 61: ...wnik ponosi od powiedzialno za przekazanie wycofanego z u yt kowania urz dzenia do punktu gospodarowania odpadami Nieprzestrzeganie tej zasady mo e by karane zgodnie z lokalnie obowi zuj cymi prze pis...

Page 62: ...NAINTE DE UTILIZARE 69 6 PREZENTARE GENERAL A PANOULUI DE CONTROL 73 7 CUM SE FOLOSE TE TELUL 76 8 UTILIZARE SUGERAT 76 9 NGRIJIRE I CUR ARE 77 10 SPECIFICA II 78 11 RESETARE CONTROL TEMPERATUR 78 12...

Page 63: ...eriorat C nd este deteriorat deconecta i aparatul de la priz i contacta i distribuitorul Avertisment Nu scufunda i p r ile electrice ale aparatului n ap sau alte lichide Nu ine i niciodat aparatul sub...

Page 64: ...tire n special bolul capacul i instrumentele pentru c r m n FIERBIN I mult timp dup ce aparatul a fost oprit Folosi i m nerele pentru a ndep rta i muta bolul Folosi i m nu i pentru cuptor atunci c nd...

Page 65: ...ierbin i n timpul utiliz rii Pentru instruc iuni privind cur area suprafe elor care intr n contact cu m ncarea consulta i sec iunea ngrijire i cur are ATEN IE asigura i v c aparatul este oprit nainte...

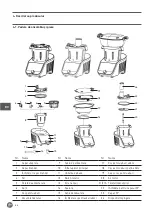
Page 66: ...Capac blender 10 ntrerup tor principal 18 Co pentru aburi pu in ad nc 3 nchiz tor capac blender 11 Unitatea de baz 19 Capac co pentru aburi 4 Tel 12 Buton rotativ 20 Ax motor 5 Palet de amestecare 13...

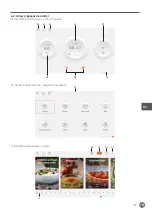
Page 67: ...7 RO 4 2 Afi aj i panoul de control a Interfa a utilizatorului set ri manuale 30 31 32 26 27 25 28 29 b Interfa a utilizatorului programe automate 33 c Interfa a utilizatorului re ete 38 6 3 37 35 4 3...

Page 68: ...25 Buton temperatur 32 Buton c nt rire 39 Setare UI 26 Buton timer 33 Buton func ii 40 Re ete UI 27 Buton viteze 34 Gestionare sortare 41 DIY UI 28 Buton Start Pauz Stop 35 A Z 42 Program automat UI 2...

Page 69: ...la locul lui LOGO n fa Max n spate Alege i diferite accesorii pentru diferite scopuri de g tire Not telul trebuie folosit cu cu itul Ad uga i ingredientele sau ap n vas Dac ave i nevoie de robot trebu...

Page 70: ...a pentru a schimba direc ia de rotire Ap sa i dup setarea temperaturii timpului i vitezei pentru a porni apoi iconi a se schimb n aparatul func ioneaz acum Ap sa i sau mijlocul butonului rotativ pentr...

Page 71: ...i Glis nd spre dreapta n ecran sau ap s nd punctul din st nga n cercul ro u sau rotind butonul rotativ invers acelor de ceas ajunge i n meniul cu re ete Ap sa i pe sau ap sa i pe punctul din mijloc di...

Page 72: ...p sa i bu tonul rotativ iar g tirea se va opri Dac dori i s suspenda i procesul ap sa i butonul rotativ Apoi ap sa i din nou iar aparatul va relua g tirea Apa ratul se va opri din g tit dac ap sa i lu...

Page 73: ...timpul efectu rii set rilor 6 C nd a i terminat de g tit ap sa i butonul iar aparatul intr n modul standby 27 1 Inversare Plaja de viteze 1 3 27 2 Viteza ap sa i pentru a trece de la direc ia n sensul...

Page 74: ...31 Pagina Home 32 Butonul de c nt rire 33 1 Fr m ntare Timp 3 interval 2 4 minute Temp 000 interval 000 37 C Viteza 1 interval 1 2 33 2 Aburi Timp 20 interval 1 60 minute Flux de aburi Rapid Mediu Le...

Page 75: ...sortare 35 A Z 36 C utare 37 Mai mult colec ia de re ete favorite i istoric 44 Ie ire 45 Re ete favorite istoric 46 Pictogram ingrediente 47 Etap proces de g tire 48 Sfaturi de la buc tar 49 Pictogra...

Page 76: ...drobire ghea Cu it de t iere 8 12 10 20 s 800 g cuburi de ghea Blender Cu it de t iere 12 1 min Capacitate maxim 3000 ml 1200g morcovi 1800g ap M run ire ceap elin etc Cu it de t iere 5 15 30 s 800 g...

Page 77: ...m i n ap nc lzi i 5 7 minute i apoi ndep rta i urma de arsur cu o c rp Bol paleta de amestecare cu it sp la i piese le i apoi usca i le bine Dac exist resturi de alimente sau arsuri pe interiorul bol...

Page 78: ...s cu amplificare anten 20 dBm Mod de modulare OFDM CCK Amplificare anten 2 0 dbi Not dac ave i o problem cu aparatul i care nu se poate rezolva cum se arat mai sus contacta i service ul autorizat 11 R...

Page 79: ...c lzeasc 1 2 Dup nevoie Dup nevoie Cu it M run ire carne 8 12 30 60 s Zdrobire ghea 8 12 10 20 s Blender 8 12 1 2 min M run ire ceap elin etc 5 7 15 60 s Fasole boabe de soia nuci alune boabe de cafea...

Page 80: ...eavoastr legale nu sunt afec tate Dac aparatul este n garan ie men iona i c nd i de unde a fost cump rat i include i dovada cump r rii de ex chitan a Conform politicii noastre de dezvoltare continu a...

Page 81: ...81 RO...

Page 82: ...82 RU 1 83 2 84 3 85 4 86 5 89 6 93 7 96 8 96 9 97 10 98 11 98 12 99 13 100 14 100 15 100 16 101...

Page 83: ...83 RU Hendi 1...

Page 84: ...84 RU 2...

Page 85: ...85 RU 1200 1800 3 Sous Vide...

Page 86: ...86 RU 4 4 1 1 2 3 4 5 6 7 8 9 11 16 17 18 19 24 23 22 21 20 12 15 14 10 13 1 9 17 2 10 18 3 11 19 4 12 20 5 13 21 21A 6 14 22 7 15 23 8 16 24...

Page 87: ...87 RU 4 2 a 30 31 32 26 27 25 28 29 33 38 6 3 37 35 4 3...

Page 88: ...88 RU 39 40 41 42 43 25 32 39 26 33 40 27 34 41 28 35 A Z 42 29 36 43 30 37 31 38 A Z...

Page 89: ...89 RU 5...

Page 90: ...90 RU...

Page 91: ...91 RU 7 8...

Page 92: ...92 RU...

Page 93: ...93 RU 6 12 1 2 3 4 5 6 27 1 1 3 27 2 1 3 1 4 1 12 26 0 90 0 90 25 1 37 130 37 40 5 C...

Page 94: ...94 RU 25 2 25 3 37 40 5 28 30 Wi Fi 31 32 33 1 3 2 4 000 000 37 C 1 1 2 33 2 20 1 60 95 C 33 3 Sous Vide 60 10 90 100 60 100 C 1 1 3 33 4 100 60 100 C 33 5 30 10 60 5 4 6...

Page 95: ...95 RU 33 6 10 10 4 6 1 12 33 7 60 12 33 8 5 5 33 8 1 33 8 2 34 35 A Z 36 37 44 45 46 47 48 49 50 60 60...

Page 96: ...96 RU 7 8 8 12 30 60 800 8 12 10 20 800 12 1 3000 1200 1800 5 15 30 800 1 2 500 250 20 5 6 30 800 1 3000...

Page 97: ...97 RU 9 5 7...

Page 98: ...98 RU 10 221761 230 B 50 60 1000 1000 1400 3 0 4 5 Wi Fi 2400 2483 5 M Wi Fi 20 OFDM CCK 2 0 dbi 11...

Page 99: ...99 RU 12 4 2 4 3 3 5 1 2 1 90 100 C 1 2 2 4 1 2 8 12 30 60 c 8 12 10 20 c 8 12 1 2 5 7 15 60 c 12 2 3 20 30 4 6 30 60 c 10 60...

Page 100: ...100 RU 13 USB USB Power Android USB 14 I 15...

Page 101: ...101 RU 16...

Page 102: ...102 GR 1 103 2 104 3 105 4 106 5 109 6 113 7 116 8 116 9 117 10 118 11 118 12 119 13 120 14 120 15 120 16 121...

Page 103: ...103 GR Hendi 1...

Page 104: ...104 GR 2...

Page 105: ...105 GR 1200 g 1800 g 3 Sous Vide...

Page 106: ...106 GR 4 4 1 1 2 3 4 5 6 7 8 9 11 16 17 18 19 24 23 22 21 20 12 15 14 10 13 1 9 17 2 10 18 3 11 19 4 12 20 5 13 21 21A 6 14 22 FP 7 15 23 FP 8 16 24...

Page 107: ...107 GR 4 2 30 31 32 26 27 25 28 29 33 38 6 3 37 35 4 3...

Page 108: ...108 GR 39 40 41 42 43 25 32 39 UI 26 33 40 UI 27 34 41 DIY UI 28 35 A Z 42 UI 29 36 43 UI 30 37 31 38 A Z...

Page 109: ...109 GR 5 LOGO Max...

Page 110: ...110 GR...

Page 111: ...111 GR 7 8...

Page 112: ...112 GR...

Page 113: ...113 GR 6 12 Rotary knob 1 2 3 4 5 6 27 1 1 3 27 2 1 3 1 4 1 12 26 0 90 0 90 25 1 37 40 5 25 2 37 130 C...

Page 114: ...114 GR 25 3 37 C 40 5 28 30 WiFi 31 32 33 1 3 2 4 00 37 C 1 1 2 33 2 20 1 60 95 C 33 3 60 10 90 100 60 100 C 1 1 3 33 4 100 60 100 C 33 5 30 10 60 5 4 6...

Page 115: ...115 GR 33 6 10 s 10 s 4 m 6 1 12 33 7 Turbo 60 s 12 33 8 5 5 g 33 8 1 33 8 2 34 35 A Z 36 37 44 45 46 47 48 Chef s tips 49 50 60 C 60 C...

Page 116: ...116 GR 7 8 8 12 30 60 s 800g 8 12 10 20 s 800g 12 1 3000 ml 1200 g 1800 ml 5 15 30 s 800 g 1 2 500g 250g 20g 5 6 30 s 800 g 1 3000 ml...

Page 117: ...117 GR 9 5 7...

Page 118: ...118 GR 10 221761 230 V 50 60 Hz 1000 W 1000 W 1400 W 3 0 l 4 5 l maks WiFi 2400 2483 5 MHz WiFi 20 dBm OFDM CCK 2 0 dbi 11...

Page 119: ...119 GR 12 4 2 4 min 3 3 5 min 1 2 1 90 min 100 C 1 2 2 4 min 1 2 8 12 30 60 s 8 12 10 20 s 8 12 1 2 min 5 7 15 60 s 12 2 3 min 20 30 min 4 6 30 60 s 10 60 min...

Page 120: ...120 GR 13 USB USB Power USB Android USB 14 15...

Page 121: ...121 GR 16...

Page 122: ...ALACE A NASTAVEN P ED POU IT M 129 6 P EHLED OVL DAC HO PANELU 133 7 JAK POU VAT LEHA 136 8 DOPORU EN POU V N 136 9 P E A I T N 137 10 TECHNICK SPECIFIKACE 138 11 RESET REGULACE TEPLOTY 138 12 P EHLED...

Page 123: ...te elektrick sti spot ebi e do vody nebo jin ch kapalin Nikdy nedr te spot ebi pod tekouc vodou Pravideln kontrolujte nap jec z str ku a kabel pro p padn po kozen Pokud je po kozen mus b tnahrazenser...

Page 124: ...pou vejte rukojeti madla P i manipulaci s horkou miskou a hork m n dob m pou vejte rukavice Spodn strana misky z st v hork dlouho po zastaven oh evu P i manipulaci bu te opatrn p i pokl d n misky na p...

Page 125: ...d t u ivatel Povrchy se mohou b hem pou v n zah vat Pokyny pro i t n povrch p ich zej c ch do styku s potravinami najdete v odstavci P e a i t n UPOZORN N P ed vyjmut m ze stojanu se ujist te e je p...

Page 126: ...e hlubok 2 V ko mix ru 10 Hlavn vyp na 18 Ko napa ova e m lk 3 T sn n v ka mix ru 11 Z kladn jednotka 19 V ko pro ko napa ova e 4 Metla 12 Knofl k 20 Poh n c h del 5 Va e ka pro m ch n 13 Obrazovka d...

Page 127: ...127 CZ 4 2 Displej a ovl dac panel a U ivatelsk rozhran ru n nastaven 30 31 32 26 27 25 28 29 b U ivatelsk rozhran automatick programy 33 c U ivatelsk rozhran recept 38 6 3 37 35 4 3...

Page 128: ...26 Tla tko asova e 33 Tla tko Funkce 40 U ivatelsk rozhran pro recepty 27 Tla tko volby rychlosti 34 Kontrola t d n 41 U ivatelsk rozhran typu Ud lej si s m 28 Tla tko Start Pauza Stop 35 A Z 42 U iv...

Page 129: ...GO vp edu n pis Max vzadu Vyberte si r zn p slu enstv pro r zn druhy va en Pozn mka leha mus b t pou v n spole n s no em P idejte do d b nu p sady nebo vodu Pokud po t ebujete funkci kuchy sk ho robot...

Page 130: ...te sm r ot en Po nastaven teploty asu a rychlosti spu t n klik n te na pot se ikona zm n na stroj pak bude v provozu Klikn te na nebo stiskn te tla tko v knofl ku a pozastavte pr ci kliknut m na nebo...

Page 131: ...azovce nebo kliknut m na levou te ku v erven m kruhu nebo oto en m knofl ku proti sm ru hodinov ch ru i ek p ejdete do nab dky recept Kliknut m na nebo kliknu t m na st edn te ku v erven m kruhu se vr...

Page 132: ...z infor mace o konci Stiskn te oto n knofl k a va en se zastav Pokud chcete proces pozastavit b hem va en stiskn te oto n knofl k Pot znovu stiskn te toto tla tko a na spor ku bude pokra ovat proces v...

Page 133: ...dlouze stisknete p slu n knofl k 6 Po dokon en va en stiskn te knofl k a spor k se p epne do pohotovostn ho re imu 27 1 Zp tn pohyb Rozsah rychlosti 1 3 27 2 Rychlost Kliknut m na m ete p ep nat pohyb...

Page 134: ...Domovsk str nka 32 Tla tko Hmotnost 33 1 Hn ten as 3 rozsah 2 4 minuty Teplota 000 rozsah 000 37 C Rychlost 1 rozsah 1 2 33 2 P ra as 20 rozsah 1 60 minut Pr chod p ry rychl st edn pomal Odpo t v n a...

Page 135: ...c v en 34 Spr va azen 35 A Z 36 Vyhled v n 37 V ce Obl ben recept ze sb rky a historie 44 Exit odchod 45 Obl ben recept historie 46 Piktogram pro ingredience 47 Krok postupu va en 48 Tipy fkucha e 49...

Page 136: ...ez kosti lachy Kostky ledu N pro sek n 8 12 10 20 s 800 g kostky ledu Mix r N pro sek n 12 1 min Maxim ln kapacita 3000 ml 1200 g mrkve 1800 g vody Sek n cibule alotka celer atd N pro sek n 5 15 30 s...

Page 137: ...ody trochu kyseliny citronov nebo ci tron zah vejte po dobu 5 7 minut a pot tyto sp leniny odstra te kart em M sa m chadlo p dlo n D ly umyjte a pot d kladn osu te Pokud se j dlo na vnit n stran misky...

Page 138: ...on WiFi se ziskem ant ny 20 dBm Modula n re im OFDM CCK Zisk ant ny 2 0 dbi Pozn mka Pokud dojde k probl mu s p stroji a pokud tyto probl my nelze vy e it kontaktujte autorizo van servis 11 Reset regu...

Page 139: ...y kter je t eba zah t 1 2 Podle pot eby Podle pot eby Lopatka n Sek n masa 8 12 30 60 s Kostky cukru 8 12 10 20 s Mix r 8 12 1 2 min Sek n cibule alotka celer atd 5 7 15 60 s Fazole s ja o ech ara dy...

Page 140: ...pokyny a nebyl dn m zp sobem zne u v n nebo zneu it Va e z konn pr va nejsou dot ena Pokud je spot ebi n rokov n v z ruce uve te kde a kdy byl zakoupen a p ilo te doklad o koupi nap potvrzen V soulad...

Page 141: ...141 CZ...

Page 142: ...1A Nazwa produktu Product name Productnaam Artikelbezeichnung Nome prodotto Nume produs D signation Tootenimi N zev v robku N zov v robku Preki pavadinimas Pre u nosaukums Marka Brand Merk Marke Marca...

Page 143: ......
Page 144: ...0 4839700 Email info pks hendi com Hendi Italia S R L Via Leonardo da Vinci 4 39100 Bolzano BZ Italy Tel 39 800 727 438 Email office italy hendi eu Hendi HK Ltd 1208 12 F Exchange Tower 33 Wang Chiu R...

Reviews: