


EN
V. Adding Device
1. Add Base Station
1
Please connect your mobile and base station to one router.
2
Open “Helo by Strong” App, click the top right “+” to add
device.
3
Select “Video Surveillance—Base Station”, follow the
instructions to add the base station.
2. Add Camera
1
Please press the On/Off button of all cameras one by one.
2
Then the cameras will beep, and the indicator light of the
camera starts to fl ash red; If the indicator light does not fl ash red,
please press and hold the reset button for 5s to reset the camera.
3
Enter the Base station interface on the app, click the “+Add
Device” in bottom, or press the pairing button on top of the
base station to enter pairing status, the Indicator light 2 will fl ash
green.
4
When the camera successfully pairs to base station, a voice
prompt will be heard from camera and camera’s indicator light
will turn green, while Indicator light 2 of base station will turn off
and base station exit the pairing status. Then the added cameras
will be displayed on the app.
5
If there is any camera that could not pair to the base station,
please add the camera again following the above +
1 +2 +3
+steps.
VI. Charging Camera
1. The camera is with built-in 6000mAh rechargeable battery.
2. When charging, please use the camera USB cable to connect
camera and camera adaptor, then plug the adptor into power outlet
(100v-240v) for charging. The indicator light on camera will turn
EN
2
Enter your verifi cation code
Enter verification
code
A verification code has been sent to your email:
[email protected], Resend(51s)
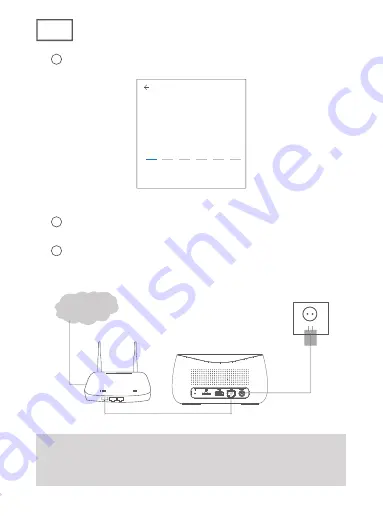
3. Connecting Device
1
Use the Ethernet cable to connect the Base Station to
Router’s LAN port.
2
Plug the adapter to the power outlet to power on the base
station. The Indicator light 1 will change from solid red to blink red
when the base station is ready for pairing.
Internet
1. Need one router connecting to internet
2. Need an Uplink connection with at least 2 Mbps
speed
Summary of Contents for CAMERA-B-KIT
Page 2: ......
Page 3: ...EN Quick Start Guide Helo by Strong CAMERA B KIT Indoor Outdoor Camera...
Page 11: ......
Page 12: ......
Page 13: ...DE Schnellstartanleitung Helo by Strong CAMERA B KIT Innen Au enkamera...
Page 21: ......
Page 22: ......
Page 23: ...FR Guide d Installation Rapide Helo by Strong CAMERA B KIT Cam ra Int rieure Ext rieure...
Page 31: ...Hauteur de montage recommand e 2 3 m tres...
Page 32: ......
Page 41: ......
Page 42: ......
Page 43: ...ES Gu a de inicio r pido Helo by Strong CAMERA B KIT C mara interior exterior...
Page 51: ......
Page 52: ......
Page 53: ...PT Guia de in cio r pido Helo by Strong CAMERA B KIT C mara para interiores exteri ores...
Page 61: ......
Page 62: ......
Page 63: ...NL Snelstartgids Helo by Strong CAMERA B KIT Binnen buitencamera...
Page 71: ......
Page 72: ......
Page 73: ...DK NO Quick Start Guide Helo by Strong CAMERA B KIT lndend rs Udend rs Kamera...
Page 81: ......
Page 82: ......
Page 83: ...SE Snabbstartsguide Helo by Strong CAMERA B KIT vervakningskamera...
Page 91: ......
Page 92: ......
Page 93: ...CZ Pr vodce rychl m pou v n m Helo by Strong CAMERA B KIT Vnit n Venkovn kamera...
Page 101: ......
Page 102: ......
Page 103: ...SK Pr ru ka pre r chle spustenie Helo by Strong CAMERA B KIT Interi rov exteri rov kamera...
Page 111: ......
Page 112: ......
Page 113: ...HR Vodi za brzi po etak upotrebe Helo by Strong CAMERA B KIT Unutarnja vanjska kamera...
Page 121: ......
Page 122: ......
Page 123: ...BG Helo by Strong CAMERA B KIT...
Page 124: ...BG I Ethernet WiFi USB 2...
Page 129: ...BG V 1 1 2 Helo by Strong 3 2 1 2 C 5 3 2 4 2 5 1 2 3...
Page 130: ...BG VI 1 6000mAh 2 USB l00v 240v 3 4 VII 1 2 3 2 3...
Page 131: ......
Page 132: ......
Page 133: ...HU Gyors zembe helyez si tmutat Helo by Strong CAMERA B KIT Belt ri K lt ri Kamera...
Page 141: ......
Page 142: ......
Page 143: ...UA HELO CAMERA B KIT...
Page 144: ...UA I Ethernet WiFi USB...
Page 145: ...UA II 1 2 1 3 2 4 5 SD 6 USB 7 WAN 8 SD 1 4 5 3 2 1 2 3 4 PIR 5 6 7 8 USB...
Page 146: ...UA III 1 2 SYNC SYNC SYNC SD SD 128 USB USB 2 WAN LAN 3 SYNC 3 USB 3...
Page 149: ...UA V 1 1 2 Tuya Smart 3 Video Surveillance Base Station 2 1 2 5 3 Add Device 2 4 2 5 1 2 3...
Page 150: ...UA VI 1 6000mAh 2 USB 100 240 3 4 VII 1 2 3 2 3...
Page 151: ......


