background image


14


C

ONSOLE 

I

NSTRUCTIONS – 

C

ONSOLE 

B

UTTONS 

”  


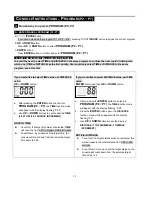
During workout (after pressing 

START/

PAUSE

), the user could press 

MODE

 to select 

SPEED

DISTANCE

 and 

CALORIES

, or

 RPM

ODO (Odometer) 

and 

WATT 


RPM

ODO

WATT

 will show at the same time


SPEED

DISTANCE, CAL.

 will show at the same time


DISTANCE

 and 

ODO (ODOMETER) 

information: 

z


DISTANCE:


a.  This measures the total distance from 0 to 999 km/Mile.   

b. After 

pressing 

START/

PAUSE

DISTANCE

 will count up. Press 

START

/PAUSE

 again to 

pause all functions and 

DISTANCE

 value during your exercise program. 

c. Press


START/

PAUSE

 again to resume the program and 

DISTANCE

 value will continue 

counting up until the program finish   

d.  The console would automatically shut off after 4 minutes of inactivity. The 

DISTANCE


value’s counting will restart from zero after pedaling or pressing any keys to active the 

console again 

z


ODO (ODOMETER): 

The function of

 ODO

 and 

DISTANCE

 are similar will accumulate the total 

distance traveled by the item during workout. If there is any necessary 
to reset 

ODO

’s distance value, press 

UP

,

 MODE

,

 DOWN

 and

 ENTER


at the same time to let the motor automatically calibrate to reset 

ODO


value to zero


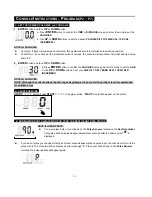
a. 

PULSE RECOVERY

 button measures how quickly you return 

to a resting hear rate after exercising. You could use this 

button to measure improvement as you get into shape 

b.  The console will monitor your pulse for 60 seconds and 

calculate a 

HEART RATE RECOVERY

 value from F1.0 to 

F6.0. F1.0 is best; F6.0 is worst (For Reference Only) 

c.  The readout should only be used as a comparison between workouts. It’s recommended to use 

right after any aerobic exercise. Stop exercising before starting the function. 

d.  Your pulse will be displayed approximately few seconds after the heart symbol “

” is displayed 


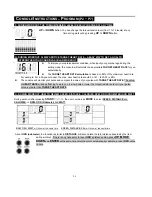
NOTE:  

If you don’t hold the 

HEART RATE SENSORS

 on the handrails 

with both hands properly, the console’s

 HEART RATE

 value 

would show “0” and the main screen would show “F6.0” after the 

console counts down to zero, which means the 

HEART RATE 

SENSORS

 won’t be able to pick up the signals. Press any keys to 

stop the long beep sound, then press 

PULSE RECOVERY

 button 

again and make sure to hold the 

HEART RATE SENSORS

 on the handrails with both hands properly 

this time.   
 

Summary of Contents for HM-U6200

Page 1: ...ur if this equipment is not assembled and used correctly Serious bodily injury can also occur if all instructions are not followed Keep children and pets away from equipment when in use Always make su...

Page 2: ...ain within them Always use common sense when exercising 12 Before using this product please consult your personal physician for a complete physicalexamination 13 Do not wear loose or dangling clothing...

Page 3: ...ood condition Do not dispose of the packing material until the assembly process is completed Assembly tools and hardware kit have included for you to use when assembling the product Console Upper Cove...

Page 4: ...head bolts and screws are measured from the top of the head to the end of the bolt or screw After unpacking the unit open the hardware bag and make sure that you have all the following items Note Some...

Page 5: ...r time and opportunity to exercise The equipment provides a convenient and simple method to begin your assault on getting your body in shape and achieving a happier and healthier lifestyle Before read...

Page 6: ...r 2 to the Main Frame 1 d Follow the above STEP b to attach the Rear Stabilizer 3 to the Main Frame 1 with two Lock Washers M8 65 two Washers 8x16x2 0t 66 and two Bolts Socket Head M8xp1 25x90mm 84 NO...

Page 7: ...he side of the Front Handlebar 6 b Position the Front Handlebar 6 in place through the Upright Post Assembly 5 and secure with five Washers 8x16x2 0t 66 five Lock Washers M8 65 four Bolts Button Head...

Page 8: ...the Console 32 33 and the Upright Post Assembly 5 d Connect the Front Connection Wire 94 to the Rear Connection Wire 95 Be care not to pinch the wires e Connect the Front Pulse Sensor Wire 100 to the...

Page 9: ...Handlebar 6 as the illustrator shown on the left b Then secure the Right Console Sleeve 35 to the Upright Post Assembly 5 with two Screws Round Head M5xp0 8x15mm 73 c Repeat the above process on the...

Page 10: ...al 11 clockwise into the right crank Tighten the Pedal as firmly as possible b Thread the Left Pedal 10 into the left crank area of the Main Frame 1 Firmly tighten the Left Pedal 10 counter clockwise...

Page 11: ...the equipment sets on the floor without rocking HOW TO ADJUST CONSOLE ANGLE To get the best console angle it s suggested to use both hands to hold the upper and lower end of the console and gently adj...

Page 12: ...SS TEST PROGRAM P7 RANDOM PROGRAM P8 BODY FAT PROGRAM P9 TARGET H R PROGRAM P10 60 H R C PROGRAM P11 75 H R C PROGRAM P12 85 H R C PROGRAM P13 USER 1 MODE PROGRAM P14 USER 2 MODE PROGRAM P15 USER 3 MO...

Page 13: ...ART PAUSE all the date will return to 0 and the console will return to POWER ON status Press ENTER to confirm the program function PROGRAM TIME HEIGHT WEIGHT DISTANCE CALORIES AGE GENDER TARGET H R an...

Page 14: ...set ODO s distance value press UP MODE DOWN and ENTER at the same time to let the motor automatically calibrate to reset ODO value to zero a PULSE RECOVERY button measures how quickly you return to a...

Page 15: ...et distance was not selected this would measure the total distance from 0 00 to 999 km mile z Count Down If you have set the target distance the console will count down from that selected target dista...

Page 16: ...d increment NOTE Although the console allows input for age beginning at 10 years old the product is not recommended for children s use BMI z During BODY FAT TEST the result would display the value of...

Page 17: ...et and enter into POWER ON status Continue pressing START PAUSE a few seconds all the date will reset to the initial value and the console will return to POWER ON status 3 Normal way to operate MANUAL...

Page 18: ...ot selected TIME will count up from 0 00 to maximum 99 59 minutes z Count Down If you have set the target time the console will count down from that selected target time down to 0 00 If you would like...

Page 19: ...t the AGE b Use UP or DOWN buttons to set your AGE 10 TO 99 YEARS OLD 1 YEAR OLD INCREMENT NOTE for AGE NOTE Although the console allows input for ages beginning at 10 years old the product is not rec...

Page 20: ...should be 161 220 30 x 85 z The console will monitor your pulse and compare the value of your pulse with TARGET HEART RATE The value of HEART RATE will keep flashing to warn you to slow down or lower...

Page 21: ...n on the console or begin pedaling to turn on the console After a few seconds the console will then light up with a short beep sound indicating the console will be ready for use 2 Prior information HO...

Page 22: ...ar with the display flashing 0 00 b Use UP or DOWN buttons to set the desired TIME 1 00 TO 99 00 1 MINUTE INCREMENT NOTE for TIME z Count Up If a target time was not selected TIME will count up from 0...

Page 23: ...he AGE b Use UP or DOWN buttons to set your AGE 10 TO 99 YEARS OLD 1 YEAR OLD INCREMENT NOTE for CALORIES NOTE Although the console allows input for ages beginning at 10 years old the product is not r...

Page 24: ...hould be 161 220 30 x 85 z The console will monitor your pulse and compare the value of your pulse with TARGET HEART RATE The value of HEART RATE will keep flashing to warn you to slow down or lower t...

Page 25: ...e 2 Prior information HOLD TO RESET button an easy way to reset and enter into POWER ON status Continue pressing START PAUSE a few seconds all the date will reset to the initial value and the console...

Page 26: ...button to confirm your HEIGHT value and enter the mode to set your WEIGHT b Use UP or DOWN buttons to set your WEIGHT 10 200KG 0 2 KG INCREMENT 23 440 LBS 0 5 LBS INCREMENT NOTE for WEIGHT NOTE The p...

Page 27: ...tain normal body functions while at rest BMR is the largest factor in determining overall metabolic rate and how many calories you need to maintain lose or gain weight To lose weight you should try to...

Page 28: ...pe 4 20 24 fat Slim Class 3 Type 5 25 29 fat Standard Type 6 30 34 fat Overweight Type 7 35 39 fat Obese Class 1 Type 8 40 44 fat Obese Class 2 Type 9 45 50 fat Extreme Obesity 5 ERROR INFORMATION If...

Page 29: ...mation HOLD TO RESET button an easy way to reset and enter into POWER ON status Continue pressing START PAUSE a few seconds all the date will reset to the initial value and the console will return to...

Page 30: ...button and then UP or DOWN button a After pressing the ENTER button to enter into H R C PROGRAM P9 12 the TIME function mode will appear with the display flashing 0 00 b Press the ENTER button again t...

Page 31: ...60 of maximum heart rate 60 of 220 you age TRAINER 75 of maximum heart rate 75 of 220 you age ACTIVE TRAINER 85 of maximum heart rate 85 of 220 you age b CONSOLE MONITOR YOUR CURRENT PULSE z The cons...

Page 32: ...ctly the pulse readout will appear again H DURING WORKOUT THE TORQUE TENSION LEVEL IS EASILY CHANGED AT ANY TIME UP or DOWN button You can change the torque tension level from 1 to 16 levels at any ti...

Page 33: ...se 2 Prior information HOLD TO RESET button an easy way to reset and enter into POWER ON status Continue pressing START PAUSE a few seconds all the date will reset to the initial value and the console...

Page 34: ...utton and then UP or DOWN button a After pressing the ENTER button to enter into USER MODE PROGRAM P13 P16 the TIME function mode will appear with the display flashing 0 00 b Press the ENTER button ag...

Page 35: ...the EACH TIME INTERVAL OF TORQUE RESISTANCE LEVEL 1 TO 16 TORQUE RESISTANCE LEVELS 1 TORQUE RESISTANCE LEVEL INCREMENT then press ENTER button to confirm c Continue following the above process to fin...

Page 36: ...rate should be 161 220 30 x 85 z The console will monitor your pulse and compare the value of your pulse with TARGET HEART RATE The value of HEART RATE will keep flashing to warn you to slow down or...

Page 37: ...may not have enough power to adjust the tension level 4 If the battery power is low please keep pedalling more than 45 RPM for normal operation and the generator would start to recharge the battery F...

Page 38: ...ulse Sensors correctly 1 Check whether the wires are broken or well connected Replace the broken wires with new wires or re connected the wires 2 Check whether the motor is broken has struggle to adju...

Page 39: ...e Computer Case Retighten the Screws Take care NOT to over tighten the Screws as this may destroy the Circuit Board You just need to keep the Circuit Board firm STOP tightening screw when you meet res...

Page 40: ...0 and 85 of your maximum heart rate as you exercise This is known as your target zone You can find your target zone in the table below Target zones are listed for both unconditioned and conditioned pe...

Page 41: ...the legs as wide as possible Stretch the upper body toward the knee on the right leg by using your arms to pull your chest to your thighs Hold this stretch 10 to 30 seconds DO NOT BOUNCE Do this stret...

Page 42: ...42 PRODUCT PARTS DRAWING...

Page 43: ...for Handlebar 2 30 Hand Pulse Upper Cover L R 2 31 Hand Pulse Bottom Cover L R 2 32 Console Upper Cover 1 NO Item Name Q TY 33 Console Bottom Cover 1 34 Left Console Sleeve 1 35 Right Console Sleeve...

Page 44: ...M6xp1 0x15mm 4 82 Bolt Socket Head M8xp1 25x16mm 4 83 Bolt Socket Head M8xp1 25x45mm 1 NO Item Name Q TY 84 Bolt Socket Head M8xp1 25x90mm 4 85 Bolt Hex Head M8xp1 25x16mm 4 86 Bolt Hex Head M10xp1 5x...

Reviews: