background image

Digital PEN User Guide                                                               


Procedure by HCL Infosystems Limited-Product Engineering Group                         Page 2 of 31 


Refill Extractor 


Inserting the Refill 


Installing/Replacing Pen Batteries 

1.  Please use the enclosed GP SR41 batteries with the positive polarity facing up. 

2.  Batteries may be safely disposed of in normal household waste Contact your local government 

for disposal or recycling practices in your area. 

3. 

Caution

: Risk of explosion if battery is replaced by an incorrect type 


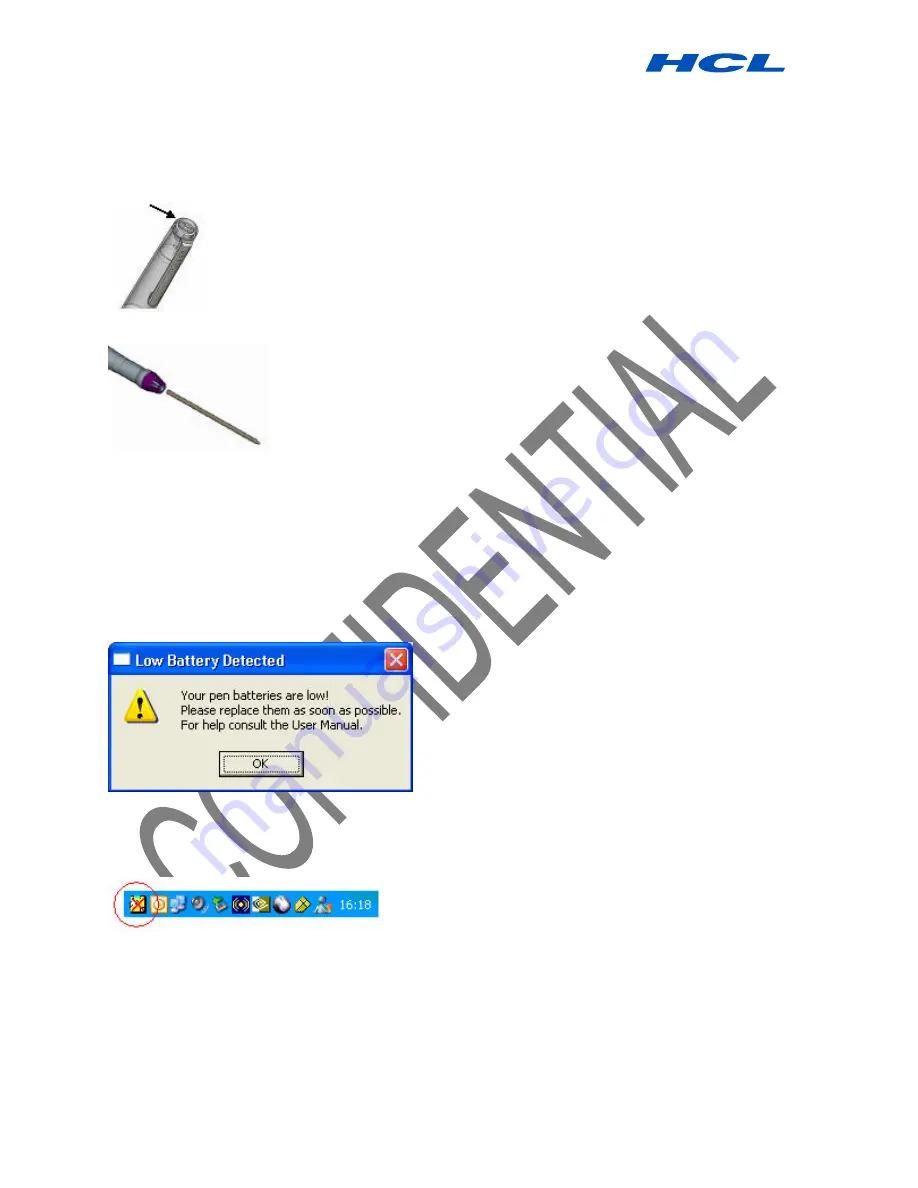
When your Pen battery runs low, the following message appears on your screen 


This warning is continuously displayed on each new note and the application icon in the system tray 

changes to reflect the current status until the batteries are replaced. 


Note

Lifetime of the batteries may vary and cannot be guaranteed. 

Supplied batteries are good for initial use only 

? ?

Remove the battery compartment cover 

? ?

Install two SR41 batteries, with the positive poles facing up 

Summary of Contents for Digital PEN

Page 1: ...image of the user s handwriting Software environment Operation System Windows XP Specially with usage with Class Mate PC Only Hardware Environments System CMPC Class Mate PC Minimum Memory Requirement 256MB Display Resolution 800x480 Setting up Your Pen WARNING Do not attempt to open the Digital Pen This may cause the pen to malfunction Installing Replacing an Ink Refill into the Pen The top of th...

Page 2: ... recycling practices in your area 3 Caution Risk of explosion if battery is replaced by an incorrect type When your Pen battery runs low the following message appears on your screen This warning is continuously displayed on each new note and the application icon in the system tray changes to reflect the current status until the batteries are replaced Note Lifetime of the batteries may vary and can...

Page 3: ...e NOTETAKER requires no installation Simply plug your base unit into a free USB port in your PC Storing your NOTETAKER Keep your NOTETAKER away from liquids and direct sunlight at all times Always store your unit in protected packaging or in the original box Severe shock can cause degradation in performance Take precautions not to drop the base Unit or Pen onto hard surfaces ...

Page 4: ...en To install NOTETAKER software 1 Insert the installation CD into your CD ROM drive The setup program should start automatically If not run the program by selecting Run from the Windows Start menu and type in D setup exe If your CD drive uses a different letter type that letter instead of D 2 Follow the instructions on the screen During installation you will be prompted to choose whether you woul...

Page 5: ...ons CLEAR Clears the entire on screen note UNDO Clears the previous stroke made by the digital Pen in reverse chronological order REDO Replaces previously undone strokes in chronological order PEN STYLES Changes the Ink color and width SAVE TO FOLDER Saves the note to a specified folder and closes the note window SEND BY NETWORK Sends the current note by local network to selected recipients PRINT ...

Page 6: ...ch ever one you have configured for that purpose NOTE It is also possible to configure an Auto Save feature That will automatically save your note periodically while you are working Printing Notes A note can be printed from any of the 3 Note interfaces The Note Window The Note Editor or the Note Manager Notes can be printed from a saved file in the Note Manager or while they are open in the Notes ...

Page 7: ... the Print button 7 Repeat steps 4 and 5 in the previous procedure Setting Your Preferences Set your default preferences such as note color auto save options print preferences etc in the Preferences dialog box The dialog box is divided into three tabs each controlling a different Aspect of the system General Printing and Ink To access Preferences In the Notes Manager Configuration menu select Pref...

Page 8: ...ly load the NOTETAKER each time you turn on your computer so that a new note will pop up whenever you begin to using the Pen Select the Save Sticky Notes on Exit checkbox to automatically save all the new sticky notes you created The saved sticky notes will then instantly appear the next time you either turn on your computer or restart the application Set your Print Preferences as follows Select t...

Page 9: ... your Paper Holder Preferences as follows Under Paper Holder opacity drag the slider to set the desired level of transparency The Note Manager The Note Manager can be used for storing viewing searching copying and exporting notes It is set up in Windows Explorer format which allows you to browse through ...

Page 10: ...ands in the system together with a short description of their function File Menu CONVERT TO TEXT Convert your note to Text using MyScript Notes MOVE TO Allows you to move the selected note to another folder SEND TO Sends any note by email or local network EXPORT Exports the selected note s to a JPEG file SET REMINDER Enables you to set an exact date and time that a selected note will be displayed ...

Page 11: ...letes the selected note notes RENAME Allows you to rename the selected note FIND NOTE Lets you search through saved notes based on defined criteria FIND NEXT Locates the next note that matches the search criteria SELECT ALL Selects all notes View Menu SORT Sort Notes by Date or Name SMALL THUMB Displays small thumbnails in the Note Manager view MEDIUM THUMB Displays medium sized thumbnails in the ...

Page 12: ... version information Note Manager Toolbox The Note Manager Toolbox contains buttons that give you access to the most commonly used menu commands The following table contains a list of each button in the toolbox together with a description of its function Convert your note to Text using MyScript Notes CUT Cuts the selected note and saves it to the clipboard COPY Copies the selected note and saves i...

Page 13: ... Contacts Follow Up and Received Notes You can use these folders for storing your notes and can create additional custom folders as needed Creating a new folder To create a new folder Creating a new folder can be done in few ways You can use File menu to run the New Folder option Choose the folder you want to create a sub folder for or choose the My Notes root folder Use File menu to run the New F...

Page 14: ...r or No to cancel the operation Renaming Notes Each time you create and save a new note it is automatically given a name that corresponds to the exact date and time the note was created You can rename notes at any time to give them names that are more meaningful to you To rename a note 1 Right click the note you want to rename Or click F2 key when the note is selected 2 In the shortcut menu that a...

Page 15: ...on of the note you are looking for 4 To search by creation date parameters select All notes created and then specify the date range according to which you would like to search 5 Click Find Backup and Restore Notes Database You can use the Note Manager to backup your entire database and restore it when needed To backup your database Select File Backup Restore Backup Database from the Note Manager m...

Page 16: ... The following dialog will appear choose the location of your database backup Click the Restore button Upon a successful restore your database will be restores to a new folder in the Note Manager This new folder will be named Restored database and will also be according to the restoring date and time Selecting Pen Style You can change Ink color and width of on screen pen strokes at any time The de...

Page 17: ... in the box Click Default in order to restore the default settings at any time Click Cancel to return to the Note Manager or to the note without changing the current pen style settings NOTE You can also change the color and width of any pen stroke in the Note Editor by selecting an individual pen stroke or group of strokes and then in the Tools Menu selecting Color or Line Width Setting a Reminder...

Page 18: ...pecify an exact time for the reminder select the Exactly At checkbox and use the arrows to change the default time or type in the desired time Setting a Reminder to Snooze When a reminder appears you can set it to snooze so that it disappears and then pops up again within 5 10 15 or 20 minutes depending on your preference To set a reminder to snooze Click Snooze In the drop down list select the nu...

Page 19: ...ch as MS Word or PowerPoint To export a note to jpeg format In the Note Manager select the note you want to export Right click the note name or in the File menu select Export to JPEG The Export dialog box appears in Save in select the destination file path In the Save as type list select JPEG Under Resolution select the resolution quality Click Save NOTE You can export multiple notes simultaneousl...

Page 20: ...e or thumbnail and in the shortcut menu select Copy or Cut 3 Open the application into which you would like to paste the note 4 In the open application locate and select the Paste option Note You can also copy a note that you are currently sketching by clicking on the button in the Note Toolbar or by pressing the virtual button programmed as Copy and then pasting it Creating Sticky Notes You can c...

Page 21: ...ect HIDE to hide a sticky note into the application tray icon You can restore any hidden sticky note by right clicking the application tray icon and selecting My Sticky Notes Then select the note you would like to restore A Sticky Note can automatically pop up after the application has been closed and re opened or after system reset In the Note Manager use the Configuration menu ...

Page 22: ...common way is if you need to read your note and rewrite it in a text editor A paper holder note will always be on top and its transparency can be adjusted You can create paper holder note by doing one of the following Select a note in the Note Manager right click it and select Show as Paper Holder Select a note in the Note Manager click the Show as Paper Holder toolbar button ...

Page 23: ...g Group Page 23 of 31 NOTES You can hide and show paper holder notes the same way you hide and show sticky note To view additional options right click on the sticky note You can set the transparency to a Paper Holder In the Note Manager use the Configuration menu The Note Editor ...

Page 24: ...ss to a wide selection of editing functions Note Editor Menus The following table lists all menu commands available in the Note Editor together with a description Standard Toolbar PRINT Prints the selected note CUT Cuts the selected note and saves it to the clipboard COPY Copies the selected note and saves it to the clipboard PASTE Pastes whatever was last saved to the clipboard ABOUT NOTETAKER Pr...

Page 25: ...llows you to insert a rectangle of any size TEXT Allows you to insert type written text COLOR Allows you to pre select or change the color of pen strokes or to highlight strokes or text LINE WIDTH 1 Allows you to pre select or change the thickness of any stroke to width 1 LINE WIDTH 2 Allows you to pre select or change the thickness of any stroke to width 2 LINE WIDTH 4 Allows you to pre select or...

Page 26: ... the Note Manager select the note and click the Edit Note button Or right click the note and in the shortcut menu click Edit Note Or Double click a note in the note view mode The Note Editor window opens displaying the selected note 2 Use the Select Area button in the Tools Toolbar or the Select option from the Tools Menu to select a particular stroke or group of strokes or in the Edit menu click ...

Page 27: ...e shortcut menu that appears select Send TO E Mail A new email form opens with the note attached as a JPEG file Type the desired recipient s email address and any desired text in the subject and body of the email Send the email Sending notes over the local network To send a note immediately after you have completed it 1 In the Note Window click the Send Note to Network PC button 2 In the Send Note...

Page 28: ...Click Send NOTE You can select multiple recipients when sending a note via local network By selecting a name in the list then pressing CTRL On the keyboard and selecting another name or names Receiving notes over the local network Users on a local area network LAN such as may exist in an office environment can receive notes over the LAN When you receive a note it automatically appears on your PC s...

Page 29: ... Exit the application Client Diagnose Application CDA General Overview The CDA is a diagnostic tool designed to help our Technical support team solving client s cases After you have installed the NOTETAKER application you will find the CDA exe file in the installation directory Default is C Program Files NoteTaker Running the CDA exe will collect the following information from your PC Operating sy...

Page 30: ...TAKER installation directory NoteTaker dat NoteTaker log NoteTakerReg txt The files can be automatically or manually sent to our Technical support team Using the CDA Make sure your base unit is connected to your PC Run the CDA application The following dialog appears explaining which data will be collected from your system Press Next to continue or Cancel to quit Enter the following details in the...

Page 31: ...Limited Product Engineering Group Page 31 of 31 Draw some circles using your Pen Press Next to attaché the log files to an e mail to our technical support team Document Code J00000374 OIA Prepared By A Packia Malar Date 16 11 2007 Approved By D Rajkumar ...

Reviews: