background image

Installation

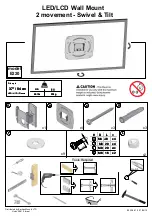
Before installing, carefully read the “Important Safeguards” 

section on page 6.


Do not plug the set in until the rest of the installation is finished.


Use only the included UL listed Hospital Grade Power Cord.

If hanging the set on a wall, make sure the wall mount used is rated to carry the weight of the set.  

All HCI TV’s utilize standard VESA mounting patterns.  Follow the directions that came with your 

mount.  The available VESA patterns can be found in the specifications section of this manual.  


P

ro

duc

t I

n

tr

o

duc

tion

TV Keypad Control

s

Closed 

Caption

Input 

Source

EDU Content

Channel Number

Navigation

Enter/Select

Clean TV

Mute

Channel up/down

Volume up/down

Power on/off

Menu

Back

Home

Summary of Contents for BM15AP

Page 1: ...Operation and Installation Manual BM15AP BedMate 15 Android Powered Low VoltageTelevision...

Page 2: ...with Model BM15AP 8 Optional Accessories 9 Product Introduction 11 IR Remote Control 12 Headphone Audio Out 13 Microphone Audio In 13 Hardware Reset 13 HDMI 13 Input Output Panels 13 VGA 13 A V Input...

Page 3: ...ounding prong The wide blade or third prong is provid ed for your safety If the provided plug does not fit into you outlet consult an electrician for replacement of the obsolete outlet Safety Instruct...

Page 4: ...CD TV Power Cord IR Remotes are shipped per order Manuals are shipped per order This manual covers the following models BM15AP low voltage television NOTE Instructions in this manual apply to all of t...

Page 5: ...ed 15 television BM15AP Media Mount Remote Quick start guide BM15AP Low Voltage television Outreach articulating arm Model OUTREACH V2 Wall Mounted Power Supply Model WM PS LB120 Individual Power Supp...

Page 6: ...Package Contents Product Introduction Please take time to look over the following pages to familiarize yourself with the product before installation and operation...

Page 7: ...LUE APP 19 ANDROID HOME SCREEN 20 ANDROID MENU 21 ANDROID BACK 22 OK 23 NAVIGATION 24 FUNCTION CODE 25 SETUP MENU 26 STATUS 27 BANK CONTROL 29 SYSTEM MENU 30 PAUSE 31 PLAY 32 REWIND 33 FAST FORWARD 34...

Page 8: ...ake sure the wall mount used is rated to carry the weight of the set All HCI TV s utilize standard VESA mounting patterns Follow the directions that came with your mount The available VESA patterns ca...

Page 9: ......

Page 10: ...nstall the TV Failure to Remove the side panels from the nose of the arm There are two screws holding each side panel in place Connect the coax cable from the TV to the coax cable from the arm using t...

Page 11: ...ont keypad to move back or return to a pre vious page or menu You can also use the BACK button on a Healthcare Information IR remote To bring up a virtual keyboard on the screen press an input area an...

Page 12: ...Folders Internet Browser Rent Me App Logo Image TV Icon Display next Live TV display Application Icons BM15AP Home Screen Components...

Page 13: ...ull screen You can also select the TV icon on the home screen if it is enabled To change channels Press the CH or CH on the TV keypad or remote You can also choose to enter a channel number using the...

Page 14: ...by pressing 7 9 6 2 the settings page will appear after entering the code TV Setting Press TV setting to open the menu options Options are Led mode Lock Poweron off time IR band and Serial control LE...

Page 15: ...power on and or power on at specific times Select Enable to turn the feature on Press the Start time option and you will see the screen below Use the or keys to set the start time Press Set when you f...

Page 16: ...Air Will search for broadcast over the air stations An antenea may be needed for reception Cable Will search the RF input for available analog and or digital stations NOTE All over the air broadcasts...

Page 17: ...elect multiple apps if you wish Once you are finished select Close Note Your changes on this screen will not be saved unless you select Save exit Otherwise your changes will be deleted Change logo To...

Page 18: ...y the live TV feed in the TV window on the home screen Show Image will allow you to select a file from the USB drive to display in the window instead of a TV feed Note changes will not be saved until...

Page 19: ...ing used by that TV AFTER ADDING ANY APPS OR FOLDERS THE RESOURCE MUST BE ENABLED IN THE BANK EDIT PAGE BY DEFAULT NEWLY ADDED APPS OR FOLDERS ARE DISABLED IN EACH BANK UNTIL THEY ARE SELECTED AS ENAB...

Page 20: ...h to use from the list Press the back button to return to the previous menu Keyboard The Keyboard settings apply to the onscreen keyboard that is included with the Android system The default keyboard...

Page 21: ...o use is displayed select it by touching the screen If teh network is secured with an encryption key you will be prompted to enter it then press Connect If no encryp tion key is needed then select Con...

Page 22: ...valid and unique for your Wi Fi network The Gateway for the network The Netmask for the network When you re connected to a network you can touch its name in the Wi Fi settings screen for details about...

Page 23: ...ists of applications and their components in each At the bottom of each tab is a graph of the memory used by the items in the list and amount of free memory Touch an application process or service in...

Page 24: ...nlaod has completed the update will start You will see the TV shut down and restart as the operating system updates Do not turn the power off during this process Information Information includes infor...

Page 25: ...t Factory reset from the main settings menu A dialog will appear to confirm you wish to con tinue Remember all data will be lost and the device will be returned to its factory state To continue select...

Page 26: ...up has been programmed to the TV Ensure all coaxial fittings and connectors are installed correctly and not damaged cracked or uncrimped Check coax cable for bends breaks or tears in the outer casing...

Page 27: ......

Reviews: