background image

Form No. FSHC1217Wm-0515

13

MAINTENANCE

English

Cleaning/Draining the Water Pan

The  water  pan  must  be  drained  for  daily  cleaning,  before

moving  the  cabinet,  and  during  the  “Removing  Lime  and

mineral Deposits” procedure.

ELECTRIC  SHOCK  HAzARD:  Turn  OFF  power  switch,

unplug  power  cord,  and  allow  unit  to  cool  before

performing any cleaning, adjustments, or maintenance.

1. move the pOWER ON/OFF (I/O) switch to the OFF (O)

position and unplug the power cord. allow the unit to cool.

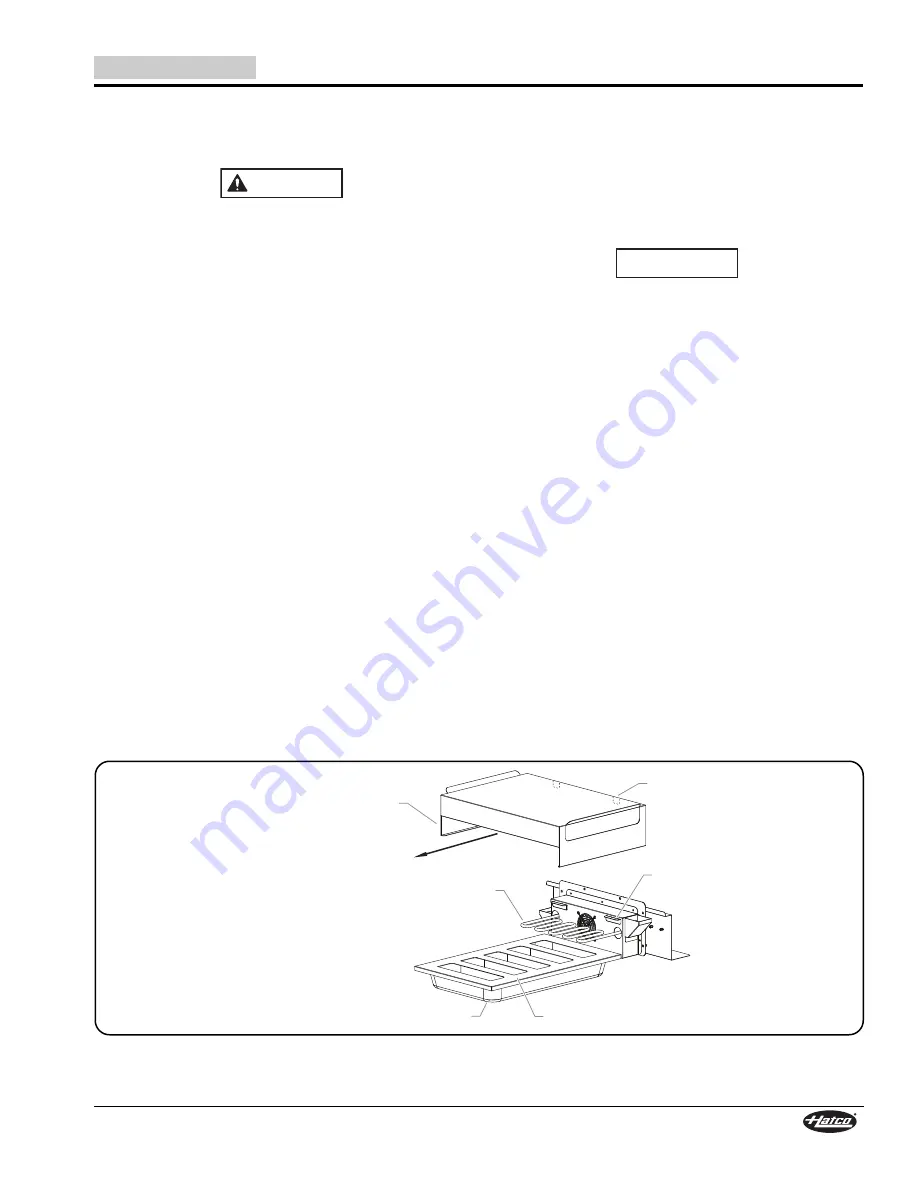
2. Lift  the  heat  tunnel  (located  on  bottom  of  the  cabinet)

straight up until the two tabs clear the slots. pull towards

the front of the cabinet to remove.

3. Remove baffle plate and life water pan out of the well on

the bottom of the unit.

4. Discard the water and clean the water pan and baffle plate.
5. Re-install  the  water  pan  with  the  baffle  plate  and  heat

tunnel into the unit.

NOTE: If the water used has an excessive amount of lime or

mineral content, follow the “

Removing Lime and mineral

Deposits”

procedure for periodic cleaning and deliming

of  the  water  pan.  Unit  failure  caused  by  liming  or

sediment buildup is not covered under warranty.

WARNING

Heat Element

Water Pan

Baffle Plate

Heat Tunnel

Heat Tunnel lifts up and out

toward the front of the cabinet.

Heat Tunnel

Tabs

Heat Tunnel

Slots

Cleaning/Draining the Water pan

Removing Lime and Mineral Deposits

Use the following procedure for periodic cleaning and deliming

of the water pan.

NOTE: The lime and mineral content of the water used for daily

operation  will  determine  how  often  the  deliming

procedure must be performed.

NOTE: Perform this procedure when the unit will not be used

for a period of time, such as the end of the day.

Use of distilled water in water reservoir of humidified units

is recommended. If non-distilled water is used, reservoir

will  require  periodic  cleaning  and  deliming  (refer  to

MAINTENANCE section for cleaning procedure). Damage

to unit caused by liming or sediment buildup is not covered

under warranty.

1. move the pOWER ON/OFF (I/O) switch to the OFF (O)

position and unplug the power cord. allow the unit to cool.

2. after the unit has cooled down, perform the “Draining the

Water pan” procedure in this section.

3. Remove the water pan and baffle plate and fill the water

pan with a mixture of 75% water and 25% white vinegar. Do

not use flavored vinegar.

4. allow the water pan and baffle plate to stand with the de-

liming mixture. (The time required will vary depending on

the amount of deposits in the pan.)

5. after the de-liming period, drain the solution from the water

pan, and wash the water pan and  baffle plate thoroughly.

6. Re-install the water pan with the baffle plate into the bottom

of unit.

NOTE: When installing the water pan, ensure the  humidity

element is laying flat in the water pan between the water

baffles and is not tilted upward.

7. plug the unit into its power source and fill the water pan as

usual for daily operation. Refer to the procedure in the

OpERaTION section of this manual.

NOTICE

Summary of Contents for FLAV-R-SAVOR FSHC-12W1

Page 1: ...sh p 2 No opere este equipo al menos que haya le do y comprendido el contenido de este manual Cualquier falla en el seguimiento de las instrucciones contenidas en este manual puede resultar en un seri...

Page 2: ...y unit is inspected and tested thoroughly prior to shipment Important Owner Information 2 Introduction 2 Important Safety Information 3 Model Description 4 Model Designation 5 Specifications 5 plug Co...

Page 3: ...voltage size and plug configuration If plug and receptacle do not match contact a qualified electrician to determine and install proper voltage and size electrical receptacle Turn OFF power switch un...

Page 4: ...of the FSHC 12W1 but is equipped with two 2 full doors one on each side of the unit for pass through operation FSHC 12W Series FSHC 12W1 FSHC 12W2 Model FSHC 17W1 The FSHC 17W1 is a single door uprigh...

Page 5: ...W2D 120 1650 13 8 60 NEma 5 15p 340 lbs 154 kg 208 240 1608 2133 7 7 8 9 60 NEma 6 15 340 lbs 154 kg 220 240 1800 2142 8 2 8 9 50 CEE Schuko BS 1363 or No plug 340 lbs 154 kg Form No FSHC1217Wm 0515 5...

Page 6: ...HC 17W2 26 659 mm 35 1 8 892 mm 73 5 8 1869 mm 60 1 2 1534 mm FSHC 17W2D 26 659 mm 35 1 8 892 mm 73 5 8 1869 mm 30 761 mm Cabinet Opening FSHC 12W Series 22 W x 43 1 2 H 559 x 1105 mm FSHC 17W Series...

Page 7: ...7Wm 0515 7 SPECIFICATIONS English 10 254 mm Transport Package Dimensions 38 3 4 984 mm 31 1 2 800 mm 36 1 2 927mm Cord Wind Bracket Depth 1 1 8 28 mm Transport package Dimensions Dimensions Transport...

Page 8: ...nit or its contents from falling accidentally and strong enough to support the weight of the unit and contents Do not locate unit in area with excessive air movement around unit Avoid areas that may b...

Page 9: ...he tray slide hooks into the slots and let the tray slide rotate down into position 7 place the unit in the desired location Locate the unit in an area where the ambient air temperature is constant an...

Page 10: ...l the capacity of the water pan is approximately two 2 gallons 7 6 liters 3 move the pOWER ON OFF I O switch to the ON I position The heating system will start up WARNING NOTICE CAUTION BURN HAzARD So...

Page 11: ...make up and consistency The CaBINET TEmpERaTURE display shows the lowest temperature point inside the cabinet not the product temperature Setting the Humidity Level Use the following procedure to set...

Page 12: ...epartment at 800 558 0607 or 414 671 6350 fax 800 690 2966 or International fax 414 671 3976 NOTE The internal blower motor is permanently lubricated and requires no maintenance WARNING Daily Cleaning...

Page 13: ...aning and deliming of the water pan NOTE The lime and mineral content of the water used for daily operation will determine how often the deliming procedure must be performed NOTE Perform this procedur...

Page 14: ...zed Serviceagent or Hatco for assistance Blower motor not working Contactauthorized Serviceagent or Hatco for assistance Opening door s unnecessarily Keep door s closed as much as possible TEmpERaTURE...

Page 15: ...es to increase the tray capacity of the unit when the height of the trays product allow Upper Cord Location Units can be supplied with the power cord located on the upper back of the unit must be fact...

Page 16: ...nd 2 51 mm wide casters This package is not for retrofit Door Transport Latch Push Pull Stand Off Handle Full Perimeter Bumper Push Pull Stand Off Handle Digital Temperature Controller Front Drip Trou...

Page 17: ...ER INTELLECTUaL pROpERTY RIGHT INFRINGEmENT Without limiting the generality of the foregoing SUCH WaRRaNTIES DO NOT COVER Coated incandescent light bulbs fluorescent lights heat lamp bulbs coated halo...

Page 18: ...s lectionn s pour une durabilit maximale un aspect esth tique et une performance optimale Chaque appareil est soigneusement inspect et test avant exp dition Informations Importantes pour le Propri tai...

Page 19: ...R DE D CHARGE LECTRIQUE Brancher l appareil sur une prise de courant avec terre de tension de format et de configuration des broches corrects Si la fiche et la prise ne se correspondent pas s adresser...

Page 20: ...int grales une de chaque c t de l appareil pour un fonctionnement en sas S rie FSHC 12W Mod le FSHC 17W1 Le FSHC 17W1 est un mod le vertical porte unique Les glissi res universelles comprises peuvent...

Page 21: ...o plug 154 kg 340 lbs FSHC 17W2D 120 1750 14 6 60 NEma 5 15p 154 kg 340 lbs 208 240 1573 2095 7 6 8 7 60 NEma 6 15 154 kg 340 lbs 220 240 1760 2095 8 0 8 7 50 CEE Schuko BS 1363 or No plug 154 kg 340...

Page 22: ...92 mm 35 1 8 1869 mm 73 5 8 1534 mm 60 1 2 FSHC 17W2D 659 mm 26 892 mm 35 1 8 1869 mm 73 5 8 761 mm 30 Ouverture de l armoire FSHC 12W Series 559 x 1105 mm 22 W x 43 1 2 H FSHC 17W Series 559 x 1518 m...

Page 23: ...0515 23 CARACT RISTIQUES TECHNIQUES Fran ais 254 mm 10 984 mm 38 3 4 800 mm 31 1 2 927mm 36 1 2 Profondeur du support d enroulement du cordon 28 mm 1 1 8 Dimensions du kit de transport Dimensions Opti...

Page 24: ...accidentelle du grille pain ou de son contenu et suffisamment solide pour r sister au poids de l appareil et de son contenu 1 Retirer l appareil de sa bo te 2 Enlever tous les l ments non fix s qui o...

Page 25: ...l endroit souhait placez l appareil un endroit o la temp rature ambiante est constante et de 70 F 21 C minimum vitez les endroits susceptibles d activer les mouvements ou les courants d air proximit d...

Page 26: ...TTENTION DANGER DE BR LURE Certaines surfaces ext rieures de l appareil deviennent chaudes Toucher ces zones de l appareil avec pr caution 4 R glez la temp rature de l air selon la temp rature souhait...

Page 27: ...peuvent varier selon la consistance et la composition des aliments L cran d affichage de la temp rature de l armoire affiche le point ayant la temp rature la plus basse dans l armoire et non la temp...

Page 28: ...u 1 414 671 6350 t l copieur 1 800 690 2966 t l copieur internationale 1 414 671 3976 NOTA Le moteur de soufflante interne se lubrifie en permanence et ne n cessite pas d entretien AVERTISSEMENT Netto...

Page 29: ...n de journ e par exemple Il est recommand d utiliser de l eau distill e dans le r servoir d eau des appareils humidifi s Si de l eau non distill e est utilis e il est n cessaire de nettoyer et de d ta...

Page 30: ...es autant que possible La commande de la TEmp RaTURE est r gl e un niveau trop faible R glez la commande de TEmp RaTURE une temp rature plus lev e l ment s chauffant s d fectueux Contactez votre agent...

Page 31: ...oires suppl mentaires Utilisez des glissi res suppl mentaires pour augmenter la capacit de l appareil lorsque la hauteur des plateaux produits le permet Emplacement du cordon sup rieur Les appareils p...

Page 32: ...as disponible pour am liorer un mod le ant rieur Loquet de transport pour la porte Poign e poussoir sortante Pare chocs de pourtour int gral Poign e poussoir sortante R gulateur de temp rature num riq...

Page 33: ...DROITS DE La pROpRI T INTELLECTUELLE Sans restreindre la port e g n rale des nonc s pr c dents CES GaRaNTIES NE COUVRENT paS ampoules d clairage incandescence enduites lumi res fluorescentes ampoules...

Page 34: ...34 Formulaire n FSHC1217Wm 0515 Fran ais NOTAS...

Page 35: ...Form No FSHC1217Wm 0515 35 English NOTES...

Page 36: ...pliance Installation Buffalo 716 884 7425 Duffy s Equipment Services Inc Buffalo 800 836 1014 3Wire Northern plattsburgh 800 634 5005 Duffy s Equipment Services Inc Sauquoit 800 836 1014 J B Brady Inc...

Reviews: