GB
47
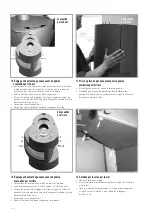
12. Adjusting the front panel for stove with rear outlet
• The fasteners at the bottom become accessible by turning
the stove.
• Fix the front panel using 4 countersunk M6 screws (no. 1)
(socket-head wrench 3 mm).
• Use the four adjusting screws (no. 2) to adjust the height of
the front panel so as to be equal to the surrounding decorative
part (socket-head wrench 3 mm).
• Firmly tighten the countersunk screws (no. 1).
• Then place the top plate on the stove.
13. Air supplied through floor or wall
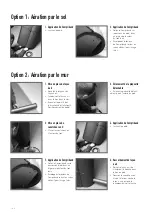
• Open the small door in the base.
• Place the cover plate in the base against the hole of the air
supply box.
• Fix the cover plate using the four socket-head screws
(socket-head wrench 4 mm). Cut the air pipe to length.
10. Adjusting the front panel for stove with top outlet
• The fasteners at the top become accessible by turning the top
plate carefully to the left and then to the right. The fasteners at the
bottom become accessible by turning the stove.
• Fix the front panel using 4 M6 screws (no. 1) (sw 3 mm).
• Use the four adjusting screws (no. 2) to adjust the height of
the front panel so as to be equal to the surrounding decorative
part (socket-head wrench 3 mm).
• Firmly tighten the countersunk screws (no. 1).
• Then place the top plate properly in the centre.
11. Placing the front panel for stove with rear outlet
• Position the front panel against the top head.
• Be careful not to cause any damage: first place the upper part,
then the lower part against it.
Back outlet
Top outlet
Back outlet

