background image

34   

I

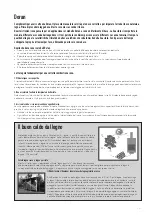
Manutenzione

Superficie esterna stufa

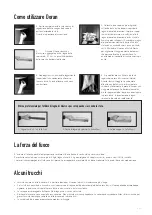
Refrattari

Vetro

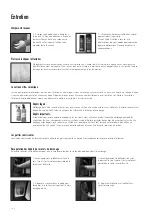
1.  Spolverate Doran utilizzando tessuti non 

fibrosi. Se necessario potete lavare la super

-

ficie con uno straccio bagnato e un prodotto 

generico per pulizia non abrasivo. Risciac-
quate attentamente e accendete la stufa in 

modo che l’umidità presente nelle fessure 

possa evaporare.

Lieve umidità:  

Rimuovetela con carta assorbente ed uno straccio umido. Esercitate una leggera pressione sulla parte esterna 
per evitare che il vetro si muova.

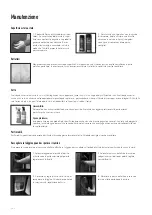
1. Sollevare leggermente lo scudo termico 
e tirarlo verso la parte anteriore per poterlo 

togliere senza difficoltà.

3.  Collocare un foglio di carta nella stufa per 
recuperare la fuliggine. Chiudere lo sportello e 
la saracinesca di regolazione dell’aria.

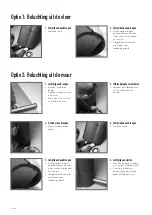
Parti mobili cigolanti possono essere lubrificate utilizzando grasso termo-resistente. Chiedete consiglio al vostro rivenditore.

Rimuovere lo scudo termico e la placca deflettrice affinché la fuliggine possa cadere sul fondo della stufa durante la pulitura della canna fumaria.

Non preoccupatevi per eventuali crepe superficiali. L’importante è che il fuoco non sia a diretto contatto con la parte 
metallica posteriore. In questo caso, sarà necessario cambiare il refrattario; contattate il vostro rivenditore.

2.  Per macchie che il polisher non è in grado 
di rimuovere, potete utilizzare uno straccio 
abrasivo e la vernice in Spray (rivolgetevi 

comunque al vostro rivenditore per un 
consiglio).

Sporco più tenace: 

può essere rimosso con prodotti più specifici (oppure anche con uno straccio bagnato e cenere). Se usate un detergente 
specifico, lasciatelo agire per qualche secondo. Assicuratevi sempre che questi agenti non entrino a diretto contatto con 

lo smalto esterno.

2. Sollevare la placca deflettrice di acciaio e 

spingerla verso il dietro per poterla togliere 

senza difficoltà.

4.  Rimettere la placca deflettrice e lo scudo 

termico al loro posto dopo la pulitura.

Il vetro può annerirsi nel caso in cui si utilizzi legna non secca oppure nel caso in cui ci sia un apporto insufficiente di aria. Il vetro può annerirsi 
anche a causa di un’accensione troppo moderata (questo può capitare se, per accendere il fuoco, utilizzate piccoli ceppi invece di legnetti). L’umidità 
sarà trattenuta più a lungo all’interno della stufa e si depositerà sulla parte più fredda: il vetro.

Parti mobili

Raccogliere la fuliggine quando si pulisce il camino

Summary of Contents for DORAN

Page 1: ...DORAN Handleiding Installatie instructie Manual Installation instruction Manuel Instruction d installation Anleitung Montageanleitung Manuale Istruzione di montaggio www leenders nl NL GB F D I...

Page 2: ...llation Instructions 43 Instructions et recommandations g n rales 7 Mesures d carts standard 10 L arrivee d air frais 12 Manuel 23 Instructions d installation 50 Allgemeine Anweisungen und Vorschrifte...

Page 3: ...ustion Verbrennungskammer di combustione 5 Deurknop branderkamer Combustion chamber Poign e de la porte de T rgriff der Maniglia dello sportello della door knob la chambre de combustion Verbrennungska...

Page 4: ...lgemene instructies en voorschriften General instructions and regulations Instructions et recommandations g n rales Allgemeine Anweisungen und Vorschriften Istruzioni e prescrizioni di carattere gener...

Page 5: ...n na een brand eerst wordt geveegd en ge nspecteerd op beschadiging en lekkage Service Het is niet toegestaan modificaties te verrichten aan het toestel zonder autorisatie van de fabrikant Maak slecht...

Page 6: ...o extinguish the fire Ensure that after a fire the chimney is first swept and inspected for any damage and leaks Service It is not allowed to make any modifications to the appliance without prior auth...

Page 7: ...l eau pour teindre le feu Apr s un feu de chemin e faites proc der au ramonage et l inspection de la chemin e d g ts fuites Service Il est interdit d apporter des modifications l appareil sans l auto...

Page 8: ...rs benutzen Daf r sorgen dass der Schornstein nach einem Brand zuerst gefegt und auf Besch digung und Leckage inspiziert wird Service Es ist nicht erlaubt ohne Zustimmung des Herstellers nderungen an...

Page 9: ...re per alcun motivo dell acqua per spegnere il fuoco Dopo un incendio fare spazzare e ispezionare la canna fumaria per escludere la presenza di danni e perdite Assistenza vietato apportare modifiche a...

Page 10: ...10 Maatschetsen Connection sizes Mesures d carts standard Anschlu ma e Holz Misure per l allacciamento...

Page 11: ...NL General The Doran has to be placed according to the indicated connection sizes In case a deviation of connection sizes are wanted please contact your supplier Connection sizes GB G n ralit s Le po...

Page 12: ...12 Positie verse luchtaanvoer Position fresh air supply Position de l apport d air frais Position der Firschluftzufuhr Posizione dell alimentazione di aria fresca...

Page 13: ...Position the hole to be made at the centre of the flue Drill a hole into the floor of at least 80 mm but not exceeding 125 mm Wall Position the hole on the projected centre line of the stove outlet pi...

Page 14: ...14 NL Handleiding Manual Manuel Anleitung Manuale...

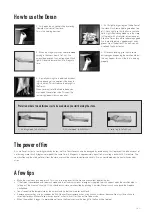
Page 15: ...verse lucht Of u gebruikt de verse luchtvoorziening van uw haard mits deze is aangesloten Bij het aanmaken is het hoofdzaak dat het rookkanaal en de haard op temperatuur komen Telkens als u tijdens h...

Page 16: ...at vocht vrijkomen uit de vuurstenen Leg voordat u de haard in gaat stoken een oude handdoek onder de haard Zorg voor voldoende ventilatie Instoken in stappen 1 Zet de beluchtingsschuif helemaal open...

Page 17: ...ur U houdt zo ook het rookkanaal schoner De kracht van vuur Eigenlijk is er maar weinig bestand tegen een echt heet vuur Ook uw haard kan door oververhitting beschadigen Om dat te voorkomen mag in uw...

Page 18: ...en neem contact op met uw leverancier 2 Beschadigingen kunnen worden bijgewerkt met een schuurdoekje en speciale kachellak Vraag advies aan uw leverancier Dikkere aanslag Deze kunt u met speciale kach...

Page 19: ...ded no fresh air supply system is used The main thing when making the fire is that both the flue and the stove reach the proper temperature Each time you want to open the stove when burning the air co...

Page 20: ...e has reached it s temperature you can close the aerations slide a little Now it is easy to regulate the fire by means of closing or opening the aeration slide a bit Make sure there is sufficient vent...

Page 21: ...gs withstand a real hot fire Your stove can also be damaged by overheating Just to prevent this take account of not burning more than 3 kilograms of wood at the same time 3 Kilograms is approximately...

Page 22: ...ntact your supplier Damaged spots can be touched up using an abrasive cloth and the special stove paint Ask you supplier for advice Thicker deposits These can be treated with special fireplace glass c...

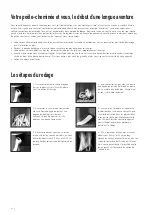
Page 23: ...modernes sont tr s bien isol es une grille d air peut suffir ventiler la pi ce et lui apporter un air frais qui est surtout conseill lorsque vous n avez pas choisi de permettre une arriv e d air frai...

Page 24: ...t seront bien chaud au bout d une bonne demie heure Plus vous ouvrez plus votre feu grandira et plus vous risquez la surchauffe de votre appareil Veillez une bonne ventilation Les tapes du rodage 1 Ou...

Page 25: ...La force du feu En fin de compte il n y a que tr s peu de choses qui r sistent au feu Votre po le chemin e peut galement s endommager cause d un exc s de chaleur A fin d viter l exc s de chaleur vous...

Page 26: ...sp cial pour entretenir la peinture Utilisez un petit chiffon r curer et la peinture sp ciale pour po les pour r parer de l g res d t riorations Demandez conseil votre revendeur D p ts importants Si...

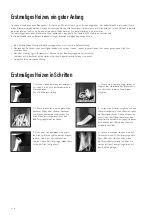
Page 27: ...ns oder eines kleinen Klappfensters sorgt f r ausreichend frische Luft sofern keine unabh ngige Au enluftzufuhr verwendet wird Beim Anheizen ist Hauptsache da der Rauchkanal und der Ofen die erforderl...

Page 28: ...f oder zu machen Sorgen Sie f r ausreichende L ftung Erstmaliges Heizen in Schritten 1 Machen Sie den Bel ftungsschieber ganz auf indem Sie ihn nach der Vorderseite des Ofens bewegen Das ist die Anbre...

Page 29: ...n richtiges hei es Feuer Ihr Ofen k nnte auch durch exzessives Heizen besch digen Das vor zu beugen darf in ihrem Ofen nicht mehr als 3 Kilogramm trockenes Holz gleichzeitig verbrennt werden 3 Kilogra...

Page 30: ...los solang die Flamme das r ckw rtige Metall nicht direkt ber hrt Sollte das aber der Fall sein ist es notwendig den Stein auszuwechseln Nehmen Sie dazu Kontakt auf mit Ihren Lieferanten 2 Leicht besc...

Page 31: ...sono spesso molto bene isolate Predisporre una griglia che dia sull esterno garantir un apporto sufficiente di aria fresca sem pre che la stufa non sia gi stata diretta mente collegata ad una presa d...

Page 32: ...ma chiudendo ed aprendo la presa d aria Assicuratevi che la stufa sia ben ventilata Prima accensione passo per passo 1 Aprire completamente la saracinesca di regolazione dell aria spingendola verso la...

Page 33: ...fa Doran per migliorare il tiraggio e creare delle braci che possano favorire la combustione In questo modo il condotto di scarico rimarr pi pulito La forza del fuoco E un dato di fatto che pochi elem...

Page 34: ...ortante che il fuoco non sia a diretto contatto con la parte metallica posteriore In questo caso sar necessario cambiare il refrattario contattate il vostro rivenditore 2 Per macchie che il polisher n...

Page 35: ...35 Installatie instructies General instructions and directions Instructions d installation Algemeine Instruktionen und Vorschriften Istruzioni e prescrizioni di carattere generale...

Page 36: ...chikt voor een gedeeld afvoersysteem Het toestel moet worden geplaatst op een vloer met voldoende draagkracht Zorg voor voldoende toegang voor het reinigen van het toestel de rookgasaansluiting en de...

Page 37: ...Kruiskopschroevendraaier Steeksleutelset Inbussleutelset Steenborenset Mes Schietlood Glijnokken Waterpas Steekwagen Afvoermateriaal klemband Bovenplaat met of zonder gat voor boven of achterafvoer H...

Page 38: ...n 3 Verplaatsen Bij gebruik van beluchting uit vloer of muur eerst voorzieningen treffen Zie instructies verderop Plaats glijnokken onder de voetjes van de haard 4x Schuif de haard voorzichtig op de j...

Page 39: ...r Plaats het frontpaneel tegen de bovenkop Let op voor beschadiging eerst de bovenkant dan de onderkant ertegen plaatsen 6 Transportblokkering onder verwijderen Open het deurtje in de voet Verwijder d...

Page 40: ...bouten inbussleutel 4 mm Maak de luchtpijp op lengte 10 Frontpaneel stellen bovenafvoer De bevestigingspunten aan de bovenzijde zijn bereikbaar door de bovenplaat voorzichtig naar links en later naar...

Page 41: ...vloer of uit de muur Vloer Positioneer het te maken gat op het hart van het rookkanaal Boor een gat in de vloer van minimaal 80 mm en maximaal 125 mm Muur Positioneer het gat op de geprojecteerde hart...

Page 42: ...voet in een ruime cirkel rondom het luchtgat Overgebleven rol Comprib and intapen voor toekomstig gebruik 2 Compriband aanbrengen Plak compriband tegen de onderzijde van de voet in een ruime cirkel ro...

Page 43: ...ed flue system The appliance must be mounted to a wall having sufficient bearing capacity Ensure adequate access for cleaning the appliance the flue gas connection and the chimney When installing the...

Page 44: ...s included Crosshead screwdriver Box spannerset Hexagonal wrench set Set of masonry bits Knife Plumb line Sliding pieces Spirit level Handtruck Single walled pipe and accessories Top plate with or wit...

Page 45: ...When air is supplied through the floor or wall first take the appropriate measures See instructions below Place the sliding pieces under the feet of the stove 4x Carefully push the stove in its corre...

Page 46: ...tion the front panel against the top head Be careful not to cause any damage first place the upper part then the lower part against it 6 Releasing transport lock below Open the small door in the base...

Page 47: ...ket head screws socket head wrench 4 mm Cut the air pipe to length 10 Adjusting the front panel for stove with top outlet The fasteners at the top become accessible by turning the top plate carefully...

Page 48: ...gh the floor or the wall Floor Position the hole to be made at the centre of the flue Drill a hole into the floor of at least 80 mm but not exceeding 125 mm Wall Position the hole on the projected cen...

Page 49: ...ompriband on the underside of the base in a wide circle around the air hole Tape up remaining roll of Compriband for future use 2 Applying Compriband Affix Compriband on the underside of the base in a...

Page 50: ...me d vacuation partag L appareil doit tre fix un mur ayant une portance suffisante Veillez un acc s suffisant pour le nettoyage de l appareil du conduit de fum e et de la chemin e Lors du placement te...

Page 51: ...tion de l appareil Mat riaux inclus Tournevis crusiforme Cl plat Cl allen Ensemble de m ches pierre Fil plomb Couteau Patins Niveau eau Diable roues Conduit et accessoires Plaque sup rieure trou ou sa...

Page 52: ...du po le En cas d a ration par le sol ou par le mur faites d abord les pr parations n cessaires Voir les instructions plus bas Mettez les patins sous les petits pieds du po le 4x Poussez avec pr caut...

Page 53: ...re Proc dez avec pr caution pour viter toute d t rioration positionez d abord la partie sup rieure puis la partie inf rieure du panneau contre la t te 6 Rel chement du blocage en bas pr vu pour le tra...

Page 54: ...uyau air 10 R glage en hauteur du panneau avant du po le vacuation par le haut Les fixations en haut sont accessibles en tournant avec pr caution la plaque sup rieure vers la gauche et apr s vers la d...

Page 55: ...ositionez le trou percer au centre du conduit de fum e Percez un trou d au moins 80 mm et de 125 mm au maximum dans le sol Mur Positionez le trou sur la ligne centrale projet e du conduit d vacuation...

Page 56: ...un large cercle autour du trou d air Enveloppez le rouleau de Compriband restant en ruban adh sif pour l usage futur 2 Application du Compriband Collez le Compriband sur le dessous du pied dans un la...

Page 57: ...Luftabzugssystem geeignet Das Ger t ist an eine Mauer mit ausreichender Tragf higkeit zu h ngen F r ausreichenden Zugang zum Reinigen des Ger ts des Rauchgasanschlusses und des Schornsteins sorgen Bei...

Page 58: ...ssels Imbusschl ssels Satz Steinbohrer Messer Senklot Gleitnocken Wasserwaage Sackkarren Abzugsmaterial Deckplatte mit oder ohne Loch f r Abzug an der Ober bzw Hinterseite Rechtwinkliger Kr mmer nur...

Page 59: ...er der Wand aus in Anspruch genommen sind zuerst bestimmte Ma nahmen zu treffen Siehe Anweisungen weiter unten Gleitst cke unter die F chen des Ofens stellen 4x Den Ofen vorsichtig auf die richtige Po...

Page 60: ...atte gegen den Oberkopf bringen Machen Sie dies vorsichtig um Besch digung zu vermeiden zuerst die Oberseite dann die Unterseite dagegen stellen 6 Transportblockierung unten l sen Das T rchen im Fu ff...

Page 61: ...ge anpassen 10 Frontplatte beim Ofen mit Abzug an der Oberseite stellen Die Befestigungsmittel an der Oberseite sind zug nglich indem Sie die Deckplatte vorsichtig ohne den Lack zu besch digen nach li...

Page 62: ...estattet werden Boden Das zu bohrende Loch auf die Mitte des Rauchkanals positionieren Ein Loch von mindestens 80 mm und h chstens 125 mm in den Boden bohren Wand Das Loch auf die projizierte Mittelli...

Page 63: ...reis rund um das Luftloch Die briggebliebene Rolle Compriband f r k nftigen Gebrauch in Klebeband einwickeln 2 Compriband anbringen Das Compriband auf die Unterseite des Fusses kleben in einem weiten...

Page 64: ...L apparecchio deve essere installata ad un muro con portata sufficiente Garantire un accesso adeguato per la pulizia dell apparecchio del raccordo per lo scarico dei gas di combustione e della canna...

Page 65: ...ra Chiave esagonale Serie di punte per metalli Un filo a piombo Elementi scorrevoli Una livella Un carrello a mano Materiale di scarico Piastra superiore forata o non forata per la stufa con scarico s...

Page 66: ...della stufa In caso di utilizzo di alimentazione di aria dal pavimento o dal muro prendere prima le apposite misure Vedi sotto per le relative istruzioni Inserire i pattini sotto i piedini della stufa...

Page 67: ...la testata superiore Procedere con cautela per evitare danni collocare prima la parte superiore poi la parte inferiore contro la testata 6 Allentamento del blocco inferiore previsto per il trasporto A...

Page 68: ...tubo dell aria 10 Regolazione in altezza del pannello anteriore della stufa con scarico superiore I fissaggi superiori sono accessibili ruotando con cautela la piastra superiore verso sinistra e succ...

Page 69: ...Pavimento Posizionare il foro da praticare al centro della canna fumaria Praticare un foro di 80 mm al minimo e di 125 mm al massimo nel pavimento Muro Posizionare il foro sulla linea centrale proiet...

Page 70: ...n ampio cerchio attorno del foro di apporto d aria Coprire il rotolo di Compriband rimanente con nastro adesivo per uso futuro 2 Applicare il nastro Compriband Applicare il nastro Compri band sul lato...

Page 71: ...www leenders nl Doran H manu INT 05 2008 Harrie Leenders Haardkachels Industrieweg 25 5688 DP Oirschot The Netherlands Tel 31 0 499 572710 Fax 31 0 499 573714 info leenders nl...

Reviews: