Martin
®
Exterior Wash
TM
200 Series User Manual
13
Installing a honeycomb louver
Honeycomb louver accessories that reduce lateral light spill and improve visual comfort are available from
Martin in two versions: one for Exterior Wash 200 and 220 fixtures, and one for Exterior Wash 210 fixtures
(see ‘Accessories’ on page 35).
If you install a louver over a diffuser lens, you do not need to use the trim ring shown at
C
in Figure 4 on
page 12 because the louver will hold the diffuser securely.
Bear in mind that louvers gather dirt, so cleaning is particularly important for fixtures with louvers.
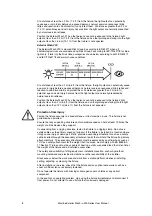
Louvers can be installed on the front of the fixture in two orientations. See illustrations below:
●
If a diffuser lens is installed on the front of the fixture, install the louver with the profile facing outwards
towards the target as shown at
A
.
●
If no diffuser lens is installed on the front of the fixture, install the louver with the profile facing inwards
towards the light source as shown at
B
.
To install a honeycomb louver:
1.
Shut down power to the fixture and allow to cool.
2.
If required, install a diffuser lens as described earlier in this chapter.
3.
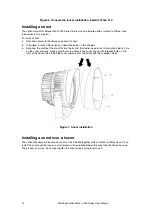
Line up the screw holes in the louver with the threaded holes in the front of the fixture, then fasten the
louver securely onto the fixture with the supplied screws as shown below.
Figure 5. Honeycomb louver installation, Exterior Wash 200 and 220
A
B
A
B
Summary of Contents for Martin Exterior Wash 200 Series
Page 1: ...Exterior Wash 200 Series User manual...
Page 4: ......
Page 36: ......
Page 37: ......
Page 38: ......
Page 39: ......
Page 40: ...www martin com...


