14
Martin
®
Exterior Wash
TM
200 Series User Manual
Figure 6. Honeycomb louver installation, Exterior Wash 210
Installing a snoot
The optional snoot for Exterior Wash 200 Series fixtures may be installed with or without a diffuser lens
(see earlier in this chapter).
To install a snoot:
4.
Shut down power to the fixture and allow it to cool.
5.
If required, install a diffuser lens as described earlier in this chapter.
6.
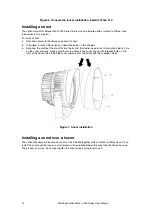
Note how the profile of the snoot fits into the front of the fixture (see arrows in illustration below). Line
up the snoot correctly, making sure that screw holes in the snoot line up with threaded holes in the
front of the fixture, then fasten the snoot securely onto the fixture with the supplied screws.
Figure 7. Snoot installation
Installing a snoot over a louver
The optional honeycomb louver and snoot can be installed together, with or without a diffuser lens. If you
install the snoot over the louver, a small groove will be visible between the snoot and the fixture housing.
The groove is normal – do not over-tighten the snoot screws trying to remove it.
Summary of Contents for Martin Exterior Wash 200 Series
Page 1: ...Exterior Wash 200 Series User manual...
Page 4: ......
Page 36: ......
Page 37: ......
Page 38: ......
Page 39: ......
Page 40: ...www martin com...


