English _
49
!
USING SPEAKER MODE
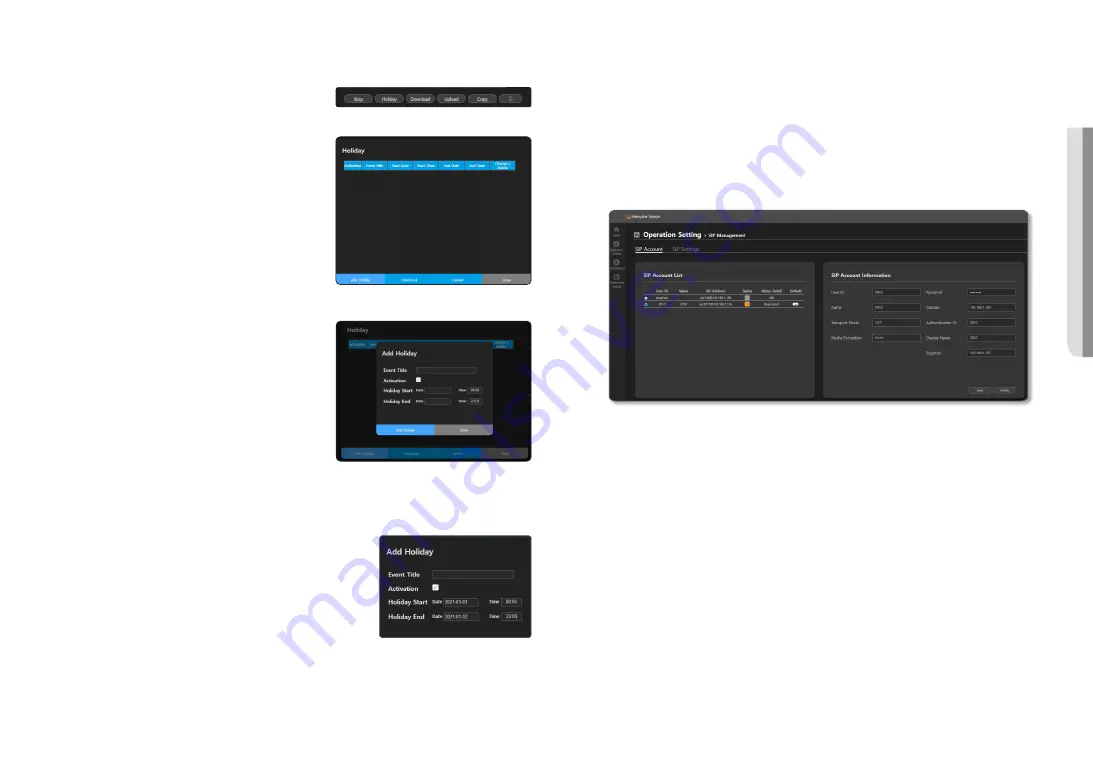
Holiday Setup Event
Click the [
Holiday
] button on the scheduler settings screen
and the
<Holiday>
screen will appear.
~
Add Holiday : You can set holidays in <
Add Holiday
>.
~
Download : You can download the created holiday settings
as an XML file.
~
Upload: You can upload the downloaded holiday settings files.
Add Holiday screen.
1.
Click the [
Add Holiday
] button and the <
Add Holiday
>
screen will appear.
2.
Enter the holiday title to be set.
3.
Set up the date and time to start and end the broadcast.
4.
<
Activation
> must be checked to operate the holiday
settings.
5.
If you select a month, week, and day under <
Specific
Holiday
>, that day is set as a holiday every year.
6.
Click the [
Add Holiday
] button when the setting is
complete.
7.
Set holiday settings are displayed on the scheduler.
8.
You can change or delete set holidays.
M
`
If you set the date and time to start as 2021-01-01, 08:00 and
the date and time to end as 2021-01-02, 23:00, the scheduled
broadcast will be suspended from 8:00 on January 1st to 23:00
on January 2nd.
SIP Management
When it is connected to the VoIP phone which uses the standard SIP protocol and IP PBX server, the voice
on the VoIP phone can be played on the speaker.
If you turn on the microphone by setting the <
DSP Setting
>
➔
<
Input Volume Setting
> of the speaker to
<
CONDENSER MIC
>, 2-way Talk (Half Duplex) is supported between the VoIP phone and the speaker.
The SIP function has been verified in an IP PBX server (Asterisk) and VoIP phone (Grandstream, Yealink,
Cisco) environment.
The SIP function has been verified in an IP PBX server (Grandstream) and VoIP phone (Grandstream)
environment.
SIP Account
1.
Register the account and IP PBX information in <
SIP Account Information
>.
~
User ID: ID of SIP users (account in the IP PBX).
~
Name: Names that users enter for easy identification.
~
Transport Mode: UDP mode is provided using the VoIP packet transmission method.
~
Media Encryption: No encryption is used.
~
Password: Enter the password provided by IP PBX.
~
Domain: Enter the address of IP PBX.
~
Authentication ID: Enter the authentication ID provided by IP PBX. (It may not be used depending on the
type of the IP PBX.)
~
Display name : It is the name which can be displayed on the receiver side. (It may not be used
depending on the type of the IP PBX.)
~
Registrar: Enter the Registrar Server address. If the account is properly registered with Registrar,
authentication is attempted regularly.
2.
When you [save] <
SIP Account Information
>, the registered <
User ID
> information is displayed on the
<
SIP Account List
>.
On the <
SIP Account list
>, you can select and modify the account.
3.
Set whether to use the account as the default account or not.
When you check the account’s [
Default
] on the <
SIP Account List
>, it will be sent from/received to that
account.
The account’s [
Status
] is activated and [detailed information of the status] is also changed from Idle to
Registered, and it is displayed as Online Devices in the IP PBX web page’s Extensions menu.
When you disable [
Default
], it is changed to Unregistered, and it is also displayed as Offline Devices in IP PBX.
Summary of Contents for SPA-C100W
Page 52: ......


