background image

16

SIDES AND THAT THE INCLINE 

PINS ARE COMPLETELY INSERTED. 

FAILURE TO DO SO COULD MAKE 

THE TREADMILL UNSTABLE AND MAY 

CAUSE INJURY.
Check the angle of incline of each level 

on the Table of Incline Positions in the 

first section of this manual.
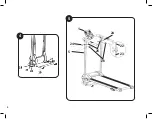
Unfolding the device (see Picture 9)

1. Hold onto the base (3) with one hand 

and use the other to pull out the vertical 

bar screw (5) and unlock the base.

2. Slowly lower the base (3) until it is on 

the floor.

3. Firmly tighten the lock screw (7).

4. Remove the two handlebar screws 

(26). 

5. 

Lower the handlebars (6) to the 

horizontal position.

6. Attach the two handlebar screws (26). 
Folding up the device (see Picture 10)

1. Remove the two handlebar screws 

(26). 

2. Raise the handlebars (6) to the vertical 

position. 

3. Replace the two handlebar screws 

(26) so they are not lost.

4. Loosen the lock screw (7).

5. Raise the base to the vertical position 

and hold it in place.

6. Attach the base (3) to the vertical bars 

(17) with the vertical bar screw (5).
When the device is folded, it can be 

transported using the wheels (16).

Product Cleaning and Maintenance

• Before performing daily cleaning, 

make sure the device is off by pressing 

the ON/OFF button and pulling the plug 

from the power supply. 

• Do not use abrasive products or 

solvents to clean the device.

•  Remove any dirt from the device with a 

damp cloth. 

•  Use a dry cloth to clean the plug and 

control panel. Do not use a damp cloth.

•  Do not use the device in very damp or 

dusty places that could cause the device 

to fail.  Set up the device on a flat surface 

to prevent it from falling and breaking 

down.

•  Do not use the device for more than 

an hour. Rest for an hour after each one-

hour workout. The components should 

be kept clean. Both sides of the belt 

should be cleaned to reduce dirt build-

up. Before using the device, make sure 

the treadmill surface is clean. Use soap 

and a damp cloth to clean the belt. Do not 

use solvents. Wipe off the sweat on the 

handlebars after each use. 

•  Anti-static lubricant was applied to the 

belt at the factory. 

• Lubricant can be applied to the 

device after 100 hours of use. Apply a 

special treadmill lubricant underneath 

the treadmill belt by lifting the belt away 

from the base slightly and applying the 

lubricant. 
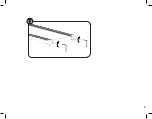
Centring the belt:

IMPORTANT: After continuous use, the 

belt may shift to one side due to the 

constant pressure of the feet. It should 

be centred again by adjusting the belt 

screws (29) with the Allen key provided 

(15). See Picture 11. 

Each time you are going to use the 

treadmill, make sure the belt is centred 

between the screws on the base. Centre 

it if necessary. It usually requires only 

minor adjustments. On the side the belt 

has shifted towards, tighten the screw 

half a turn clockwise and then test the 

treadmill for at least 15 seconds at 4 

km/h. Make sure shifting has been 

corrected and, if necessary, tighten the 

screw ¼ or half of a turn more until the 

belt is centred.
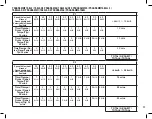
NOTE: Check the distance between the 

belt and the edge of the treadmill. If it 

looks like the belt in Picture 12, it needs 

to be centred.
Tightening the belt: (Fig.13):

3.  If the treadmill belt (4) slides during 

use, it should be tightened. Switch OFF 

the treadmill and unplug it from the power 

source. Use the Allen key (15) to give the 

left screws and then the right screws ¼ of 

a turn in the clockwise direction. Switch 

ON the main switch and start the treadmill 

running at 6 km/h. Walk on the treadmill. 

If it still slides, repeat the process until 

the belt no longer slides.

- If you do not plan to use the device for 

an extended period of time, please store 

it in a clean, dry place and prevent it from 

coming into contact with dust.

• Do not touch the ON/OFF button or the 

power cable with wet hands.

• Do not tug on the cable when 

unplugging the device. To prevent the 

cable from being damaged, do not place 

heavy objects on top of it and do not 

wrap it around the device . Do not use 

the device if the cable or the plug do not 

make a good connection.

NOTE: The belt should not be too tight 

because the device could damage it 

during operation and make noise.

Technical Specifications:

Voltage:  

220-240 V

Frequency:  

50/60 Hz

Power : 735W
Assembled size: 1575mm x 680mm x 

1188mm (L x W x H)
Folded size: 472mm x 680mm x 1505mm 

(L x W x H)
Packaging size: 1610 mm x 700 mm x 

290 mm (L x W x H)
Net Weight 

32 kg

Gross Weight  36 kg

Class HB product for household use
Gymform Slim Fold Treadmill Pro 

(VDPGYCIND0121)

DISPOSAL OF MATERIALS

A symbol of a crossed-out wheeled 

bin means you should find out about 

and follow local regulations about 

disposing of this kind of product.

Summary of Contents for SLIM FOLD PRO

Page 1: ......

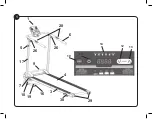
Page 2: ...1 29 30 1 28 6 26 26 9 5 17 3 7 18 19 16 4 10 11 14 12 13...

Page 3: ...3 2 3 31 7 5...

Page 4: ...4 5 1 5 25 26 24 24 22 23 4...

Page 5: ...6 7 8 7 1...

Page 6: ...6 8 2 6 6 3 9...

Page 7: ...7 5 2 6 4 1 1 10...

Page 8: ...8 11 12...

Page 9: ...9 13...

Page 10: ...S Incline position 1 2 Inclinaison 1 2 Neigung 1 2 Inclinazione 1 2 Inclina o 1 2 Helling 1 2 Incline position 2 3 5 Inclinaison 2 3 5 Neigung 2 3 5 Inclinazione 2 3 5 Inclina o 2 3 5 Helling 2 3 5 In...

Page 11: ...n 30 mins TOTAL GESAMT TOTALE TOTAAL P2 Speed Velocidad Vitesse Geschwindigkeit Velocit Velocidade Snelheid 3 0 km h 5 0 km h 8 0 km h 8 0 km h 8 0 km h 8 0 km h 8 0 km h 8 0 km h 5 0 km h 3 0 km h 4k...

Page 12: ...fini o 10 mins 1 min 1 min 1 min 1 min 1 min 1 min 1 min 1 min 1 min 1 min 10 min Default Preset Pr s lection Voreinstellung Predefini o 20 mins 2 min 2 min 2 min 2 min 2 min 2 min 2 min 2 min 2 min 2...

Page 13: ...al use The distributor is not liable for any loss or damage caused by misuse of the device Never tug on the power cable Do not jump on the device because it may damage the unit If the supply cord is d...

Page 14: ...e 4 Treadmill belt 5 Vertical bar screw 6 Handlebars 7 Lock screw 8 Control panel screw 9 ON OFF button 10 MODE button 11 Button 12 Button 13 Button 14 Function indicators 15 Allen key 16 Wheels 17 Ve...

Page 15: ...button 10 for two seconds once the belt has stopped 11 The treadmill has a manual mode P0 and three automatic programmes P0 Manual mode P1 Intervals P2 Resistance P3 Cardio Booster To change programme...

Page 16: ...e base slightly and applying the lubricant Centring the belt IMPORTANT After continuous use the belt may shift to one side due to the constant pressure of the feet It should be centred again by adjust...

Page 17: ...prescribed by the Australian Consumer Law the New Zealand Consumer Guarantees Act 1993 both of which provide protection for consumers There is no express warranty for this product in Australia or New...

Page 18: ...en buen estado antes de que usted lo use por primera vez En el caso de estar da ados la m quina no podr ser usada Por favor devu lvala a su tienda El dispositivo es s lo para el uso personal y de int...

Page 19: ...re no estar encima de la cinta es preferible estar de pie a ambos lados de la cinta Si la velocidad inicia de la cinta es muy alta no salte sobre ella empiece su uso progresivamente No pare bruscament...

Page 20: ...nando el bot n MODE 10 podr ver las otras opciones de funci n en pantalla Cada vez que presione el bot n cambiar para ver la velocidad SPEED el tiempo TIME la distancia DIST las calor as quemadas CAL...

Page 21: ...r ca da del dispositivo que ocasione aver as No utilice el dispositivo durante m s de 1 hora haga un descanso entre hora y hora de uso Los componentes se deben mantener limpios ambos lados de la cinta...

Page 22: ...icaci n sujeta a los plazos de tiempo estipulados por la legislaci n vigente en cada pa s Esta garant a no cubre los da os resultantes de un uso inadecuado uso comercial negligente desgaste anormal ac...

Page 23: ...45 ans s ils fument en cas d ob sit de manque d entra nement r gulier durant l ann e pr c dente ou s ils prennent des m dicaments Avant d utiliser l appareil pour la premi re fois v rifiez que tous s...

Page 24: ...r un usage individuel Toute panne due une utilisation inad quate ne pourra faire l objet d un recours en garantie Assurez vous que l appareil se trouve sur une surface plane Ne portez pas de v tements...

Page 25: ...que vous utilisez le tapis D s que vous fixez la cl de s curit 2 sur le panneau de commande 1 l indication 0 0 s affiche l cran 5 Appuyez sur le bouton 11 pour mettre le tapis en marche Il ne commence...

Page 26: ...bien fix e 4 Retirez les 2 crous du guidon 26 5 Abaissez le guidon 6 jusqu ce qu il soit l horizontale 6 Fixez les 2 crous du guidon 26 Pliage de l appareil voir fig 10 1 Retirez les 2 crous du guido...

Page 27: ...rgeur x hauteur Dimensions de l emballage 1610 mm x 700 mm x 290 mm longueur x largeur x hauteur Poids net 32 kg Poids brut 36 kg Produit de cat gorie HB con u pour une utilisation domestique Gymform...

Page 28: ...im vergangenen Jahr oder der Einnahme von Medikamenten berpr fen Sie vor der erstmaligen Benutzung dass sich alle Komponenten des Ger ts in einem guten Zustand befinden Sind diese besch digt darf das...

Page 29: ...enn Ihr K rpergewicht ber 120 kg betr gt Das Ger t wurde f r die Einzelnutzungkonzipiert Sch den durch eine unangemessene Nutzung sind von der Garantie ausgeschlossen StellenSiesicher dassdasGer t auf...

Page 30: ...zwischen Klammer und Bedienfeld damit eine sofortige Abschaltung erfolgt falls Sie sich ein wenig nach hinten bewegen Befestigen Sie bei jeder Laufbandnutzung den Notfallschl ssel an der von Ihnen get...

Page 31: ...KOMMEN Sie finden die Gradzahl der Neigung jeder Stufe in der Tabelle Neigungsstufen zu Beginn der Gebrauchsanweisung Vorgehensweise zum Aufklappen der Maschine siehe Abb 9 1 Den Sockel 3 mit der Hand...

Page 32: ...ssel ist nicht korrekt installiert 3 Die Haushaltssicherungen haben ausgel st 4 Die Sicherung des Lauf bands hat ausgel st 1 Stromkabel an das Stromnetz anschlie en 2 Sicherheitsschl ssel erneut insta...

Page 33: ...te et superiore ai 45 anni obesit mancanza di allenamento regolare nell ultimo anno consumo di qualsiasi farmaco o se si fumatori Controllare che i componenti del prodotto siano in buone condizioni pr...

Page 34: ...proprio peso supera i 120 kg Questo dispositivo stato progettato per l uso individuale Qualsiasi malfunzionamento generato da un uso improprio sar esente da garanzia Assicurarsi che il dispositivo ven...

Page 35: ...lant attaccare la chiave di emergenza ai vestiti indossati Una volta collegata la chiave di emergenza 2 al pannello di controllo 1 il display mostrer 0 0 5 Premere il tasto 11 per avviare il tapis rou...

Page 36: ...rlo completamente 4 Rimuovere i 2 dadi del manubrio 26 5 Abbassare il manubrio 6 in modo che si trovi in posizione orizzontale 6 Fissare i 2 dadi del manubrio 26 Sistema per piegare l apparecchio vedi...

Page 37: ...ezza Peso netto 32 kg Peso lordo 36 kg Prodotto di classe HB per uso domestico Gymform Slim Fold Treadmill Pro VDPGYCIND0121 DISMISSIONE E ROTTAMAZIONE DEL PRODOTTO Il simbolo di un contenitore di spa...

Page 38: ...ta de exerc cio peri dico no ltimo ano ou toma de alguma medica o Certifique se de que os componentes do produto est o em bom estado antes de o utilizar pela primeira vez Caso estejam danificados a m...

Page 39: ...utiliza o inadequada n o estar coberta de garantia Certifique se de que o aparelho est numa superf cie plana N o utilize roupa muito larga durante a utiliza o para evitar fric es na passadeira que di...

Page 40: ...e fixar a chave de emerg ncia 2 no painel de controlo 1 o ecr indicar 0 0 5 Carregue no bot o 11 para p r a passadeira em funcionamento A m quina n o come ar a funcionar enquanto n o passarem 3 s que...

Page 41: ...do man pulo 26 Sistema para dobrar a m quina ver fig 10 1 Retire as duas porcas do man pulo 26 2 Suba o man pulo 6 para que fique na posi o vertical 3 Volte a colocar as duas porcas do man pulo 26 pa...

Page 42: ...uto 36 kg Produto de classe HB para utiliza o dom stica Gymform Slim Fold Treadmill Pro VDPGYCIND0121 COMO ELIMINAR OS MATERIAIS O s mbolo de um contentor sobre rodas riscado indica que se deve inform...

Page 43: ...sonen van 45 jaar of ouder rokers personen met overgewicht personen die het afgelopen jaar niet regelmatig getraind hebben en personen die geneesmiddelen nemen Controleer of de onderdelen van het prod...

Page 44: ...el is ontworpen voor individueel gebruik Storingen die worden veroorzaakt door een onjuist gebruik vallen niet onder de garantie Zorg ervoor dat het toestel op een vlakke ondergrond staat Draag geen a...

Page 45: ...en de clip en het bedieningspaneel moet zo lang zijn dat hij direct loskomt als u iets naar achteren loopt Klem de veiligheidssleutel altijd op uw kleding wanneer u de loopband gebruikt Nadat u de vei...

Page 46: ...n van de stuurstang 26 5 Laat de stuurstang 6 zakken tot hij in horizontale stand staat 6 Zet de 2 draaiknoppen van de stuurstang 26 vast Werkwijze voor het invouwen van het toestel zie Fig 10 1 Verwi...

Page 47: ...goed als je erop gaat staan 1 Er zit onvoldoende smeer middel tussen de loopband en het onderstel 2 De loopband staat te strak gespannen 1 Koop smeermiddel en breng dat aan 2 Stel de spanning van de l...

Page 48: ...hina Fabricado en China Fabriqu en Chine Hergestellt in China Prodotto in Cina Fabricado na China Best Direct International Benelux B V 3871 KM NL www best direct nl PO Box 202 Spit Junction NSW 2088...

Reviews: