Geophysical Survey Systems, Inc.
SIR® 20
Manual
MN92-078 Rev F
34
During Collection
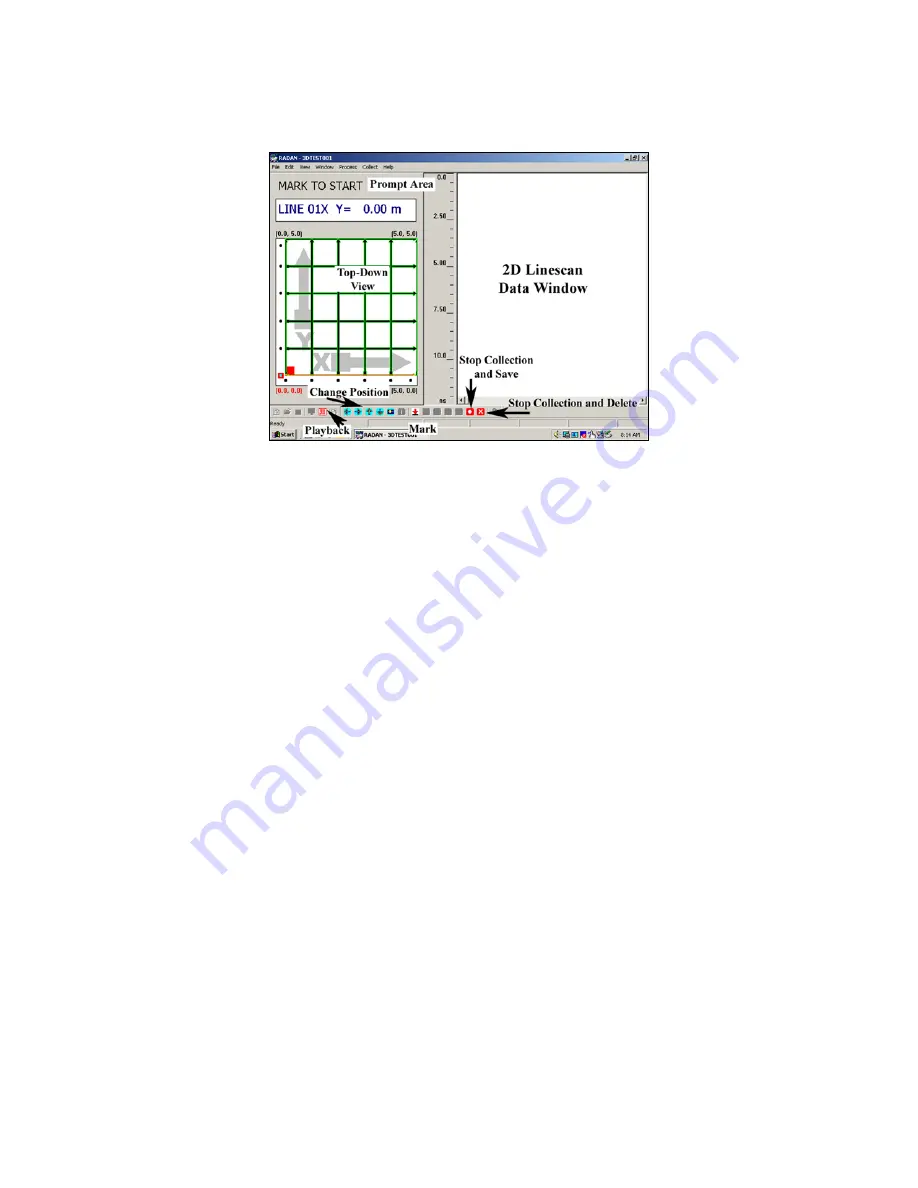
Figure 33: 3D Data Collection Screen.
The 3D data collection window is divided into two main areas. You will see data scrolling by on the right
hand side of the window and you can keep track of your location with the left hand side of the window.
Prompts at the top-left of the screen will guide you through your survey.
Note:
You must pay careful attention to the prompt area while you are collecting a 3D survey. The
SIR 20 will tell you what to do and where to go at each step of data collection. If you miss one of the
system cues you may have to re-scan a line or the entire grid.
1
Move cart to beginning of survey line. You will begin by clicking the Mark button on your cart or the
down arrow icon at the bottom of the screen. The prompt area will not change after you click the
mark button. Once the SIR 20 detects survey wheel movement, the Mark to Start field will change to
Collect Data.
2
Move the cart to the end of the survey line. Be careful not to move the antenna too fast. The SIR 20
will beep if the survey wheel encoder (and the antenna) is moving too quickly. The beeping indicates
that you are moving faster than the system can record the data. In effect you are ‘dropping’ scans
along the profile. If this occurs, your profiles will not be the same length and the number of scans
between your survey marks will not be consistent (i.e. they will be non-linear). Once you get to the
end of the line, the SIR 20 will stop collecting data. The system knows the correct stop location
because you defined the line length during setup.
3
At the end of the line, you will see the phrase Wait for Beep appear in the prompt area. The SIR 20 is
saving that data profile and resetting itself to accept the next profile. Once it is ready, you will see
Mark to Start in the prompt area and the location information will be displayed for the beginning of
the next line.
4
Once you finish the last line, you can click the Playback icon to leave the collection program and go
directly to processing and playback. (See: the RADAN and 3D QuickDraw software manuals for
details on processing and imaging steps) If you want to collect another 3D section immediately,
without first going into playback, click the Stop and Save button. Your data files are now stored in
your output folder. To collect another area, click the Run Project button
(green square).
Summary of Contents for SIR 20
Page 1: ......
Page 4: ......
Page 6: ......
Page 12: ...Geophysical Survey Systems Inc SIR 20 Manual MN92 078 Rev F 6 ...
Page 56: ...Geophysical Survey Systems Inc SIR 20 Manual MN92 078 Rev F 50 ...
Page 88: ...Geophysical Survey Systems Inc SIR 20 Manual MN92 078 Rev F 82 ...
Page 96: ...Geophysical Survey Systems Inc SIR 20 Manual MN92 078 Rev F 90 ...


