background image

Revision 1.1                                                                                        Page77 of 92 


Language; 

press 

 to select.


Improved Charger; 

 box must be checked to use optimised keyboards. 

Keyboard; 

press 

to select key mappings and display screen. 

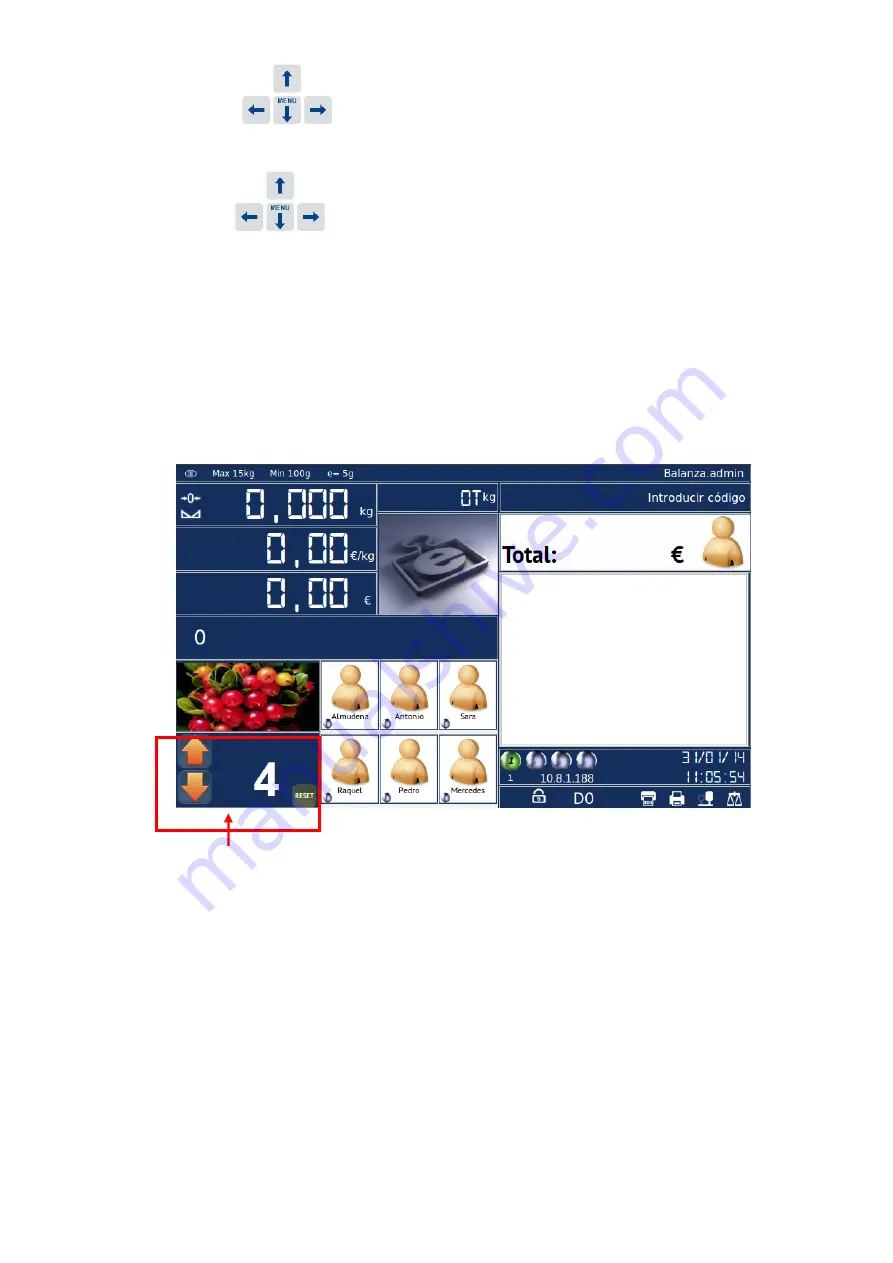
From this option you can select different keyboard mappings which the scale uses. Here we 
can  change  the  keyboard  mapping  which  incorporates  the  Turnomatic  option  by  choosing 
"

Hardware_ST4_turno

".  

 
After selecting this key mapping, two cursors will be shown at the bottom left of the operator's 
screen, the shift number and a reset button. The operation is simple: click on the arrows as 
desired, in ascending order (0-999) or descending order (999-0). To set the counter to zero, 
click on the reset button. 


TURNOMATIC 


The customer display also shows a large Turnomatic on all our counter scales.  If you have 
more counters in the store with K-Scales and with the Turnomatic option active, the scale 
screen informs us of the shift in which the other scales are set. 
 

Summary of Contents for K-scale

Page 1: ...Revision 1 1 Page1 of 92 ...

Page 2: ...Revision 1 1 Page2 of 92 ...

Page 3: ...re weight 11 5 MAIN MENU 12 5 1 Accessing the Main Menu 12 6 SET UP 13 6 1 Accessing the Set up Menu 13 6 2 Item set up 13 6 3 Item prices 20 6 4 Hotkeys set up 21 6 5 Sellers set up 23 6 6 Counter Set up 24 6 7 Identification Texts Set up 26 6 8 Barcode Set up EAN13 28 6 9 Cattle 30 6 10 Nutritional information 33 6 11 Codified Tare weight 36 6 12 Items categories 38 6 13 Item sections 40 6 14 VA...

Page 4: ...nting Parameters 70 7 5 4 Label Calibration 71 7 6 Weight configuration 71 7 6 1 Weight adjustment Weight configuration and scale serial number 72 7 6 2 Weight verification 72 7 6 3 Auto Zero 73 7 7 Accessing the Installation Settings Menu 73 7 7 1 Label formatting selection 74 7 7 2 Ticket formatting selection 74 7 7 3 Type of Sale Maintenance 75 7 7 4 Special settings 76 7 7 5 Security Copy 79 7...

Page 5: ... SLIGHTLY IN SOAPY WATER WITH NEUTRAL PH We want to provide the user of the scale with some very useful recommendations The performance of the device you have just acquired will be better if you pay as much attention as possible to the instructions which are included in this Manual Please forget about the traditional apathy that surrounds the use of manuals and don t wait until everything goes wro...

Page 6: ...Revision 1 1 Page6 of 92 3 SALE SCREEN AND PACKAGING SCREEN 3 1 Sale 3 2 Packaging ...

Page 7: ...ISTICS WEIGHT INDICATOR SALE TYPE USER PRICE INDICATOR COST INDICATOR 3 4 Network NETWORKED SCALES SCALE NUMBER SCALE IP ADDRESS DATE AND TIME 3 5 Product Information ITEM PICTURE ITEM DESCRIPTION 3 6 Seller keys SELLER S NAME NUMBER OF OPERATIONS TOTAL COST OF SALE ...

Page 8: ...ER NETWORK D0 TO D4 3 8 Button keypad 3 8 1 Counter Scale Button keypad 14x7 98 keys HOTKEYS AND ALPHANUMERIC KEYBOARD SELLER KEYS FUNCTION KEYS NUMERIC KEYS SEARCH DELETE 3 8 2 Suspended Scale Button keypad 16x6 96 keys HOTKEYS AND ALPHANUMERIC KEYBOARD SELLER KEYS FUNCTION KEYS NUMERIC KEYS SEARCH DELETE ...

Page 9: ...perations we will see a list showing the seller and the products in the ticket After this the seller can select either Subtotal or Total finish the sale with all the products in the ticket 4 1 2 Subtotal From the sale screen press the key then select the seller and the ticket will appear on the screen While on the Subtotal mode the user can perform the following actions Cancel line with we place o...

Page 10: ...elect the seller who is going to perform the operation b After that the user must select the item through hotkeys or the item s code or the price he is going to perform the packaging with c Pressing the key we can start packing items Every time the weight is modified a label will be printed d Pressing we will change the packaging to manual As we perform packaging operations the scale will show a l...

Page 11: ...e the tare weight retrieve the weight from the plate 4 3 2 Manual Fixed Tare weight Having the Tare weight on display see section above Press again To eliminate the tare price without having any item on the plate press 4 3 3 Numeric tare weight To introduce a numeric tare weight press A table appears for the user to introduce the value of the tare weight With the numeric keypad introduce the tare ...

Page 12: ...Sale or Packaging window pressing If the user passwords are activated both the User and Password information will be required Example USER AND PASSWORD User admin Password admin Press if the password is correct the user will access the MAIN MENU Press as many times as is needed to go back to the work screen ...

Page 13: ...f 92 6 SET UP 6 1 Accessing the Set up Menu Choose Programming with the cursors and press Press as many times as is needed to go back to the work screen 6 2 Item set up From the Set up menu select the option Items and press ...

Page 14: ...ously set up its information will be displayed If the item does not exist it s the first time it is introduced the user must complete the fields that appear on the screen with the information to be set up With the Tab key we move through the different fields to be set up The different fields are completed with the alphanumeric keyboard ...

Page 15: ...le items is shown Here the user can select the item he is looking for with the numeric keypad Once selected press Pressing the key when located on the Item field we can select the image that will be assigned to the product the path is sistema de archivos home pcscale pcscale resources icons item ...

Page 16: ...er Counter it is necessary to programme it if the access if done or has been set up through Plu PLU Number it is necessary to set up whether the access will be done through Plu Pressing the user accesses the Price tab where the price discount and the VAT type is set up With the user moves through the different fields to be programmed In order to select the VAT the user has to locate the VAT field ...

Page 17: ...cific set up of the packaging information for that item With the user moves through the different fields to be set up By pressing the key while the user is on the Label field he will see a list of the available label formats in the scale With and later the user can select the label format he desires ...

Page 18: ...labels if programmed Mixed With checked box the item works in mixed mode the price is calculated per amount introduced Mixed Weight Numeric 0 Full scale 5 Only for Mixed sale items Pressing the user goes to the Item description tab In Descriptive 1 2 3 4 y 5 up to 100 characters can be programmed For Long descriptions the user can programme up to 1000 characters With the user moves through the dif...

Page 19: ...ategory Numeric 0 99 2 Item category Part 0 99 2 Item section Type of sale Type of sale available for working on Quality levels Alphanumeric 8 Group selection for Quality Level The key searches for families sections or levels of quality stored or set up The user can select any of these criteria with Pressing all set up data is stored Press as many times as is needed to go back to the work screen ...

Page 20: ...rices From the Set up menu select the option Item prices and press Then we can see the item list The search is performed by introducing the code with the cursors To make the search easier it can be arranged by code through by name through ...

Page 21: ...d Then the user can modify the price he is interested in with the numeric keypad Press again to save changes Press as many times as is needed to go back to the work screen 6 4 Hotkeys set up From the Set up menu select the option Hotkeys set up and press With the user moves through the different fields to be programmed ...

Page 22: ...number The screen will show the data corresponding to the selected item Pressing when on the Item field a list with the items available will be shown The user will be able to select the code of the item he wishes to search for using the numeric keypad With the item is selected With the device saves changes Press as many times as is needed to go back to the work screen ...

Page 23: ...ter number and TT is the key number Name name of the seller Password the password the seller will use will be set up when the person is available to start working Image picture of the seller By pressing while on this field the user can select if there are previously uploaded images the path is sistema de archivos home pcscale pcscale resources icons item Counter counter number assigned to this sel...

Page 24: ...n the Seller field the user can see a list Choose with cursors and select with Press to save changes Press as many times as is needed to go back to the work screen 6 6 Counter Set up From the Set up Menu select the option Counter and press With the user moves through the different fields ...

Page 25: ...Start shift when we activate this box the Turnomatic system is set to zero when saving the programmed date from the counter Description counter description Pressing a list is shown Select with cursors and press Press to save changes Press as many times as is needed to go back to the work screen ...

Page 26: ...ification Texts and press With the user moves through the different fields With the alphanumeric keyboard hotkeys the user can set up the texts Name company name Description description of the company Business type business type Slogan company slogan Headquarters company s headquarters Web company s URL ...

Page 27: ...ent fields Name name of the shop Address shop s address City city where the shop is located Telephone number shop s telephone number TIN shop s TIN Web The shop s web address By pressing the user can go to the Texts tab Here he can set up the six line text that will appear as an inscription at the end of the ticket maximum 40 digits per line With the user moves through the different fields to be p...

Page 28: ...ess as many times as is needed to go back to the work screen 6 8 Barcode Set up EAN13 From the Set up Menu select the option Barcode and press With the user moves through the different fields With the alphanumeric keyboard the user can set up the data ...

Page 29: ...digits T Number of tickets W Weight or units of the item except for Sale Mixed mode V Seller code Z Item s selling price N Scale number i Item s sale amount I Total cost of all operations ticket or labels with the total amount j Item s sale cost in local original currency J Total cost in all operations ticket or labels with the total amount in local original currency Independent from the Euro s ph...

Page 30: ... predominates will be the one set up for the item itself and not the one set up in this general menu Press to save changes Press as many times as is needed to go back to the work screen 6 9 Cattle From the Set up Menu select the option Cattle and press With the user moves through the different fields With the alphanumeric keyboard the user can set up the data ...

Page 31: ...o Press when located in the field File number the user can see a list of the cattle files already created being able to select them with the arrows o By pressing the file data will appear which can be then modified With the user moves through the different fields With the alphanumeric keyboard the user can set up the data Ear tag ear tag number 30 digits Set animal set 20 digits Date of birth the ...

Page 32: ...he screen With the user can set up the date in the corresponding field Pressing the user can access the More Information tab Pressing to go through the different fields to be set up With the alphanumeric keyboard hotkeys the user can set up the information Birth country of birth code when pressing a new table with countries will appear the user looks for the correct one and selects it by clicking ...

Page 33: ...quartered same steps as the previous sections RSI Id number for the quartering house 30 digits Press to save changes Press as many times as is needed to go back to the work screen 6 10 Nutritional information From the Set up Menu select the option Nutritional information and press With the user moves through the different fields With the alphanumeric keyboard the user can set up the data There are...

Page 34: ...igatory and must be set up Modify a file already created o Press when located in the field Identification the user can see a list of the nutritional information files already created being able to select them with the arrows o By pressing the file data will appear which can be then modified ...

Page 35: ...00 grams or 100 millilitres per product although this can also be displayed per portion The information about energy value and nutrients is o Energy value o Proteins o Carbohydrates o Fat o Fibre o Vitamins and minerals Pressing the user can access the More Information tab Pressing to go through the different fields to be set up With the alphanumeric keyboard hotkeys the user can set up the inform...

Page 36: ...Nutritional information and when pressing it will search for the files created selecting the one the user is interested in Press to save changes Press as many times as is needed to go back to the work screen 6 11 Codified Tare weight From the Set up Menu select the option Nutritional information and press With the user moves through the different fields With the alphanumeric keyboard the user can ...

Page 37: ...ing tare weight o The user presses all the fields appear empty in order to be programmed Name name of the tare weight Tare weight weight in kg Modify existing tare weight o Pressing when located in the field Tare weight code the user can see a list of the tare weight entries already created being able to select them with the arrows o By pressing the data will appear which can be then modified ...

Page 38: ...es and press With the user moves through the different fields With the alphanumeric keyboard the user can set up the data There are two options create or modify Item category Create new Items category o A number is introduced in the field Identification a number that is not associated to any existing category o When the user presses all the fields appear empty in order to be programmed ...

Page 39: ...s the Label format selection screen Modify existing Item Category o By pressing when located in the field Category the user can see a list of categories already created being able to select them with the arrows o By pressing the data will appear which can be then modified Press to save changes Press as many times as is needed to go back to the work screen ...

Page 40: ...fields With the alphanumeric keyboard the user can set up the data There are two options create or modify Item sections Create new Item sections o A number is introduced in the field Identification a number that is not associated to any existing section o The user presses all the fields appear empty in order to be programmed Name name of the section ...

Page 41: ...tion the user can see a list of sections already created being able to select them with the arrows o By pressing the data will appear to be then modified Press to save changes Press as many times as is needed to go back to the work screen 6 14 VAT From the Set up Menu select the option VAT and press ...

Page 42: ... VAT type number Programmable from 0 9 Name VAT type name Percentage a certain percent for the VAT type Use for price sales with the box checked it can only be checked for a type of VAT it will be the type of VAT used by default for all price sales With the box unchecked this will only be applied to items to be programmed Press to save changes Press as many times as is needed to go back to the wor...

Page 43: ...to any existing client o The user presses all the fields appear empty in order to be programmed Name the name of the client Address shop s address City city where the client is located Telephone number the client s telephone number Web the client s webpage Modify existing client o By pressing when located in the field TIN the user can see a list of clients already created being able to select them...

Page 44: ...s as many times as is needed to go back to the work screen 6 16 Payment methods From the Set up Menu select the option Payment methods and press With the user moves through the different fields With the alphanumeric keyboard the user can set up the data ...

Page 45: ...esponding field With the key the user can enable disable the selected payment option Press to save changes Press as many times as is needed to go back to the work screen 6 17 Quality levels Set up From the Set up Menu select the option Quality level and press With the user moves through the different fields With the alphanumeric keyboard the user can set up the data ...

Page 46: ...ity level for the products is used for besides illustrating the item s picture assign an extra icon which indicates a special characteristic of the product for example Gluten free Icon name of the Icon s file Description text about the level Modify an existing Quality level o By pressing when located in the field Quality level code the user can see a list of the Quality level entries already creat...

Page 47: ...s Press as many times as is needed to go back to the work screen 7 SETTINGS 7 1 Accessing the Settings Menu From the Main Menu select the option Settings and press 7 2 Accessing the Scale Menu From the Setting Menu select the option Scale and press ...

Page 48: ...ber for the scale Counter identification number for the counter the scale is at Table Group tables for grouping the PLUS hotkeys Frequently used PLU Groups the most frequently used PLU groups Invoice Number it has two parts serial invoice No and Invoice No 1300101 two digits for the year three digits for set up serial two digits for scale number 46 six digits for correlative invoice number ...

Page 49: ...he work screen 7 2 2 Types of Sale From the Set up Menu select the option Types of Sale and press Header with the ticket s general data Information about the simplified invoice s issuing company Simplified invoice number YYSSSBB TTTTTTT Information about the client receiving the simplified invoice ...

Page 50: ...iously select a seller then select the item and place the weight on the plate The operation then is performed automatically When the process is finished a ticket is printed with all performed operations No changes It allows the user to exit the option without making any changes to it When selecting the new work mode the following image pops up When the keyboards are loaded the Scale screen is show...

Page 51: ...hen pressing the user can configure the selected sale mode 7 2 3 1 Scale Mode Configuration Sale With the user moves through the different fields Print ticket with the box checked the user can print the ticket with the total sales Print Total Label with the box checked the user can print the total sales label Print label by transaction with the box checked the user can print one label for every sa...

Page 52: ...lient to the ticket Allow orders if the box is checked the device allows for orders Payment methods NOTHING no payment method is allowed CHANGE only the change function is allowed Cash sale PAYMENT METHODS besides cash it allows for different types of payment methods Allow cost 0 if the box is checked the user can issue tickets with a value of 0 Reload ticket if the box is checked the user can rel...

Page 53: ...abled the tare weight is automatically deleted once the sale is closed Access to item with this option the user can select the way in which he wants to name the item when in work mode The options are by PLU or by Code Code digits with this option the user can select the number of digits the item s code must have from 3 to 6 digits Weight error in the event of the scale having a weight error the us...

Page 54: ...ing the user can move to the Base tab With the user moves through the different fields With this screen the user can filter the items on the scale by sections We select from the drop down menu the sections that the user has created and with the keys the user can add items to that section With the delete key we eliminate the filter from the list below 7 2 3 2 Packaging mode Configuration Allow mult...

Page 55: ...e change in price once the article to be sold is selected Client if the box is checked the client can be included Show printing window if the box is checked the printing screen is shown Pressing the user can move to the Base tab With the user moves through the different fields Allow Combined PLU If we activate this option we can calculate the price if we pack items with the same weight and cost NO...

Page 56: ...er moves through the different fields NOTE all the information to be configured in the Base tab request user and sections are the same items which have been explained before Sale mode Press to save changes Press as many times as is needed to go back to the work screen 7 2 4 Display Advertisement Screen From the Scale Menu select the option Display and press With the user moves through the differen...

Page 57: ...the transition of images Start only if weight is 0 If the box is ticked the advertisement only works if there is no weight on the plate Pressing the user can change tabs With the user moves through the different fields Type of advertising NOTHING no advertising PICTURE set of images VIDEO publication with video Full screen when the box is checked the advertisement is shown in full screen ...

Page 58: ...er moves through the different fields Type of advertising NOTHING no advertising PICTURE set of images VIDEO publication with video Full screen when the box is checked the advertisement is shown in full screen Show forms when the box is checked the forms will be shown on the client s screen Pressing the user can change tabs With the user moves through the different fields ...

Page 59: ... Press as many times as is needed to go back to the work screen 7 2 5 Regional Configuration date and time From the Scale Menu select the option Regional Configuration and press By pressing on the information to be modified and using the tab keys up and down the user can increase or decrease the value of the digit to be modified Press to store changes to exit date and time Press as many time as ne...

Page 60: ...Self Service Besides there is also the Administrator user Pressing on the desired user it will be selected Introduce his password and press to change user Once this is done the permissions for that user will become available Press as many times as is needed to go back to the work screen 7 2 6 2 Maintenance of Users In this menu we can configure permissions passwords and Usernames With the user mov...

Page 61: ...ess as many times as is needed to go back to the work screen 7 2 6 3 Default user selection From this option we can select the user that the scale will utilise by default for the different work modes With the user moves through the different fields to be set up Press to save changes Press as many times as is needed to go back to the work screen 7 3 Accessing the Settings Menu From the Setting Menu...

Page 62: ...Labels and press After selecting Storage Numbering and Settings With this option we select the way to number scale tickets This option is available for all scales in the system It is necessary to configure the independent data for each type of sale With the user can change the sale mode to be configured ...

Page 63: ... will be deleted at start up Delete oldest from XXX Days ago it selects the number of days that have passed for the totals that want to be deleted Restart numbering after deletion when the box is checked the ticket numbering will be restarted after the deletion of the totals Press to save changes Press as many times as is needed to go back to the work screen 7 4 Accessing the Communications Settin...

Page 64: ...ddress mask and gateway In this case the user will programme the corresponding fields With the user moves through the different fields The second option is that we have a server PC to which the user assigns the IP addresses automatically If this is the case we need to activate the DHCP option and thus the scale will wait for the user to assign it that IP address 7 4 2 Network From the Communicatio...

Page 65: ...the same node Pressing the list of networked scales will update Pressing the selected scale will be deleted Careful the scale selected tells us in advance whether the user is sure about deleting it Press as many time as needed to go back to the work screen 7 4 2 2 Explore All scale nodes found within the network are displayed here ...

Page 66: ...tion we activate the server scale and we assign the name of the node NOTE In order to configure this option the devices can t be connected to the network If they are the devices will tell us to disconnect Press to configure the device as Server By pressing the user exits the screen saving changes Press as many times as is needed to go back to the work screen ...

Page 67: ...vice will show a list with all declared systems in the local network NOTE In order to configure this option the devices can t be connected to the network If they are the devices will tell us to disconnect Pressing the window is refreshed Pressing the scale remains connected to the node within the scale network Press as many times as is needed to go back to the work screen 7 4 2 5 Copy database ...

Page 68: ...d scales is ready the user can select the device of origin that whose database we want to copy Once this has been selected press and the scale will start loading the database from the scale of origin NOTE If the user wants to connect the end scale to the network again he must go to the Settings menu so that the end scale settings remain configured 7 4 2 6 Separate scale from network With this opti...

Page 69: ...ept the scale will be out of the network 7 5 Accessing the Printer Configuration Menu From the Settings Menu select the option Printer Configuration and press 7 5 1 Selecting a printer Select the printer the scale will work with and press to save changes The default name for the printer is CP 290 HRS Press as many time as needed to go back to the work screen ...

Page 70: ... to go back to the work screen 7 5 3 Printing Parameters Contrast increasing or decreasing the burning percentage Between 60 and 60 with intervals of 10 Forward Feed dots number of blank paper forward feed after the ticket is printed By default 255 value between 0 and 800 Press to change tab With the user moves through the different fields The labeller s parameters are configured in this screen ...

Page 71: ... Value between 0 and 800 by default 300 Activate rewind depending on the type of paper select the type of paper Continuous or Label Press to save changes Press as many times as is needed to go back to the work screen 7 5 4 Label Calibration With this option the configured parameters are stored in the memory and the device performs a calibration of the sensor at the end of the label opto adjustment...

Page 72: ...ration this option displays the weight configuration parameters Scale s serial number here the user can modify the scale s serial number NOTE In order to access the previously mentioned options the scale will request an access password for Calibration as can be seen in the following image IMPORTANT Access to these menus can only be done by authorised staff from Grupo Epelsa 7 6 2 Weight verificati...

Page 73: ...is needed to go back to the work screen 7 6 3 Auto Zero Once the Auto Zero option has been selected when pressing the scale goes to auto zero automatically It is recommended that there is no weight on the plate when the user makes use of this option Press as many times as is needed to go back to the work screen 7 7 Accessing the Installation Settings Menu From the Settings Menu select the option I...

Page 74: ...as is needed to go back to the work screen NOTE If a label is selected during item set up the settings made for the item always take precedence over whatever is selected in this menu 7 7 2 Ticket formatting selection On this screen the user selects the default ticket the scale will work with This is selected with the cursors Press as many times as is needed to go back to the work screen ...

Page 75: ...t the permissions which will be used Keyboard we write the name of the keyboard to use for this type of sale Load hotkeys here we can select the hotkeys we wish to use For example for tables Table Key standard or for Families Families Key Position select the position of items in the table either by the position of the hotkey Fixed or occupying the last position of the list Vendors keyboard to sele...

Page 76: ...o save changes Press as many times as is needed to go back to the work screen 7 7 4 Special settings From the Installation Menu select the option Special Settings and press With the user moves through the different fields to be set up ...

Page 77: ...4_turno After selecting this key mapping two cursors will be shown at the bottom left of the operator s screen the shift number and a reset button The operation is simple click on the arrows as desired in ascending order 0 999 or descending order 999 0 To set the counter to zero click on the reset button TURNOMATIC The customer display also shows a large Turnomatic on all our counter scales If you...

Page 78: ...er of days for the log file to be generated to be set up Pressing the user can change tabs With the user moves through the different fields Image folder press to select the folder from which the scale will take the pictures of the items vendors etc Vendor icon with this option set the vendor s work icon can be selected The icon is found at the bottom left If we press the changes are saved Press as...

Page 79: ... option a backup of the database is made Once the Store Security Copy option is selected it will indicate the name of the copy of the database with the following data Name of the DB version DB revision and creation date of this copy of the DB Pressing will accept the creation of the backup Press as many times as is needed to go back to the work screen ...

Page 80: ...d Select the copy from the list that you wish to restore and press to begin the process of restoring the DB Press as many times as is needed to go back to the work screen 7 7 5 3 Initialise Database With this option all contents photos item etc are deleted from the DB Once we select the option it will ask for confirmation If we accept the erase process is done by leaving the balance ready for the ...

Page 81: ...ll the actions of this menu it is recommended that the scale is in local mode 8 REPORTS 8 1 Accessing the Reports Menu From the Main Menu select the option Print and press 8 2 Selecting Lists From the Print Menu select the option List Selection and press With the user moves through the different fields to be set up ...

Page 82: ...ist of items that we have set in this menu Press to change tab With the user moves through the different fields In this tab we can see the list of vendors on the scale You can list all the vendors set different filters or even arrange the list depending on what we want to print Press to preview the list which will be printed Press to print the list of items that we have set in this menu Press to c...

Page 83: ... depending on what we want to print Press to preview the list which will be printed Press to print the list of items that we have set in this menu Press as many times as is needed to go back to the work screen 8 3 Sales Reports From the Print Menu select the option Sales Report and press With the user moves through the different fields to be set up ...

Page 84: ...counter to print or view only those of interest For the totals of tickets we can also group by vendor scale counter and date and then expand the report with more data Press to preview the list which will be printed Press to print the list of items that we have set in this menu Press to change tab With the user moves through the different fields 8 4 Removal of tickets From the Sales Report select t...

Page 85: ...ce the last draft created Sale mode Packaging mode and POS mode The scale then asks for confirmation of deletion The scale will then ask if we want to restart the ticket numbering Once deleted the scale displays a confirmation of the action done Press as many times as is needed to go back to the work screen ...

Page 86: ...nce the option is selected it will ask for confirmation Press as many times as is needed to go back to the work screen 8 6 Clearing Automatic Operations This option is unused in the standard versions of the scale Consult the Grupo Epelsa 9 CHANGE USER 9 1 Accessing the Change User Menu From the Main Menu select the option Change User and press ...

Page 87: ...g the password 10 ABOUT From the Main Menu select the option About and press The next screens show us information about the scale s software and hardware In the TScale tab we can find the scale s software version the serial number the version of the libraries and versions of software that Linux uses Press to change tab ...

Page 88: ...ight program followed by the firmware version and date of the last modification of the weighing electronics Finally there is the data related to the electronic seal Press to change tab In the Database tab it shows the software version of the database manager a user and an update counter Press to change tab ...

Page 89: ...e front and rear display Press as many times as is needed to go back to the work screen 11 CLOSE PROGRAM From the Main Menu select the option Close Program and press With this option the scale program will close and we will exit to the Linux desktop Here we can use the various options of the Linux operating system and the ticket and label design program Encase ...

Page 90: ...Revision 1 1 Page90 of 92 ...

Page 91: ...nstallation Damage caused by neglect wear and tear misuse or errors caused due to repairs performed by unauthorised personnel Warranty if the information on this card has been manipulated or altered Warranty in case of broken or tampered seals The fees and charges of official verification from the application of legal regulations 2 Warranty period The warranty is valid for 1 year For the warranty ...

Page 92: ...A DE HENARES MADRID SPAIN TEL 91 830 46 16 FAX 91 830 58 64 E mail infomad grupoepelsa com CTRA SANTA CRUZ DE CALAFELL 35 08830 SANT BOI DE LLOBREGAT BARCELONA SPAIN TEL 93 654 62 12 FAX 93 654 54 53 E mail infobcn grupoepelsa com www grupoepelsa com ...

Reviews: