


-72-
Model g0661/g0713 (Mfg. since 1/10)
Fence Adjustments
there are four main adjustments for the fence: (1)
square, (2) height, (3) parallelism, and (4) clamp-
ing pressure. Keep in mind that these adjustments
are interconnected and some trial-and-error may
be needed to achieve satisfactory results.
Tools Needed
Qty
hex Wrench 4mm .............................................. 1
hex Wrench 6mm .............................................. 1
square ............................................................... 1
Felt-tipped Marker ............................................ 1
Square and height
the fence face must be square to the table in
order to produce square cuts. also, the fence
should be adjusted high enough off the table that
it does not drag across the surface.
To check/adjust the fence height and square-
ness to the table:
1. disConnECt saW FroM poWEr!
2. place a square on the table against the face
of the fence (
Figure 118) to check if the fence
is square to the table.
— if the fence is not square to the table, pro-
ceed to
Step 3.
— if the fence is square to the table, skip
ahead to
Step 4.
Figure 118. Checking if fence is square to table.
.%HfjVgZ
;ZcXZ
IVWaZ
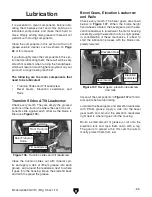
Figure 119. Fence components used to adjust
fence height and squareness to table.
HZiHXgZlh
;ZcXZ
7gVX`Zi
GZVgGV^a
;ddi
4. look at the gap between the fence and the
table top.
— if the gap is approximately
1
⁄
16
" and even
from the front of the table to the back (see
Figure 120), then no additional adjust-
ments are necessary. proceed to
Clamping
pressure and parallelism.
—if the gap is uneven, if the fence height is
more than
1
⁄
8
", or if the fence touches the
table, then continue with
Step 5.
3. adjust the set screws (Figure 119) on top of
the fence bracket to ensure the fence face is
90° to the table.
Adjusting Bent Spreader/Riving
Knife
1. disConnECt saW FroM poWEr!
2. Bend the spreader or riving knife by hand
while installed, then follow
Steps 1–4 in
Checking Alignment on page 70 to deter-
mine if it is parallel with the blade and inside
the "alignment zone."
— if this does not work, remove it to straight-
en.
— if you cannot straighten it properly, replace
it.
&
$
&+
<Ve
;ZcXZ
H^YZK^Zl
IVWaZ
Figure 120. gap between fence and table
approximately
1
⁄
16
" from from to back.


