DON’T HAVE TO INITIALIZE IT
!!!)
.
In case you
have to replace the IMU (because it is damaged)
you can initialize the new IMU following those
steps
:
•
Connect the new IMU to the wiring
loom
•
Start the engine of the bike
•
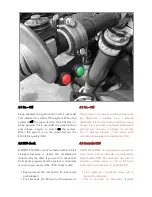
Keep pressed both buttons (for 4 sec.) and
release them. The red led on ECU will switch
on
•
Place the
IMU
like shown in picture
(A)
. With Y
arrow pointed to the front and Z arrow pointed
to the ground
pic
.A
•
Press the re
d button for half second
. The red
led will switch off and the green led will switch
on
•
Place the
IMU
as shown in picture
(B)
, with the
Y arrow to the sky and the Z arrow to the front
pic
.B
•
Press the green button for
half second
•
Wait the flashing at end
of procedure and
switch off the engine.
The IMU is now initialized and ready to be used.
NOTE: the anti wheelie control needs an
extreme precision of IMU signal. For that
reason, every time you start the bike, the
system proceed with the measurement of
Z axis’s offset. For that reason. when you
start the engine, can be helpfull keep the
bike most straight as possible.
INIZIALIZZARLA!!!)
. Nel caso di rottura della
IMU c’è la possibilità di inizializzare una nuova
IMU tramite i pulsanti. Procedere seguendo i
passi indicati:
•
Collegare la nuova IMU al cablaggio
•
Accendere la moto
•
Premere per 4 sec. e
ntrambi i pulsanti e
rilasciarli. Si accenderà il led rosso sulla ECU
•
Posizionare la IMU come la figura (A)
con la
freccia Y verso avanti e la freccia Z verso il
terreno
fig.A
•
Premere il pulsante rosso
per mezzo
secondo
. Si spegnerà il led rosso e si
a
ccenderà quello verde
•
Posizionare la IMU come mostra la figura
(B)
, con la freccia Y verso l’alto e la freccia Z
in avanti
fig.B
•
Premere il pulsante verde
per mezzo
secondo
•
Attendere il lampeggio di fine procedura e
spegnere la moto
Adesso la IMU è l
inearizzata e pronta.
NOTA: l’anti impennamento richiede una
estrema precisione dalla IMU. Per questo ad
ogni avviamento viene effettuato la misura
dell’offset sul canale Z. E’ opportuno in
questa fase mantenere la moto più dritta
possibile
Summary of Contents for Leone
Page 14: ...ruota posteriore ...
Page 15: ......


