GripOne Leone Manual Download Page 2


1.0 Included into the kit 
 

1 x ECU 
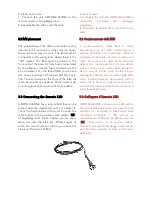
1 x IMU (inertial platform) 

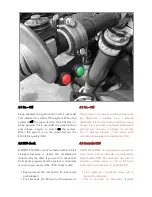
1 x loom plug&play (with remote buttons) 
1 x remote led 

1 x bracket for remote buttons 
1 x user manual 

2 x stickers 

1.0 Incluso nel kit 
 

1 x ECU 
1 x IMU (piattaforma inerziale) 

x cablaggio plug&play (con pulsanti a manubrio)


1 x led remoto 

1 x staffa per pulsanti 
1 x manuale utente 

2 x adesivi


2.0 Security 
 

During  the  installation  of  this  product,  it  is 
recommended to position the motorbike in such 

a way that is cannot cause any injury or damage 
by falling down or moving forward or backward;  
it  is  recommended  to  use  the  rear  stand  or,  if 

necessary,  the  wheel  lock.    Make  sure  that  the 
injection system is always turned off and that the 

electrical  equipment  is  not  being  powered 
during  the  installation  of  this  product  (and,  as 

well  as,  during  all  assembly  phases  indicated  in 
this  manual).    When  adding  or  removing 

electrical  cables  or  wiring  to/from  the 
motorcycle’s  equipment,  always  be  sure  to 

remove the negative battery terminal before the 
positive  battery  terminal.    During  reassembly 

phases,  connect  the  negative  terminal  last  in 
order  to  avoid  short  circuiting  the  electrical 

equipment. 


3.0 Installation recommandation 
 

DO  NOT  RUSH!  When  installing  the  GRIPONE 
LEONE,  make  sure  that  the  unit  is  protected 

from  excessive  vibrations  and  surrounding 
elements  and  that  it  is  clamped  firmly.  When 

positioning the wiring, make sure that the wires 
cannot be pinched or crushed which may cause 

subsequent  malfunctions,  clamp  them  as 
necessary.  


2.0 Sicurezza 
 

Durante  l’installazione  di  questo  prodotto  si 
consiglia  di  collocare  la  moto  in  modo  che 

non possa causare ferite o danni, cadendo o 
spostandosi avanti o indietro o lateralmente; 
si  raccomanda  l’utilizzo  di  un  cavalletto 

posteriore e se necessario il bloccaggio delle 
ruote. 

Assicurarsi che l’iniezione sia sempre spenta e 
che  l'impianto  elettrico  sia  non  alimentato 

durante  l’installazione  di  questo  prodotto  (e 
comunque durante tutte le fasi di montaggio 

indicate  da  questo  manuale).  Quando  si 
rimuovono  o  aggiungono  cavi  elettrici  o 

cablaggi  all’impianto  del  veicolo,  rimuovere 
sempre  il  terminale  negativo  dalla  batteria 

prima  del  terminale  positivo.  In  fase  di 
rimontaggio  collegare  il  terminale  negativo 

come  ultimo  per  evitare  corto  circuito 
all’impianto elettrico. 
 

3.0 Buone norme per l’installazione 
 

NON  AVERE  FRETTA!  Quando  installi 
GRIPONE  LEONE  assicurati  che  l’unità  sia 

protetta da eccessive vibrazioni, dal calore e 
dagli  elementi  circostanti,  e  che  sia 

saldamente  fissata.  Quando  si  posizionano  i 
cablaggi  assicurarsi  che  essi  non  possano 

essere  pizzicati  o  schiacciati  e  quindi 
provocare  malfunzionamenti,  fissarli  con 

fascette  dove  necessario  (senza  stringere 
troppo i cavi incidendoli).  


Summary of Contents for Leone

Page 1: ...which it is installed in GRIPONE system Prima di utilizzare il sistema GRIPONE leggere attentamente tutte le pagine di questo manuale L installazione di questo dispositivo richiede attenzione Ricordati che stai installando un dispositivo su un veicolo in grado di raggiungere velocità elevate Il sistema di controllo di trazione GRIPONE è un dispositivo professionale utilizzabile nel settore agonist...

Page 2: ...is protected from excessive vibrations and surrounding elements and that it is clamped firmly When positioning the wiring make sure that the wires cannot be pinched or crushed which may cause subsequent malfunctions clamp them as necessary 2 0 Sicurezza Durante l installazione di questo prodotto si consiglia di collocare la moto in modo che non possa causare ferite o danni cadendo o spostandosi av...

Page 3: ...g the accelerating phase ATTENZIONE La centralina deve essere posizionata dove non vi sia una temperatura di esercizio superiore di 65 C e deve essere protetta da vibrazioni Localizzare una superficie adatta su cui fissare la centralina Non fissare la centralina fino a che non è terminata l installazione di tutti gli altri componenti e il cablaggio L utilizzo di un sistema di controllo trazione no...

Page 4: ... connector B of plug play harness to the factory connector of main harness previously unplugged 5 Connect the black wire of plug play loom to the negative pole of battery or to the chassis or engine 6 Lay the plug play loom by following the inside of the chassis to the point where you want to fix the GRIPONE LEONE control unit The unit can be placed under the seat or even better inside the front f...

Page 5: ...erent typer of blink the remote led can inform you about the status and functions of ECU lontana da essa 7 Collegare la centralina GRIPONE LEONE al connettore principale del cablaggio plug play 8 Rimontare la scatola filtro il serbatoio e la sella 5 2 Posizionamento della IMU Il posizionamento della IMU è molto importante e se non fatto correttamente il sistema potrebbe non funzionare L IMU va col...

Page 6: ...anti impennamento 1 lampeggio singolo Attivata il livello controllo 1 2 lampeggi singoli Attivata il livello controllo 2 3 lampeggi singoli Attivata il livello controllo 3 4 lampeggi singoli Attivata il livello controllo 4 5 lampeggi singoli Attivata il livello controllo 5 Lampeggio lungo Problema alla piattaforma inerziale Il sistema non può lavorare correttamente 6 0 Remote buttons The kit inclu...

Page 7: ...Keep pressed the red button for 4 seconds and release it For 3 seconds the ECU will cut the power on 6 1 On Off Tieni premuto il pulsante verde per 4 secondi per disattivare il sistema Con il sistema disattivato il led verde sulla centralina rimane acceso Tieni premuto il pulsante verde per 4 secondi per riattivare il sistema on mode Con il sistema attivato il led verde sulla centralina lampeggerà...

Page 8: ...U by USB cable 6 4 IMU Initialization The IMU inside the kit of GRIPONE LEONE is initialized in factory FOR THAT REASON YOU potenza cosi da far cambiare suono al motore Se risulta difficile sentire la variazione consigliamo di mantenere il regime di rotazione attorno a 5000 RPM 6 3 Livelli controllo di trazione GRIPONE LEONE è pre programmata con una mappa base che prevede un controllo di trazione...

Page 9: ...with the measurement of Z axis s offset For that reason when you start the engine can be helpfull keep the bike most straight as possible INIZIALIZZARLA Nel caso di rottura della IMU c è la possibilità di inizializzare una nuova IMU tramite i pulsanti Procedere seguendo i passi indicati Collegare la nuova IMU al cablaggio Accendere la moto Premere per 4 sec entrambi i pulsanti e rilasciarli Si acc...

Page 10: ...stema Pressione prolungata del pulsante ROSSO 3sec Attivazione controllo ECU Pressione prolungata del pulsante VERDE e ROSSO 3sec Azzeramento IMU 7 0 Program the ECU by USB cable GRIPONE LEONE is pre programmed with a base map that cover a large range of user By the buttons you can change the level of traction but you can not change the anti wheelie or the launch control If you want access to all ...

Page 11: ...meters Wait the end of procedure Disconnect the USB cable At the end of procedure the ECU is ready to be used NOTE we suggest to save the map you created so you can re load it into WINSOFT any moment you want To save the map select Save As from the menu File 7 2 Programmare la ECU Dopo l installazione di WINSOFT puoi programmare l ECU GRIPONE LEONE può essere programmata con il motore spento Colle...

Page 12: ...ne the sensitive of anti wheelie control Increase its value if you want to cut the power as soon the tire lift from the ground Reduce its value if 7 3 Parametri TRACTION CONTROL SENSITIVE stabilisce la sensibilità del controllo di trazione 20 è massimo controllo 1 è minimo controllo TRACTION CONTROL INTENSITY stabilisce la progressione del controllo di trazione Usa valori alti 12 20 se vuoi fermar...

Page 13: ...i solleva dal terreno Riduci il valore se vuoi permettere un certo impennamento prima di tagliare la potenza ANTI WHEELIE DURATION L anti impennamento taglia la potenza ogni volta che la ruota si solleva DURATION definisce la durata in centesimi di secondo della riduzione di potenza Aumenta il valore se vuoi prolungare il taglio di potenza riduci il valore se vuoi ottenere solamente un taglio brev...

Page 14: ...ruota posteriore ...

Page 15: ......

Page 16: ...designed owned and made by GUBELLINI s a s di Diego Gubellini C Via Euridia Bergianti 10 B 40059 Medicina BO Italy P IVA IT03466001207 www gripone com info gripone com ...

Reviews: