


5.0
Electric connection
GRIPONE LEONE kit’s include a plug&play loom
to be connected to the main harness of the bike.
No modification are required on the bike.
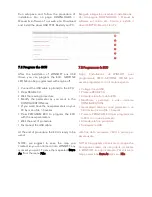
5.1 Connection of the plug & play loom
The GRIPONE LEONE must be connected to the
ignition coil (or fuel injector only for some
application) of last cylinder.
5.0 Collegamenti elettrici
Il kit GRIPONE LEONE include il cablaggio
plug&play. Non sono richieste modifiche
all’impianto di serie della moto.
5.1 Connessione del cablaggio
GRIPONE LEONE va collegato alla bobina (o
in alcuni casi all’iniettore) dell’ultimo cilindro
del motore.
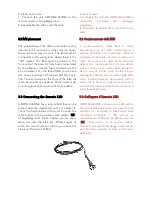
The shape of the connectors may vary according
to the bike. The connector (A) is an example of
female type. The connector (B) is an example of
male type
La forma dei connettori può variare in base al
modello di moto. Per ognuno si avranno
sempre un connettore maschio (B) e un
connettore femmina (A).
Follow those steps to connect the wiring
loom:
1. Take out the fuel tank (and if necessary the
aribox) to have access to the ignition coils (or the
fuel injectors);
2. Unplug the connector of ignition coils (or
injector) of last cylinder;
3. Connect the female connector (A) of
plug&play loom to the coil (or injector);
4. Connect the male connector (B) of plug&play
harness to the factory connector of main harness
(previously unplugged);
5. Connect the black wire of plug&play loom to
the negative pole of battery (or to the chassis or
engine);
6. Lay the plug&play loom by following the
inside of the chassis, to the point where you want
to fix the GRIPONE LEONE control unit. The unit
can be placed under the seat or (even better)
inside the front fairing. Secure the ECU in a
location not too hot and immune to vibration.
Please note that the IMU (you will place further)
must be placed in the front of the bike, so place
Seguire i seguenti passi per il
collegamento:
1. Rimuovere serbatoio e se necessario la
scatola filtro per avere libero accesso alle
bobine (o agli iniettori);
2. Scollegare il connettore dalla bobina (o
dall’iniettore) dell’ultimo cilindro;
3. Collegare il connettore femmina (A) del
cablaggio plug&play alla bobina (o
all’iniettore;
4. Connettere il connettore maschio (B) del
cabaggio plug&play al connettore femmina
del cablaggio di serie (precedentemente
scollegato);
5. Collegare il filo nero (con il capicorda a
“occhiello”) del cablaggio plug&play a massa
o al negativo della batteria;
6. Stendere il cablaggio plug&play lungo la
parte interna del telaio, fino al punto in cui si
desidera posizionare la centralina GRIPONE
LEONE. Prego di notare che la IMU adrà
piazzata nella parte anteriore della moto e
quindi la centralina non dovrà stare troppo
Summary of Contents for Leone
Page 14: ...ruota posteriore ...
Page 15: ......


