background image

80 / PL

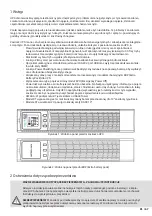
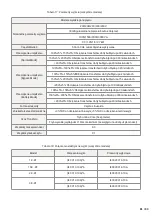
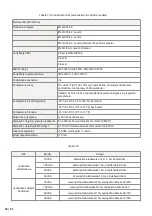
USTAWIENIA UŻYTKOWNIKA

Ustawienia mogą być zmieniane w każdym trybie pracy. Ustawienia decydują o zachowaniu urządzenia w  konkret-

nych okolicznościach. Poniższa tabela opisuje w jaki sposób je zmieniać.

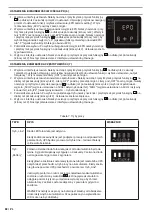
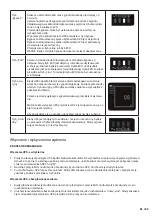
USTAWIENIA FUNKCJI ECO (1)

1. 

Wejście w interfejs ustawień.

 Należy naciśnąć i przytrzymać przycisk funk-

cyjny 

 na dłużej niż 2 sekundy, a następnie przejść do interfejsu, a litery 

ECO zaczną migać.

2. 

Wejście w ustawienia „ECO”.

 Należy nacisnąć i przytrzymać przycisk funk-

cyjny 

 na dłużej niż pół sekundy (krócej niż 2), a litery „ECO” zaczną się 

świecić. Sygnalizacja ON (lub OFF) pod „ECO” także się zaświeci. Powtarzaj 

czynność, by zadecydować czy funkcja ECO będzie aktywna, czy nie.

3. 

Potwierdź ustawienie ECO

 naciskając przycisk OFF oraz naciskając 

i przytrzymując przycisk funkcyjny 

 przez 2 sekundy. Po tym funkcja ECO 

będzie już zatwierdzona i sygnalizacja ECO ON, lub OFF będzie się świeciła 

bez migania.

4. 

Jeśli wybrano „OFF” przejść do punktu 7. Jeśli „ON”, do punktu 5.

5. 

Ustawienie pożądanej czułości trybu ECO. Należy nacisnąć krótko przyciski 

 lub 

, by wybrać ramy procentowe (od 5% do 25%, gdzie 25% jest ust. 

domyślnym). Następnie należy nacisnąć przycisk funkcyjny 

 na dłużej niż pół sekundy (krócej niż dwie), by po-

twierdzić wybór i ustawić górną granicę.

6. 

Dolny margines ustawić można w ten sam sposób.

7. 

Po ustaleniu dolnego marginesu należy nacisnąć przycisk funkcyjny 

 na dłużej niż 2 sekundy, by wyjść z menu 

ustawień. 

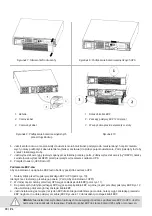
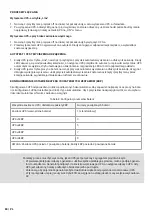
USTAWIENIA FUNKCJI BYPASS (2)

1. 

Wejście w interfejs ustawień. Należy nacisnąć i przytrzymać przycisk 

funkcyjny 

 na dłużej niż 2 sekundy, by przejść do ustawień, a następnie 

nacisnąć przycisk nawigacji 

 na dłużej niż pół sekundy (mniej niż 2) 

by przejść do ustawień BPS.

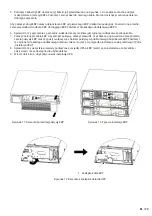
2. 

Wejście w ustawienia BPS. Nacisnąć i przytrzymać przycisk funkcyjny 

dłużej niż pół sekundy (krócej niż 2). W tym momencie można zauważyć, 

że literki „BPS” migąją lub przestają. Klikając przycisk funkcyjny 

 można 

zmienić ustawienie BPS z ON na OFF. Przycisk klikamy dłużej niż 0,5 sekun-

dy i krócej niż dwie.

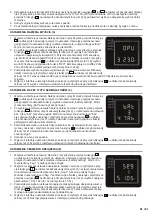
3. 

Potwierdzenie wyboru ustawień BPS. Po wybraniu ON lub OFF, należy naci-

snąć i przytrzymać przycisk funkcyjny 

 na dłużej niż pół sekundy (krócej 

niż 2). Teraz ustawienie BPS jest zakończone i ON lub OFF pod BPS będzie 

świecić się bez migania.

4. 

Jeśli wybrałeś OFF, należy przejść do kroku 7. Jeśli ON, do kroku 5.

Summary of Contents for 1.5KVAH-RT

Page 1: ...BEDIENUNGSANLEITUNG INSTRUKCJA OBS UGI MODE D EMPLOI DE PL FR RACK TOWER 1KVA 3KVA UPS User s manual...

Page 2: ...CIFICATIONS 31 TROUBLESHOOTING DE 35 EINLEITUNG 35 SICHERHEITSWARNUNGEN 36 INSTALLATION 44 BETRIEB 53 ANSCHLUSS 56 USV WARTUNG 58 TECHNISCHE DATEN 63 FEHLERBEHEBUNG PL 67 WST P 67 OSTRZE ENIA DOTYCZ C...

Page 3: ...FR 99 INTRODUCTION 100 CONSIGNES DE S CURIT 100 INSTALLATION 108 FONCTIONNEMENT 117 COMMUNICATION 117 OPTIONS DE COMMUNICATION ET RACCORDS DE CONTR LE 122 CARACT RISTIQUES TECHNIQUES 127 D PANNAGE...

Page 4: ...tested and found to comply with the limits for a Class B digital device pursuant to part 15 of the FCC Rules These limits are designed to provide reasonable protection against harmful interference in...

Page 5: ...n to startup the UPS without utility Standard communication options one RS 232 communication port one USB communication port and relay output contacts or SNMP card Power Shedding function may turn off...

Page 6: ...e EBP s directly below the UPS so that all wiring between the cabinets is installed behind the front covers and is inaccessible to users The maximum number of EBP s per UPS is four If the UPS requires...

Page 7: ...rdered an optional Extended Battery Module EBP verify that the following additional item is included with the EBP EBP user s guide NOTE Discard the EBP user s guide if you are installing the EBP with...

Page 8: ...ail 1 Assemble the left and right rails to the rear rails as shown in FIG 3 Do not tighten the screws Adjust each rail size for the depth of your rack 2 Select the proper size in the rack for position...

Page 9: ...de through the bottom hole of mounting bracket and the bottom hole of the rail 13 Repeat for any optional cabinets 1 M5X12 Pan Head Screws 2places 2 M5 Float Nuts 2places FIG 6 Securing the Front of t...

Page 10: ...Connect the cables quickly and rmly 3 If you are installing EBPS see the following section Connecting the EBP s before continuing with the UPS installation 4 Replace the UPS front cover To replace th...

Page 11: ...EBP cable into the UPS battery connector quickly and rmly 5 Plug the EBP cable s into the battery connector s as shown in FIG 12 Up to four EBPS may be connected to the UPS Connect black to black Pres...

Page 12: ...cket FIG 15 Increase EBP plastic base installation RACKMOUNT CONVERTED TO TOWER INSTALLATION Rackmount converted to Tower plastic base installation If an EBP is needed to be placed in the middle the a...

Page 13: ...ity you need to set bPS option to ON on the setting mode 7 Press the combination start up buttons on the UPS front cover for at least half a second The UPS will start up and the LED will turn on and o...

Page 14: ...Button function Button Function description Start up combination RT Press and hold this key for more than half a second to turn on the UPS or to turn off the UPS Shutdown Rotating combination RT Press...

Page 15: ...if the battery switch is closed Power up or start Six times A rm if the battery is connected well 5 Output overload protection Overload WARNING in line mode Twice per second Remove the uncritical load...

Page 16: ...the dynamic fan blades rotating when the fan works ab normally the icon will keep on ashing with the WARNING Charger status graphics section Display the status of the charger When charger works norma...

Page 17: ...e inverter is 37 C Input Display the voltage and frequency of the input As the following graphics shown the input voltage is 210v input frequency is 49 8Hz Battery Display the voltage and capacity of...

Page 18: ...f a second less than 2 seconds to select BPS setting the letters bPS will ash 2 Enter the BPS setting interface Press and hold the function setting key for more than half a second less than 2 seconds...

Page 19: ...ing key for more than 2 seconds then come to setting interface Press and hold the scroll keyfor more than half a second less than 2 seconds select the function setting choose battery setting interface...

Page 20: ...input frequency MODE DESCRIPTION INDICATOR Line Mode The inverter green LED is on When input AC mains is in line with the working conditions UPS will work in line mode charge the battery and protect...

Page 21: ...is working in line mode Turn on the UPS by DC without mains power 1 When mains power is disconnected press and hold the ON key for more than half a second to start UPS 2 The operation of the UPS in t...

Page 22: ...r Con guration CAUTION The following process must be performed if the UPS is connected with generator First turn on the generator after it runs stably connect output power of the generator to UPS inpu...

Page 23: ...is installed power management software can exchange data with the UPS The software polls the UPS for detailed information on the status of the power environment If a power emergency occurs the softwar...

Page 24: ...ra low voltage SELV circuit This circuit must be separated from any hazardous voltage circuits by reinforced insulation CAUTION The EPO must not be connected to any utility connected circuits Reinforc...

Page 25: ...explains how to Care for the UPS and batteries Replace Extended Battery Packs EBPs Test new batteries Recycle used batteries or UPS UPS AND BATTERY CARE For the best preventive maintenance keep the a...

Page 26: ...PS Release the screw of the ba e of the battery pack as the Fig 25 shows then remove the ba e from the left or right 4 Grasp the handle in front of the battery pack take out of it and hold it then rem...

Page 27: ...nto the slot 2 M4X8 Pan Head Screws 2places FIG 25 The Installation for ba e of battery pack 1 Insert the thin wall into the slot 2 M4X8 Pan Head Screws 4 places FIG 26 Remove the battery park FIG 27...

Page 28: ...tion Battery Voltage For Power Ratings 1KVAS EBP RT 24VDC 1000 VA 1 5KVAS EBP 36VDC 1000 1500 VA 2KVAS EBP 48VDC 2000 VA 3KVAS EBP 72VDC 2000 3000 VA Model Power Level Rear Cover Diagram 1KVAS 1KVAH R...

Page 29: ...ion Input Cable 1KVAS 1KVAH IEC320 C13 10A IEC320 C14 10A 1 5KVAS 1 5KVAH IEC320 C13 10A IEC320 C14 10A 2KVAS 2KVAH IEC320 C13 10A IEC320 C19 16A 3KVAS 3KVAH IEC320 C13 10A IEC320 C19 16A Table 17 Ele...

Page 30: ...2 Class B Class B EMC Emissions IEC 62040 2 ed2 2005 EN 62040 2 2006 Safety Conformance IEC 62040 1 1 IEC 60950 1 Agency Markings CE Operating Temperature 0 C to 40 C 32 F to 104 F in Online mode wit...

Page 31: ...ull use of the information Fault indicator on indicates that the UPS has detected some faults Buzzer beeps indicates that UPS need to be paid attention to if beeps for a long time it means that there...

Page 32: ...ltage low please turn off UPS and remove some loads then start UPS Fault occurs inside UPS Contact supplier for servicing The icon of charger status on LCD display ashes and buzzer beeps once per seco...

Page 33: ...lanced voltage 82 83 84 85 Soft inverter 62 Inverter error High risk 4 24 42 86 Minimal risk 14 34 52 96 Soft fail 63 Discharge voltage error 61 Overheating error 33 6 8 43 53 Loading error 16 2 44 73...

Page 34: ...t und entspricht den Grenzwerten f r ein digitales Ger t der Klasse B gem Teil 15 der FCC Vorschriften Diese Beschr nkungen sollen einen angemessenen Schutz gegen sch dliche St rungen in Hausinstallat...

Page 35: ...von Kontakten oder SNMP Karten Power Shedding Funktion kann eine unkritische Ladung in eine Backup Batterie umleiten um die Zeit f r eine kritische Lastladung zu verl ngern Erh hte Betriebszeit mit b...

Page 36: ...AGE Wenn eine Anlage w hrend des Transports besch digt wurde denken Sie daran die in der Verpackung enthaltenen Kisten und Materialien am Kaufort oder in Anwesenheit eines Kuriers zu berpr fen und dan...

Page 37: ...Schienenmontagekits f r jede USV enthalten sind Montagesatz f r die linke Seite der Montageschienen Linke Schiene Hintere Schiene 3 Sternmontageschrauben M5 8mm Set f r die Montage der rechten Seite d...

Page 38: ...in Abb 3 Schienenschutz Abb 4 Befestigung der Schienen 7 Falls Sie optionale Racks installieren wiederholen Sie die Schritte 1 bis 6 f r jede Schienenbaugruppe 8 Stellen Sie die USV auf eine ebene sta...

Page 39: ...lusses siehe Bild 8 Verbinden Sie das rote mit dem roten und dr cken Sie dann den Verbinder fest an um die korrekte Verbindung zu gew hrleisten HINWEISe Bitte beachten Sie dass die Schritte 1 und 2 nu...

Page 40: ...n von EBP s So installieren Sie das optionale EBP zus tzliches Batteriepaket f r die USV 1 Entfernen Sie die Frontabdeckung jedes EBP und jeder USV siehe Abb 10 Dasselbe gilt f r die Installation der...

Page 41: ...rt Wiederholen Sie dies f r jede weitere EBP 6 Pr fen Sie ob die Verbindungen fest sind ob es m glich ist jedes Kabel zu biegen und zu entlasten 7 Setzen Sie die EBP Frontabdeckung auf Pr fen Sie zum...

Page 42: ...ng ab achen 3 Muss das EBP in der Mitte platziert werden ist die Grundfaltung hnlich Der Unterschied besteht darin dass in der Mitte zwei Kunststoffsockel hinzugef gt werden wie unten gezeigt 1 2 Kuns...

Page 43: ...e en k nnen Sie die USV starten setzen Sie jedoch die BPS Option im Einstellmodus auf ON Anweisung in Tabelle 6 7 Dr cken Sie mindestens zweieinhalb Sekunden lang die Tastenkombination auf der Vorders...

Page 44: ...n Durch Dr cken und Halten dieser Taste f r mehr als eine halbe Sekunde wird die Stromversorgung ein oder ausge schaltet Ausschaltkombination Rotation Wenn Sie diese Tasten l nger als 2 Sekunden gedr...

Page 45: ...e sicher dass der Batte rieschalter geschlossen ist Stromversorgung oder Inbetriebnahme 6 mal Stellen Sie sicher dass der Akku richtig angeschlossen ist 5 Ausgangs berlastschutz Lineare berlastwarnung...

Page 46: ...Hz Gra scher Abschnitt Kapazit ten und Lasten Die obere Signalisierung zeigt die Batteriebelastung an Jede Einheit entspricht 20 Wie aus den unten stehenden Gra ken ersichtlich ist erreicht die Auslas...

Page 47: ...leistung W und der Scheinleistung VA der Last an Wie in der Gra k zu sehen ist betr gt beispiel sweise die Leistungsbelastung 100W und die Scheinleistung 100VA Obwohl keine Ger te angeschlossen sind k...

Page 48: ...e Standardeinstellung ist Dr cken Sie dann die Funktionstaste f r mehr als eine halbe Sekunde weniger als zwei um die Auswahl zu best tigen und die Obergrenze festzulegen 6 Der untere Rand kann auf di...

Page 49: ...rt unter OPU leuchtet auf ohne zu blinken 4 Verlassen Sie die Schnittstelle Halten Sie die Funktionstaste l nger als eine halbe Sekunde weniger als 2 gedr ckt verlassen Sie dieSchnittstelle und gehen...

Page 50: ...nde weniger als 2 gedr ckt Die Einstellung f r die maximale Batte rieladung wird jetzt best tigt 4 Beenden Sie die Schnittstelle Halten Sie die Funktionstaste l nger als eine halbe Sekunde weniger als...

Page 51: ...das Tonsignal mit der Stummschalttaste auszuschalten Sie k nnen die USV auch ausschalten indem Sie die AUS Taste dr cken wenn sichergestellt ist dass der Fehler nicht kritisch ist Informationen zur Be...

Page 52: ...uf ON ein Ausschalten der USV wenn keine externe Stromversorgung vorhanden ist 1 Zum Ausschalten der USV mehr als eine halbe Sekunde lang dr cken und gedr ckt halten 2 Die USV f hrt zun chst einen Sel...

Page 53: ...aus explosionsgef hrdeten Bereichen 3 Gehen Sie zum Abschnitt Wartung um die USV zu starten KOMMUNIKATIONSM GLICHKEITEN Das Netzteil kann ber serielle RS 232 Anschl sse USB Kommunikationsanschl sse od...

Page 54: ...r eine Webbrowser Schnitt stelle die Verbindung erfolgt ber ein Ethernet Kabel 10 100BaseT Dar ber hinaus kann ein Umgebungs be rwachungsdetektor f r Feuchtigkeit Temperatur Rauchmelder und Sicherheit...

Page 55: ...s falls notwendige Ger te gewartet werden w hrend andere Ger te abgeschaltet werden Diese Funktion spart Batteriestrom WARNUNG EPO 60950 ist eine Schutzschaltung f r sehr niedrige Spannungen SELV der...

Page 56: ...Die Akkulaufzeit der USV Ger te betr gt 3 5 Jahre Die Lebensdauer variiert je nach Nutzun gsh u gkeit und Umgebungstemperatur Batterien die l nger als die erwartete Lebensdauer verwendet wurden haben...

Page 57: ...sorgen Sie Batterien niemals in einem Feuer Batterien k nnen explodieren wenn sie hohen Tempe raturen ausgesetzt werden ERSETZEN VON RT UPS UND EBPS Wenn ein Batteriedefekt auftritt tauschen Sie die B...

Page 58: ...explodieren Die Batterien m ssen ordnungsgem entsorgt werden Bitte beachten Sie die rtlichen Vorschriften f r die Entsorgung ffnen oder besch digen Sie keine Batterien oder Akkus Freigesetzter Elektro...

Page 59: ...m der R ckseite 1KVAS 1KVAH RT 1000 VA 900W FIGURE 28 1 5KVAS 1 5KVAH RT 1500 VA 1350W FIGURE 28 2KVAS 2KVAH RT 2000 VA 1800W FIGURE 29 3KVAS 3KVAH RT 3000 VA 2700W FIGURE 29 Model UPS Version RACK Ab...

Page 60: ...8 2 7 kW Frequenz 50 or 60 Hz automatisch festgestellt berlastung des Ger ts Normalmo dus 108 5 150 5 Last von bertragungen in den Fehlermodus nach 30 Sekunden 150 5 200 5 Last von bertragungen in den...

Page 61: ...1000 2 2 EN 61000 4 2 Level 4 EN 61000 4 3 Level 3 EN 61000 4 4 Level 4 auch f r Signalports EN 6100 4 5 Level 4 Criteria A EMC Zerti kate CE per IEC EN 62040 2 Class B Class B EMC Emissionen IEC 6204...

Page 62: ...KVAS Internes Ladeger t 6 12A externe Batterie 72 96V Modell interne Batterien 1EBP 2EBPs 3EBPs 4EBPs 1KVAS 24VDC 3 15 25 40 53 1KVAS 36VDC 5 25 45 65 85 1 5KVAS936VDC 3 15 25 40 53 2KVAS 48VDC 3 15 2...

Page 63: ...rte Beschreibung des Problems z B Indikatorberichte auf der Anlage Die folgende Tabelle beschreibt typische Alarmprobleme problemy alarmowe Fehler Ursache Behebung Die Buchstaben INPUT die auf dem LCD...

Page 64: ...gedr ckt Dr cken Sie beide Tasten gleichze itig An der USV ist keine Batterie ange schlossen oder ihre Spannung ist zu niedrig f r die angeschlossenen Verbraucher Schlie en Sie die Stromversor gungsb...

Page 65: ...84 85 Weicher Wechselrichter 62 Wechselrichter Fehler Hohes Risiko 4 24 42 86 Geringes Risiko 14 34 52 96 Softfail 63 Fehler bei der Entlade spannung 61 berhitzungsfehler 33 6 8 43 53 Fehler beim Lade...

Page 66: ...ta o przetestowane i uznane za zgodne z ograniczeniami dla urz dze cyfrowych klasy B zgodnie z cz ci 15 przepis w FCC Ograniczenia te maj na celu zapewnienie odpowiedniej ochrony przed szkodliwymi zak...

Page 67: ...hedding mo e przekierowa bezkrytyczny adunek na zapasow bateri aby wyd u y czas dla adunku obci enia krytycznego Zwi kszony czas pracy z maksymalnie czterema rozszerzonymi modu ami bateryjnymi EBP Ext...

Page 68: ...zacja akumulator w Zapoznaj si z lokalnymi przepisami o utylizacji Nie wolno wrzuca baterii do ognia Baterie mog wybuchn pod wp ywem p omieni 3 Instalacja TA SEKCJA WYJA NIA Kontrola urz dzenia Rozpak...

Page 69: ...enty zestawu monta owego szyn zosta y uwzgl dnione dla ka dego zasilacza UPS Zestaw do zamontowania lewej strony szyn monta owych Lewa szyna Tylna szyna 3 Wkr ty monta owe gwiazdkowe M5 8mm Zestaw do...

Page 70: ...nek 4 Mocowanie szyn 7 W przypadku instalowania opcjonalnych szaf powt rzy kroki 1 do 6 dla ka dego zestawu szyn 8 Umie ci UPS na p askiej stabilnej powierzchni z obudow skierowan do frontu 9 Dopasowa...

Page 71: ...nast pnie docisn ciasno z cz aby zapewni prawid owe po czenie Uwaga Nale y pami ta e kroki 1 i 2 przeznaczone s tylko dla wymiany baterii lub dodania dodat kowych akumulator w Wtyczka b dzie pod czon...

Page 72: ...s ony przedniej UPS wyj za lepk kabla EBP patrz rys 11 3 Do poni szych lub tylko jednego EBP wyj za lepk kabla EBP w g rnej cz ci przedniej pokrywy EBP Rys 12 dla u ci lenia po o enia g rnej za lepki...

Page 73: ...e i odci anie ka dego kabla 7 Za o y os on przedni EBP Aby za o y pokryw nale y sprawdzi czy kable s poprowadzone przez przet o czenia pokrywy EBP oraz czy pokrywa czy si z hakiem pokrywy w pobli u le...

Page 74: ...owaniu 3 Je li istnieje potrzebna aby EBP by umieszczony po rodku sk adanie podstawy jest podobne R nica polega na tym e dwie plastikowe podstawy dodane s na rodku Jak wynika z poni szego 1 2 Plastiko...

Page 75: ...7 Nacisn kombinacj uruchamiania przycisk w na pokrywie przedniej UPS przez co najmniej dwie i p sekundy UPS uruchomi si a diody LED b d w cza si i wy cza po kolei 8 Sprawdzi wy wietlacz pokrywy przedn...

Page 76: ...h przycisk w przez wi cej ni 2 sekundy obraca ekran LCD Kombinacja testu baterii kombinacja wyciszenia Wcisn i przytrzyma przycisk przez ponad 1 sekund w kolejce lub trybie ekonomicznym ECO UPS urucha...

Page 77: ...PL 77...
Page 78: ...bezczynno ci Wy wietlacz ga nie automatycznie po 5 minutach bezczynno ci Naci ni cie jakiegokolwiek przycisku przywraca pod wietlenie Wy wietlacz zawiera informacje gra czn o pojemno ci statusie ch o...

Page 79: ...ieraj si w tym takie parametry jak pr d wyj ciowy i wej ciowy pojemno i napi cie akumulatora temperatura oraz obci enie Wcisn i przytrzyma przycisk na d u ej ni 2 sekundy a wy wietlacz LCD zacznie pok...

Page 80: ...o przyciski lub by wybra ramy procentowe od 5 do 25 gdzie 25 jest ust domy lnym Nast pnie nale y nacisn przycisk funkcyjny na d u ej ni p sekundy kr cej ni dwie by po twierdzi wyb r i ustawi g rn gran...

Page 81: ...i gacji przej do ustawie funkcji i wybra ustawienia battery setting W tym momencie litery bAt powinny zacz miga 2 Po wybraniu interfejsu ustawie baterii nale y nacisn i przytrzyma przycisk funkcyjny n...

Page 82: ...d EPO tak e zaczn miga Nale y nacisn i przytrzyma przycisk funkcyjny na d u ej ni p sekundy kr cej ni 2 by wybra biegunowo wyj cia P egzekwuj funkcj otwartego obwodu EPO lub P egzekwuj funkcj kr tkieg...

Page 83: ...lanie a wy wietlacz pokazuje kod b du Zaleca si wtedy wy czy sygna d wi kowy przyciskiem wycisze nia Mo na tak e wy czy UPS przyciskiem OFF je li upewniono si e b d nie jest krytyczny Aby dowiedzie si...

Page 84: ...ygaszony AUTOTEST I TEST WYCISZENIA URZ DZENIA 1 Kiedy UPS jest w trybie Line nacisn i przytrzyma przycisk autotestu wyciszenia na d u ej ni sekund Diody LED za wiec si w odpowiedniej kolejno ci a nas...

Page 85: ...jsc niebezpiecznych 3 Przej do sekcji Obs uga aby uruchomi UPS OPCJE KOMUNIKACYJNE Zasilacz ma mo liwo ci komunikacji poprzez porty szeregowe RS 232 porty komunikacyjne USB lub za pomoc karty czno ci...

Page 86: ...jedn dost pn sie komunikacji dla nast puj cych kart komunikacyjnych Karta Web SNMP SNMP i HTTP ma mo liwo ci monitorowania poprzez interfejs przegl darki internetowej czy si poprzez kabel Ethernet 10...

Page 87: ...jest obwodem zabezpieczaj cym bardzo niskiego napi cia SELV obwodu IEC Ten obw d musi pozosta oddzielony od wszelkich niebezpiecznych obwod w napi ciowych poprzez wzmoc nion izolacj UWAGA EPO nie mo e...

Page 88: ...lingu zu ytych baterii lub zasilacza DBANIE O ZASILACZ UPS ORAZ BATERIE Dla najlepszej konserwacji prewencyjnej nale y utrzymywa teren wok UPS w czystym i wolnym od py w ro dowisku Je li miejsce przec...

Page 89: ...pokazuje Rys 25 nast pnie wyj przegrod z lewej lub prawej strony 3 Nale y z apa za uchwyt z przodu przegrody wyci gn i przytrzyma j a nast pnie wyci gn pakiet baterii Przedstawione na Rys 26 4 Trzymaj...

Page 90: ...MULATOR W LUB UPS A UWAGA Nie wrzuca baterii lub akumulator w do ognia Baterie mog wybuchn Wymagana jest w a ciwa utylizacja akumulator w Nale y zapozna si z lokalnymi przepisami o utylizacji Nie woln...

Page 91: ...12 Lista modeli UPS wszystkie modele UWAGA Nie wyrzuca zasilacza UPS lub baterii do mieci Produkt ten zawiera zamkni ty w sobie o w kt ry musi by odpowiednio zutylizowany Aby uzyska wi cej informacji...

Page 92: ...Bypass 5 10 15 25 25 standardowo 20 30 45 45 standardowo Standardowe napi cie na wej ciu Napi cie Nat enie Napi cie do wyboru Zakres napi cia przy 100 obci eniu 1KVAS 1KVAH 230V 4 4A 200 208 220 230 2...

Page 93: ...enie transfer w do trybu b du po 140 milisekundach Przeci enie urz dzenia Battery Mode 108 5 150 5 Obci enie transfer w do trybu b du po 30 sekundach 150 5 200 5 Obci enie transfer w do trybu b du po...

Page 94: ...ranzytu 25 C to 55 C 13 F to 131 F Wilgotno wzgl dna 0 90 bez kondensacji Wysoko na jakiej pracuje urz dzenie Do 3 000 metr w nad poziomem morza 9 843 ft Wysoko na jakiej dzia a tranzyt Do 10 000 metr...

Page 95: ...uracji napi cia i poziomy na adowania baterii Wewn trzne baterie EBPs Konfiguracja baterii 2 3K VA 72 Vdc 6 12V 9Ah 1K VA 24Vdc 2 12V 9 Ah 2K VA 48Vdc 4 12V 9Ah 1 1 5 KVA 36Vdc 3 12V 9 Ah 3K EBP 72 Vd...

Page 96: ...omunikaty s informacjami kt re u ytkownik znajdzie na UPS o ile pojawi si problemy U ytkownicy mog oceni czy usterka jest spowodowana przez czynniki zewn trzne i dowiedz si jak sobie z nimi poradzi po...

Page 97: ...tusu adowania jest wy wietlana na ekranie LCD miga i sygna d wi kowy wyst puje raz na sekund adowanie baterii nie dzia a lub baterie utraci y ywotno Skontaktuj si z dzia em serwiso wym Bypass Tryb Lin...

Page 98: ...st et d clar conforme aux limites indiqu es un appareil num rique de classe B en vertu de la partie 15 de la r glementation FCC Ces limites sont con ues pour assurer une protection raisonnable contre...

Page 99: ...Rendement Fonction de D marrage froid qui permet de d marrer l alimentation sans source d alimentation externe Options de communication un port RS 232 un port USB et un contact de relais cartes SNMP...

Page 100: ...ent install s derri re le couvercle avant et ne soient pas accessibles aux utilisateurs Il est possible d installer 4 compartiments des batteries suppl mentaires au maximum Si l onduleur n cessite d t...

Page 101: ...eur INSTALLATION DANS L ARMOIRE RACK L amoire Rack doit tre quip e de tout le mat riel requis pour l installation dans une con guration de Rack standard en topologie EIA ou JIS trous carr s et ronds L...

Page 102: ...le des glissi res la profondeur de l armoire Figure 3 Protection de glissi res 2 S lectionnez la taille appropri e de l armoire pour positionner l alimentation voir Fig 4 La glissi re occupe quatre po...

Page 103: ...nstaller l ASI et connecter ses batteries internes comment connecter les batteries suppl mentaires EBP INSTALLATION DE L ASI ATTENTION Toute intervention non autoris e sur l alimentation est interdite...

Page 104: ...ports de communica tion ou en option par une carte de communication Utilisez le c ble appropri pour les ports de communication 6 Si l armoire Rack a des c bles pour mise la terre ou une possibilit d t...

Page 105: ...hez le c ble et les batteries suppl mentaires au connecteur de la batterie comme l indique la Figure 12 L alimentation peut accepter 4 kits de batteries suppl mentaires au maximum Connectez le c ble n...

Page 106: ...en ist die Grundfaltung hnlich 3 Si un compartiment des batteries suppl mentaires EBP est plac au milieu le montage de la base est similaire La diff rence est que les deux l ments suppl mentaires sont...

Page 107: ...oisir l option BPS sur ON voir l instruction dans le tableau 7 Utilisez la combinaison de boutons de marche sur le couvercle avant de l ASI pendant au moins deux secondes et demie L ASI se met en marc...

Page 108: ...ces boutons et maintenez les enfonc s pendant une demie seconde pour mettre l ASI en marche en arr t Combinaison de boutons pour mettre en arr t retourner l cran Si vous maintenez ces boutons enfonc s...

Page 109: ...de batterie est teint Alimentation ou d mar rage 6 fois Assurez vous que la batterie est bien branch e 5 Protection de sortie contre la surcharge Avertissement de sur charge en mode lin aire 2 fois pa...

Page 110: ...50Hz Section graphique de capacit et de charge L indication sup rieure indique l tat de charge de la batterie Chaque unit correspond 20 Comme vous pouvez le voir sur l image c t la charge atteint 80...

Page 111: ...V et la fr quence est de 50 Hz Charge L cran a che la valeur num rique de la puis sance active W et de la puissance apparente VA de la charge titre d exemple comme l indique l image c t la charge de p...

Page 112: ...e demie seconde mais moins de 2 secondes pour valider la s lection est r gler la limite sup rieure 6 La limite inf rieure peut tre r gl e de la m me mani re 7 Apr s avoir d termin la limite inf rieure...

Page 113: ...t plus d une demie seconde moins de 2 et retournez l interface principale PARAM TRES DE TYPE ET DE NOMBRE DE BATTERIES 4 1 A n d acc der l interface de con guration appuyez sur le bouton de fonction e...

Page 114: ...ux param tres de polarit de sortie EPO appuyez le bouton de fonction et maintenez le enfonc pendant plus d une demie seconde moins de 2 Les lettres EPO commenceront clignoter Appuyez sur le bouton pen...

Page 115: ...critique Pour voir la signi cation d une erreur donn e regardez sur le Tableau 23 Mode Stand by Lorsque l ASI est connect l alimentation et n est pas teint il fonctionnera en mode Standby et chargera...

Page 116: ...iodes clignotent dans l ordre appropri et l cran se met en veille Autotest et test de mettre l appareil en mode silencieux 1 Lorsque l ASI est en mode Line appuyez sur le bouton de test mise en mode s...

Page 117: ...e sont pas achemin s dans un endroit dangereux 3 Passez la section Maintenance pour d marrer l ASI OPTIONS DE COMMUNICATION L onduleur a des options de communication par les ports s rie RS 232 les por...

Page 118: ...e communication suivantes Carte WEB SNMP SNMP et HTTP permettent la surveillence par l interface du navigateur Web sont connec t es par le c ble Ethernet 10 100BaseT En plus un d tecteur de surveillan...

Page 119: ...limentation comprend deux segments de charge Segment de charge 1 Vous pouvez con gurer le transfert de la tension de batterie par l cran LCD Segment de charge 2 Regardez Panneau arri re pour localiser...

Page 120: ...s maximales STOCKAGE DE L ASI ET DES BATTERIES En cas d entreposage prolong de l ASI rechargez les batteries tous les 6 mois en connectant l ASI la prise de r seau Les batteries internes se chargent 8...

Page 121: ...ie selon les tapes suivantes 1 Retirez le couvercle avant de batterie 2 Retirez les c bles de connexion entre la batterie et l alimentation Desserrez la vis avec le compartiment de batte rie comme ind...

Page 122: ...eries au feu Les batteries risquent d exploser Pour plus d informations contactez votre centre local de recyclage N ouvrez pas et n endommagez pas la batterie L lectrolyte lib r est nocif pour la peau...

Page 123: ...m tres Figure du panneau avant 1KVAS 1KVAH RT 1000 VA 900W FIGURE 28 1 5KVAS 1 5KVAH RT 1500 VA 1350W FIGURE 28 2KVAS 2KVAH RT 2000 VA 1800W FIGURE 29 3KVAS 3KVAH RT 3000 VA 2700W FIGURE 29 Mod le d A...

Page 124: ...7 kW Fr quence 50 or 60 Hz d tect e automatiquement Surcharge de l appa reil Normal Mode 108 5 150 5 Charge de transferts en mode de surveillance apr s 30 secondes 150 5 200 5 Charge de transferts en...

Page 125: ...4 galement pour les ports de signal EN 6100 4 5 Niveau 4 Criteria A Certi cats EMC CE per IEC EN 62040 2 Class B Class B EMC Emission IEC 62040 2 ed2 2005 EN 62040 2 2006 Certi cats de s curit IEC 620...

Page 126: ...eries internes 1EBP 2EBPs 3EBPs 4EBPs 1KVAS 24VDC 3 15 25 40 53 1KVAS 36VDC 5 25 45 65 85 1 5KVAS936VDC 3 15 25 40 53 2KVAS 48VDC 3 15 25 40 53 2KVAS 72VDC 5 25 45 65 85 3KVAS 72VDC 3 17 31 52 69 REMA...

Page 127: ...taill e du probl me Le tableau pr sent ci dessous d crit toutes les alertes Tableau 23 1 Prise de sortie 2 Connecteur de batterie 3 Emplacement de carte SNMP 4 Protection du r seau contre le court ci...

Page 128: ...t sich nicht ein wenn die Taste ON gedr ckt wird Die Tastenkombination EIN wurde nicht gedr ckt Dr cken Sie beide Tasten gleichze itig An der USV ist keine Batterie ange schlossen oder ihre Spannung i...

Page 129: ...55 51 71 91 Tension d s quilibr e 82 83 84 85 Onduleur doux 62 Erreur d inverteur Risque lev 4 24 42 86 Faible risque 14 34 52 96 Soft fail 63 Erreur de tension de recharge 61 Erreur de surchauffe 33...

Page 130: ...ay differ from pictures All brand names and products are registe red trademarks of their respective owners Warranty service Green Cell ul Mieczys awa Majdzika 15 dok 36 32 050 Skawina Poland tel 48 12...

Reviews: