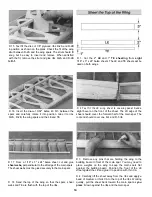


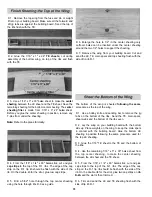


D 4. Repeat the process to install the other LE.
D 5. Position the TE on the aft end of the ribs, flush with
the top and bottom edge of the ribs. Use a straightedge to
check that the TE is straight before gluing it in position.
Trim the root end to match the plan.
D 6. Fit the second TE, trimming the root end to butt
against the first TE. Use a straightedge to check that the
TE is straight before gluing it in position.
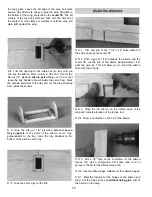
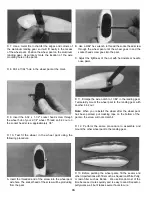
D 7. Glue ribs R-1 and R-7 to the bottom main spar,
perpendicular to the building board.
D 8. Use 30-minute epoxy to glue the die-cut 1/8" birch ply
joiner between the R-7 root ribs, perpendicular to the
building board. The center of the joiner is flush to the back
of the main spar and the joiner ends are flush with the front
of the main spar. Make sure the top of the joiner is flush
with the bottom of the slots for the top main spar. Allow the
epoxy to cure before proceeding with the next step.
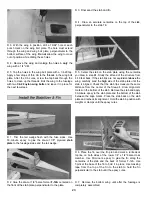
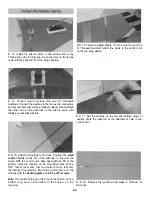
D 10. Trim the leftover LE to fit between the installed LE.
When satisfied with the fit, glue it in place.
D 11. Use 6-minute epoxy to glue the die-cut 1/8" plywood
leading edge joiner (LEJ), centered vertically, across the
joint between the center LE and the outer LE.
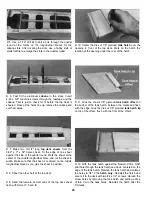
D 12. Test fit the die-cut 1/8" plywood ribs R-2A and R-2B in
position as shown on the plans. Check the fit of the wing strut
between R-2A and the wing spars. The strut should fit snugly,
but be easy to insert and remove. When satisfied with the fit,
remove the strut and glue ribs R-2A and R-2B to R-1.
D 9. Use 30-minute epoxy to glue the top spar to the joiner
and thin CA to glue the joiner to the ribs. Hold the spar in
place with weights until the epoxy cures.
D 13. Insert the die-cut 3/32" balsa rib R-3 between the
spars and carefully rotate it into position and glue it to ribs
R-2A, R-2B, the wing spars and the LE and TE.
28


