background image

5

ASSEMBLY INSTRUCTIONS

Ducted Fan Assembly

Reference the separate HyperFlow instruction sheet as 

necessary, but follow the instructions below for assembly/
installation into the Phazer.

❏ 

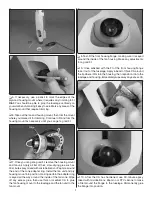
1. Enlarge the hole in the fan housing to allow installation 

and removal of the motor without having to remove the brass 
fan adapter.

❏ 

2. As shown in the HyperFlow manual, trim the three 

alignment guides

 from inside the housing to accommodate 

the motor.

❏ 

3. Trim any fl ashing from around the fan housing so the 

fi berglass 

cone adapter

 will fi t correctly.

❏ 

4. Key one of the 3mm set screws (for fastening the brass 

fan rotor adapter to the motor shaft) onto a 1.5mm Allen 
wrench—a basic “L” wrench is included if you don’t have one 
of your own. Use a metal fi le to lightly fi le down the end of the 
screw—it won’t take much—just a few passes to remove the 
slightest fraction of an inch.

Summary of Contents for PHAZER

Page 1: ...he act of using the user assembled product the user accepts all resulting liability If the buyer is not prepared to accept the liability associated with the use of this product the buyer is advised to...

Page 2: ...ll size airplane Because of its performance capabilities the Phazer if not assembled and operated correctly could possibly cause injury to yourself or spectators and damage to property 2 You must asse...

Page 3: ...esigned to fly with a 4S 14 8V LiPo battery in the 2200mAh 30C range Weighing 9 2 oz 260g the Flight Power 4S 2200mAh 30C EON X LiPo FPWP6199 has a good combination of compact size reasonable weight a...

Page 4: ...etail prices and shipping and handling charges will apply Illinois and Nevada residents will also be charged sales tax If ordering via fax include a Visa or MasterCard number and expiration date for p...

Page 5: ...in the HyperFlow manual trim the three alignment guides from inside the housing to accommodate the motor 3 Trim any flashing from around the fan housing so the fiberglass cone adapter will fit correc...

Page 6: ...flush or slightly below the surface of the adapter If necessary file down the screw a little more 7 Take out the set screws and lightly wet the threads with threadlocker Then tighten them back into th...

Page 7: ...on the stator extension to remove any flashing and to make sure they are even with the housing 15 Use medium grit sandpaper to smooth the rough edges around the motor wire hole in the fiberglass cone...

Page 8: ...es through the hole While you re at it position the plywood housing mount and guide the motor wires through it 3 Test fit the front housing flange into the fan housing just to make sure it fits if nec...

Page 9: ...ring Install the fan unit and ply housing mount into position making certain the adapter ring is keyed all the way around the inside of the tail cone Wipe off any excess glue then use thick or medium...

Page 10: ...s of thin CA to the hinge in the gap allow to harden and then test again 2 Use a covering iron with a cover sock to go over the wings and servo hatches and remove any wrinkles When you do find wrinkle...

Page 11: ...in half Use medium grit sandpaper to roughen the side of each servo then use medium CA to glue each balsa sheet to the side of each servo Caution Do not use thin CA for this step because it could wic...

Page 12: ...the servo with the servo arm screw and mount the hatch to the wing 1 4 6 7mm Outer Hole 12 Temporarily mate one of the short Z bend pushrods to the long pushrod on the servo with two collars and set s...

Page 13: ...Wing Skids 1 The wing skids come pretty much ready to glue on but if you want perfection you could true the factory cut edges a little with a bar sander and 80 grit sandpaper followed by 320 grit fini...

Page 14: ...e canopy hatch for plugging into your receiver a total of 10 to 12 255mm 300mm of wire is recommended with 10 255mm being the minimum so use whatever length extensions you need For each Futaba S3157 s...

Page 15: ...hile the glue dries 3 While the fuselage is upside down center the nose skid on the bottom of the fuselage and glue it into position with thin CA The precise location isn t critical but try to get the...

Page 16: ...sive back Velcro strips to the top of the battery mount plate and the bottom of your battery the rougher hook side goes on the mount plate and the softer loop side goes on the battery 6 Mount the batt...

Page 17: ...whether or not your first flight will be successful If you value your Phazer and wish to enjoy it for many flights DO NOT OVERLOOKTHIS IMPORTANT PROCEDURE A model that is not properly balanced may be...

Page 18: ...gh actual flight testing and accurate record keeping allowing the model to perform in the manner in which it was intended If after you have become accustomed to the way the Phazer flies you would like...

Page 19: ...n the Fan If possible perform this procedure outdoors In any case wear eye and hearing protection and request that any observers leave the room Follow the preparation and break in procedures on the ba...

Page 20: ...ecal sheet and place it on or inside your model Charge the Batteries Follow the battery charging instructions that came with your radio control system to charge the batteries You should always charge...

Page 21: ...ere necessary an observer shall be utilized to supervise flying to avoid having models fly in the proximity of full scale aircraft 3 Where established I will abide by the safety rules for the flying s...

Page 22: ...from your battery for a flight B How long you flew C How much capacity was used from the battery for that flight To prevent over discharging your battery you should use no more than 80 of your battery...

Page 23: ...hazer hard concentrate more on throwing it with the wings level and the nose pointed up at about a 20 30 degree angle When ready go to full throttle then throw the Phazer into the air Remember to focu...

Page 24: ...again You might notice that the Phazer bleeds off speed a little faster than you expected Knowing this you can make your approaches a little shorter or simply drag it in with some throttle If you end...

Reviews: