19
❏
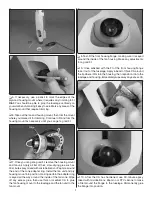
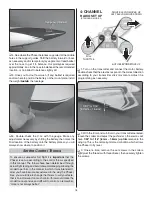
4. Now set the elevator and aileron throws according to the
measurements below: (
Hint:
If necessary, use a scrap sheet
of balsa or cardstock to shim up your ruler, making it easier
to read the measurements.)
If your radio does not have dual rates, we recommend setting
the throws at the high rate settings.
NOTE
: The throws are measured at the
widest part
of the
elevons (at the root end next to the fuselage).
These are the recommended control surface throws:
ELEVATOR
LOW RATE
AILERONS
HIGH RATE
3/16"
[5mm]
9°
Up
1/8"
[3mm]
6°
Up
3/8"
[10mm]
17°
Up
3/16"
[5mm]
9°
Up
3/16"
[5mm]
9°
Down
1/8"
[3mm]
6°
Down
3/8"
[10mm]
17°
Down
3/16"
[5mm]
9°
Down
IMPORTANT!:
When giving an elevator command from
the control stick it is
imperative
that the defl ection of both
elevons is precisely identical to each other. Otherwise, the
Phazer may yaw toward or away from the ground in banked
turns, not to mention rolling out of loops. Spend time and
use your critical eye to make sure both elevons defl ect the
same when an elevator input is given.
PREFLIGHT
Run-In the Fan
If possible perform this procedure outdoors. In any case, wear
eye and hearing protection and request that any observers
leave the room.
Follow the preparation and break-in procedures on the back
page of the HyperFlow instruction manual for running-in your
fan. Sometimes these HyperFlow fan units can emit a little
resonance while transitioning through the rpm range, which is
OK, but it must run smoothly at full-throttle. If the fan doesn’t
run smooth at full-throttle or if the resonance is more than you
are willing to tolerate, follow the procedure to balance the fan:
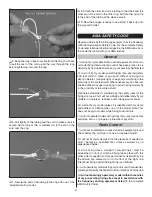
❏
1. Disconnect the battery from the ESC. Insert a #2 Phillips
screwdriver into the cheater hole opening and into the fan cone.
Hold the fan with one fi nger while turning the screwdriver to
loosen the screw just enough to rotate the cone.
❏
2. Using the dimple you made on the fan cone as an
alignment cue, rotate the cone so the dimple aligns with the
next fan blade over. Tighten the Phillips screw, connect the
battery, then run up the fan again to see if it smooths out.
Continue the procedure, rotating the cone one blade at a time
until you can get it to run smoothly. If you cannot get the fan
to run smoothly, proceed to the next step.


