22 / 48
S1042_sh_V1
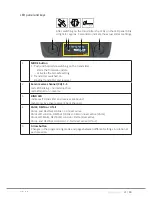
LED panel and keys
After switching on the transmitter the LEDs on the LED panel blink
or light for approx. 5 seconds to indicate the actual correct settings.
1
2 3
8
6
Cut-off Rate
CH6
CH7
CH8
BIND
-100% +100%
CH9
4 4 5
7
9
1
MODE button
1. Push and hold while switching on the transmitter ...
... starts the firmware-update
... activates the Fail-safe setting
2. Transmitter switched on
Binding transmitter and receiver
short push takes a snapshot through the camera
Push for about 2 seconds: select video channel
2
Cut-off
(operated with left upper switch)
Red LED blinks = Motors-OFF function is on
Red LED off = Motors-OFF function is off
3
Rate
(operated with right upper switch)
Red LED lights = Rate mode is on
Red LED off = Rate mode is off
4
CH6 + CH7
Red LED on: upper right switch on LED position
5
CH8
Red LED off/lights = shows the video resolution depending on the used video system
6
Arrow button
Short push starts and stops video reproduction
Push for about 2 seconds changes the video resolution
7
BIND LED
Yellow LED on = the transmitter receives the feedback signal from the last bound
receiver
8
-100 %
Green LED blinks = camera snapshot
9
+100 %
Green LED blinks = Video recording on
1 + 7
pressed together
Starts and stops the range test
Summary of Contents for MZ-10 HOTT
Page 2: ...2 48 S1042_sh_V1...
Page 48: ......


