System Hardware Installation
- 32 -
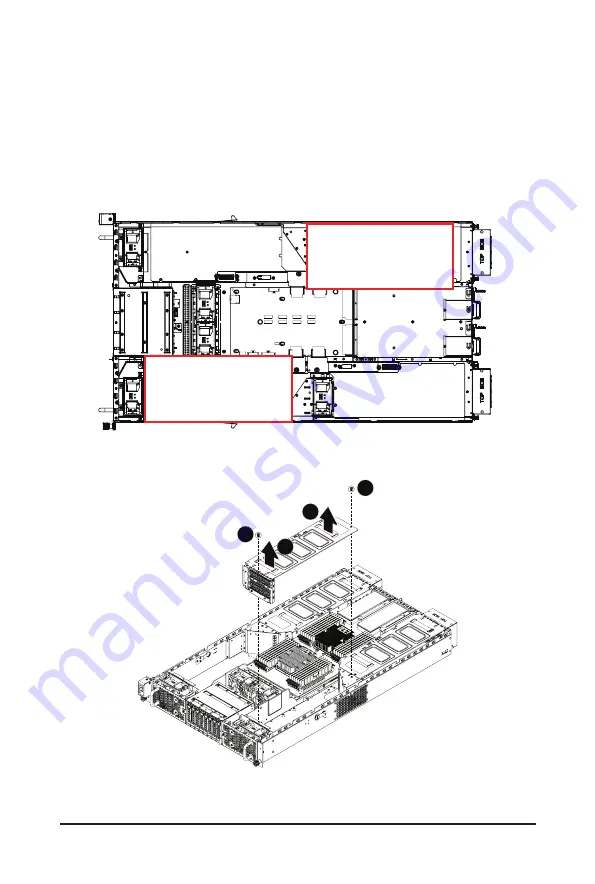
For GPU6/GPU7/GPU8/GPU9/GPU10/GPU11/GPU12
Follow these instructions to install the GPU card:
1. [For GPU9/GPU10/GPU11/GPU12] Loosen and remove the two screws securing the PCI cage at
the top of the system.
[For GPU5/GPU6/GPU7/GPU8] Loosen and remove the single screw at the top of the system and
the two screws at the rear of the system securing the PCI cage.
Pull the two plastic handles to lift up the PCI cage from the system.
2. Insert the card into the selected slot. Make sure that the card is properly seated.
3. Secure the GPU cards in place with two screws.
Front
Rear
Top to Bottom:
GPU Card #6 (Slot 2)
GPU Card #8 (Slot 4)
GPU Card #7 (Slot 3)
GPU Card #5 (Slot 1)
Top to Bottom:
GPU Card #10 (Slot 2)
GPU Card #12 (Slot 4)
GPU Card #11 (Slot 3)
GPU Card #9 (Slot 1)
(For GPU9/GPU10/GPU11/GPU12)
2
1
1
2
Summary of Contents for G291-2G0
Page 15: ...Hardware Installation 15 This page intentionally left blank ...
Page 21: ...System Appearance 21 ...
Page 26: ...System Hardware Installation 26 1 4 3 2 CPU1 CPU0 ...
Page 30: ...System Hardware Installation 30 For GPU1 GPU2 GPU3 GPU4 Front Rear 1 1 2 2 ...
Page 33: ... 33 System Hardware Installation For GPU5 GPU6 GPU7 GPU8 Front Rear 1 1 2 2 ...
Page 37: ... 37 System Hardware Installation 3 4 5 6 6 ...
Page 41: ... 41 System Hardware Installation 3 4 5 7 6 ...
Page 50: ...System Hardware Installation 50 This page intentionally left blank ...
Page 54: ...Motherboard Components 54 ...
Page 63: ... 63 BIOS Setup 5 2 3 Intel R Ethernet Connection X722 ...
Page 72: ...BIOS Setup 72 5 2 6 SIO Configuration ...
Page 86: ...BIOS Setup 86 5 3 1 1 Pre Socket Configuration ...
Page 89: ... 89 BIOS Setup 5 3 3 UPI Configuration ...


