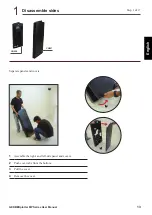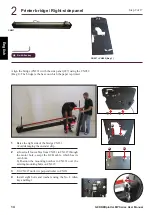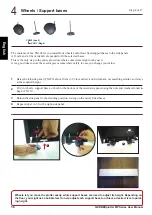
20
GERBERplotter MP Series User Manual
English
Rear cover
Step 8 of 17
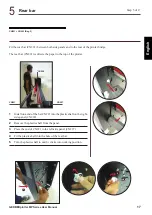
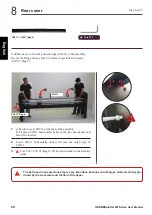
Add the rear cover for the printer bridge (CN013) to the assembly.
Secure the bridge using a Torx T30 and a single bolt and washer
(CN017, Bag 5).
1
a) Position cover CN211 at the rear of the assembly.
b) Fit piece CN211 horizontally between the two side panels and
below the inverter.
2
Lower CN211 horizontally until it fits into the outer edge of
CN231.
3
Torx T30 + CN107 (Bag 5): Fix bolt and washer to the left-side
panel.
The bolt used in the previous step is very important, because it discharges static electricity pro-
duced by the movement and friction of the paper.
CN211
CN107 (Bag 5)
1
1
2
2
3
2
2
Torx T30
CN211 + CN107 (Bag 5)
8
3
Summary of Contents for GERBERplotter MP Series
Page 1: ...GERBERplotter MP Series User Manual...
Page 2: ......
Page 3: ...GERBERplotter MP Series User Manual...
Page 4: ......
Page 6: ...English GERBERplotter MP Series User Manual ii...
Page 10: ...English GERBERplotter MP Series User Manual vi...
Page 12: ...2 GERBERplotter MP Series User Manual English...
Page 18: ...8 GERBERplotter MP Series User Manual English...
Page 44: ...34 GERBERplotter MP Series User Manual English...
Page 46: ...36 GERBERplotter MP Series User Manual English...
Page 65: ...55 GERBERplotter MP Series User Manual English 4 Updating WinPlot or AccuMark...
Page 66: ...56 GERBERplotter MP Series User Manual English...
Page 72: ...62 GERBERplotter MP Series User Manual English...
Page 74: ...64 GERBERplotter MP Series User Manual English...
Page 122: ...112 GERBERplotter MP Series User Manual English...
Page 158: ...148 GERBERplotter MP Series User Manual English...
Page 160: ...150 GERBERplotter MP Series User Manual English...
Page 172: ...162 GERBERplotter MP Series User Manual English...
Page 174: ...164 GERBERplotter MP Series User Manual English...
Page 179: ...169 GERBERplotter MP Series User Manual English 9 Glossary...
Page 180: ...170 GERBERplotter MP Series User Manual English...
Page 183: ......

